
An interesting alternative to WordPress, Keystone.js is a content management system (CMS) built with Node.js that uses Express.js for its backend and a MongoDB or PostgreSQL database as its storage layer. It’s flexible and enables you to customize your CMS while still maintaining a lightweight codebase, unless WordPress.
Keystone.js provides GraphQL support, which is pretty powerful. You can quickly define schemas and the GraphQL engine will take care of the integration with PostgreSQL or MongoDB.
Moreover, Keystone.js allows you to choose which underlying database you want to use. Natively, it supports both PostgreSQL and MongoDB, which gives you the ability to choose between a relational and nonrelational database. GraphQL will generate a set of useful queries related to CRUD operations so you don’t have to code those queries. It’s a great feature that saves you a lot of time.
Also, the Keystone Admin UI automatically changes based on the schema you define. All data can be created, updated, and deleted via the admin user interface. If you add a schema about books, for example, Keystone.js will generate a whole admin panel to manage your books. Another powerful feature that makes developers’ lives easier.
In this tutorial, we’ll demonstrate how to build a movie rating app with Keystone.js. You can download the full code for this project from this GitHub repository.
The Replay is a weekly newsletter for dev and engineering leaders.
Delivered once a week, it's your curated guide to the most important conversations around frontend dev, emerging AI tools, and the state of modern software.
Before you get started using Keystone.js, you’ll need the following. (Note: For this tutorial, we’ll use MongoDB).
Next, make sure your MongoDB instance is running. Once you have all the dependencies, it’s time to get started.
You can start with a Keystone.js template, such as a sample to-do app or an authentication example. However, for the purposes of this tutorial, we’ll start from scratch.
First, create a new Keystone application using the keystone-app command. You can directly use this command with Yarn from your CLI.
yarn create keystone-app movie-rating
You’ll be prompted to answer three questions:
movie-ratingblank to generate an empty templateMongoose.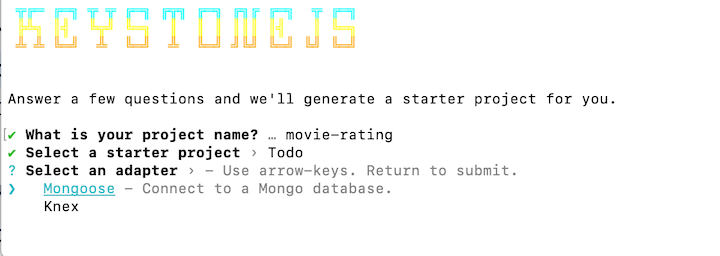
The command will copy the right project files in a new folder called movie-rating. You’ll end up with the following application structure.
/movie-rating
- /node_modules
- index.js
- package.json
- README.md
Now let’s create the data model for storing movie ratings.
In this step, we’ll create our data schema. Currently, our index.js file looks like the code snippet below. Since the MongooseAdapter has already been connected, we can focus on writing our schema.
const { Keystone } = require('@keystonejs/keystone');
const { GraphQLApp } = require('@keystonejs/app-graphql');
const { AdminUIApp } = require('@keystonejs/app-admin-ui');
const { MongooseAdapter: Adapter } = require('@keystonejs/adapter-mongoose');

const PROJECT_NAME = "movie-rating";

const keystone = new Keystone({
  name: PROJECT_NAME,
  adapter: new Adapter(),
});

module.exports = {
  keystone,
  apps: [new GraphQLApp(), new AdminUIApp({ enableDefaultRoute: true })],
};
View the source code on Gist.
First, we need to install the @keystonejs/fields dependency, which holds all the supported field types we need to define new fields in our schema.
Install this dependency via Yarn:
yarn add @keystonejs/fields
Now that’s we’ve added this dependency to our project, we can import the required types, Text and Integer.
const { Text, Integer } = require('@keystonejs/fields');
Now we can create the movie rating schema. The schema will consist of two properties: title, which accepts a Text type, and rating, which accepts an Integer type.
keystone.createList('Movie', {
  fields: {
    title: {
      type: Text,
      isRequired: true,
      isUnique: true
    },
    rating: {
      type: Integer,
      isRequired: true,
      defaultValue: 10
    }
  },
});
You can add extra properties for each field. For example, you can combine the Integer type with a defaultValue property. You can also use the isUnique property, which enforces inputs to be unique.
For this step, your code should look like this.
Start the project with the following command.
yarn run dev
This will spin up the following elements:
First, open the admin UI at http://localhost:3000/admin. You’ll see the newly created movie list.
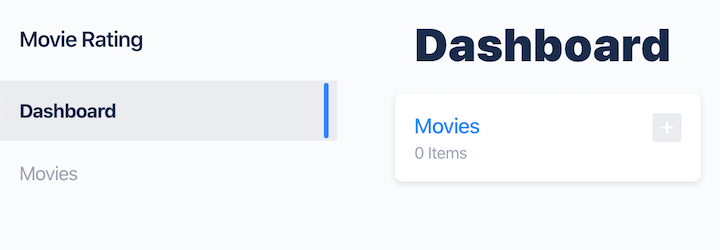
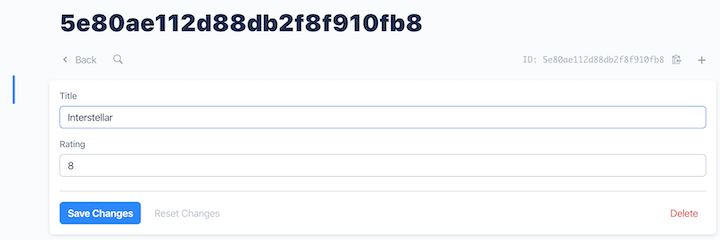
If you click the plus icon on the Movies card, you can add a new movie to the list. For example, let’s add “Interstellar” and assign it a rating of 8.
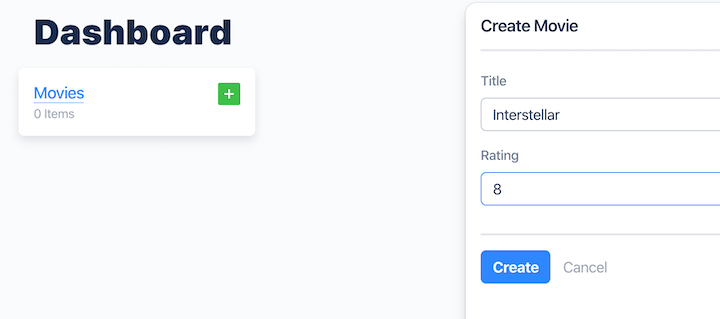
Hit the create button to store the record in your MongoDB instance. You’ll see an overview of your newly created record.
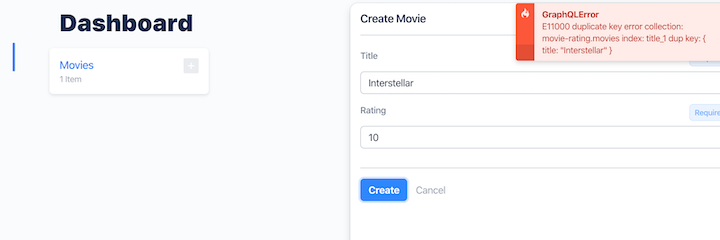
Let’s try to add the same record again. If the isUnique property has been configured correctly, the admin UI should throw an error.
Keystone.js will process each defined schema, such as the Movie schema. For each schema, it creates GraphQL CRUD operations and associated queries. We can use all those queries to change or access data in MongoDB.
Below is an overview of the generated operations for the Movie schema.
type Mutation {
  createMovie(..): Movie
  updateMovie(..): Movie
  deleteMovie(..): Movie
}

type Query {
  allMovies(..): [Movie]
  Movie(..): Movie // query single movie
  GetMovies(..): [Movie]
}

type Movie {
  id: ID
  title: String
  rating: Integer
}
For more about the GraphQL Schema Definition Language (SDL), see the official website.
With the backend part completed, the next step is to create an interface to interact with the movie rating schema.
The next step is to build a simple static HTML website that allows you to interact with your data via the GraphQL API endpoint at http://localhost:3000/admin/api.
To connect to a static page, add the @keystonejs/app-static dependency.
yarn add @keystonejs/app-static
Don’t forget to import the dependency at the top of the index.js file.
const { StaticApp } = require('@keystonejs/app-static');
As you can see, Keystone.js defines the static page dependency as an application. This means we can add the StaticApp object to the apps array, which is exported at the bottom of the index.js file.
Notice how we configured the StaticApp object: we told the object to look for our static pages in the public folder, which we will create in the next step. This folder hosts the HTML file we’ll create.
module.exports = {
  keystone,
  apps: [
    new GraphQLApp(),
    new StaticApp({ path: '/', src: 'public' }),
    new AdminUIApp({ enableDefaultRoute: true })
  ],
};
Now let’s create the public folder in the root of the project.
mkdir public
Next, create the following three files.
index.html — Holds all the HTML codestyles.css — Basic styling for our static websitescript.js — Holds logic for interacting with GraphQL endpoint and loading dataYour project folder should look like this:
/movie-rating
- /node_modules
- /public
- index.html
- styles.css
- script.js
- index.js
- package.json
- README.md
This isn’t an absolutely essential step, but it’s always nice to have a pretty interface. All you have to do is create a styles.css file with the below contents.
Add the HTML to the index.html file. Be sure to look at the body tag, where we define our script element. This script acts as a hook to all the logic we need to dynamically load data and fetch static HTML.
<body>
    <script type="text/javascript" id="movie-app" src="/script.js"></script>
 </body>
Next, copy the following HTML contents into your index.html file.
The most important step is to add the logic. Make sure you copy the full contents into your script.js file.
Let’s try to understand how the above logic works, starting with the bottom of the script.js file. This logic replaces the content of the script tag we defined in the index.html file. The following snippet creates a simple website with a form that allows the user to create new movie ratings and display all submitted ratings.
document.getElementById('movie-app').parentNode.innerHTML = `
  <div class="app">
    <h1 class="main-heading">Welcome to Keystone 5!</h1>
    <p class="intro-text">
      Here's a simple demo app that lets you add/remove movie ratings. Create a few entries, then go
      check them out from your <a href="/admin">Keystone 5 Admin UI</a>!
    </p>
    <hr class="divider" />
    <div class="form-wrapper">
      <h2 class="app-heading">Add Movie</h2>
      <div>
        <form class="js-add-movie-form">
          <input required name="add-item-movie" placeholder="Add new movie" class="form-input add-item" />
          <input required name="add-item-rating" placeholder="Add rating" class="form-input add-item" />
          <input type="submit" value="Submit">
        </form>
      </div>
      <h2 class="app-heading">Movie List</h2>
      <div class="results">
        <p>Loading...</p>
      </div>
    </div>
  </div>`;
The rendered interface will look like this:
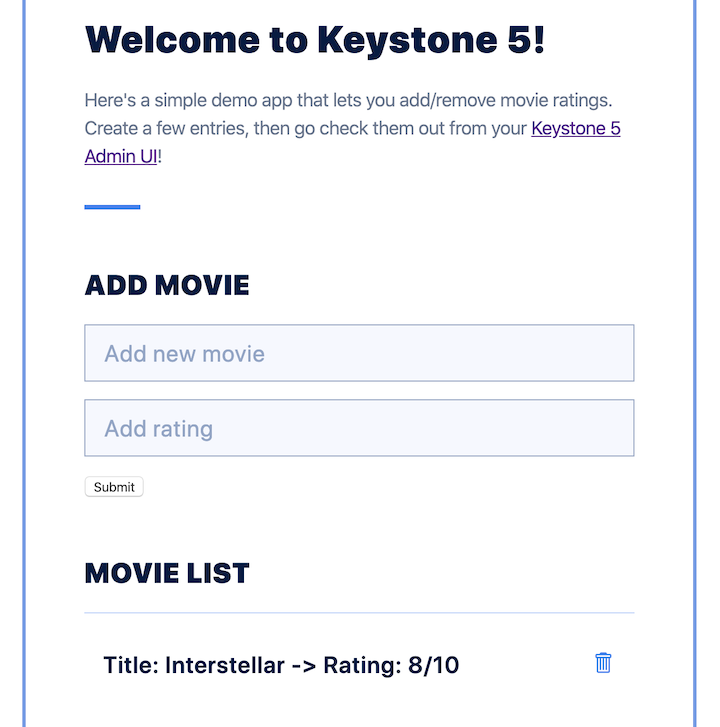
Users can submit movies via the form. When you click the submit button, the following code is triggered.
function addMovie(event) {
    event.preventDefault();
    const form = event.target;

    // Find inputted data via 'add-item-movie' and 'add-item-rating' input elements
    const movie = form.elements['add-item-movie'];
    const rating = form.elements['add-item-rating'];

    if (movie && rating) {
        graphql(ADD_MOVIE, { title: movie.value, rating: Number(rating.value) }).then(fetchData);
    }

    // Clear the form
    form.reset();
}
The code tries to access the data entered in the form’s input fields via the IDs add-item-movie and add-item-rating. If both the movie title and rating have been input, we’ll call our GraphQL endpoint with the correct data.
Notice that we passed ADD_MOVIE as our first parameter. This constant represents a query developed using the GraphQL SDL. The query accepts a title and rating. Since it’s prefixed with the mutation keyword, it can add new data to your database.
const ADD_MOVIE = `
    mutation AddMovie($title: String!, $rating: Int!) {
      createMovie(data: { title: $title, rating: $rating }) {
        title
        rating
        id
      }
    }
  `;
The GET_MOVIES query helps retrieve all movies. As we are reading data, we use the query keyword instead of the mutation keyword. This query displays all movies on the static website.
const GET_MOVIES = `
    query GetMovies {
      allMovies {
        title
        rating
        id
      }
    }
  `;
Finally, the REMOVE_MOVIE constant holds a query for removing movie ratings.
const REMOVE_MOVIE = `
    mutation RemoveMovie($id: ID!) {
      deleteMovie(id: $id) {
        title
        rating
        id
      }
    }
  `;
But how do we actually access the GraphQL endpoint? The script.js file holds a helper function for sending a POST request to our GraphQL endpoint.
function graphql(query, variables = {}) {
    return fetch('/admin/api', {
        method: 'POST',
        headers: {
            'Content-Type': 'application/json',
        },
        body: JSON.stringify({
            variables,
            query,
        }),
    }).then(function (result) {
        return result.json();
    }).catch(console.error)
}
To verify that everything is working correctly, let’s start our application. If the app is still running, exit by hitting CTRL+C (Windows) or CMD+C (Linux/Mac). Next, restart the application and visit the interface at http://localhost:3000.
yarn run dev
Try to add a new movie and verify whether they’re added to the movie ratings list below the input form. Next, try to delete a movie by clicking the trash icon on the movie rating. The rating should disappear.
If everything works correctly, you just built your first movie rating application with Kestone.js. Congratulations!
While GraphQL has some features for debugging requests and responses, making sure GraphQL reliably serves resources to your production app is where things get tougher. If you’re interested in ensuring network requests to the backend or third party services are successful, try LogRocket.


LogRocket lets you replay user sessions, eliminating guesswork around why bugs happen by showing exactly what users experienced. It captures console logs, errors, network requests, and pixel-perfect DOM recordings — compatible with all frameworks.
LogRocket's Galileo AI watches sessions for you, instantly aggregating and reporting on problematic GraphQL requests to quickly understand the root cause. In addition, you can track Apollo client state and inspect GraphQL queries' key-value pairs.

Claude Code is deceptively capable. Point it at a codebase, describe what you need, and it’ll autonomously navigate files, write […]

Compare the top AI development tools and models of February 2026. View updated rankings, feature breakdowns, and find the best fit for you.

Broken npm packages often fail due to small packaging mistakes. This guide shows how to use Publint to validate exports, entry points, and module formats before publishing.

Discover what’s new in The Replay, LogRocket’s newsletter for dev and engineering leaders, in the February 11th issue.
Would you be interested in joining LogRocket's developer community?
Join LogRocket’s Content Advisory Board. You’ll help inform the type of content we create and get access to exclusive meetups, social accreditation, and swag.
Sign up now
2 Replies to "Create a movie rating app with Keystone.js"
I saw you manually updating the DOM. Is it against the whole ReactJS thing?
That’s correct but we don’t want to confuse the reader here with React-specific details to keep the tutorial simple. Thanks for mentioning this! 🙂 .