Before we begin this tutorial, we will first have to understand what Prisma is, and why it is a good choice for developers who are new to Express. We’ll also discuss PostgreSQL, and how to use it for database schema and structuring.

We will also learn about the effectiveness of Prisma and how use it for basic authentication, along with code samples and test examples to help you follow along with this tutorial.
The Replay is a weekly newsletter for dev and engineering leaders.
Delivered once a week, it's your curated guide to the most important conversations around frontend dev, emerging AI tools, and the state of modern software.
Prisma is an open source ORM that allows you to easily manage and interact with your database. This is done with Prisma schema, a place where you can define your database models and relations using the Prisma schema language.
You can run your schema from scratch or generate it by introspecting an existing database. Then, you can use Prisma Client to interact with your database and Prisma Migrate to migrate your schema to the database.
Prisma supports PostgreSQL, MySQL, SQLite, and Microsoft SQL Server. Prisma interacts with every Node.js backend framework and makes database management and migration easy.
To start, we will set up an Express application and add Prisma. Then, we will use third party packages like JWT for token-based authentication to create an authentication scheme. Finally, we’ll cover how to run tests and make sure our authentication scheme is running correctly.
To follow this tutorial, you should have a working knowledge of these technologies, as well as their latest versions installed on your computer:
To install Express, we’ll have to first initialize our application using npm. To do that, run the following codes in your terminal:
mkdir express-prisma
cd express-prisma

npm init -y
Then we can install Express using npm in our newly created application using the following code:
npm install express
Next we set up our PostgreSQL using Docker.
To do that, we will create a new Docker file using the following composer command:
nano docker-compose.yml
Then in our docker-compose.yml file, we can add the below code to connect to the database:
version: '3.8'
services:
  postgres:
    image: postgres:10.3
    restart: always
    environment:
      - POSTGRES_USER=sammy
      - POSTGRES_PASSWORD=your_password
    volumes:
      - postgres:/var/lib/postgresql/data
    ports:
      - '5432:5432'
volumes:
  postgres:
Note that POSTGRES_USER and POST_PASSWORD are the preset user name and password that will be used to access the database.
When the installation and configuration of our Express application is done, we can now go ahead and install Prisma into our application using npm. To do so, simply use the below command:
npx prisma init
This will create a new Prisma folder that will contain the schema.prisma file and will also create a .env file if it does not exist.
After the files have been generated, open the .env file and add a link to your database:
DATABASE_URL="postgresql://<NAME_OF_DATABASE>:<DATABASE_PASSWORD>@localhost:5432/express-prisma?schema=public"
Be sure to use your customized database name and password.
Now that we are done with the Prisma configuration, we can create a Prisma schema and add our authentication scheme.
We will begin by creating a schema that will contain the user parameters that will be migrated to the database. These will enable us interact with them in order to complete authentication.
To add a schema, go to prisma/schema.prisma file and add the below code:
model User {
  id       Int     @id @default(autoincrement())
  email    String  @unique
  name     String?
  password String?
}
Once that is done, we can run our migration, which will create the table user in the database and add the columns for it.
To run the migration, add the below code to your terminal and run it:
npx prisma migrate dev --name "init" --preview-feature
If the migration is successful, a migrations folder will be created inside the prisma folder that was created previously. The folder will be called migrations and will contain a SQL file.
Mine came out as 20210613163752_init/migration.sql with the file migration.sql containing the SQL structure created in the schema:
-- CreateTable
CREATE TABLE "User" (
    "id" SERIAL NOT NULL,
    "email" TEXT NOT NULL,
    "name" TEXT,
    "password" TEXT,
    PRIMARY KEY ("id")
);
-- CreateIndex
CREATE UNIQUE INDEX "User.email_unique" ON "User"("email");
Prisma Client is an auto-generated and type-safe query builder that you can use to programmatically read and write data in a database from a Node.js or TypeScript application. You will use it for database access within your REST API routes, replacing traditional ORMs, plain SQL queries, custom data access layers, or any other method of talking to a database.
To install Prisma Client in your project, simply input the following command in your terminal and run it:
npm install @prisma/client
This will enable you use Prisma Client anywhere on your project and, in turn, allow you to interact with your database.
After Prisma Client has been set up, we can go ahead and add our controller, which will interact with our routes (which point to the specified functions in our controllers). We will also add our services, which interact with the database or Prisma.
To start, we will create a couple of files and folders to house them. The first will be the routes – we will create a folder named routes and add our files index.js and auth.js.
Then we start our Express server in the root index.js file and point the routes to routes/index.js.
Next we require Prisma Client in the root index.js file:
const express = require('express');
require('@prisma/client');
const app = express();
require('dotenv').config();
const route = require('./routes');
const bodyParser = require('body-parser');
const multer = require('multer');
app.use(bodyParser.urlencoded({ extended: true }))
app.use(bodyParser.json())

// redirect to routes/index.js
const route = require('./routes');
app.use('/', route);

const port = process.env.PORT || 5000;
app.listen(port, () => {
    console.log(`server is running on port ${port}`);
});
When that is done, we can go ahead and point our routes to their various destinations in the routes/index.js file:
const express = require('express');
const router = express.Router();
const auth = require('./auth');
const createError = require('http-errors')
router.get('/', (req, res) => {
    res.send('Hello World!');
});
router.use('/auth', auth);
router.use( async (req, res, next) => {
    next(createError.NotFound('Route not Found'))
})
router.use( (err, req, res, next) => {
    res.status(err.status || 500).json({
        status: false,
        message: err.message
    })
})
module.exports = router;
If you notice, I am requiring the http-errors package in my index.js file. This is because I will be using it to intercept errors and properly pass it to the client as a message.
To make use of http-errors, you can install using:
npm install http-errors
We will need to create a service file to communicate between our database and controller. Inside the service file, we will create three functions: register, login, and all, which will register a new user to the database, get the user’s information, and log the user in.
The all function will get all users, which will only happen if the request has a valid token generated during login or registration.
To start, we will create a folder named services, then create a file inside the services folder called auth.services.js. Next, we can create our register function and install bcrypt and JWT for password hashing and generating tokens.
To install bcrypt and JWT, input the below command to your terminal and run it:
npm install bcryptjs jsonwebtoken
After the installation is done, we will create a folder called utils in order to add our JWT function, which we will use later for token generation.
In our utils folder, create a file named jwt.js and add the below functions:
const jwt = require('jsonwebtoken')
const createError = require('http-errors')
require('dotenv').config()
const accessTokenSecret = process.env.ACCESS_TOKEN_SECRET
module.exports = {
    signAccessToken(payload){
        return new Promise((resolve, reject) => {
            jwt.sign({ payload }, accessTokenSecret, {
            }, (err, token) => {
                if (err) {
                reject(createError.InternalServerError())
                }
                resolve(token)
            })
        })
    },
    verifyAccessToken(token){
        return new Promise((resolve, reject) => {
            jwt.verify(token, accessTokenSecret, (err, payload) => {
                if (err) {
                    const message = err.name == 'JsonWebTokenError' ? 'Unauthorized' : err.message
                    return reject(createError.Unauthorized(message))
                }
                resolve(payload)
            })
        })
    }
}
Then in our .env file, we add our ACCESS_TOKEN_SECRET:
ACCESS_TOKEN_SECRET=<CUSTOM_ACCESS_TOKEN>
We can then go back to auth.service.js and require our JWT file along with bcrypt and Prisma:
// services/auth.service.js

const { PrismaClient } = require('@prisma/client');
const prisma = new PrismaClient();

require('dotenv').config();
const bcrypt = require('bcryptjs');
const jwt = require('../utils/jwt');
Next, create our register function to add a new user to the database:
class AuthService {
  static async register(data) {
        const { email } = data;
        data.password = bcrypt.hashSync(data.password, 8);
        let user = prisma.user.create({
            data
        })
        data.accessToken = await jwt.signAccessToken(user);

        return data;
    }
}

module.exports = authService;
While we are at it, we can also add our login and all functions:
// services/auth.service.js

static async login(data) {
        const { email, password } = data;
        const user = await prisma.user.findUnique({
            where: {
                email
            }
        });
        if (!user) {
            throw createError.NotFound('User not registered')
        }
        const checkPassword = bcrypt.compareSync(password, user.password)
        if (!checkPassword) throw createError.Unauthorized('Email address or password not valid')
        delete user.password
        const accessToken = await jwt.signAccessToken(user)
        return { ...user, accessToken }
    }
    static async all() {
        const allUsers = await prisma.user.findMany();
        return allUsers;
    }
To get our request body from our routes, we will create a controller called controllers/auth.controller.js and add our register, login, and all functions to communicate with our respective services:
const auth = require('../services/auth.service');
const createError = require('http-errors');
class authController {
    static register = async (req, res, next) => {
        try {
            const user = await auth.register(req.body);
            res.status(200).json({
                status: true,
                message: 'User created successfully',
                data: user
            })
        }
        catch (e) {
            next(createError(e.statusCode, e.message))
        }
    }
    static login = async (req, res, next) => {
         try {
            const data = await auth.login(req.body)
            res.status(200).json({
                status: true,
                message: "Account login successful",
                data
            })
        } catch (e) {
            next(createError(e.statusCode, e.message))
        }
    }
    static all = async (req, res, next) => {
        try {
            const users = await auth.all();
            res.status(200).json({
                status: true,
                message: 'All users',
                data: users
            })
        }
        catch (e) {
            next(createError(e.statusCode, e.message))
        }
    }
}
module.exports = authController;
After the controller has been added, we can add our guard, which will protect some routes like all from users who are not logged in. This guard will verify our issued JWTs and, if valid, will allow users to access those routes.
Create a file called middlewares/auth.js and add the below code:
const jwt = require('../utils/jwt')
const createError = require('http-errors')
const auth = async (req, res, next) => {
    if (!req.headers.authorization) {
        return next(createError.Unauthorized('Access token is required'))
    }
    const token = req.headers.authorization.split(' ')[1]
    if (!token) {
        return next(createError.Unauthorized())
    }
    await jwt.verifyAccessToken(token).then(user => {
        req.user = user
        next()
    }).catch (e => {
        next(createError.Unauthorized(e.message))
    })
}
module.exports = auth;
The above code will take the passed token from headers added in routes to verify the JWT and return a true or false.
Now we are done with our controller, service, and guard. We can now open our routes/auth.js file and add our routes:
const router = require('express').Router();
const user = require('../controllers/auth.controller');
const auth = require('../middlewares/auth');
// register
router.post('/', user.register);
// login
router.post('/login', user.login);
// all users
router.get('/', auth, user.all);
module.exports = router;
The auth guard is added to the all route to restrict the route from users without JWTs.
Now that we are done building our application, we can test to see if it’s working properly. We will be testing the register, login, and all routes using Postman.
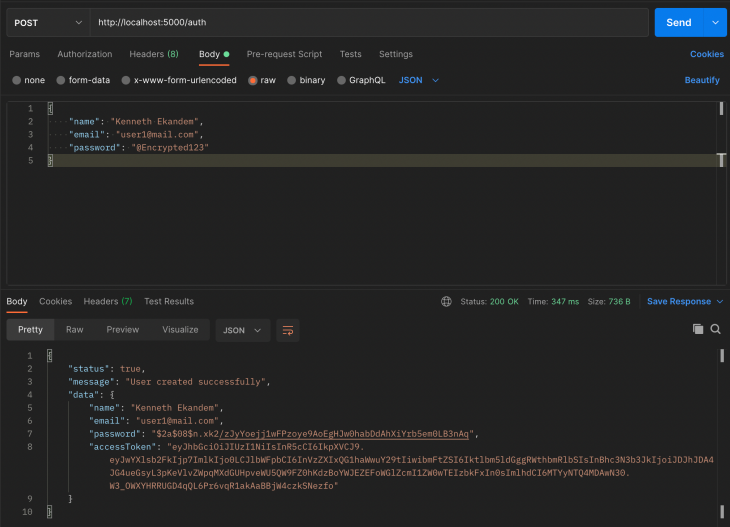
Register
As seen above in the Postman screenshot, once you input your email, name, and password, you are successfully registered as a new user.
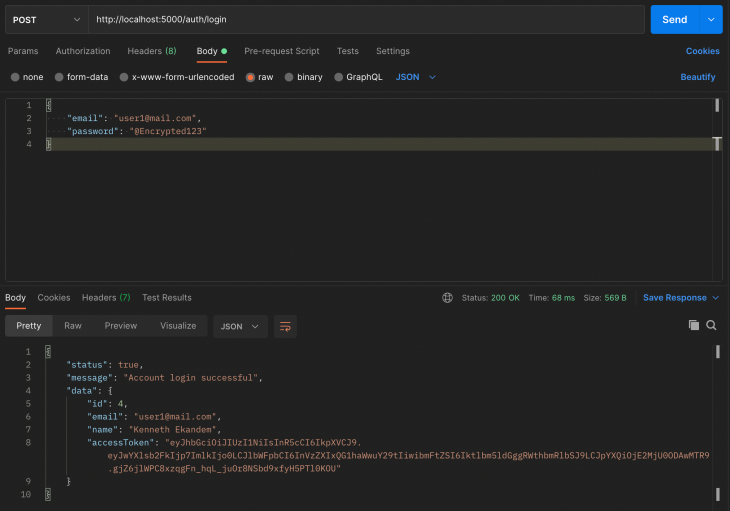
Login
When a user provides the correct email and password, they are given an access token that they will use to log in. This is passed as a header in requests that require JWTs in the header.
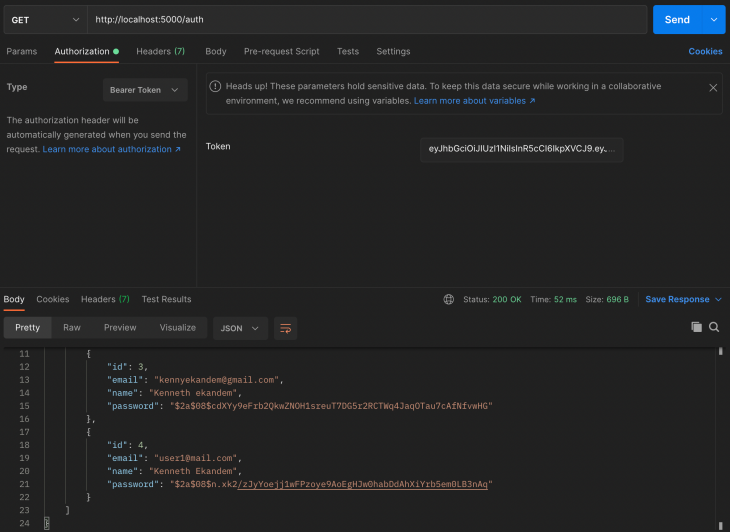
All users
The all route is a protected route for only users with a valid token. As you can see in the screenshot above, the token is added to the header with the property BearerToken.
In this tutorial, we have gone through the process of building an authenticated server-side application using Prisma for the database schema and migration. Then, using the migrated data, we can register and log in a user, and create protected routes that accept valid tokens.
For a more detailed codebase, you can clone the repository and configure it.
Install LogRocket via npm or script tag. LogRocket.init() must be called client-side, not
server-side
$ npm i --save logrocket

// Code:

import LogRocket from 'logrocket';
LogRocket.init('app/id');
// Add to your HTML:

<script src="https://cdn.lr-ingest.com/LogRocket.min.js"></script>
<script>window.LogRocket && window.LogRocket.init('app/id');</script>

Explore how the Universal Commerce Protocol (UCP) allows AI agents to connect with merchants, handle checkout sessions, and securely process payments in real-world e-commerce flows.

React Server Components and the Next.js App Router enable streaming and smaller client bundles, but only when used correctly. This article explores six common mistakes that block streaming, bloat hydration, and create stale UI in production.

Gil Fink (SparXis CEO) joins PodRocket to break down today’s most common web rendering patterns: SSR, CSR, static rednering, and islands/resumability.

@container scroll-state: Replace JS scroll listeners nowCSS @container scroll-state lets you build sticky headers, snapping carousels, and scroll indicators without JavaScript. Here’s how to replace scroll listeners with clean, declarative state queries.
Hey there, want to help make our blog better?
Join LogRocket’s Content Advisory Board. You’ll help inform the type of content we create and get access to exclusive meetups, social accreditation, and swag.
Sign up now
One Reply to "Crafting authentication schemes with Prisma in Express"
I’m trying to run this within a Nuxt document. Essentially trying to combine this with https://dev.to/prisma/adding-an-api-and-database-to-your-nuxt-app-with-prisma-2nlp
I seem to have everything working. Running post in Postman responds with:
“status”: true,
“message”: “User created successfully”,
“data”: {
However running get doesn’t show that User. It will however load any data I’ve added through Prisma Studio