React components are JavaScript functions that return React elements. These determine what will be added to the DOM. Just like functions, React components can receive arguments called props, which can result in dynamic returned elements.

Props can be of any data type, but the expected data type for components can differ. For example, component A may expect a name argument with a string data type, while component B may expect an age argument with a number data type. C may expect a post argument with an object data type with properties like title and date, whereas D may expect an onClick argument with a Function data type.
How do we specify the type of data that our component should expect?
There are many ways to do this, but this article focuses on PropTypes and TypeScript. Despite having similar purposes, these two methods differ in how they work. We’ll cover what these tools are, understand their differences, and, lastly, try some advanced ways of using them.
To get a complete understanding of this article, prior knowledge of PropTypes and TypeScript is required. You’ll also need to install an integrated development environment (IDE) like VS Code.
PropTypes is a runtime type-checking tool for props in React applications. Since React 15.5, the PropTypes utility is available through the prop-types package. With PropTypes, you can define the types of props expected in a component, like stating whether props are required or optional. When you pass a different type to a component or skip a required prop, you will get a warning in the JavaScript console:
import React from 'react'
import PropTypes from 'prop-types'

const NotificationCard = ({ message, type, id }) => {
  return <span>Notification</Notification>
}

NotificationCard.propTypes = {
  message: PropTypes.string.isRequired,
  type: PropTypes.oneOf(["error", "warning", "success"]),
  id: PropTypes.string.isRequired
}

export default NotificationCard
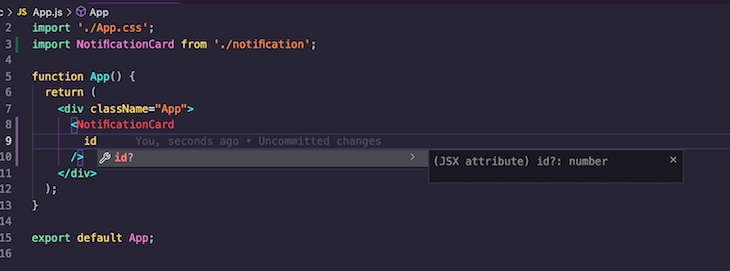
With React plugins installed, the IntelliSense will show an auto-completed prop name with the expected type of data for the prop as you type. Here’s an example:

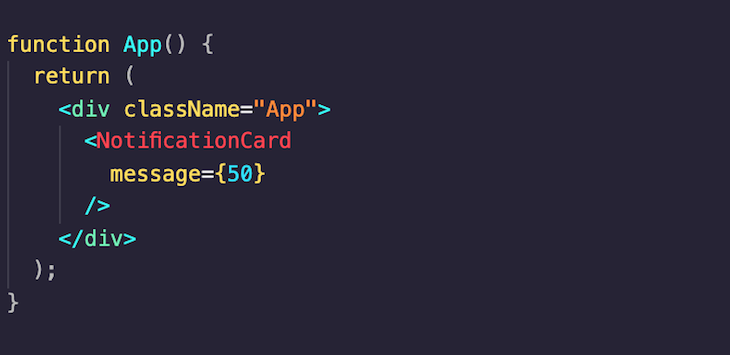
What happens when we pass an unexpected data type? Or when we don’t provide a required prop?

The IDE does not show us any errors or warnings. Now let’s trying running the code:

The browser console screenshot shows an unexpected data type of the message prop from passing a wrong data type. If you pass a string to message, you’ll get another error indicating id, a required prop, was not provided.

Note that PropTypes does not provide warnings in production applications; warnings are only printed during development. If an unexpected type is received while using the production version of your application, the console will not print any warnings.
Using TypeScript with React allows you to add typings to your props that will be verified at compile time. TypeScript compiles back to JavaScript because that’s what the browser understands.
Before using TypeScript in your React application, you may need to provide the necessary dependencies and configurations. For example, if you’re using Create React App, you can follow this documentation to add TypeScript support in your existing application.
Here’s the TypeScript interpretation of the PropTypes definition above:
import React from 'react'
import PropTypes from 'prop-types'

type Props = {
  message: string;
  type: "error" | "warning" | "success";
  id: string;
}

const NotificationCard = ({ message, type, id }: Props) => {
  return <span>Notification</span>
}

export default NotificationCard
With the IDE tools for TypeScript, you would get instant IntelliSense warnings in your IDE when you pass an unexpected prop. Let’s test this out by providing the wrong data type; we’ll get a warning message:

When we provide the correct data type for message, we’ll receive this notification:

As seen above, IntelliSense also provides more information on the error to help you resolve it.
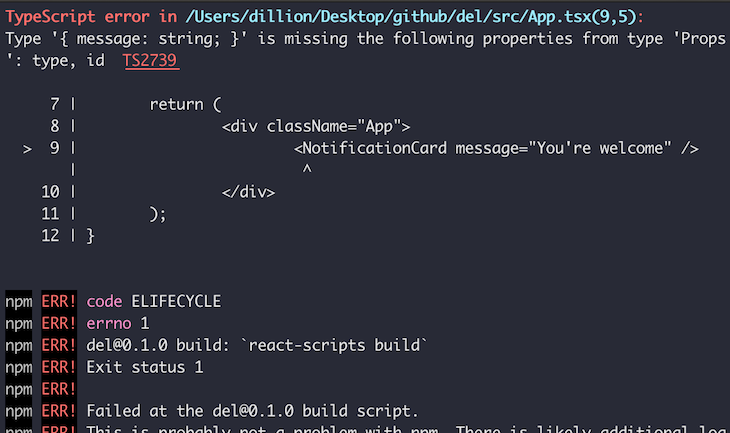
With TypeScript, running npm run build will fail when there’s a violation of a props requirement:

Both of these tools are used for type-checking props. Although TypeScript may seem like the best option now, choosing one will inevitably result in a trade-off. Here are some key differences to consider:
PropTypes does type-checking during runtime while the application is running in the browser. However, TypeScript does type-checking during compile time when the TypeScript code is compiled to JavaScript. This is worth noting because it influences how the tools can be used. Here are some examples:
TypeScript cannot type-check data coming from an API. Compilation of such code wouldn’t be successful because the content of that data can only be known at runtime. In contrast, PropTypes will give warnings if the expected types are violated.
Think of PropTypes as a tool that does something similar (not exactly) to:
...
if (typeof age !== number) {
  console.warn("Age should have a number data type")
}
...
Regardless of whether age is hardcoded or gotten from an API, the type checker still runs. On the other hand, TypeScript does not make its way to the browser, therefore limiting type checking to hardcoded data.
If you’re creating a component library, it’s very likely you will publish the production code to a package manager. At compile time, TypeScript will be converted to JavaScript. This means users of your library cannot depend on your TypeScript type definitions for props, reiterating the relevance of PropTypes. PropTypes is normal JavaScript code, which means validations will also be possible when your library is being used.
Both tools have plugins that provide autocompletion with information on components’ props. However, TypeScript’s highlighting tools outperform PropTypes’. You’ll find numerous features in TypeScript IDE tools like VS Code, WebStorm, and Atom. TypeScript highlights your components appropriately when the expected props’ data types are not provided and provides insights into the solution.
There are many ways you can specify types for your props in TypeScript that PropTypes may not be able to provide. For example, TypeScript allows you to combine interfaces with types and perform conditional type checking, like stating that if property A is true, property C must also be provided.
Here’s an example of advanced usage of TypeScript:
import React from "react";
import PropTypes from "prop-types";
type Props =
    | {
            type: "error";
            message: "";
      }
    | {
            type: "success";
      };
const NotificationCard = (props: Props) => {
    return <span>Notification</span>;
};
export default NotificationCard;
In the above code snippet, if type is error, then a message property is also required. But if it is success, then we don’t need to specify another property.
Here’s the warning we get when we have a type of error without providing the message property:

Notice that the first NotificationCard without a message property provides the warning, but the second NotificationCard usage does not.
As I stated earlier, making a choice between Type Script and PropTypes will require a trade-off. Do you want to keep features of TypeScript like syntax highlighting by using PropTypes? Or would you rather forego type checking at runtime?
Your choices will be influenced by how your application is used. For example, if you’re building your application as a library that will be used by many people, then runtime type checking is of great importance.
However, you may not need to sacrifice any features — there are ways to enjoy both runtime and compile-time type checking.
First, you can choose to write type definitions and PropTypes definitions for your application. This will be strenuous in the long run when you have to write both definitions for every component in your application. Let’s review two ways in which you can write one and automatically generate the other.
InferPropsInferPropTypes from @types/prop-types can be used to create type definitions from PropTypes definitions. Here’s an example:
import React from "react";
import PropTypes, { InferProps } from "prop-types";

const BlogCardPropTypes = {
    title: PropTypes.string.isRequired,
    createdAt: PropTypes.instanceOf(Date),
    authorName: PropTypes.string.isRequired,
};

type BlogCardTypes = InferProps<typeof BlogCardPropTypes>;
const BlogCard = ({ authorName, createdAt, title }: BlogCardTypes) => {
    return <span>Blog Card</span>;
};

BlogCard.propTypes = BlogCardPropTypes;

export default BlogCard;
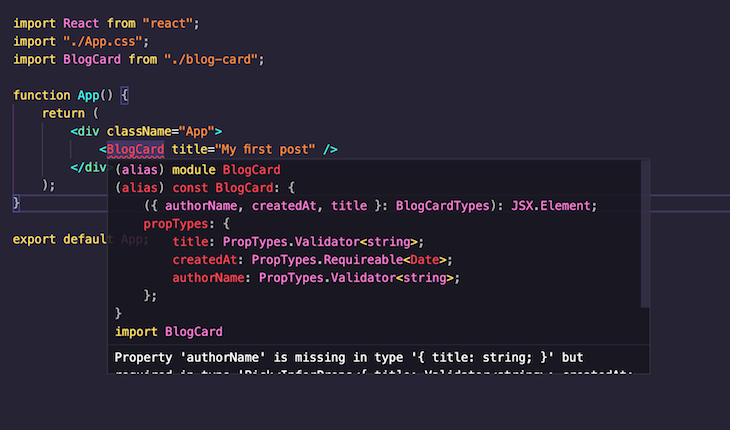
Here’s what we have when we highlight the component:

The component now has a PropTypes definition and also gives errors when TypeScript types are violated. As seen, it says Property 'authorName' is missing, but it doesn’t say createdAt is missing because we didn’t add an isRequired for that property in the BlogCardPropTypes object.
babel-plugin-typescript-to-proptypesYou can generate PropTypes from TypeScript type definitions using babel-plugin-typescript-to-proptypes. When you specify types for your props, the plugin converts those type definitions to PropTypes definitions.
For example, the following code:
import React from "react";
type Props = {
    title: string;
    createdAt: Date;
    authorName: string;
};
const BlogCard = ({ title, createdAt, authorName }: Props) => {
    return <span>Blog card</span>;
};
export default BlogCard;
will work as if it were written like this:
import React from 'react'
import PropTypes from 'prop-types'

const BlogCard = ({ title, createdAt, authorName }) => {
    return <span>Blog card</span>;
};

BlogCard.propTypes = {
  title: PropTypes.string.isRequired,
  createdAt: PropTypes.instanceOf(Date),
  authorName: PropTypes.string.isRequired,
}

export default BlogCard
It will be compiled accordingly, thereby giving your React application type-checking powers during runtime.
There are a lot of misconceptions surrounding PropTypes and TypeScript. Some will say one is important, but the other isn’t. For me, both of them are important, but I’ll give more priority to TypeScript if I’m not building a tool that will be used by other people.
In this article, we’ve looked at what PropTypes and TypeScript are, their relevance in React applications, their differences, and ways in which they can be used together.
To continue reading, check out this extensive guide on React PropTypes.

LogRocket lets you replay user sessions, eliminating guesswork by showing exactly what users experienced. It captures console logs, errors, network requests, and pixel-perfect DOM recordings — compatible with all frameworks, and with plugins to log additional context from Redux, Vuex, and @ngrx/store.
With Galileo AI, you can instantly identify and explain user struggles with automated monitoring of your entire product experience.
Modernize how you understand your web and mobile apps — start monitoring for free.
Install LogRocket via npm or script tag. LogRocket.init() must be called client-side, not
server-side
$ npm i --save logrocket

// Code:

import LogRocket from 'logrocket';
LogRocket.init('app/id');
// Add to your HTML:

<script src="https://cdn.lr-ingest.com/LogRocket.min.js"></script>
<script>window.LogRocket && window.LogRocket.init('app/id');</script>
Hey there, want to help make our blog better?
Join LogRocket’s Content Advisory Board. You’ll help inform the type of content we create and get access to exclusive meetups, social accreditation, and swag.
Sign up now
Discover how to use Gemini CLI, Google’s new open-source AI agent that brings Gemini directly to your terminal.

This article explores several proven patterns for writing safer, cleaner, and more readable code in React and TypeScript.

A breakdown of the wrapper and container CSS classes, how they’re used in real-world code, and when it makes sense to use one over the other.

This guide walks you through creating a web UI for an AI agent that browses, clicks, and extracts info from websites powered by Stagehand and Gemini.