Editor’s note: This post was updated on 13 April 2023 to include instructions on how to use GitHub Actions to publish the Node.js CLI to npm so it will be accessible to all users.
The command line has thousands of tools, such as awk, sed, grep, and find available at your disposal that cut development time and automate tedious tasks. Creating a command line tool in Node.js isn’t very complicated, thanks to a powerful library like Commander.js.
Pairing Node.js with TypeScript helps you catch bugs early during the development process so that you can ship CLIs that are more reliable and have fewer bugs.
In this tutorial, we will talk about what a CLI is and then demonstrate how to use Commander.js with TypeScript to build one. We will then make the CLI globally accessible so that users can access it anywhere in their system. Lastly, we’ll use GitHub Actions to publish it to npm so that it will be readily available to all developers.
Jump ahead:
The Replay is a weekly newsletter for dev and engineering leaders.
Delivered once a week, it's your curated guide to the most important conversations around frontend dev, emerging AI tools, and the state of modern software.
To follow this tutorial, you will need:
A command-line interface, often referred to as a CLI, is a program that allows users to type instructions and interact with a script that processes the input and produces an output. Node.js has many packages that allow you to build CLIs. Some examples are args, minimist, and oclif.
Commander.js provides a lot of features that allow you to succinctly build command-line interfaces. Furthermore, the Node.js community provides libraries such as Chalk and Figlet that complement Commander.js CLIs to make them look visually appealing.
We will use Commander.js because of the following features:
Before we dive into building CLIs, let’s look at how an existing CLI works.
If you are following this tutorial, you probably have Node.js installed on your machine. Node.js provides a CLI that you can access by typing the following command:
node
This allows you to access the Node.js read–eval–print loop (REPL) where you can enter and execute JavaScript code.
You can modify the Node.js CLI to do something else with the use of command-line flags, or options. Exit the REPL by typing CTRL+D, then check the Node.js version, like so:
node -v
// v18.11.0
As you can see in the output, passing the -v option changed the behavior of the CLI to show the Node.js version. You can also use the long-form options:
node --version
// v18.11.0
Other Node.js CLI options require an argument to be passed along with the option. For example, the -e option, which is a short form of --eval, accepts an argument of a string that contains JavaScript code. Node executes the code and logs the result in the terminal:
node -e "console.log(4 * 2)"
// 8
The -e option returns an error if no argument is passed:
node -e
// node: -e requires an argument
Now that we have an idea of how a CLI works. Let’s look at the Commander.js terminology for the Node CLI options we have seen far:
-v is an example of a Boolean option; other familiar examples are ls -l or sudo -inode -e "console.log(4 * 2)" throws an error if an argument isn’t passednode -e "console.log(4 * 2)" command, "console.log(4 * 2)" is an option-argument; another example is git status -m "commit message", where the "commit message" is an option-argument for the -m optionNow that you have an idea of what a CLI is, we will create a directory and configure it to use TypeScript and Commander.js.
In this section, we will create a directory for the project, initialize it as an npm package, install all the necessary dependencies, and configure TypeScript.
To begin, create the directory for the project:
mkdir directory_manager
Change into the directory:
cd directory_manager
Initialize the directory as an npm project:
npm init -y
This creates a package.json file, which contains important information about your project and track dependencies.
Next, run the following command:
npm install commander figlet
Commander.js is our library for building a CLI, and Figlet will be used for turning CLI text into ASCII art.
Next, download the TypeScript and ts-node packages:
npm install @types/node typescript --save-dev
Now, create a tsconfig.json file in your text editor and add the following configuration settings for TypeScript:
{
  "compilerOptions": {
    "rootDir": "src",
    "outDir": "dist",
    "strict": true,
    "target": "es6",
    "module": "commonjs",
    "sourceMap": true,
    "esModuleInterop": true,
    "moduleResolution": "node"
  }
}
Let’s go over some of the options:
rootDir: Directory containing the TypeScript files(.ts files) for the CLI, which we’ll keep in the src directoryoutDir: Directory containing TypeScript-compiled JavaScript source code. We will use the dist directorystrict: Disables optional typing and ensures that all the TypeScript code you write has typestarget: Version of ECMAScript to which TypeScript should compile JavaScriptFor a comprehensive look at all the options, visit the TypeScript documentation.
Next, in the package.json file, create a build script that you will use to compile TypeScript(omit the comments in the JSON file:
{
  ...
  "scripts": {
    // add the following line
    "build": "npx tsc",
    "test": "echo \"Error: no test specified\" && exit 1"
  },
  ...
}
To compile TypeScript later in the tutorial, you will run the build script with npm run build, which will run the npx tsc command that compiles TypeScript to JavaScript.
We have now configured TypeScript and added a script for compiling TypeScript. We will start building a CLI next.
In this section, we will begin building a CLI using TypeScript and Commander.js. It will look as follows:

The CLI will be used to manage a directory and it will have a -l option that will list directory contents in a table format. For each item, it will display its name, size, and date of creation. It will also have a -m for creating directories and a -toption for creating empty files.
Now that you have an idea of what we will be building, we will break the CLI into smaller chunks and start building each part.
In this section, we will create the name of the CLI and use the Figlet package to turn it into ASCII art text.
It will look like this when finished:

In your project directory, create the src directory and navigate into it:
mkdir src && cd src
This directory will contain the TypeScript files. You might recall, we specified this directory in the rootDir option when we configured TypeScript with the tsconfig.js file earlier in the tutorial.
Next, create an index.ts file and add the following contents:
const figlet = require("figlet");

console.log(figlet.textSync("Dir Manager"));
In the first line, we import the Figlet module. Next, we invoke the figlet.textSync() method with the string Dir Manager as the argument to turn the text into ASCII Art. Finally, we log the text in the console.
To verify that the changes work, save your file. Compile the TypeScript file to JavaScript with the following command:
npm run build
When TypeScript finishes compiling, you will see output like this:
// output
> [email protected] build
> npx tsc
If successful, you won’t see any errors here.
You may recall that we added an outDir option and set it to the dist directory in the tsconfig.json file. After compiling TypeScript, the directory will be created automatically in the root directory.
Change into the dist directory:
cd ../dist
List the directory contents:
ls

// output
index.js  index.js.map
You will see that the index.js file has been created. You can run the file with Node.js as follows:
node index.js
Upon running the command, you will see the CLI name in ASCII art:

Now, go back to the root directory:
cd ..
Going forward, we won’t log into the dist directory to run the file. We will do it while in the root directory as node dist/index.js.
Now that you can create the name of the CLI in ASCII text, we will create the CLI options.
In this section, we will use Commander.js to create a description for the CLI and its options.
We will create the following options:
The -V option will invoke the Commander.js version() method, and the -hwill be provided by default. We are now left to define three options:
-l / --ls : Modifies the CLI to list directory contents in a table. It will also accept an optional directory path argument-m / --mkdir: Used to create a directory. It will require an option-argument, which is the name of the directory to be created-t / --touch: Modifies the CLI to create an empty file. It will require an option-argument, which is the name of the fileNow that we know the options we’ll be creating, we will define them using Commander.js.
In your text editor, open the index.ts file in the src directory and add the following code to import and initialize Commander.js:
const { Command } = require("commander"); // add this line
const figlet = require("figlet");

//add the following line
const program = new Command();

console.log(figlet.textSync("Dir Manager"));
In the first line, we import the Commander.js module and extract the Command class. We then set the program variable to an instance of the Command class. The class gives us several methods that can be used to set the version, description, and CLI options.
Next, define the CLI options in your index.ts file:
...

program
  .version("1.0.0")
  .description("An example CLI for managing a directory")
  .option("-l, --ls  [value]", "List directory contents")
  .option("-m, --mkdir <value>", "Create a directory")
  .option("-t, --touch <value>", "Create a file")
  .parse(process.argv);

const options = program.opts();
In the preceding code, we use the program variable containing the Commander instance to invoke the version() method. The method takes a string containing the version of the CLI and Commander creates the -V option for you.
Next, we chain the description() method call with the text that describes the CLI program. Following this, you chain a call to the option() method of Commander package, which takes two arguments: an option and a description. The first argument is a string that specifies the -l option and the long name --ls. We then wrap value in [] so that the option can accept an optional argument. The second argument is the help text that will be shown when users use the -h flag.
After that, we chain another option() method call to define the -m / --mkdiroption. The <> in the <value> signifies that it requires an argument. Following this, we chain another option() to define the -t option and the long name --touch, which also requires an argument.
We then chain the parse() method call, which processes the arguments in the process.argv, which is an array containing the arguments the user passed. The first argument is node, the second argument is the program filename, and the rest are additional arguments.
Finally, we set the options variable to the program.opts() call, which returns an object. The object has CLI options as properties, whose values are the arguments the user passed.
At this point, the index.ts file will look like the following:
const { Command } = require("commander");
const figlet = require("figlet");

const program = new Command();

console.log(figlet.textSync("Dir Manager"));

program
  .version("1.0.0")
  .description("An example CLI for managing a directory")
  .option("-l, --ls  [value]", "List directory contents")
  .option("-m, --mkdir <value>", "Create a directory")
  .option("-t, --touch <value>", "Create a file")
  .parse(process.argv);

const options = program.opts();
When you are finished making changes, save the file, then compile TypeScript:
npm run build
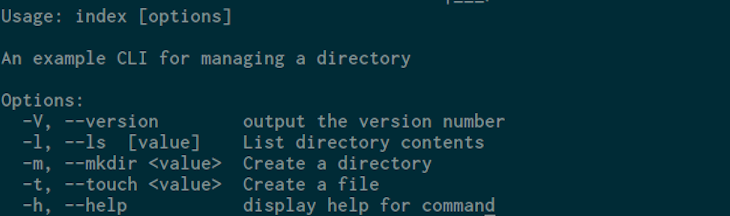
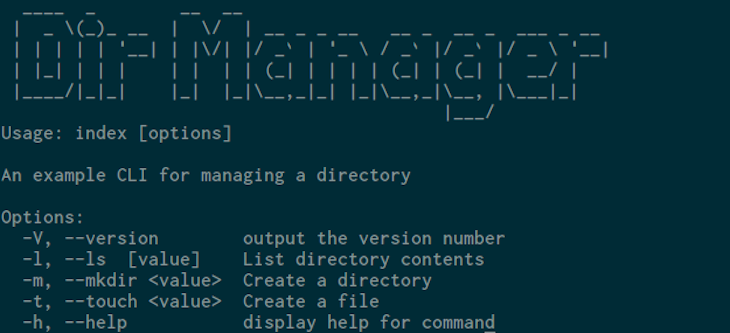
Run the index.js with the -h option to see the CLI help page:
node dist/index.js -h
Upon running the command, the page will look like this:

Let’s also try the -V option:
node dist/index.js -V
// 1.0.0
So far, the -h and the -V option work without any issues. If you try the other options we defined, you will only see the CLI name:
node dist/index.js -l

This is happening because we have not defined the actions for the other options.
So far, we have defined options for the CLI but they have no actions associated with them. In this section, we will create actions for the options so that when a user uses the options, the CLI will perform the relevant task.
We will begin with the -l option. We want the CLI to show directory contents in a table with the following fields:
created_atA user can also provide an optional directory path:
node dist/index.js -l /home/username/Documents
If the user doesn’t pass any option-argument, the CLI will only show contents in the location of the index.js file we are executing:
node dist/index.js -l
In your index.ts file, import the fs and path modules:
const { Command } = require("commander");
// import fs and path modules
const fs = require("fs");
const path = require("path");
const figlet = require("figlet");
Define a listDirContents() function with an exception handler at the end of the file:
const { Command } = require("commander");
...
const options = program.opts();

//define the following function
async function listDirContents(filepath: string) {
  try {

  } catch (error) {
    console.error("Error occurred while reading the directory!", error);
  }
}
The listDirContents() asynchronous function takes a filepath parameter, which has a TypeScript type declaration of string. The type ensures that the function only accepts strings as arguments, and the async keyword you prefix makes the function asynchronous. This will allow us to use the await keyword inside the function, which we’ll do soon.
Within the function, we define the try block, which is empty for now. It will contain the functionality that lists the directory contents and format the result into a table. After that, we define the catch block that will log a message in the console if the code contained in the try block has an exception.
Let’s add the code that lists the directory contents in the listDirContents()function:
async function listDirContents(filepath: string) {
  try {
    // add the following
    const files = await fs.promises.readdir(filepath);
    const detailedFilesPromises = files.map(async (file: string) => {
      let fileDetails = await fs.promises.lstat(path.resolve(filepath, file));
      const { size, birthtime } = fileDetails;
      return { filename: file, "size(KB)": size, created_at: birthtime };
    });
  } catch (error) {
    console.error("Error occurred while reading the directory!", error);
  }
}
First, we call fs.promises.readdir() with the value in the filepathparameter to read the directory contents. The function returns a promise, so we prefix it with the await keyword to wait for it to resolve. Once resolved, filesis set to an array.
Second, we iterate over each element in the files array and return a new array using the map() method, which takes an asynchronous callback. The callback accepts the file parameter. In the callback, we invoke fs.promises.lstat()with the full path of the file to get more details about the file, such as size, birthtime, and info. We then extract the size and birthtime properties and the return an object with the filename, size(KB), and created_atproperties into the array that the map() method returns into the detailedFilesPromise variable.
Now, add the following code toward the end of the try block to create a table that displays the directory contents:
async function listDirContents(filepath: string) {
  try {
    const files = await fs.promises.readdir(filepath);
    const detailedFilesPromises = files.map(async (file: string) => {
      let fileDetails = await fs.promises.lstat(path.resolve(filepath, file));
      const { size, birthtime } = fileDetails;
      return { filename: file, "size(KB)": size, created_at: birthtime };
    });
    // add the following
    const detailedFiles = await Promise.all(detailedFilesPromises);
    console.table(detailedFiles);
  } catch (error) {
    console.error("Error occurred while reading the directory!", error);
  }
}
Now, each element in the the detailedFilesPromise will return a promise and evaluate to an object once resolved. To wait for all of them to resolve, we call the Promise.all() method.
Finally, we invoke console.table() with the detailedFiles array to log the data in the console.
Let’s now define an action for the -m option. To do that, define the createDir() function below the listDirContents() function:
async function listDirContents(filepath: string) {
  ...
}

// create the following function
function createDir(filepath: string) {
  if (!fs.existsSync(filepath)) {
    fs.mkdirSync(filepath);
    console.log("The directory has been created successfully");
  }
}
In the CreateDir() function, we check if the given directory path exists. If it doesn’t exist, we call fs.mkdirSync() to create a directory, then log a success message.
Before we invoke the function, define a createFile() function for the -t flag:
async function listDirContents(filepath: string) {
  ...
}

function createDir(filepath: string) {
  ...
}
// create the following function
function createFile(filepath: string) {
  fs.openSync(filepath, "w");
  console.log("An empty file has been created");
}
In the createFile() function, we invoke fs.openSync() to create an empty file in the given path. We then log a confirmation message to the terminal.
So far, we have created three functions but we haven’t called them. To do that, we need to check if the user has used the option, so that we can invoke the suitable function.
To check if the user has used the -l or --ls option, add the following in index.ts:
...
function createFile(filepath: string) {
  ...
}
// check if the option has been used the user
if (options.ls) {
  const filepath = typeof options.ls === "string" ? options.ls : __dirname;
  listDirContents(filepath);
}
If options.ls is set to a value, we set the filepath variable to the path the user provided, if option.ls is a string; otherwise, it’s set to the file path of the index.js file in the dist directory. After that, we call the listDirContents() with the filepath variable.
Now, let’s invoke the createDir() and createFile() function when the user uses the appropriate option:
if (options.ls) {
  ...
}

// add the following code
if (options.mkdir) {
  createDir(path.resolve(__dirname, options.mkdir));
}
if (options.touch) {
  createFile(path.resolve(__dirname, options.touch));
}
If the user uses the -m flag and passes an argument, we invoke createDir()with the full path to the index.js file to create the directory.
If the user uses the -t flag and passes an argument, we invoke the createFile() function with the full path to the index.js location.
At this point, the complete index.ts file will look like this:
const { Command } = require("commander");
const fs = require("fs");
const path = require("path");
const figlet = require("figlet");

const program = new Command();

console.log(figlet.textSync("Dir Manager"));

program
  .version("1.0.0")
  .description("An example CLI for managing a directory")
  .option("-l, --ls  [value]", "List directory contents")
  .option("-m, --mkdir <value>", "Create a directory")
  .option("-t, --touch <value>", "Create a file")
  .parse(process.argv);

const options = program.opts();

async function listDirContents(filepath: string) {
  try {
    const files = await fs.promises.readdir(filepath);
    const detailedFilesPromises = files.map(async (file: string) => {
      let fileDetails = await fs.promises.lstat(path.resolve(filepath, file));
      const { size, birthtime } = fileDetails;
      return { filename: file, "size(KB)": size, created_at: birthtime };
    });
    const detailedFiles = await Promise.all(detailedFilesPromises);
    console.table(detailedFiles);
  } catch (error) {
    console.error("Error occurred while reading the directory!", error);
  }
}
function createDir(filepath: string) {
  if (!fs.existsSync(filepath)) {
    fs.mkdirSync(filepath);
    console.log("The directory has been created successfully");
  }
}

function createFile(filepath: string) {
  fs.openSync(filepath, "w");
  console.log("An empty file has been created");
}

if (options.ls) {
  const filepath = typeof options.ls === "string" ? options.ls : __dirname;
  listDirContents(filepath);
}
if (options.mkdir) {
  createDir(path.resolve(__dirname, options.mkdir));
}
if (options.touch) {
  createFile(path.resolve(__dirname, options.touch));
}
Save your file and compile TypeScript:
npm run build
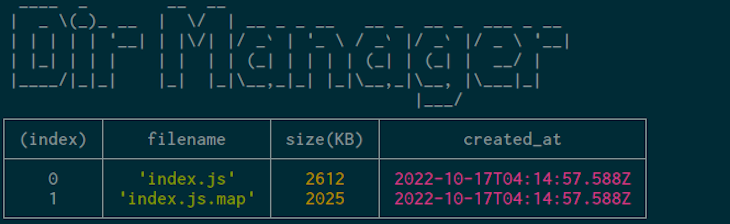
Let’s verify that the options work. In your terminal, enter the following to try the -l option:
node dist/index.js -l
You will see the directory contents in a table that looks similar to this:
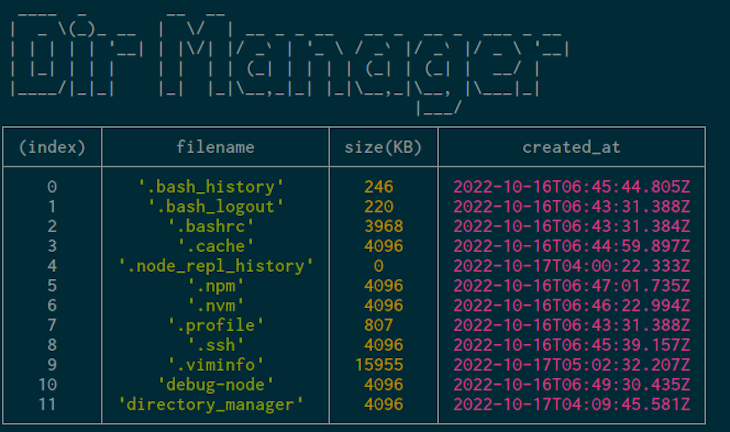
Next, pass the directory path of your choosing as an argument:
node dist/index.js -l /home/<your_username>/
In the output, you will see the directory contents of your chosen path:
Using the -m option, create a new directory with any name you prefer:
node dist/index.js -m new_directory
// The directory has been created successfully
Let’s also create an empty file using the -t option:
node dist/index.js -t empty_file.txt
// An empty file has been created
Following this, let’s check if the directory and the empty file have been created with the following:
node dist/index.js -l
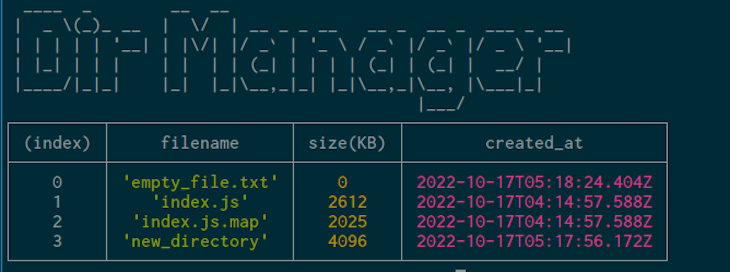
The output shows the new_directory and the empty_file.txt file, confirming that they were created.
Now, if you use the node dist/index.js command without any option, it will show the CLI name:
node dist/index.js

It would be a good idea to show the help page when no options have been passed. In the index.ts file, add the following at the end of the file:
...
if (!process.argv.slice(2).length) {
  program.outputHelp();
}
If the number of arguments passed is equal to two — that is, process.argv has only node and the filename as the argument — you can invoke outputHelp()to show the output.
As with any changes, compile TypeScript to JavaScript:
npm run build
Run the following command:
node dist/index.js
At this point, our CLI is now complete. You might notice that using the CLI is tedious. On a daily basis, we would have to change the directory into the CLI project directory, then invoke index.js to use it. It would be easier if we could give it a name like dirmanager that works anywhere in our system, like so:
dirmanager -l
To do this, open the package.json file and add the following:
{
  ...
  "main": "dist/index.js",    // <- update this
  // add the following lines
  "bin": {
    "dirmanager": "./dist/index.js"
  },
  ...
}
In the preceding code, we update main to the compiled index.js file. You then add bin with an object as its value. In the object, we set dirmanager to ./dist/index.js, which is the location of the compiled script. We will be using dirmanager to access the CLI, but you can use any name you like.
Next, open the index.ts file and add the following line at the top of the file:
#! /usr/bin/env node

const { Command } = require("commander");
const fs = require("fs");
The line is called a shebang line, which tells the OS to run the file with the nodeinterpreter.
Save your file and compile TypeScript once more:
npm run build
Run the following command:
npm install -g .
The -g option tells npm to install the package globally.
At this point, you can open a new terminal or use the current terminal, then enter the following command:
dirmanager
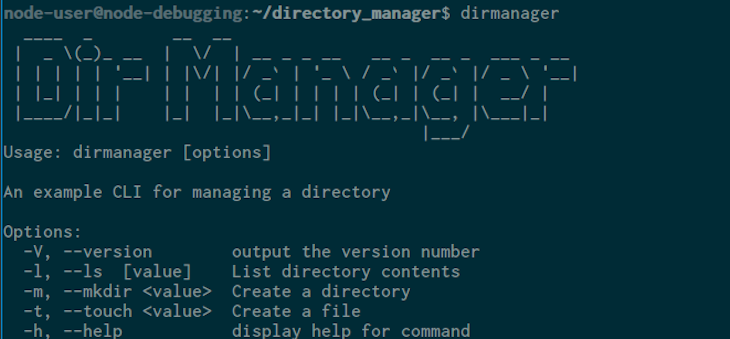
You can also try the other options and they will work fine:
dirmanager -l
We have now successfully created a TypeScript CLI that works anywhere in the system.
Now that we have our CLI, let’s publish it on npm so that other developers will be able to use it anywhere on their systems. First, we’ll create a GitHub repository and push the source code to the repo. Next, we’ll set up an access token in our npm account and then set up GitHub Actions to publish the repo to npm using the access token. When finished, users will be able to access the app anywhere.
To get started, enter the following code in the project root directory to create a git repo:
git init
Next, create a .gitignore file and add the following contents:
# Dependency directories
node_modules/
jspm_packages/

# Snowpack dependency directory (https://snowpack.dev/)
web_modules/

# TypeScript cache
*.tsbuildinfo\
The .gitignore file contains specifies files and directories that git should ignore. We have added a few directories for brevity’s sake, but on a real world project, be sure to add all the contents on Node.gitignore file on GitHub.
Next, create a README.md file in the root directory with a short description of the project:
A CLI directory manager that can be used to create directories, list directory contents and create files
Now, stage the files in the repository:
git add .
Make the first commit for the repo:
git commit -am "initial commit"
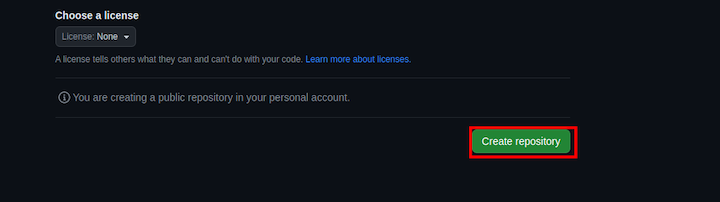
Next, open your browser and visit https://github.com/new to create a remote repository with the name “directory_manager” and click Create repository:
On the repository page, copy the commands under “…or push an existing repository from the command line” and paste them into the terminal:
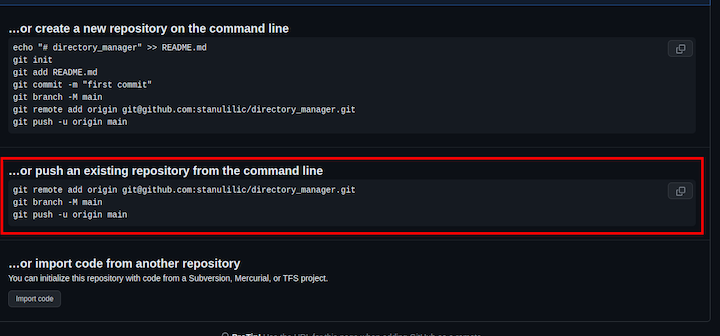
If you are unable to copy those commands for some reason, just copy and paste the below code and replace with your GitHub username for this and subsequent examples in this article:
git remote add origin [email protected]:<username>/directory_manager.git
git branch -M main
git push -u origin main
You’ll see that the local directory contents have been added to the repository on GitHub.
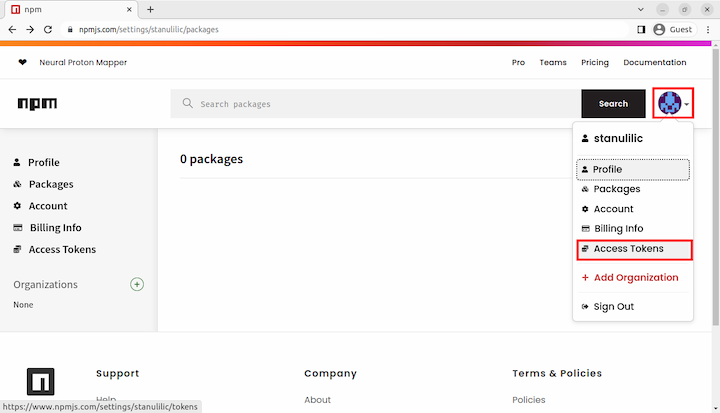
Now, let’s create an access token in your npm account. We’ll use the token to create a GitHub Actions secret.
First, update your package.json file with the package name, name, keywords, and GitHub repository links:
{
  "name": "@<Github_username>/directory_manager",
  "version": "1.0.0",
  "description": "",
  "main": "dist/index.js",
  "bin": {
    "dirmanager": "./dist/index.js"
  },
  "scripts": {
    "build": "npx tsc",
  },
  "keywords": [
    "cli",
    "npmtool"
  ],
  "author": "Your full name",
  "license": "ISC",
  "repository": "https://github.com/<your_github_username>/directory_manager",
  "homepage": "https://github.com/<your_github_username>/directory_manager#readme",
  "dependencies": {
    "commander": "^10.0.1",
    "figlet": "^1.6.0"
  },
  "devDependencies": {
    "typescript": "^5.0.4"
  }
}
In the package.json file, we update the name property with a new name containing the GitHub repository name. This is optional, you can leave the name unchanged if you prefer. We also updated the following properties:
keywords: Contains keywords that help users discover the packageauthor: Your full namerepository: Link to your GitHub repositoryhomepage: Link to your GitHub repository README.md file, which will be displayed on the package’s npm pageNext, visit your npm account and click your avatar; this will open the drop-down navigation. In the navigation, click Access Tokens:
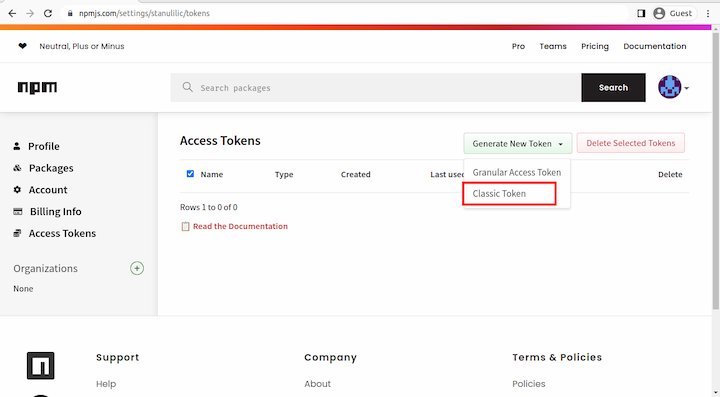
On the Access Tokens page, click the Generate New Token button, then click on the Classic Token button:
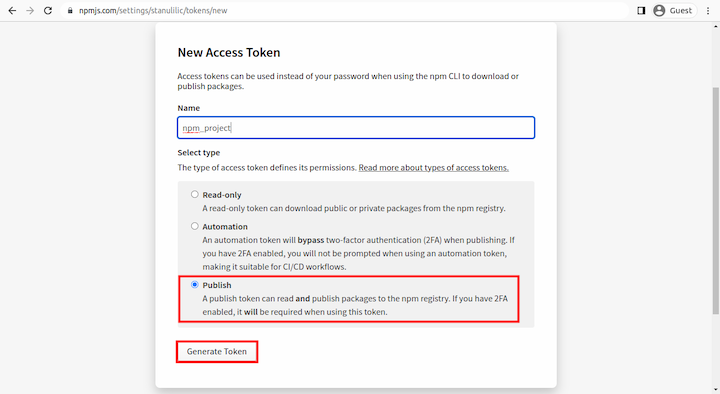
Next, on the New Access Token page, enter a name for your access token, select the Publish option, and click Generate Token:
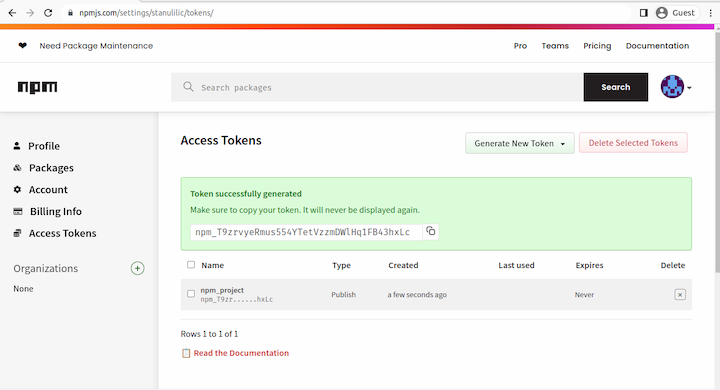
You will see that a new key has been generated. Copy the key somewhere safe as it will not be displayed again:
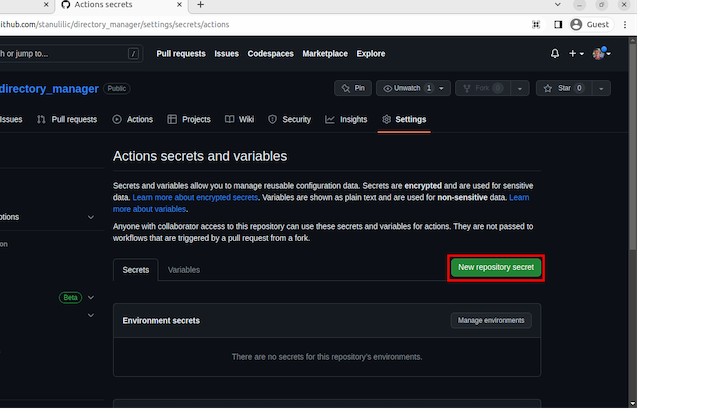
Next, open a new tab and visit https://github.com//directory_manager/settings/secrets/actions, which is under the repository settings page, and click New repository secret:
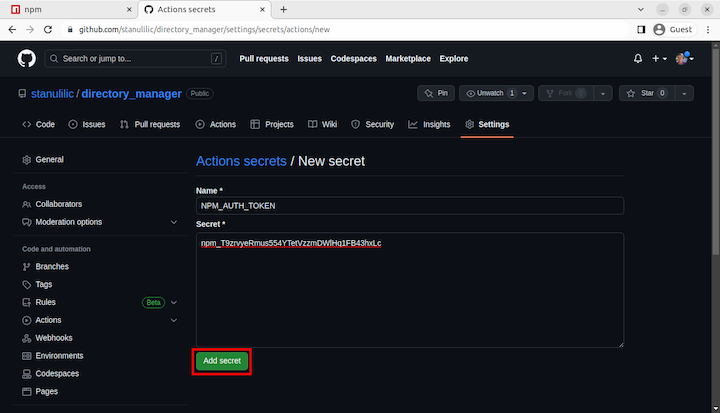
On the New secret page, enter “NPMAUTHTOKEN” as the name of the key, and paste the npm access token in the “Secret” field:
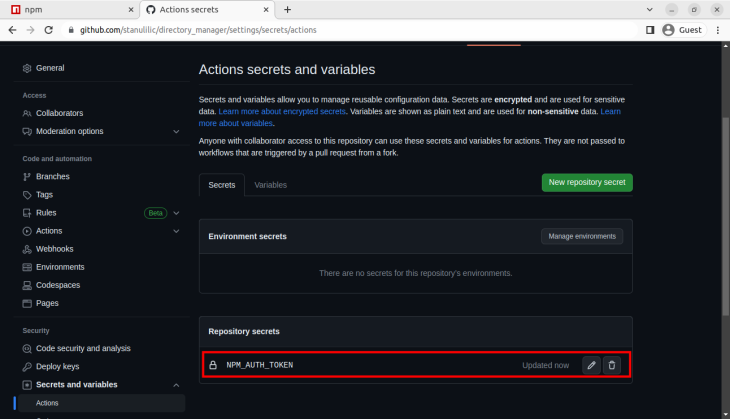
You can see that the secret key has been created:
Next, we’ll set up GitHub Actions to publish the package on npm.
In the root directory, create a .github/workflows directory:
mkdir -p .github/workflows
Now, move into the directory:
cd .github/workflows/
Next, create a publish.yml with the following code:
name: "publish package to npm"

on: push

jobs:
  publish:
    runs-on: ubuntu-latest
    steps:
      - name: checkout
        uses: actions/checkout@v2
      - name: node
        uses: actions/setup-node@v2
        with:
          node-version: 16
          registry-url: https://registry.npmjs.org
      - name: publish
        run: npm publish --access public
        env:
          NODE_AUTH_TOKEN: ${{secrets.NPM_AUTH_TOKEN}}
Stage the new changes:
git add .
Commit the new changes:
git commit -am "set up github actions"
Push the new changes to remove the repository:
git push
Now, go to https://github.com//directory_manager/actions:
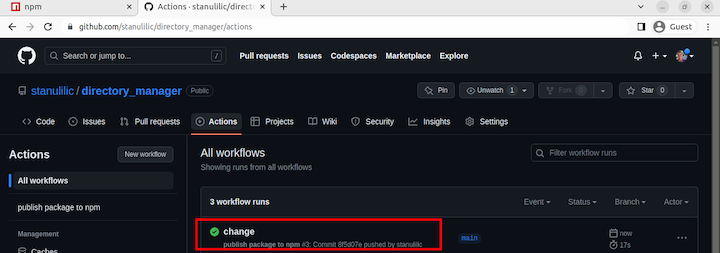
If you see a green checkmark, it means that GitHub Actions finished without any issues — it might take some time to see this.
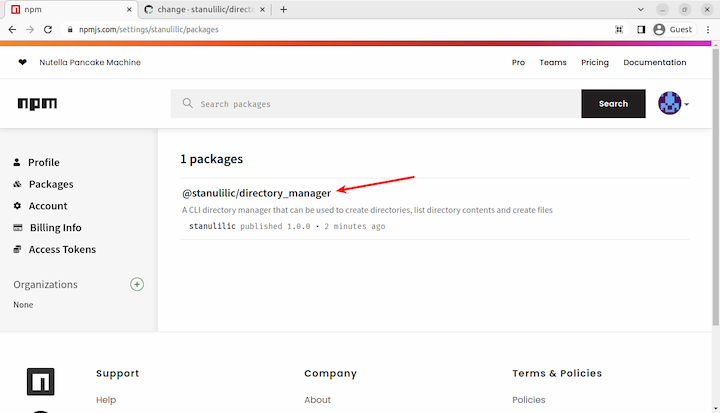
Next, visit https://www.npmjs.com/settings//packages to see if the package has been published:
Now go to https://www.npmjs.com/package/@/directory_manager to see the package homepage:
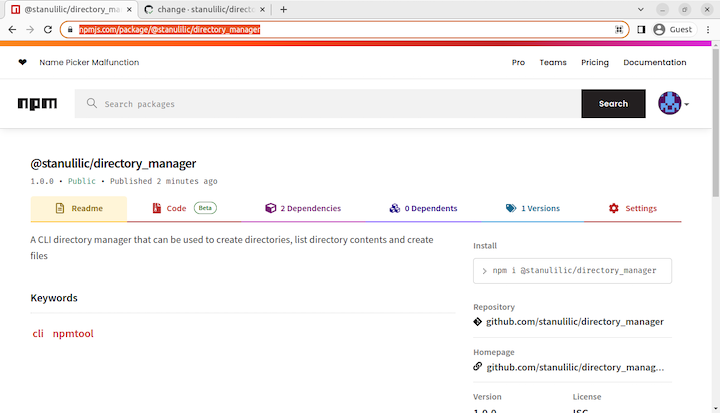
With that, you have successfully published the package using GitHub Actions.
In this article, we looked at what a CLI is and then used Commander.js and TypeScript to build a CLI. We then made the CLI globally accessible anywhere in the system and used GitHub Actions to publish the project on npm so that others can use it. Now you are equipped with knowledge on how to create CLIs with TypeScript.
Commander is a powerful library, and we have only scratched the surface of its capabilities. The following are some of the other interesting features:
Visit the Commander documentation to learn more about it. To continue your TypeScript journey, visit the TypeScript documentation. You can also check out TypeScript tutorials on this blog.
 Monitor failed and slow network requests in production
Deploying a Node-based web app or website is the easy part. Making sure your Node instance continues to serve resources to your app is where things get tougher. If you’re interested in ensuring requests to the backend or third-party services are successful, try LogRocket.

LogRocket lets you replay user sessions, eliminating guesswork around why bugs happen by showing exactly what users experienced. It captures console logs, errors, network requests, and pixel-perfect DOM recordings — compatible with all frameworks.
LogRocket's Galileo AI watches sessions for you, instantly identifying and explaining user struggles with automated monitoring of your entire product experience.
LogRocket instruments your app to record baseline performance timings such as page load time, time to first byte, slow network requests, and also logs Redux, NgRx, and Vuex actions/state. Start monitoring for free.

Learn what context rot is, why AI agent sessions degrade over time, and how to fix it with compaction, prompt anchoring, context files, plan files, and RAG.

Learn about TypeScript v6’s breaking changes, new ES2025 features, and deprecated options. A complete migration guide from v5 to prepare for v7.

Learn how Vite+ unifies Vite, Vitest, Oxlint, Oxfmt, Rolldown, and Node.js management in one CLI.

AI companies are buying developer tools as coding agents turn runtimes, package managers, and linters into strategic infrastructure.
Hey there, want to help make our blog better?
Join LogRocket’s Content Advisory Board. You’ll help inform the type of content we create and get access to exclusive meetups, social accreditation, and swag.
Sign up now

