
Slack is a cloud-based instant messaging platform designed for companies to supplement email as a method of communication and sharing data. It also has cool features like sending messages to a channel using its webhooks.
Webhooks are automated payloads sent from applications when something happens. It’s basically a way that applications can send automated messages or information to other application.
In this article, we will build a Slackbot to log all activities that happen in our application using Node.js. Our bot will log all activities that happen in our Node.js application including errors into a channel that we will be creating soon.
The Replay is a weekly newsletter for dev and engineering leaders.
Delivered once a week, it's your curated guide to the most important conversations around frontend dev, emerging AI tools, and the state of modern software.
Before we start building our bot, we have to create a simple Node.js application where users can create an account and log in. Our bot will log when a user has created an account; when an error occurred during account creation; when a user logs in with the correct credentials; and when a user has attempted login with the incorrect credentials.
We’ll be using the Express generator to create a new Express application, and then we’ll install all the necessary dependencies the we will need for our application. To do this, open up your terminal and type the following:
npx express-generator --no-view
After scaffolding the application, run npm install to install the project dependencies.
npm i axios bcrypt cors jsonwebtoken mongoose dotenv
With these installed, you will modify your app.js file like so:
require('dotenv').config()
var express = require('express');
var path = require('path');
var cookieParser = require('cookie-parser');
var logger = require('morgan');
var indexRouter = require('./routes/index');
var usersRouter = require('./routes/users');
var app = express();
app.use(logger('dev'));
app.use(express.json());
app.use(express.urlencoded({
    extended: false
}));
app.use(cookieParser());
app.use(express.static(path.join(__dirname, 'public')));
require("./config/mongoose")(app);

app.use('/', indexRouter);
app.use('/users', usersRouter);
module.exports = app;
Now we need to set up Mongoose for our application. Create a config/mongoose.js file and add the following code:
const mongoose = require("mongoose");
module.exports = app => {
    mongoose.connect("mongodb://localhost:27017/slackbot", {
        useUnifiedTopology: true,
        useNewUrlParser: true,
        useFindAndModify: false
    }).then(() => console.log("conneceted to db")).catch(err => console.log(err))
    mongoose.Promise = global.Promise;
    process.on("SIGINT", cleanup);
    process.on("SIGTERM", cleanup);
    process.on("SIGHUP", cleanup);
    if (app) {
        app.set("mongoose", mongoose);
    }
};
function cleanup() {
    mongoose.connection.close(function () {
        process.exit(0);
    });
}
Running npm start will display connected to db on the console, which means exactly what you’d think it does.
Now let’s set up our models and controllers for the application. Create a models/users.js file and add the following:
const mongoose = require("mongoose");
const bcrypt = require("bcrypt");
const jwt = require("jsonwebtoken");
const Schema = mongoose.Schema;
const userSchema = new Schema({
    name: {
        type: String,
        required: true,
    },
    password: {
        type: String,
        required: true
    },
    email: {
        type: String,
        required: true,
    },
}, {
    timestamps: true,
});

userSchema.methods.hashPassword = async password => {
    return await bcrypt.hashSync(password, 10);
}
userSchema.methods.compareUserPassword = async (inputtedPassword, hashedPassword) => {
    return await bcrypt.compare(inputtedPassword, hashedPassword)
}
userSchema.methods.generateJwtToken = async (payload, secret, expires) => {
    return jwt.sign(payload, secret, expires)
}
module.exports = mongoose.model("User", userSchema);
Here we create a simple Mongoose schema for our user model and define functions that will hash the user’s password, compare the user’s password, and also generate a JWT token when the user login credentials are correct.
We’ll also create a controllers/users.js file and add the following code to it:
const User = require("../models/user");
exports.createNewUser = async (req, res) => {
    try {
        const user = new User({
            name: req.body.name,
            email: req.body.email,
            phone_number: req.body.phone_number,
            role: req.body.role
        });
        user.password = await user.hashPassword(req.body.password);
        let addedUser = await user.save()
        res.status(200).json({
            msg: "Your Account Has been Created",
            data: addedUser
        })
    } catch (err) {
        console.log(err)
        res.status(500).json({
            error: err
        })
    }
}
exports.logUserIn = async (req, res) => {
    const {
        email,
        password
    } = req.body
    try {
        let user = await User.findOne({
            email: email
        });
        //check if user exit
        if (!user) {
            return res.status(400).json({
                type: "Not Found",
                msg: "Wrong Login Details"
            })
        }
        let match = await user.compareUserPassword(password, user.password);
        if (match) {
            let token = await user.generateJwtToken({
                user
            }, "secret", {
                expiresIn: 604800
            })
            if (token) {
                res.status(200).json({
                    success: true,
                    token: token,
                    userCredentials: user
                })
            }
        } else {
            return res.status(400).json({
                type: "Not Found",
                msg: "Wrong Login Details"
            })
        }
    } catch (err) {
        console.log(err)
        res.status(500).json({
            type: "Something Went Wrong",
            msg: err
        })
    }
}
These are basic functions to create a user account and log a user in.
We have to modify our routes/user.js file to listen to our controllers that we created:
var express = require('express');
const controller = require('../controllers/user')
var router = express.Router();
/* GET users listing. */
router.get('/', function (req, res, next) {
  res.send('respond with a resource');
});

router.post('/register', controller.createNewUser)
router.post('/login', controller.logUserIn)


module.exports = router;
You can use POSTMAN to test your login and register routes.
Before we start building our bot, we have to create a new slack application. Head over to https://api.slack.com and ensure you are logged in. Click on the Start Building button, which will route you to a page prompting you to give your bot a name and specify the workspace into which you want to integrate it.
After setting this up, navigate to the incoming webhooks route and activate it:
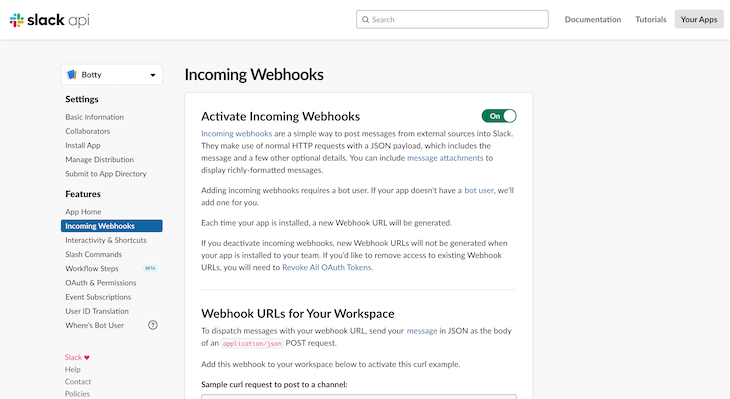
We will need a webhook URL to communicate with our workspace.
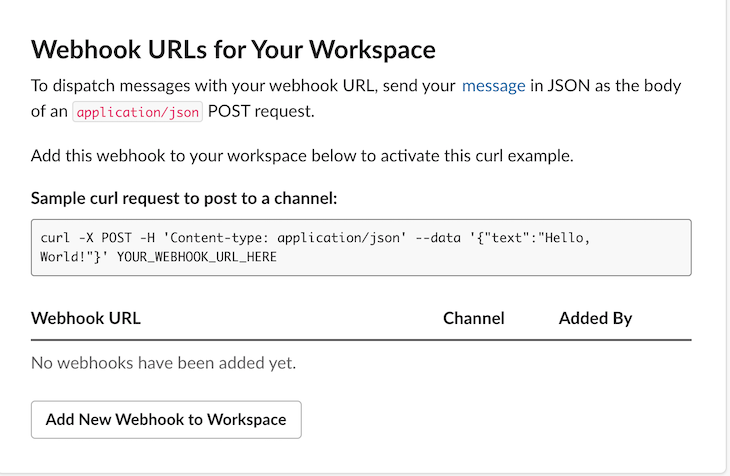
Click on the Add New Webhook to Workspace button. This will request you to select a channel to post messages from the bot. Select the channel of your choice and click on the allow button:
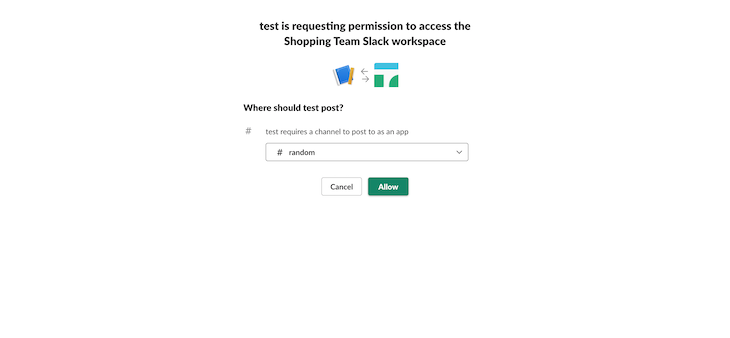
Clicking Allow will generate a webhook URL for our application. We can copy this and store it in our .env file:
HOOK=<hook>
Don’t forget to add your .env file in the .gitignore file.
Now create a util/bot.js file — this is where we’ll setting up our bot. We will have a function that sends a request to our Slack API. This function will take in two parameters: error and payload.
To dispatch messages with your webhook URL, we will send a payload (whether an error or an actual payload) in JSON as the body of an application/json POST request. This is where Axios comes in.
Modify your bot.js file like so:
const axios = require("axios");
const hook = process.env.HOOK;
exports.sendNotificationToBotty = async (error, log) => {
    try {
        let slackbody;
        if (log) {
            slackbody = {
                mkdwn: true,
                attachments: [{
                    pretext: "Booty Notification",
                    title: "Activity Log",
                    color: "good",
                    text: log,
                }, ],
            };
        } else if (error) {
            slackbody = {
                mkdwn: true,
                attachments: [{
                    pretext: "Booty Notification",
                    title: "Error Notification",
                    color: "#f50057",
                    text: error,
                }, ],
            };
        }
        await axios.post(
            `https://hooks.slack.com/services/${hook}`,
            slackbody
        );
    } catch (err) {
        console.log(err);
    }
};
We can now use this in our application. We use message attachments that Slack has provided to display our messages.
So now we have to bring in this module into our controllers/user.js file so that our bot can send custom messages when an activity takes place. Modify the controllers/user.js file like so:
const User = require("../models/user");
const bot = require("../util/bot")
exports.createNewUser = async (req, res) => {
    try {
        const user = new User({
            name: req.body.name,
            email: req.body.email,
            phone_number: req.body.phone_number,
            role: req.body.role
        });
        user.password = await user.hashPassword(req.body.password);
        let addedUser = await user.save()
        await bot.sendNotificationToBotty(null, `${addedUser.name} Just Created an account with Email as ${addedUser.email}`)
        res.status(200).json({
            msg: "Your Account Has been Created",
            data: addedUser
        })
    } catch (err) {
        console.log(err)
        res.status(500).json({
            error: err
        })
    }
}
exports.logUserIn = async (req, res) => {
    const {
        email,
        password
    } = req.body
    try {
        let user = await User.findOne({
            email: email
        });
        //check if user exit
        if (!user) {
            await bot.sendNotificationToBotty(`Login Attempt with Invalid Credentials ${email} as Email and ${password} as Password`)
            return res.status(400).json({
                type: "Not Found",
                msg: "Wrong Login Details"
            })
        }
        let match = await user.compareUserPassword(password, user.password);
        if (match) {
            let token = await user.generateJwtToken({
                user
            }, "secret", {
                expiresIn: 604800
            })
            if (token) {
                await bot.sendNotificationToBotty(null, `${user.name} Just Logged in`)
                res.status(200).json({
                    success: true,
                    token: token,
                    userCredentials: user
                })
            }
        } else {
            await bot.sendNotificationToBotty(`Login Attempt with Invalid Credentials ${email} as Email and ${password} as Password`)
            return res.status(400).json({
                type: "Not Found",
                msg: "Wrong Login Details"
            })
        }
    } catch (err) {
        await bot.sendNotificationToBotty(`An Error Occured`)
        console.log(err)
        res.status(500).json({
            type: "Something Went Wrong",
            msg: err
        })
    }
}
Now when a new user creates an account, the bot will send the users name and email to the channel and same thing happens when a user logs in.
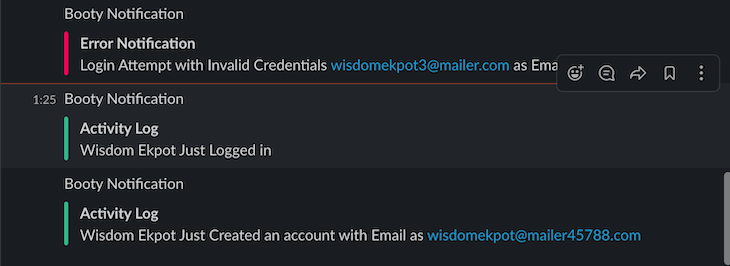
An error message will be sent when an error occur such as when a user tries to login with wrong login details.
Logging is an essential part of any application which has to be taken seriously. In this article we learnt how to use the Slack webhooks in our custom Node.js application.It could be used to build more interesting applications. To get the application source code, Click here.
 Monitor failed and slow network requests in production
Deploying a Node-based web app or website is the easy part. Making sure your Node instance continues to serve resources to your app is where things get tougher. If you’re interested in ensuring requests to the backend or third-party services are successful, try LogRocket.

LogRocket lets you replay user sessions, eliminating guesswork around why bugs happen by showing exactly what users experienced. It captures console logs, errors, network requests, and pixel-perfect DOM recordings — compatible with all frameworks.
LogRocket's Galileo AI watches sessions for you, instantly identifying and explaining user struggles with automated monitoring of your entire product experience.
LogRocket instruments your app to record baseline performance timings such as page load time, time to first byte, slow network requests, and also logs Redux, NgRx, and Vuex actions/state. Start monitoring for free.

Russ Miles, a software development expert and educator, joins the show to unpack why “developer productivity” platforms so often disappoint.

Discover what’s new in The Replay, LogRocket’s newsletter for dev and engineering leaders, in the February 18th issue.

Learn how to recreate Claude Skills–style workflows in GitHub Copilot using custom instruction files and smarter context management.

Claude Code is deceptively capable. Point it at a codebase, describe what you need, and it’ll autonomously navigate files, write […]
Hey there, want to help make our blog better?
Join LogRocket’s Content Advisory Board. You’ll help inform the type of content we create and get access to exclusive meetups, social accreditation, and swag.
Sign up now