Getting the authentication flow right when starting a new app development project saves an enormous amount of time down the road. To that end, today, we’ll learn how to create a reusable auth flow in React Native.

The goal of this tutorial is to demonstrate how to set up a basic yet real-world auth flow from end to end. The result will be a generic solution that handles most authentication use cases that we can easily copy-paste into our next project.
To follow this tutorial, please make sure your dev setup includes the following configuration:
react-native-cli installed on your local machinePlease note that we are using React Native version 0.64.0 in this tutorial, so make you are using version ≥0.60.x.
For a complete walkthrough on setting up a development environment for React Native on your local machine, you can go through the official documentation here.
We’ll now create a new React Native project. First, we’ll create a directory to contain all of our code, then cd into that directory. We chose RNauthflow as the application name and will use that name throughout the tutorial, but you can use whatever name you like.
Run this command to create the basic project files and configuration:
npx react-native init RNauthflow
# navigate to project directory
cd RNauthflow
Once the basic project setup is done, we can install all the dependencies required to run and build the demo app:
# for navigation

yarn add @react-navigation/native @react-navigation/stack react-native-reanimated react-native-gesture-handler react-native-screens react-native-safe-area-context @react-native-community/masked-view
It’s worth reading up on using React Navigation in React Native projects if you’re unfamiliar. To finalize the installation on iOS, you’ll have to install pods (N.B., make sure you have CocoaPods installed for this purpose).
cd ios/ && pod install
# once pod dependency installed
cd ..
# to run on ios
react-native run-ios
# to run in android
react-native run-andriod
To store token here, we are using the react-native-async-storage/async-storage npm package.
However, there are already existing solutions for Android and iOS platforms.
To get started, first install react-native-async-storage/async-storage:
yarn add @react-native-async-storage/async-storage
Then we can easily implement our helpers functions like so:
// async-storage.js file
import AsyncStorage from '@react-native-async-storage/async-storage';
export async function getItem() {
  const value = await AsyncStorage.getItem('token');
  return value ? JSON.parse(value) : null;
}
export async function setItem(value) {
  return AsyncStorage.setItem('token', JSON.stringify(value));
}
export async function removeItem() {
  return AsyncStorage.removeItem('token');
}
Note that we’re not using any library to manage our project state. We can use any state management library we want, but here we’ll use the React Context API, which provides a way to share values between components without having to explicitly pass a prop through each level of the tree.
First, we create a simple auth context and implement the provider components. We
have status, authToken, signIn, and signOut in our auth context. We’re using the useReducer approach to update the state, which will help make our code clean and easy to follow.
We created our auth actions with the useMemo Hook to memoize them. This optimization helps to avoid generating new instances on every render. Last, we wrap up our app using the AuthProvider:
/**
* AuthProvider.js file
*
**/
import * as React from 'react';
import {
  getItem as getToken,
  setItem as setToken,
  removeItem as removeToken,
} from './async-storage';
const AuthContext = React.createContext({
  status: 'idle',
  authToken: null,
  signIn: () => {},
  signOut: () => {},
});
export const useAuthorization = () => {
  const context = React.useContext(AuthContext);
  if (!context) {
    throw new Error('Error');
  }
  return context;
};
export const AuthProvider = props => {
  const [state, dispatch] = React.useReducer(reducer, {
    status: 'idle',
    authToken: null,
  });
  React.useEffect(() => {
    const initState = async () => {
      try {
        const authToken = await getToken();
        if (authToken !== null) {
          dispatch({type: 'SIGN_IN', token: authToken});
        } else {
          dispatch({type: 'SIGN_OUT'});
        }
      } catch (e) {
        console.log(e);
      }
    };
    initState();
  }, [state, dispatch]);
  const actions = React.useMemo(
    () => ({
      signIn: async token => {
        dispatch({type: 'SIGN_IN', token});
        await setToken(token);
      },
      signOut: async () => {
        dispatch({type: 'SIGN_OUT'});
        await removeToken();
      },
    }),
    [state, dispatch],
  );
  return (
    <AuthContext.Provider value={{...state, ...actions}}>
      {props.children}
    </AuthContext.Provider>
  );
};
const reducer = (state, action) => {
  switch (action.type) {
    case 'SIGN_OUT':
      return {
        ...state,
        status: 'signOut',
        authToken: null,
      };
    case 'SIGN_IN':
      return {
        ...state,
        status: 'signIn',
        authToken: action.token,
      };
  }
};
Let’s create two new screens, HomeScreen and LoginScreen, inside the src/screens/ directory. This screen component will be responsible for displaying a login screen if the user hasn’t authenticated. Once the user is authorized, they will be able to access the home screen.
Here we are using React Navigation v5. It follows a more component-based approach, using a NavigatorContainer and an instance of createStackNavigator:
/**
* Home.js file
*
*/
import * as React from 'react';
import {NavigationContainer} from '@react-navigation/native';
import {createStackNavigator} from '@react-navigation/stack';
import {HomeScreen, LoginScreen} from '../screens';
const Stack = createStackNavigator();
export function Home() {
  return (
    <NavigationContainer>
      <Stack.Navigator initialRouteName="Root" headerMode="none">
        <Stack.Screen name="Home" component={HomeScreen} />
        <Stack.Screen name="Auth" component={LoginScreen} />
      </Stack.Navigator>
    </NavigationContainer>
  );
}
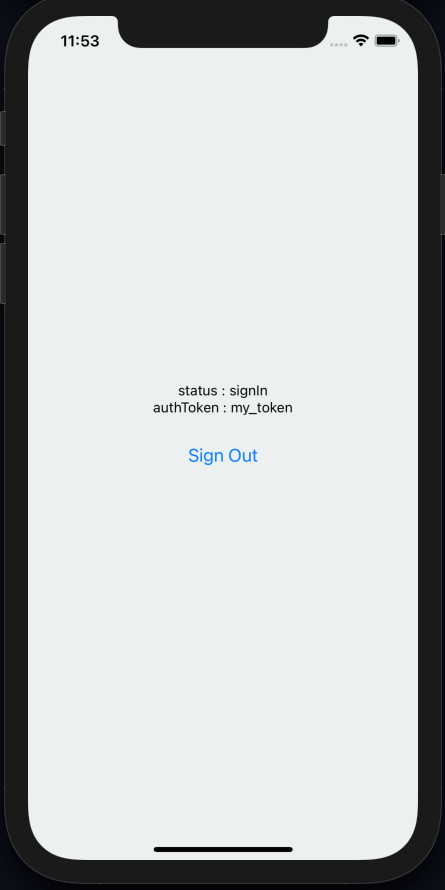
If we check the app on an emulator or device, we should see an output similar to the below:

To use this solution, we need to wrap our Root(App) component with AuthProvider, and we ca start using our reusable auth flow.
export default function App() {
  return (
    <AuthProvider>
      <Home />
    </AuthProvider>
  );
}
And there we have it — we’ve successfully created a generic and reusable auth flow. We also learned how configure React Navigation and use its component-based approach. We can go ahead and deploy this reusable auth flow with Firebase, Okta, Auth0, and others.
Last but not least, you can find the complete code used in this demo in the GitHub repo here.

LogRocket's Galileo AI watches sessions for you and and surfaces the technical and usability issues holding back your React Native apps.
LogRocket also helps you increase conversion rates and product usage by showing you exactly how users are interacting with your app. LogRocket's product analytics features surface the reasons why users don't complete a particular flow or don't adopt a new feature.
Start proactively monitoring your React Native apps — try LogRocket for free.
Would you be interested in joining LogRocket's developer community?
Join LogRocket’s Content Advisory Board. You’ll help inform the type of content we create and get access to exclusive meetups, social accreditation, and swag.
Sign up now
Not sure if low-code is right for your next project? This guide breaks down when to use it, when to avoid it, and how to make the right call.

Compare Firebase Studio, Lovable, and Replit for AI-powered app building. Find the best tool for your project needs.

Discover how to use Gemini CLI, Google’s new open-source AI agent that brings Gemini directly to your terminal.

This article explores several proven patterns for writing safer, cleaner, and more readable code in React and TypeScript.


