
Nowadays, developing web applications that accommodate users from various languages is essential — especially if you’re building large-scale applications. Developing a multi-lingual application can be daunting, but Nuxt i18n makes it easier for Nuxt 3 projects by simplifying content translation, locale handling, and routing, enabling a smoother experience for a global audience.

This tutorial will guide you through creating a multi-lingual web application using Nuxt 3 and Nuxt i18n. You will learn to set up Nuxt i18n, configure locales, and implement translations. We will build a multi-lingual ecommerce app that displays products to users in three languages depending on a user’s chosen language.
To follow along, you’ll need:
The Replay is a weekly newsletter for dev and engineering leaders.
Delivered once a week, it's your curated guide to the most important conversations around frontend dev, emerging AI tools, and the state of modern software.
To get Nuxt i18n to work, we need to set up a Nuxt 3 project. Go to your command line, navigate to the folder in which you wish to set up your project, and run the code below:
npx nuxi init ecommmerceDemo
The above code creates an ecommmerceDemo folder and initializes a Nuxt app inside the folder.
Run the following command to start your app:
cd ecommmerceDemo
npm run dev
You should now have your Nuxt app running in your browser.
Before we can make our app multi-lingual, we need to first set up its basic features.
Let’s create the folders we need to organize our project. In the root folder, create three folders:
componentspagesstaticWe also need a JSON file to hold our data. In the static folder, create a JSON file with the name products. Then paste the following:
[
    {
        "id": 1,
        "name": "Timberland boots",
        "description": "Leather boot crafted with your legs in mind",
        "price": 50
    },
    {
        "id": 2,
        "name": "Product B",
        "description": "This is Product B",
        "price": 75
    },
    {
        "id": 3,
        "name": "Product B",
        "description": "This is Product C",
        "price": 75
    },
    {
        "id": 4,
        "name": "Product B",
        "description": "This is Product C",
        "price": 75
    },
    {
        "id": 5,
        "name": "Product B",
        "description": "This is Product C",
        "price": 75
    }
]
The above file contains information we will display on our app.
Next, create a file called ProductCard.vue in the components folder and paste the code below:
<script>
export default {
  props: {
    title: {
      type: String,
      required: true
    },
    price: {
      type: Number,
      required: true
    }
  }
};
</script>

<template>
  <div class="product-card">
    <h3>{{ item.name }}</h3>
    <p>{{ item.description }}</p>
    <p>Price: ${{ item.price }}</p>
    <button>Add to Cart</button>
  </div>
</template>

<style scoped>
.product-card {
  border: 1px solid #ddd;
  background-color: bisque;
  padding: 16px;
  margin: 8px;
  border-radius: 8px;
  text-align: center;
}

.product-button {
  border: 1px solid blueviolet;
  border-radius: 8px;
  padding:5px;
}
</style>
We’ve just created the ProductCard component to display our products nicely in our ecommerce store.
Next, create a index.vue file inside the pages folder and paste the following code to display the ProductCard component:
<script>
import products from '~/static/products.json';
import ProductCard from '~/components/ProductCard.vue';

export default {
  components: {
    ProductCard,
  },
  data() {
    return {
      items: products,
    };
  },
};
</script>

<template>
  <div>
    <h1>Welcome to our e-commerce store!</h1>
    <div class="product-list">
      <ProductCard
        v-for="item in items"
        :key="item.id"
        :item="item"
      />
    </div>
  </div>
</template>

<style scoped>
.product-list {
  display: grid;
  grid-template-columns: repeat(auto-fill, minmax(200px, 1fr));
  gap: 16px;
  padding: 16px;
}

h1 {
  text-align: center;
  margin-bottom: 24px;
}
</style>
Now, update app.vue to add some style:
<template>
  <div>
    <NuxtPage />
  </div>
</template>

<style>
body {
  background-color: #f0f0f0;
  display: grid;
  place-content: center;
  height: 100vh;
  text-align: center;
  font-family: sans-serif;
}

a,
a:visited {
  color: #fff;
  text-decoration: none;
  padding: 8px 10px;
  background-color: cadetblue;
  border-radius: 5px;
  font-size: 14px;
  display: block;
  margin-bottom: 50px;
}
a:hover {
  background-color: rgb(23, 61, 62);
}
</style>
Now let’s fire up our app with npm run dev:
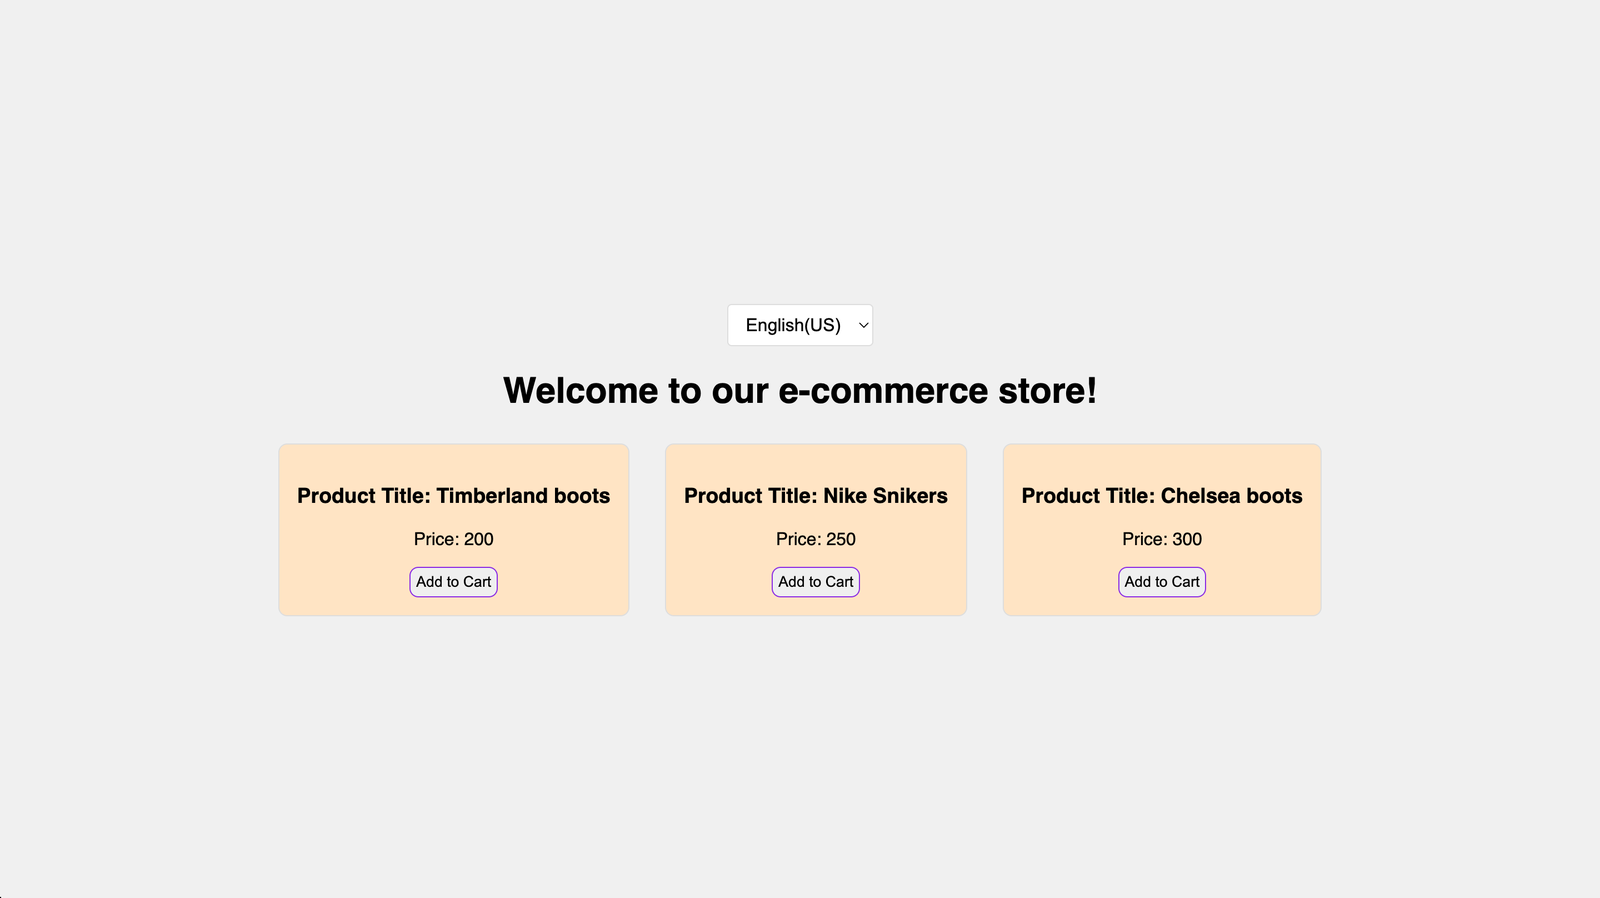
Our app is now working!
Nuxt i18n is an internationalization (i18n) module that integrates Vue I18n into Nuxt projects, optimizing performance and SEO. It automatically adds locale prefixes to URLs, provides composable functions for setting locale-based SEO metadata, and supports lazy loading of selected languages, ensuring a user-friendly multi-lingual experience.
To set up Nuxt i18n, run the following in your terminal:
npx nuxi@latest module add @nuxtjs/i18n@next
The above code will install the Nuxt i18n module for our project, but we still have some work to do to get Nuxti 18n working on our project.
Open the next config.ts file and paste the code below after modules: ['@nuxtjs/i18n']:
 i18n: {
    /* module options */
    lazy: true,
    langDir: "locales",
    strategy: "prefix_except_default",
    locales: [
      {
        code: "en-US",
        iso: "en-US",
        name: "English(US)",
        file: "en-US.json",
      },
      {
        code: "es-ES",
        iso: "es-ES",
        name: "Español",
        file: "es-ES.json",
      },
      {
        code: "in-HI",
        iso: "en-HI",
        name: "हिंदी",
        file: "in-HI.json",
      },
    ],
    defaultLocale: "en-US",
  },
In the code above, we defined Nuxt i18n properties of the locales, specifying the ISO language codes: en for English, es for Spanish, and hi for Hindi. We also specified the directory for the language translation with langDir: 'locales', and enabled optimized loading of translation files with lazy: true, which tells Nuxt 3 to load the translation files only when needed. We also set the default language to English with defaultLocale: 'en'.
Nuxt i18n translation files are written in the JSON file format. To add languages and translations to our project, we will create an i18n folder and inside of that, a locale folder.
For our app, we will add the following languages:
Inside the locale folder, we will create three files:
en-US.jsones-ES.jsonin-HI.jsonIn the en-US.json file, paste the following JSON:
{
    "welcome": "Welcome to our e-commerce store!",
    "product_title": "Product Title",
    "product_price": "Price",
    "product_description": "Description",
    "add_to_cart": "Add to Cart",
    "product_a": "Timberland boots",
    "product_b": "Nike Snikers",
    "product_c": "Chelsea boots",
    "product_a_price": "200",
    "product_b_price": "250",
    "product_c_price": "300"
  }
In the es-ES.json file, paste the following JSON:
{
  "welcome": "¡Bienvenido a nuestra tienda en línea!",
  "product_title": "Título del producto",
  "product_price": "Precio",
  "product_description": "Descripción",
  "add_to_cart": "Añadir a la cesta",
  "product_a": "Botas Timberland",
  "product_b": "Zapatos nike",
  "product_c": "Botas Chelsea",
  "product_a_price": "200",
  "product_b_price": "250",
  "product_c_price": "300"
}
In the in-HI.json file, paste the following JSON:
{
  "welcome": "हमारे ई-कॉमर्स स्टोर में आपका स्वागत है!",
  "product_title": "उत्पाद का शीर्षक",
  "product_price": "कीमत",
  "product_description": "विवरण",
  "add_to_cart": "कार्ट में जोड़ें",
  "product_a": "टिम्बरलैंड बूट्स",
  "product_b": "नाइक स्नीकर्स",
  "product_c": "चेल्सी बूट्स",
  "product_a_price": "200",
  "product_b_price": "250",
  "product_c_price": "300"
}
We have just created the translation files for our app.
In this section, we’ll implement a language switcher to use the created translation files to display products in the selected language and update the current locale.
To keep our code well organized, create a LanguageSwitcher.vue file inside the component folder, and add the code below:
<template>
  <div class="language-switcher">
    <select v-model="selectedLocale" @change="changeLocale">
      <option v-for="locale in $i18n.locales" :key="locale.code" :value="locale.code">
        {{ locale.name }}
      </option>
    </select>
  </div>
</template>

<script>
export default {
  data() {
    return {
      selectedLocale: this.$i18n.locale, // Set initial locale
    };
  },
  methods: {
    changeLocale() {
      this.$i18n.setLocale(this.selectedLocale); // Dynamically change locale
    },
  },
};
</script>

<style scoped>
.language-switcher {
  margin: 16px 0;
}

select {
  padding: 8px 12px;
  border: 1px solid #ddd;
  border-radius: 4px;
  font-size: 16px;
  cursor: pointer;
}
</style>
Based on the code above, when the user selects any option from the select HTML tag, the @change event triggers the SwitchLanguage function, which updates the application locale or language using the JSON files in our locales folder.
Now, let’s update the code for our pages/index.vue file to get the translation working:
<script>
import products from '~/static/products.json';
import ProductCard from '../components/ProductCard.vue';
import LanguageSwitcher from '../components/LanguageSwitcher.vue';

export default {
  components: { ProductCard, LanguageSwitcher },
  data() {
    return {
      items: products
    };
  }
};
</script>

<template>
  <div>
    <LanguageSwitcher />
    <h1>{{ $t('welcome') }}</h1>
    <div class="product-list">
      <ProductCard :title="$t('product_a')" :price="$t('product_a_price')"/>
      <ProductCard :title="$t('product_b')" :price="$t('product_b_price')"/>
      <ProductCard :title="$t('product_c')" :price="$t('product_c_price')"/>
    </div>
  </div>
</template>

<style scoped>
.product-list {
  display: flex;
  flex-wrap: wrap;
  gap: 16px;
}
</style>
Here is what our app should look like now:
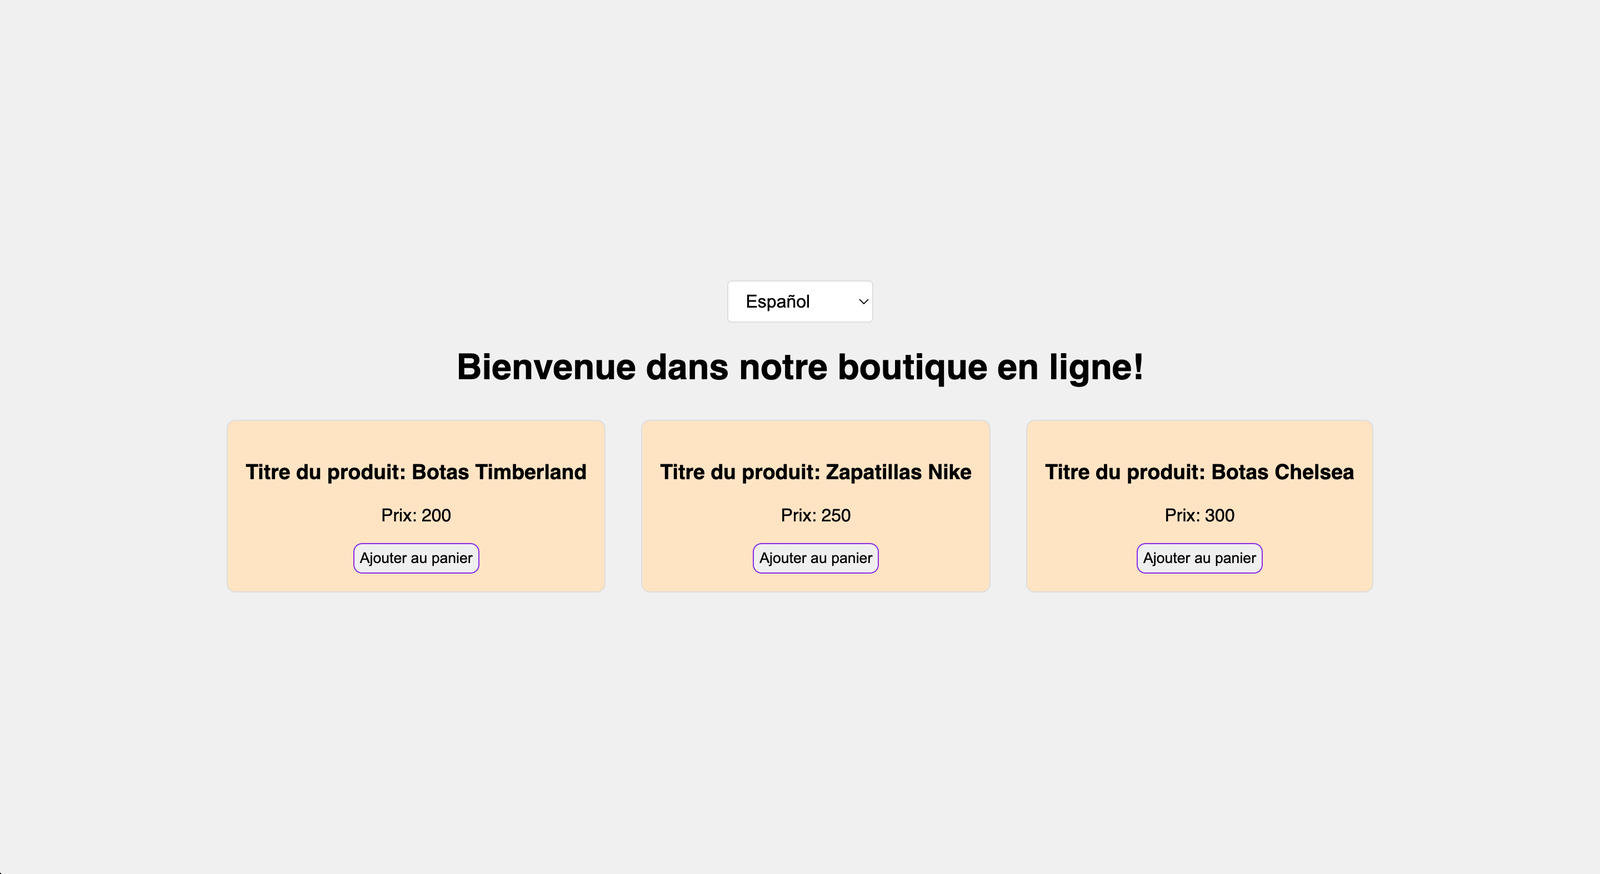
@nuxtjs/i18n adds some metadata to improve your page’s SEO using the useLocaleHead and definePageMeta() composable functions.
The module enables several SEO optimizations, including:
<html> taghreflang alternate links for better multi-lingual navigationTo configure SEO for our app, let’s first configure the locales option in nuxt.config.ts, adding a language option set to the locale language tags to each object as follows:
export default defineNuxtConfig({
  ...
  i18n: {
    locales: [
      {
        code: "en-US",
        iso: "en-US",
        language: "en-US",
        name: "English(US)",
        file: "en-US.json",
      },
      {
        code: "es-ES",
        iso: "es-ES",
        language: "es-ES",
        name: "Español",
        file: "es-ES.json",
      },
      {
        code: "in-HI",
        iso: "en-HI",
        language: "en-HI",
        name: "हिंदी",
        file: "in-HI.json",
      },
    ],
  },
});
Then, set the baseUrl option to a production domain to make alternate URLs fully qualified:
export default defineNuxtConfig({
  ...
  i18n: {
    ...
    baseUrl: '<https://my-nuxt-app.com>',
  },
});
Now, we can call the composable functions in the following places within the Nuxt project:
To enable the SEO metadata globally, set the meta components within the Vue components in the layouts directory as follows:
<script setup>
const route = useRoute()
const { t } = useI18n()
const head = useLocaleHead()
const title = computed(() => t(route.meta.title ?? 'TBD', t('layouts.title'))
);
</script>

<template>
  <div>
    <Html :lang="head.htmlAttrs.lang" :dir="head.htmlAttrs.dir">
      <Head>
        <Title>{{ title }}</Title>
        <template v-for="link in head.link" :key="link.id">
          <Link :id="link.id" :rel="link.rel" :href="link.href" :hreflang="link.hreflang" />
        </template>
        <template v-for="meta in head.meta" :key="meta.id">
          <Meta :id="meta.id" :property="meta.property" :content="meta.content" />
        </template>
      </Head>
      <Body>
        <slot />
      </Body>
    </Html>
  </div>
</template>
The useRoute function retrieves the current route object, including metadata like the page title specified in the route configuration. The t function from useI18n translates keys into the active locale’s language, enabling localization. Meanwhile, useLocaleHead generates localized metadata, such as lang attributes, hreflang links, and other SEO-related tags for the current locale.
To override the global SEO metadata, use the definePageMeta() function within the Vue components in the pages directory as follows:
<script setup>
definePageMeta({
  title: 'pages.title.top' // set resource key
})

const { locale, locales, t } = useI18n()
const switchLocalePath = useSwitchLocalePath()

const availableLocales = computed(() => {
  return locales.value.filter(i => i.code !== locale.value)
})
</script>

<template>
  <div>
    <p>{{ t('pages.top.description') }}</p>
    <p>{{ t('pages.top.languages') }}</p>
    <nav>
      <template v-for="(locale, index) in availableLocales" :key="locale.code">
        <span v-if="index"> | </span>
        <NuxtLink :to="switchLocalePath(locale.code)">
          {{ locale.name ?? locale.code }}
        </NuxtLink>
      </template>
    </nav>
  </div>
</template>
The definePageMeta function sets the page metadata using a key (pages.title.top) that corresponds to a localized title resource, which is automatically translated into the active language. The useSwitchLocalePath function generates paths for switching between languages, ensuring correct routing for each locale. The availableLocales computed property excludes the current locale from the list of all supported locales, showing only the options available for switching.
You can also call the useHead() function in Vue components in the pages directory to add more metadata. The useHead() function will merge the additional metadata to the global metadata:
<script setup>
definePageMeta({
  title: 'pages.title.about'
})

useHead({
  meta: [{ property: 'og:title', content: 'this is og title for about page' }]
})
</script>

<template>
  <h2>{{ $t('pages.about.description') }}</h2>
</template>
Nuxt i18n provides a way to add locale prefixes to URLs with routing strategies. It comes packed with four routing strategies:
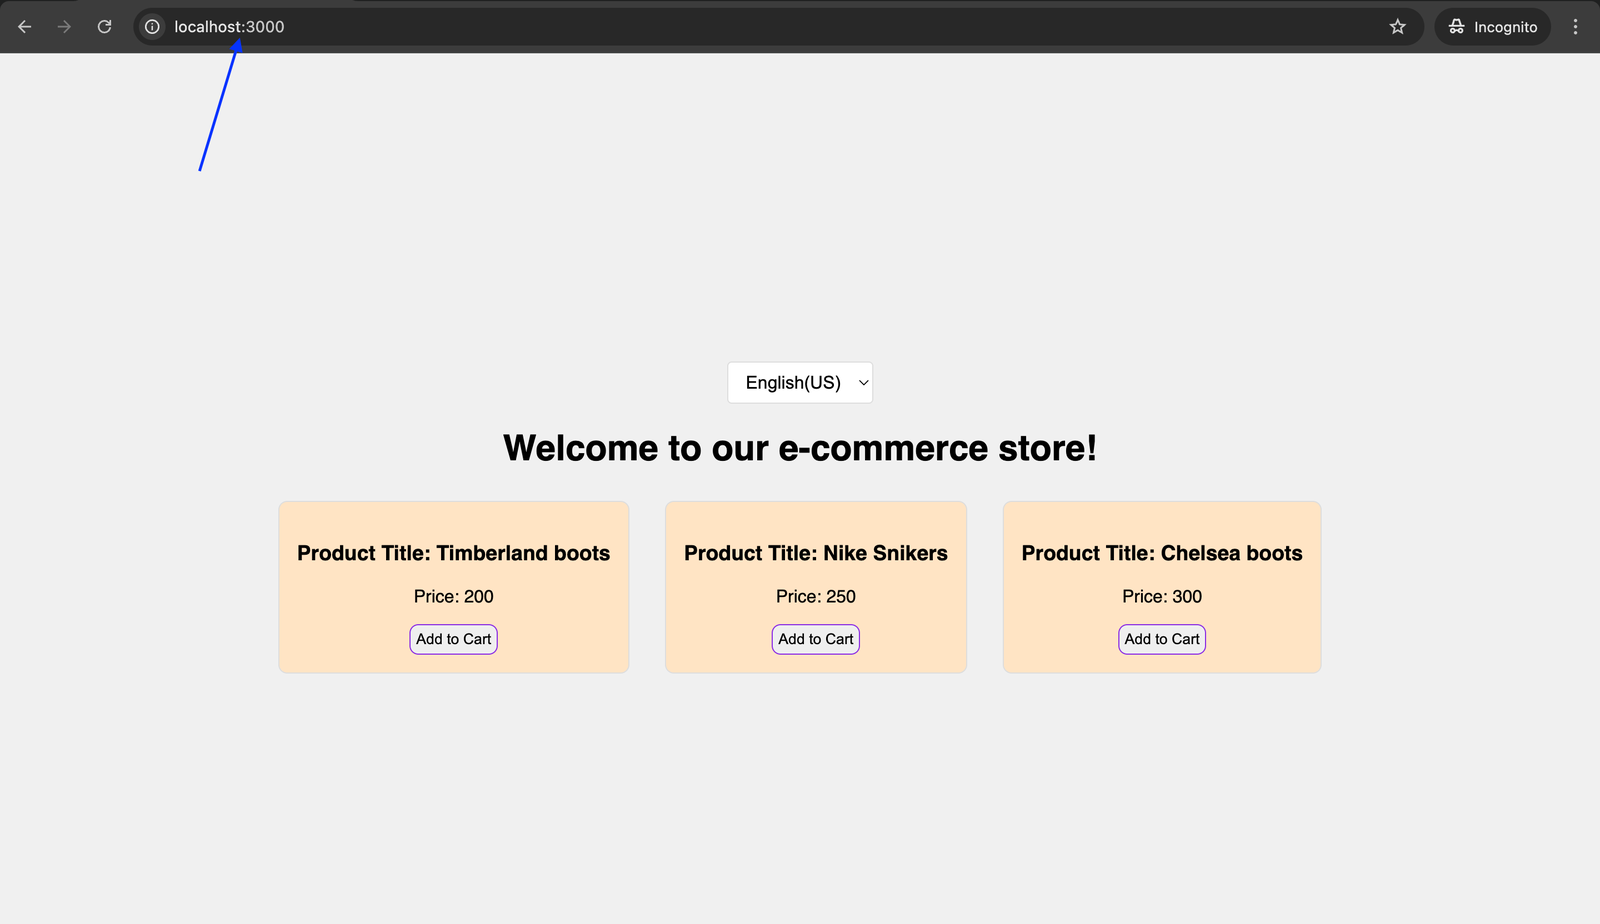
no_prefixprefix_except_defaultprefixprefix_and_defaultTo demonstrate what each of these routing strategies do within our app, let’s revisit our nuxtconfig.ts file. We will be adjusting strategy: "prefix_except_default" to strategy: "no_prefix".
In the following example, no locale-specific prefix is added to the URL:
Now, change the strategy to strategy: "prefix_except_default". This adds a locale-specific prefix to the URL for non-default languages, but the default language does not have a prefix:
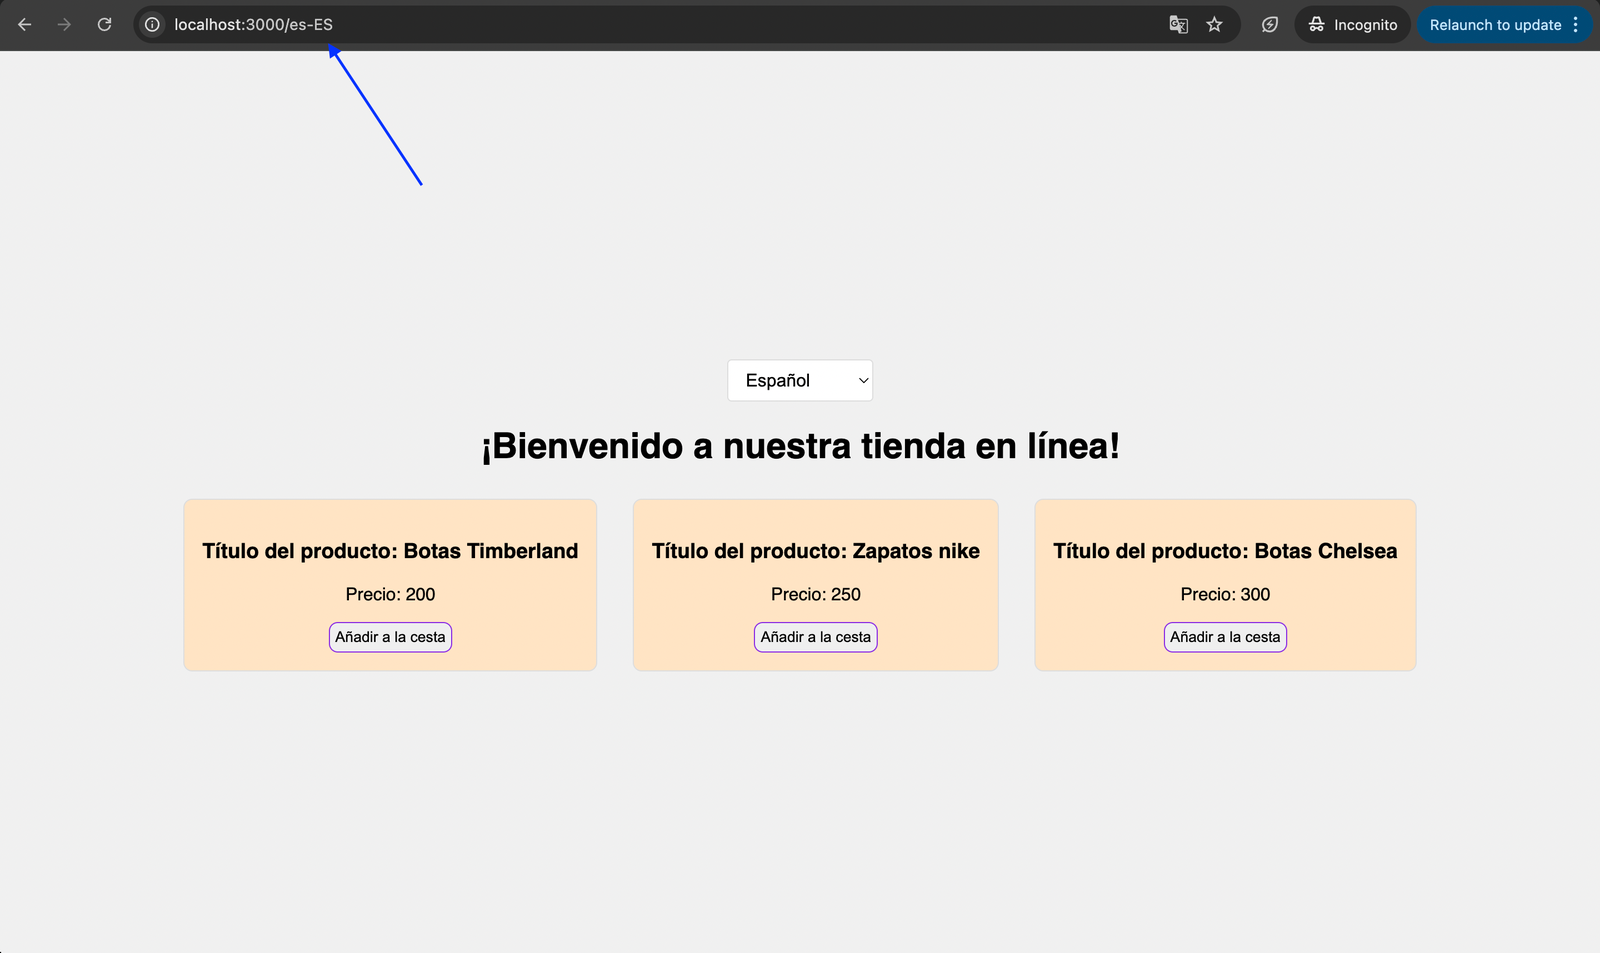
If you change the language to English, you will notice there is no URL prefix added to the URL because English is the default language.
Now, change the strategy to strategy: "prefix". This adds a locale-specific prefix to the URL for all languages, including the default:
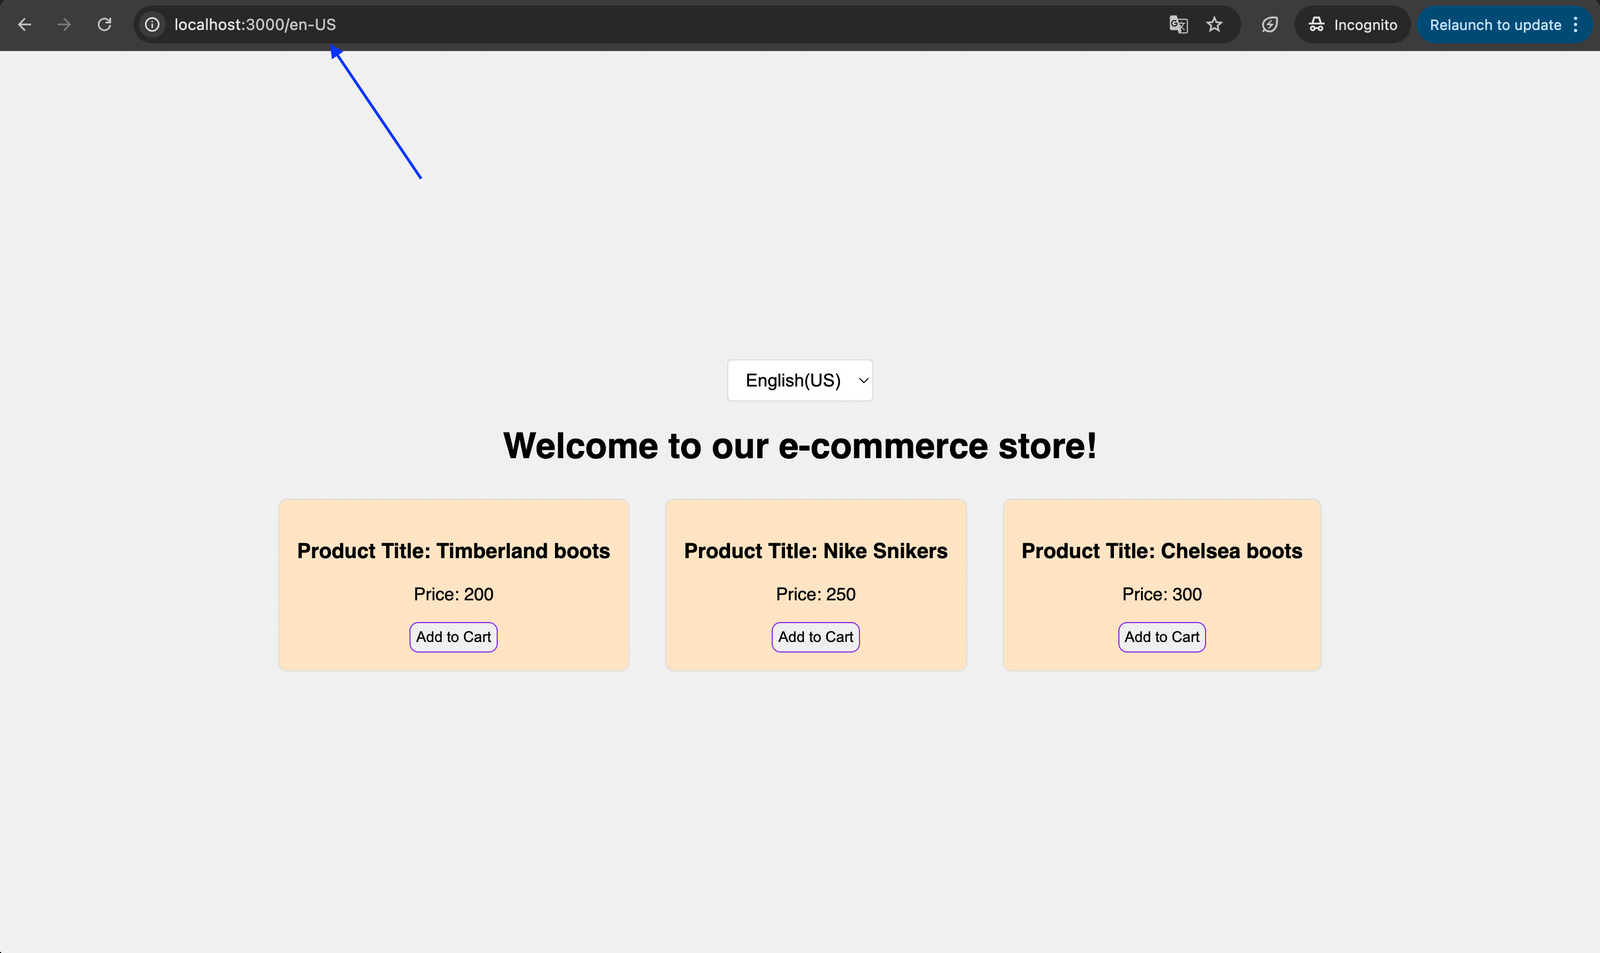
Now, change the strategy to strategy: "prefix_and_default". This combines all the above strategies, with the added advantage that you will get prefixed and non-prefixed URLs for the default language.
Nuxt i18n Micro is an effective internationalization module for Nuxt. It’s designed to deliver top-notch performance even for large-scale projects, delivering better performance compared to traditional options like @nuxtjs/i18n.
Built with speed in mind, Nuxt i18n Micro helps cut down build times, ease server demands, and keep bundle sizes small.
Getting Nuxt i18n Micro working on your project is easy. In your terminal, run the following code:
npm install nuxt-i18n-micro
Next, add it to your nuxt.config.ts:
export default defineNuxtConfig({
  modules: [
    'nuxt-i18n-micro',
  ],
  i18n: {
    locales: [
      { code: 'en', iso: 'en-US', dir: 'ltr' },
      { code: 'fr', iso: 'fr-FR', dir: 'ltr' },
      { code: 'ar', iso: 'ar-SA', dir: 'rtl' },
    ],
    defaultLocale: 'en',
    translationDir: 'locales',
    meta: true,
  },
})
You’re now ready to use Nuxt i18n Micro in your project and compare its speed to Nuxt i18n. Check out the Nuxt documentation to learn more about Nuxt i18n Micro.
Tests were conducted under identical conditions to show the efficiency of Nuxt I18n Micro. Both modules were tested with a 10MB translation file on the same hardware to ensure a fair benchmark.
| Nuxt i18n | Nuxt i18n Micro | |
|---|---|---|
| Total size | 54.7 MB (3.31 MB gzip) | 1.93 MB (473 kB gzip) — 96% smaller |
| Max CPU usage | 391.4% | 220.1% — 44% lower |
| Max memory usage | 8305 MB | 655 MB — 92% less memory |
| Elapsed time | 0h 1m 31s | 0h 0m 5s — 94% faster |
| Nuxt i18n | Nuxt i18n Micro | |
|---|---|---|
| Requests per second | 49.05 [#/sec] (mean) | 61.18 [#/sec] (mean) — 25% more requests per second |
| Time per request | 611.599 ms (mean) | 490.379 ms (mean) — 20% faster |
| Max memory usage | 703.73 MB | 323.00 MB — 54% less memory usage |
These results demonstrate that Nuxt i18n Micro significantly outperforms the original module in every critical area.
When it comes to SEO optimization for multi-lingual sites, Nuxt i18n Micro simplifies the process by automatically generating essential meta tags and attributes that inform search engines about the structure and content of your site with a single flag.
To enable automatic SEO management, ensure the meta option is set to true in your nuxt.config.ts file:
export default defineNuxtConfig({
  modules: ['nuxt-i18n-micro'],
  i18n: {
    meta: true,
  },
})
Nuxt i18n offers an easy and efficient way to build multi-lingual Nuxt apps that cater to people of different languages. In this tutorial we looked at how Nuxt i18n can be used to achieve the internationalization of apps while specifically looking at how to configure Nuxt i18n, adding locale files, adding a language switcher in Nuxt i18n while building our multi-lingual ecommerce app. Finally, we compared Nuxt i18n to Nuxt i18n Micro, highlighting the performance benefits that the latter module offers.

@container scroll-state: Replace JS scroll listeners nowCSS @container scroll-state lets you build sticky headers, snapping carousels, and scroll indicators without JavaScript. Here’s how to replace scroll listeners with clean, declarative state queries.

Explore 10 Web APIs that replace common JavaScript libraries and reduce npm dependencies, bundle size, and performance overhead.

Russ Miles, a software development expert and educator, joins the show to unpack why “developer productivity” platforms so often disappoint.

Discover what’s new in The Replay, LogRocket’s newsletter for dev and engineering leaders, in the February 18th issue.
Hey there, want to help make our blog better?
Join LogRocket’s Content Advisory Board. You’ll help inform the type of content we create and get access to exclusive meetups, social accreditation, and swag.
Sign up now