
In this tutorial, we’ll explore how to develop a type-safe ecommerce site with Astro. Astro’s innovative islands architecture empowers developers to create content-first websites using type-safe Markdown and MDX APIs. It also integrates smoothly with frontend frameworks like React, Vue, and more.

We’ll focus on constructing a high-performance web app that leverages Astro, React, and TypeScript. Additionally, we’ll integrate our app with a custom server for a comprehensive understanding.
Before delving into the ecommerce site implementation, let’s delve into the significance of strong and static typing in frontend projects to understand why we’re using TypeScript in this project.
The Replay is a weekly newsletter for dev and engineering leaders.
Delivered once a week, it's your curated guide to the most important conversations around frontend dev, emerging AI tools, and the state of modern software.
Strong typing typically implies that once a variable is defined, its value type doesn’t automatically convert to another type when interacting with a variable of a different type. Python serves as an excellent example of strong typing.
For instance, consider having the variables age = 25 and name = "Bonarhyme". Due to strong typing, attempting to run operations like sum = age + name would result in a TypeError. This error indicates that such operations are invalid because the types of the variables do not match.
Strong typing has many benefits. For example, it:
However, keep in mind that with strong typing, more time is spent on code compilation. Strongly typed languages also rely on compilation in order to detect errors.
Static typing, on the other hand, will throw an error for the code above at compile time and not just when it’s run. In fact, it will not allow the code to be run at all because of the error in the code. Examples of languages with static typing include TypeScript and Java. Statically typed languages:
However, they also generally allow for more boilerplate code and have a tougher learning curve. Furthermore, static typing tends to be verbose and essentially makes developers write code duplicates.
Not all statically typed languages have strong typing — some might be more dynamic than others, allowing some sort of flexibility in type conversions. Generally, with dynamic typing, the type of a variable in a programing language is assigned at runtime by an interpreter.
Dynamically typed languages like Ruby and JavaScript are able to infer types and perform some sort of type conversion between variables. Although this provides some level of flexibility, it can produce less optimized code since runtime errors are possible and type errors are only detected later during code execution.
Combining strong and static typing helps solve the problems of dynamic typing and enhances code performance by preventing errors like inadvertent variable type reassignments. Statically typed languages also offer a structured way of defining types, which serves as valuable documentation for future code maintainers.
Since utilizing a language that is both statically and strongly typed is notably beneficial in frontend projects, we’ll be using TypeScript in this Astro ecommerce project. This will help us optimize our code and ensure that variable types can’t be automatically changed but should be explicitly implemented.
Astro provides a convenient, easy-to-use template for ecommerce projects called Astro Ecommerce. However, it’s pretty straightforward to set up a completely custom implementation, which is what we’re going to demonstrate in this tutorial.
The ecommerce site we will build will enable users to create an account and log in, as well as fetch and update their profile. Authenticated users will be able to view the product listing, select a product, add and remove items from their carts, and place and manage orders.
Any orders that users place will only be completed once they make a payment using their selected payment platform. The site will also feature screens for admins to manage users, products, and orders.
As a bonus, our project will also feature a review and rating system for products.
To keep the focus of this tutorial on our frontend ecommerce site, we won’t dive into our backend implementation in detail. Generally, the backend was built with TypeScript using Express.js as the backend framework and MongoDB as the database.
The source code for the server can be found here on Github. You can also examine the available endpoints that we will consume for our Astro ecommerce site:
| Name | Endpoint | Type | Category | Description |
|---|---|---|---|---|
| User Register | /api/users/register | POST | Public | Allow unauth. users to create a new account |
| User Login | /api/users/login | POST | Public | Allow unauth. users to generate a new login session |
| Fetch User Profile | /api/users/profile | GET | Protected | Allow a user to fetch their profile |
| Update User Profile | /api/users/profile | PUT | Protected | Allow a user to update their profile |
| List Users | /api/users | GET | Private | Allow admins to fetch all users |
| Delete User | /api/users/:id | DELETE | Private | Allow admins to remove a users |
| Get User by ID | /api/users/:id | GET | Private | Allow admins to fetch a user’s profile |
| Update User by ID | /api/users/:id | PUT | Private | Allow admins to update a user’s profile |
| Get products | /api/products | GET | Public | Allow unauth. to users fetch products |
| Get Product by ID | /api/products/:id | GET | Public | Allow unauth. users to fetch a single product |
| Delete Product by ID | /api/products/:id | DELETE | Private | Allow admins to delete a product |
| Create Product | /api/products | POST | Private | Allow admins to create a new product |
| Update Product | /api/products/:id | PUT | Private | Allow admins to update a product |
| Create Product Review | /api/products/:id/reviews | POST | Protected | Allow users to create a product review |
| Add order Items | /api/orders | POST | Protected | Allow users to add an order item |
| Get Order by ID | /api/orders/:id | GET | Protected | Allow users to fetch a single order |
| Update Order to Paid | /api/orders/:id/pay | PUT | Protected | Allow users to update their payment info |
| Get My Orders | /api/orders/myorders | GET | Protected | Allow users to fetch all their orders |
| Get Orders | /api/orders | GET | Private | Allow admins to fetch all orders |
| Update Order To Delivered | /api/orders/:id/deliver | PUT | Private | Allow admins to update the delivery status |
First, create a folder named something like astro-ecommerce and then follow the official Astro setup guidelines. You can also just open your terminal, run npm create astro@latest, and follow the prompts, ensuring your setup matches what’s shown below:
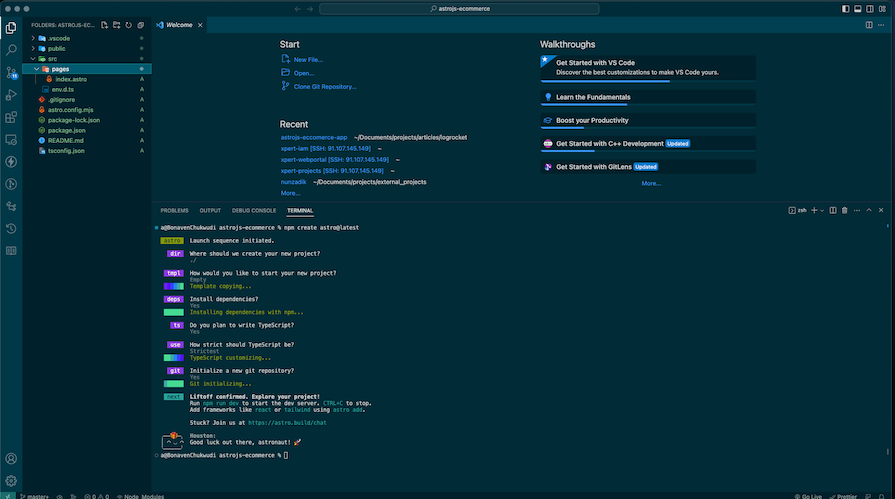
Next, we will create the necessary folders and files inside the src directory. There are a lot to create, but ultimately, our src folder structure should now look like this:
// src folder structure
src
 ┣ components
 ┃ ┣ AddReview.tsx
 ┃ ┣ AdminManageOrders.tsx
 ┃ ┣ AdminManageProducts.tsx
 ┃ ┣ AdminManageUsers.tsx
 ┃ ┣ Button.tsx
 ┃ ┣ CartItem.tsx
 ┃ ┣ CartList.tsx
 ┃ ┣ CheckoutCart.tsx
 ┃ ┣ CreateProduct.tsx
 ┃ ┣ Dialog.tsx
 ┃ ┣ Heading.tsx
 ┃ ┣ Loader.tsx
 ┃ ┣ LoginForm.tsx
 ┃ ┣ Message.tsx
 ┃ ┣ OrderDetails.tsx
 ┃ ┣ Payment.tsx
 ┃ ┣ PaymentProcessor.tsx
 ┃ ┣ PlaceOrder.tsx
 ┃ ┣ Product.tsx
 ┃ ┣ ProductDetails.tsx
 ┃ ┣ ProductList.tsx
 ┃ ┣ Profile.tsx
 ┃ ┣ Rating.tsx
 ┃ ┣ RegisterForm.tsx
 ┃ ┣ Select.tsx
 ┃ ┣ Shipping.tsx
 ┃ ┗ Showcase.tsx
 ┣ layouts
 ┃ ┣ Footer.astro
 ┃ ┣ Header.tsx
 ┃ ┗ Layout.astro
 ┣ pages
 ┃ ┣ order
 ┃ ┃ ┗ [id].astro
 ┃ ┣ product
 ┃ ┃ ┗ [id].astro
 ┃ ┣ account.astro
 ┃ ┣ cart.astro
 ┃ ┣ checkout.astro
 ┃ ┣ index.astro
 ┃ ┣ login.astro
 ┃ ┣ manage-orders.astro
 ┃ ┣ manage-products.astro
 ┃ ┣ manage-users.astro
 ┃ ┗ register.astro
 ┣ state
 ┃ ┣ auth.ts
 ┃ ┣ cart.ts
 ┃ ┣ order.ts
 ┃ ┣ products.ts
 ┃ ┗ user.ts
 ┗ env.d.ts
Once you’ve created all the folders and files above, the next step is to add the React and Tailwind integrations as well as install the necessary dependencies. Run the following commands in your terminal to do so:
npx astro add react
npx astro add tailwind
These commands will also update the astro.config.mjs file like so:
// astro.config.mjs

import { defineConfig } from 'astro/config';
import tailwind from '@astrojs/tailwind';
import react from '@astrojs/react';
// https://astro.build/config
export default defineConfig({
  output: 'server',
  integrations: [tailwind(), react()],
});
After that we will open the terminal and run the following command:
npm install axios react-icons react-paystack nanostores
This will install:
axios: A package we’ll use to make API calls to the serverreact-icons: A library that provides many free icons from popular icon librariesreact-paystack: A payment platform for web appsnanostores: The recommended global state management library for AstroNote that we must set the ouput to server inside the astro.config.mjs file since we want Astro to render our site on the server side.
Let’s add all the code for state management using nanostores. We’ll also set up asynchronous functions that we can use to make API calls within the app. Starting with these steps will make it easier to follow along with the rest of the tutorial.
First, open the state/auth.ts file, import the necessary dependencies, and define the interfaces and initial states that we’ll use for the API calls:
// state/auth.ts

import { atom, map } from 'nanostores';
import axios from 'axios';

export interface AuthState {
  id: string;
  _id?: string;
  name: string;
  email: string;
  isAdmin: boolean;
  token: string;
}
export const authInitialState = {
  id: '',
  name: '',
  email: '',
  isAdmin: false,
  token: '',
};
// Next code below here
Next, initialize the various global states using atom or map from nanostores. atom should be used to initialize primitive values and arrays while map should be used strictly for objects and undefined values. Hence, we will initialize loading, error, and value states for auth APIs like so:
// state/auth.ts

export const loadingRegister = atom<boolean>(false);
export const errorRegister = atom<string | undefined>(undefined);

export const loadingLogin = atom<boolean>(false);
export const errorLogin = atom<string | undefined>(undefined);

export const authState = map<AuthState>(authInitialState);

export const SERVER_URL = 'http://localhost:5211';
We added the SERVER_URL inside the state.auth.ts file so we can reuse it wherever we want to make an API call. TypeScript’s typing behavior ensures that we don’t mix up variables.
Generally, to get the value from the nanostores variable, we call a get method attached to it. To modify the variable, we use the set method. For example, in loadingRegister, we can:
loadingRegister.set(true);loadingRegister.get()Next, let’s create the registerRequest and loginRequest asynchronous functions:
// state/auth.ts
export const registerRequest = async (name: string, email: string, password: string) => {
  errorRegister.set(undefined);
  loadingRegister.set(true);
  try {
    const response = await axios.post<AuthState>(`${SERVER_URL}/api/users/register`, { name, email, password });
    authState.set({ ...authState.get(), ...response.data });
    localStorage.setItem('user', JSON.stringify(response.data));
    window.location.href = '/';
  } catch (error: any) {
    const message = error.response && error.response.data.message ? error.response.data.message : error.message;
    errorRegister.set(message);
  } finally {
    loadingRegister.set(false);
  }
};

export const loginRequest = async (email: string, password: string) => {
  errorLogin.set(undefined);
  loadingLogin.set(true);
  try {
    const response = await axios.post<AuthState>(`${SERVER_URL}/api/users/login`, { email, password });
    authState.set({ ...authState.get(), ...response.data });
    localStorage.setItem('user', JSON.stringify(response.data));
    window.location.href = '/';
  } catch (error: any) {
    const message = error.response && error.response.data.message ? error.response.data.message : error.message;
    errorLogin.set(message);
  } finally {
    loadingLogin.set(false);
  }
};
In the code above, registerRequest accepts name, email, and password variables with their appropriate types. Meanwhile, loginRequest accepts just email and password.
Notice how we systematically update the values of the appropriate states:
error state to undefinedloading state to truetry...catch block
try block, we send a request to the appropriate API endpoint using axios, specifying the expected response type for type safety. We then store successful authentication results to localStorage before redirecting the user to the homepagecatch block, we access the appropriate error message and we set the message to the error state if an error occursfinally block resets the loading state to falseThe pattern above ensures systematic state management for authentication processes in our project. We’ll reuse this approach for secure endpoint access by adding config objects as needed for API requests.
We’re done with the state management for authentication at this point, so let’s move on to the state for managing users and profiles. Open the state/user.ts file and add the following:
// state/user.ts

import axios from 'axios';
import { atom, map } from 'nanostores';
import { SERVER_URL } from './auth';
import type { AuthState } from './auth';

// Omit is TypeScript utility code. Use it to remove one or more types from a given type
export type IUser = Omit<AuthState, 'token'>;
export type IUsers = Array<IUser>;

export const loadingGetProfile = atom<boolean>(false);
export const errorGetProfile = atom<string | undefined>(undefined);
export const getProfileState = map<IUser>();

export const loadingUpdateProfile = atom<boolean>(false);
export const errorUpdateProfile = atom<string | undefined>(undefined);
export const updateProfileState = map<IUser>();

// Admin state to fetch all users
export const loadingUsers = atom<boolean>(false);
export const errorUsers = atom<string | undefined>(undefined);
export const usersState = atom<IUsers>([]);

// Admin state to make a user an admin
export const loadingUpdateUser = atom<boolean>(false);
export const errorUpdateUser = atom<string | undefined>(undefined);

export const profileGetRequest = async () => {
  errorGetProfile.set(undefined);
  loadingGetProfile.set(true);
  try {
    const user = localStorage.getItem('user') ? JSON.parse(localStorage.getItem('user') || '') : null;
    const config = {
      headers: {
        Authorization: `Bearer ${user?.token}`,
      },
    };
    const response = await axios.get<IUser>(`${SERVER_URL}/api/users/profile`, config);
    console.log({ hhh: response });
    getProfileState.set(response.data);
  } catch (error: any) {
    const message = error.response && error.response.data.message ? error.response.data.message : error.message;
    errorGetProfile.set(message);
  } finally {
    loadingGetProfile.set(false);
  }
};

export const profileUpdateRequest = async (name: string, email: string) => {
  errorUpdateProfile.set(undefined);
  loadingUpdateProfile.set(true);
  try {
    const user = localStorage.getItem('user') ? JSON.parse(localStorage.getItem('user') || '') : null;
    const config = {
      headers: {
        Authorization: `Bearer ${user?.token}`,
      },
    };
    const response = await axios.put<IUser>(`${SERVER_URL}/api/users/profile`, { email, name }, config);
    console.log({ hhh: response });
    getProfileState.set(response.data);
  } catch (error: any) {
    const message = error.response && error.response.data.message ? error.response.data.message : error.message;
    errorUpdateProfile.set(message);
  } finally {
    loadingUpdateProfile.set(false);
  }
};

export const usersRequest = async () => {
  errorUsers.set(undefined);
  loadingUsers.set(true);
  try {
    const user = localStorage.getItem('user') ? JSON.parse(localStorage.getItem('user') || '') : null;
    const config = {
      headers: {
        Authorization: `Bearer ${user?.token}`,
      },
    };
    const response = await axios.get<IUsers>(`${SERVER_URL}/api/users/`, config);
    console.log({ hhh: response });
    usersState.set(response.data);
  } catch (error: any) {
    const message = error.response && error.response.data.message ? error.response.data.message : error.message;
    errorUsers.set(message);
  } finally {
    loadingUsers.set(false);
  }
};

export const makeAdminRequest = async (id: string) => {
  errorUpdateUser.set(undefined);
  loadingUpdateUser.set(true);
  try {
    const user = localStorage.getItem('user') ? JSON.parse(localStorage.getItem('user') || '') : null;
    const config = {
      headers: {
        Authorization: `Bearer ${user?.token}`,
      },
    };
    const response = await axios.put<IUser>(`${SERVER_URL}/api/users/${id}`, { isAdmin: true }, config);
    console.log({ hhh: response });
  } catch (error: any) {
    const message = error.response && error.response.data.message ? error.response.data.message : error.message;
    errorUpdateUser.set(message);
  } finally {
    loadingUpdateUser.set(false);
  }
};
In the code above:
profileGetRequest allows users to fetch their profilesprofileUpdateRequest allows users to update their profilesusersRequest allows admins to fetch a list of usersmakeAdminRequest allows permitted users to assign the admin role to other usersNotice how the code pattern is the same as before except for the config, which contains the headers and other metadata for our specific request. In this case, Authorization uses the token we get when we create or log into an account. Essentially, we extract the token from the user object stored in localStorage.
Next, let’s open the state/product.ts and add the global states and functions to fetch APIs. We’ll handle listing, creating, deleting, getting, and reviewing products. Pay careful attention to the types and interfaces to create a proper statically typed site, which helps us write code with integrity and allows our code editor to help us with autocompletion:
// state/product.ts

import axios from 'axios';
import { atom, map } from 'nanostores';
import { SERVER_URL } from './auth';

// interface for review. This matches the model in the server
interface IReview {
  name: string;
  rating: number;
  comment: string;
  user: string;
}

// inteface for a product. This matches the model in the server
export type IProduct = {
  _id: string;
  user: any;
  name: string;
  image: string;
  brand: string;
  category: string;
  description: string;
  reviews: Array<IReview>;
  rating: number;
  numReviews: number;
  price: number;
  countInStock: number;
};

// This is the response we are expecting when we fetch a product list from our custom server
export type ProductListRequest = {
  products?: Array<IProduct> | undefined;
  page?: number;
  pages?: number;
};

export const loadingProductList = atom<boolean>(false);
export const errorProductList = atom<string | undefined>(undefined);
export const productListState = map<ProductListRequest>({
  page: 0,
  pages: 0,
  products: undefined,
});

export const loadingCreateProduct = atom<boolean>(false);
export const errorCreateProduct = atom<string | undefined>(undefined);

export const loadingDeleteProduct = atom<boolean>(false);
export const errorDeleteProduct = atom<string | undefined>(undefined);

export const loadingGetProduct = atom<boolean>(false);
export const errorGetProduct = atom<string | undefined>(undefined);
export const productGetState = map<IProduct>();

export const loadingReviewProduct = atom<boolean>(false);
export const errorReviewProduct = atom<string | undefined>(undefined);
export const productReviewState = map<IProduct>();

export const listProductRequest = async (keyword = '', pageNumber = '') => {
  errorProductList.set(undefined);
  loadingProductList.set(true);
  try {
    const response = await axios.get<ProductListRequest>(
      `${SERVER_URL}/api/products?keyword=${keyword}&pageNumber=${pageNumber}`
    );
    productListState.set({ ...productListState.get(), ...response.data });
    console.log({ data: response.data });
  } catch (error: any) {
    const message = error.response && error.response.data.message ? error.response.data.message : error.message;
    errorProductList.set(message);
  } finally {
    loadingProductList.set(false);
  }
};

export const createProductRequest = async (
  name: string,
  price: string,
  brand: string,
  category: string,
  countInStock: string,
  description: string,
  image: string
) => {
  errorCreateProduct.set(undefined);
  loadingCreateProduct.set(true);
  try {
    const user = localStorage.getItem('user') ? JSON.parse(localStorage.getItem('user') || '') : null;
    const config = {
      headers: {
        Authorization: `Bearer ${user?.token}`,
      },
    };
    const response = await axios.post<IProduct>(
      `${SERVER_URL}/api/products`,
      { name, price, brand, category, countInStock, description, image },
      config
    );
    console.log({ productCreated: response });
  } catch (error: any) {
    const message = error.response && error.response.data.message ? error.response.data.message : error.message;
    errorCreateProduct.set(message);
  } finally {
    loadingCreateProduct.set(false);
  }
};

export const deleteProductRequest = async (id: string) => {
  errorDeleteProduct.set(undefined);
  loadingDeleteProduct.set(true);
  try {
    const user = localStorage.getItem('user') ? JSON.parse(localStorage.getItem('user') || '') : null;
    const config = {
      headers: {
        Authorization: `Bearer ${user?.token}`,
      },
    };
    const response = await axios.delete<ProductListRequest>(`${SERVER_URL}/api/products/${id}`, config);
    console.log({ data: response.data });
  } catch (error: any) {
    const message = error.response && error.response.data.message ? error.response.data.message : error.message;
    errorDeleteProduct.set(message);
  } finally {
    loadingDeleteProduct.set(false);
  }
};

export const getProductRequest = async (id: string, ui: boolean = true): Promise<IProduct | undefined> => {
  {
    ui && errorGetProduct.set(undefined);
  }
  {
    ui && loadingGetProduct.set(true);
  }
  try {
    const user = localStorage.getItem('user') ? JSON.parse(localStorage.getItem('user') || '') : null;
    const config = {
      headers: {
        Authorization: `Bearer ${user?.token}`,
      },
    };
    const response = await axios.get<IProduct>(`${SERVER_URL}/api/products/${id}`, config);
    {
      ui && productGetState.set(response?.data);
    }
    return response?.data;
  } catch (error: any) {
    const message = error.response && error.response.data.message ? error.response.data.message : error.message;
    {
      ui && errorGetProduct.set(message);
    }
    return undefined;
  } finally {
    loadingGetProduct.set(false);
  }
};

export const reviewProductRequest = async (
  id: string,
  rating: string,
  comment: string
): Promise<IProduct | undefined> => {
  errorReviewProduct.set(undefined);
  loadingReviewProduct.set(true);
  try {
    const user = localStorage.getItem('user') ? JSON.parse(localStorage.getItem('user') || '') : null;
    const config = {
      headers: {
        Authorization: `Bearer ${user?.token}`,
      },
    };
    const response = await axios.post<IProduct>(
      `${SERVER_URL}/api/products/${id}/reviews`,
      { rating: Number(rating), comment },
      config
    );
    productReviewState.set(response?.data);
    return response?.data;
  } catch (error: any) {
    const message = error.response && error.response.data.message ? error.response.data.message : error.message;
    errorReviewProduct.set(message);
    return undefined;
  } finally {
    loadingReviewProduct.set(false);
  }
};
Next, we’ll create the state and functions for order processes. We’ll handle placing an order, getting a single order, updating an order’s payment status, updating an order’s delivery status, allowing admins to fetch all the orders in the system, and allowing users to fetch orders they’ve placed:
// state/order.ts

import { SERVER_URL } from './auth';
import { atom, map } from 'nanostores';
import axios from 'axios';
import type { ICartItem } from './cart';

export interface OrderItem {
  name: string;
  qty: number;
  image: string;
  price: number;
  product: any;
}
export interface IOrder {
  _id: string;
  user: any;
  orderItems: Array<OrderItem>;
  shippingAddress: {
    address: string;
    city: string;
    postalCode: string;
    country: string;
  };
  paymentMethod: string;
  paymentResult: {
    message: string;
    reference: string;
    status: string;
    transactionId: string;
    user: string;
  };
  itemsPrice: number;
  taxPrice: number;
  shippingPrice: number;
  totalPrice: number;
  isPaid: boolean;
  paidAt: Date | number;
  isDelivered: boolean;
  deliveredAt: Date | number;
}
export interface IPaymentResult {
  message: string;
  reference: string;
  status: string;
  transactionId: string;
}

export const loadingPlaceOrder = atom<boolean>(false);
export const errorPlaceOrder = atom<string | undefined>(undefined);

export const loadingGetOrder = atom<boolean>(false);
export const errorGetOrder = atom<string | undefined>(undefined);
export const orderGetState = map<IOrder>();

export const loadingPay = atom<boolean>(false);
export const errorPay = atom<string | undefined>(undefined);
export const payState = map();

export const loadingDelivery = atom<boolean>(false);
export const errorDelivery = atom<string | undefined>(undefined);

export const loadingOrderList = atom<boolean>(false);
export const errorOrderList = atom<string | undefined>(undefined);
export const orderListState = atom<Array<IOrder>>([]);

export const loadingMyOrderList = atom<boolean>(false);
export const errorMyOrderList = atom<string | undefined>(undefined);
export const myOrderListState = atom<Array<IOrder>>([]);

export const placeOrderRequest = async (
  orderItems: ICartItem[],
  shippingAddress: IOrder['shippingAddress'],
  paymentMethod: IOrder['paymentMethod'],
  itemsPrice: IOrder['itemsPrice'],
  taxPrice: IOrder['taxPrice'],
  totalPrice: IOrder['totalPrice'],
  shippingPrice: IOrder['shippingPrice']
) => {
  errorPlaceOrder.set(undefined);
  loadingPlaceOrder.set(true);
  try {
    const user = localStorage.getItem('user') ? JSON.parse(localStorage.getItem('user') || '') : null;
    const config = {
      headers: {
        Authorization: `Bearer ${user?.token}`,
      },
    };
    const response = await axios.post<IOrder>(
      `${SERVER_URL}/api/orders`,
      {
        orderItems,
        shippingAddress,
        paymentMethod,
        itemsPrice,
        taxPrice,
        totalPrice,
        shippingPrice,
      },
      config
    );
    localStorage.removeItem('cart');
    window.location.href = `/order/${response?.data?._id}`;
  } catch (error: any) {
    const message = error.response && error.response.data.message ? error.response.data.message : error.message;
    errorPlaceOrder.set(message);
  } finally {
    loadingPlaceOrder.set(false);
  }
};

export const getOrderDetailsRequest = async (id: string) => {
  errorGetOrder.set(undefined);
  loadingGetOrder.set(true);
  try {
    const user = localStorage.getItem('user') ? JSON.parse(localStorage.getItem('user') || '') : null;
    const config = {
      headers: {
        Authorization: `Bearer ${user?.token}`,
      },
    };
    const response = await axios.get<IOrder>(`${SERVER_URL}/api/orders/${id}`, config);
    orderGetState.set(response.data);
  } catch (error: any) {
    const message = error.response && error.response.data.message ? error.response.data.message : error.message;
    errorGetOrder.set(message);
  } finally {
    loadingGetOrder.set(false);
  }
};

export const payRequest = async (id: string, paymentResult: IPaymentResult) => {
  errorPay.set(undefined);
  loadingPay.set(true);
  try {
    const user = localStorage.getItem('user') ? JSON.parse(localStorage.getItem('user') || '') : null;
    const config = {
      headers: {
        Authorization: `Bearer ${user?.token}`,
      },
    };
    const response = await axios.put(`${SERVER_URL}/api/orders/${id}/pay`, paymentResult, config);
    console.log({ response });
  } catch (error: any) {
    const message = error.response && error.response.data.message ? error.response.data.message : error.message;
    errorPay.set(message);
  } finally {
    loadingPay.set(false);
  }
};

export const deliveryRequest = async (id: string) => {
  errorDelivery.set(undefined);
  loadingDelivery.set(true);
  try {
    const user = localStorage.getItem('user') ? JSON.parse(localStorage.getItem('user') || '') : null;
    const config = {
      headers: {
        Authorization: `Bearer ${user?.token}`,
      },
    };
    const response = await axios.put(`${SERVER_URL}/api/orders/${id}/deliver`, {}, config);
    console.log({ response });
  } catch (error: any) {
    const message = error.response && error.response.data.message ? error.response.data.message : error.message;
    errorDelivery.set(message);
  } finally {
    loadingDelivery.set(false);
  }
};

export const listOrdersRequest = async () => {
  errorOrderList.set(undefined);
  loadingOrderList.set(true);
  try {
    const user = localStorage.getItem('user') ? JSON.parse(localStorage.getItem('user') || '') : null;
    const config = {
      headers: {
        Authorization: `Bearer ${user?.token}`,
      },
    };
    const response = await axios.get<Array<IOrder>>(`${SERVER_URL}/api/orders`, config);
    console.log({ hhh: response });
    orderListState.set(response.data);
  } catch (error: any) {
    const message = error.response && error.response.data.message ? error.response.data.message : error.message;
    errorOrderList.set(message);
  } finally {
    loadingOrderList.set(false);
  }
};

export const listMyOrdersRequest = async () => {
  errorMyOrderList.set(undefined);
  loadingMyOrderList.set(true);
  try {
    const user = localStorage.getItem('user') ? JSON.parse(localStorage.getItem('user') || '') : null;
    const config = {
      headers: {
        Authorization: `Bearer ${user?.token}`,
      },
    };
    const response = await axios.get<Array<IOrder>>(`${SERVER_URL}/api/orders/myorders`, config);
    console.log({ hhh: response });
    myOrderListState.set(response.data);
  } catch (error: any) {
    const message = error.response && error.response.data.message ? error.response.data.message : error.message;
    errorMyOrderList.set(message);
  } finally {
    loadingMyOrderList.set(false);
  }
};
You may notice in this file that when importing a type or an interface, we specified it as a type. This is the pattern for importing types recommended by the Astro team.
Also in this file, we imported the necessary dependencies and variables, then defined the interface and types for our APIs. Next, we initialized our global states and created our functions with their respective, properly typed parameters.
You may also notice that after an order is placed successfully in the placeOrderRequest function, we remove the cart from localStorage. There are other states — such as cart, shippingAddress, and paymentMethod — that we’ll store in our localStorage, but we’ll address them later.
The last state to handle for now is the cart state. Here, we’ll handle features like adding, modifying, and removing products in the cart. As usual, we’ll import the necessary dependencies and functions, then define our interfaces and initialize our global states:
// state/cart.ts

import { atom } from 'nanostores';
import { getProductRequest } from './products';
export interface ICartItem {
  product: string;
  qty: number;
  name: string;
  image: string;
  price: number;
  countInStock: number;
}
export const loadingAddCart = atom<boolean>(false);
export const errorAddCart = atom<string | undefined>(undefined);
export const cart = atom<Array<ICartItem> | undefined>(undefined);

// Other code below here
After that, we will add a function to add an item to a cart:
// state/cart.ts

export const addToCart = async (id: string, qty: number) => {
  try {
    errorAddCart.set(undefined);
    loadingAddCart.set(true);
    // Get product first
    const productResponse = await getProductRequest(id, false);
    // Check if product is available and not less than requested quantity
    if ((productResponse?.countInStock || 0) < qty || !productResponse?.countInStock) {
      throw new Error('Few items remaining... Reduce quantity');
    }
    // Define cart items from state
    const cartItems = cart?.get() || [];
    // Get existing cart iytem
    const existingCartItem = cartItems?.find((item) => item.product === productResponse?._id);
    // Selected Cart item has been previously selected
    if (existingCartItem) {
      // Update the existing item's quantity
      const updatedCartItem = { ...existingCartItem, qty };
      // Update the list of cart items with the modified cart item
      const updatedCartItems = cartItems?.map((cartItem) =>
        cartItem?.product === existingCartItem.product ? updatedCartItem : cartItem
      );
      // save the changes to the state
      cart.set(updatedCartItems);
    }
    // Cart item is a new item
    if (!existingCartItem) {
      // Create a new cart item with data from server and also selected quantity
      const newCartItem: ICartItem = {
        product: productResponse?._id,
        image: productResponse?.image,
        name: productResponse?.name,
        price: productResponse?.price,
        qty,
        countInStock: productResponse?.countInStock,
      };
      // Update the list of cart items with the newly added cart items
      const updatedCartItems = [...cartItems, newCartItem];
      // Save the  Update to  the state
      cart.set(updatedCartItems);
    }
    localStorage.setItem('cart', JSON.stringify(cart?.get()));
  } catch (error: any) {
    const message = error.response && error.response.data.message ? error.response.data.message : error.message;
    errorAddCart.set(message);
  } finally {
    loadingAddCart.set(false);
  }
};
In the addToCart function, we:
error and loading statesgetProductRequest function defined earliercart state defined abovelocalStorageNext, we will add the code to remove an item from the store and then update the cart in localStorage using the code below:
// state/cart.ts


export const removeFromCart = async (id: string) => {
  try {
    // Define cart items from state
    const cartItems = cart?.get() || [];
    const updatedCartItem = cartItems?.filter((cartItem) => cartItem?.product !== id);
    cart.set(updatedCartItem);
    localStorage.setItem('cart', JSON.stringify(cart?.get()));
  } catch (error) {
    console.log({ RemoveFromCartError: error });
  } finally {
  }
};
Let’s work on the layout folder, which will house our header, footer, and layout components. We’ll start with the Header.tsx. file by bringing in the required dependencies and defining our component prop type:
// layout/Header.tsx

import { useStore } from '@nanostores/react';
import React, { useCallback, useEffect } from 'react';
import { FaCartPlus, FaSignOutAlt, FaUser, FaUsers } from 'react-icons/fa';
import { FaTableList } from 'react-icons/fa6';
import { authInitialState, authState } from '../state/auth';
import { cart } from '../state/cart';

type HeaderProps = {};

export const Header: React.FC<HeaderProps> = () => {
// Other codes here

// Stop here
return <></<>
}
Using nanostores for state management is convenient because you can easily use it in a React component with the useStore Hook. We’ll use this tool to access the values in the global states we set up before — authState, cart, and so on. In the Header.tsx file, add the following code:
// layout/Header.tsx
export const Header: React.FC<HeaderProps> = () => {
  const user = useStore(authState);
  const isLoggedIn = Boolean(user.token);
  const isAdminLoggedIn = Boolean(user.isAdmin);
  const cartItems = useStore(cart);

  const handleLogout = useCallback(() => {
    authState.set(authInitialState);
    if (window) {
      localStorage.removeItem('user');
      localStorage.removeItem('shippingAddress');
      localStorage.removeItem('paymentMethod');
      window.location.href = '/login';
    }
  }, []);

  useEffect(() => {
    // Set initial auth state data from storage
    const authStateStorage = localStorage.getItem('user') ? JSON.parse(localStorage.getItem('user') || '') : null;
    if (authStateStorage) {
      authState.set(authStateStorage);
    }
    // Set initial cart items if it exists
    const cartStorage = localStorage.getItem('cart') ? JSON.parse(localStorage.getItem('cart') || '') : null;
    if (cartStorage) {
      cart.set(cartStorage);
    }
  }, []);

return <></<>
}
In the code above, we start by extracting the user details from authState to determine whether a user is logged in and whether their role is admin. We also use cartItems from the cart global state to extract the items in a cart.
The handleLogout callback simply clears the auth state along with the user, shippingAddress, and paymentMethod values that might exist in the localStorage. In the useEffect Hook, we get the user and cart from the localStorage and update the respective states.
In the jsx, we will simply return a nav with an image and a bunch of links in a <li> tag. You will also notice that when a user isn’t logged in, we display a login link while hiding some other links, like account. Meanwhile, when the logged-in user is an admin, we show some other links, like products. So, our jsx should look like this:
// layout/Header.tsx

return (
    <nav className='p-3 bg-slate-100'>
      <div className='max-w-[1800px] mx-auto flex items-end justify-between'>
        <div>
          <a href='/'>
            <img
              src={'/astro.png'}
              width='150'
              height='50'
              alt='Astro ecommerce'
              style={{ objectFit: 'cover' }}
              className='w-[80px] md:w-[100px]'
            />
          </a>
        </div>
        <ul className='flex gap-4'>
          <li>
            <a href='/cart' className='flex items-center gap-1'>
              <span className='relative'>
                <FaCartPlus size={20} />{' '}
                {cartItems?.length && (
                  <span className='absolute -right-1 -top-1 rounded-full bg-red-600 w-4 h-4  right text-white font-mono text-[10px]  leading-tight text-center flex justify-center items-center'>
                    {cartItems?.length}
                  </span>
                )}{' '}
              </span>
              Cart
            </a>
          </li>
          {isLoggedIn && (
            <li>
              <a href='/account' className='flex items-center gap-1'>
                <FaUser size={20} /> Account
              </a>
            </li>
          )}
          {isAdminLoggedIn && (
            <>
              <li>
                <a href='/manage-products' className='flex items-center gap-1'>
                  <FaTableList size={20} /> Products
                </a>
              </li>
              <li>
                <a href='/manage-orders' className='flex items-center gap-1'>
                  <FaTableList size={20} /> Orders
                </a>
              </li>
              <li>
                <a href='/manage-users' className='flex items-center gap-1'>
                  <FaUsers size={20} /> Users
                </a>
              </li>
            </>
          )}
          {isLoggedIn && (
            <li>
              <button onClick={handleLogout} className='flex items-center gap-1 text-red-500'>
                <FaSignOutAlt size={20} /> Logout
              </button>
            </li>
          )}
          {!isLoggedIn && (
            <li>
              <a href='/login' className='flex items-center gap-1'>
                <FaUser size={20} /> Login
              </a>
            </li>
          )}
        </ul>
      </div>
    </nav>
  );
Next, we will create the footer component. Since it’s a pure .astro file, we have to open the layout/Footer.astro file and add the following code:
// layout/Footer.astro

<footer class='p-3 bg-slate-400'>
  <div class='max-w-[1800px]'>
    <p class='text-center'>Astro ecommerce - Lorem, ipsum dolor sit amet consectetur adipisicing elit.</p>
  </div>
</footer>
We can assemble two files in the layout/Layout.astro file like so:
// layout/Layout.astro

---
import { ViewTransitions } from 'astro:transitions';
import { Header } from './Header';
import Footer from './Footer.astro';
interface Props {
  title: string;
  description: string;
}
const { title, description } = Astro.props;
---

<html lang='en'>
  <head>
    <meta charset='utf-8' />
    <link rel='icon' type='image/svg+xml' href='/favicon.svg' />
    <meta name='viewport' content='width=device-width' />
    <meta name='generator' content={Astro.generator} />
    <meta name='description' content={description} />
    <title>{title}</title>
    <ViewTransitions />
  </head>
  <body>
    <div>
      <Header client:load />
      <div style={{ minHeight: 'calc(100vh - 130px)' }}>
        <slot />
      </div>
      <Footer />
    </div>
  </body>
</html>
Any code written between the hyphens is assumed to be TypeScript, so we imported the ViewTransitions and other components before defining our props variable, which accepts a title and a description. Note that this is the Astro-recommended pattern for defining types and using the values from the props.
Since we’re going to use the Layout component in our pages, it will contain the appropriate head and meta tags as well as the ViewTransitions component, which ensures smooth navigation between pages. In the body tag, we render our Header file, slot, and Footer.
Essentially, you need the client:load prop whenever you use a React component in an Astro file. Also, the slot is used to display whatever content is going to be passed in the Layout component.
The message, loader, and button components will be heavily used in different parts of the app, so let’s create these essential components now. Add the following code to the components/Message.tsx file:
// components/Message.tsx

import React from 'react';
type MessageProps = {
  variant: 'danger' | 'info' | 'success' | 'secondary';
  children: React.ReactNode;
};

export const Message: React.FC<MessageProps> = ({ variant, children }) => {
  if (variant === 'secondary') {
    return (
      <div className='bg-gray-100 border border-gray-400 text-gray-700 px-4 py-3 rounded relative my-2' role='alert'>
        <span className='block sm:inline'>{children}</span>
      </div>
    );
  }
  if (variant === 'danger') {
    return (
      <div className='bg-red-100 border border-red-400 text-red-700 px-4 py-3 rounded relative my-2' role='alert'>
        <strong className='font-bold mr-3'>Error!</strong>
        <span className='block sm:inline'>{children}</span>
      </div>
    );
  }
  if (variant === 'info') {
    return (
      <div className='bg-blue-50 border border-blue-300 text-blue-600 px-4 py-3 rounded relative my-2' role='alert'>
        <span className='block sm:inline'>{children}</span>
      </div>
    );
  }
  return (
    <div className='bg-green-100 border border-green-400 text-green-700 px-4 py-3 rounded relative my-2' role='alert'>
      <strong className='font-bold mr-3'>Successful!</strong>
      <span className='block sm:inline'>{children}</span>
    </div>
  );
};
The component above accepts variant and children props. Based on the value of the variant, it also displays a certain jsx.
We’ll do something similar for the components/Loader.tsx and components/Button.tsx components. However, Loader.tsx accepts just one prop while the Button.tsx accepts multiple props, including onClick, loading, disabled, and others.
Here’s the code for the Loader.tsx component:
// components/Loader.tsx

import React from 'react';
type LoaderProps = {
  variant?: 'small' | 'large';
};
export const Loader: React.FC<LoaderProps> = ({ variant }) => {
  if (variant === 'small') {
    return (
      <div className='flex items-center justify-center'>
        <div className='animate-spin rounded-full h-6 w-6 border-t-4 border-blue-500 border-solid'></div>
      </div>
    );
  }
  return (
    <div className='flex items-center justify-center'>
      <div className='animate-spin rounded-full h-12 w-12 border-t-4 border-blue-500 border-solid'></div>
    </div>
  );
};
Here’s the code for the Button.tsx component:
// components/Button.tsx

import React from 'react';
import { Loader } from './Loader';

type ButtonProps = {
  children: React.ReactNode;
  loading?: boolean;
  size?: 'small' | 'large';
  onClick?(): void;
  type?: 'submit' | 'button' | 'reset';
  disabled?: boolean;
};

export const Button: React.FC<ButtonProps> = ({
  children,
  loading,
  size = 'large',
  onClick,
  type = 'submit',
  disabled,
}) => {
  if (size === 'small') {
    return (
      <button
        className='bg-slate-900 text-white rounded-2xl px-5 py-2 text-lg md:text-xl font-medium w-full max-w-[250px] flex gap-3 justify-center mt-8 cursor-pointer hover:bg-slate-800'
        disabled={loading || disabled}
        onClick={onClick}
        type={type}
      >
        {children} {loading && <Loader variant='small' />}
      </button>
    );
  }
  return (
    <button
      className='bg-slate-900 text-white rounded-2xl px-5 py-2 text-lg md:text-xl font-medium w-full max-w-[500px] mx-auto flex gap-3 justify-center mt-8 cursor-pointer hover:bg-slate-800'
      disabled={loading || disabled}
      onClick={onClick}
      type={type}
    >
      {children} {loading && <Loader variant='small' />}
    </button>
  );
};
The Button component simply returns a different jsx depending on the size prop. The onClick prop is passed in each button attribute. Also, we use the loading prop to show a loader alongside the text in the button and disable the button based on the value of the loading and disabled props.
Similar to the components defined above, the components/Heading.tsx component is a simple component that accepts text, variant, and textAlign props and renders different jsx based on the variant like so:
// components/Heading.tsx

import React from 'react';

type HeadingProps = {
  text: string;
  variant?: 'h1' | 'h2' | 'h3';
  textAlign?: 'center' | 'left' | 'right';
};

export const Heading: React.FC<HeadingProps> = ({ text, variant = 'h1', textAlign = 'left' }) => {
  return (
    <>
      {variant === 'h1' && (
        <h1 className='text-xl md:text-3xl font-bold py-6 mx-auto' style={{ textAlign }}>
          {text}
        </h1>
      )}
      {variant === 'h2' && (
        <h2 className='text-lg md:text-2xl font-bold mx-auto' style={{ textAlign }}>
          {text}
        </h2>
      )}
      {variant === 'h3' && (
        <h3 className='text-lg md:text-xl mx-auto' style={{ textAlign }}>
          {text}
        </h3>
      )}
    </>
  );
};
Next, we’ll use the components/Dialog.tsx component to display a modal. It will accept children, open, and onClose props. Generally, it will contain a close button that should call onClose when clicked:
// components/Dialog.tsx

import React from 'react';
import { FaTimes } from 'react-icons/fa';
type DialogProps = {
  children: React.ReactNode;
  open: boolean;
  onClose(): void;
};
export const Dialog: React.FC<DialogProps> = ({ children, open, onClose }) => {
  return (
    <>
      {open ? (
        <div className='fixed w-full right-0 left-0 bottom-0 top-0 z-50' style={{ backgroundColor: 'rgba(0, 0, 0, 0.5)' }}>
          <div className='flex justify-center items-center h-full'>
            <div className='min-h-[700px]  bg-white  w-full max-w-[500px] m-auto py-4'>
              <div className='flex justify-end mb-4 px-4'>
                <FaTimes className='text-red-500' size={20} onClick={onClose} />
              </div>
              <div className='h-[650px] overflow-y-auto px-4'>{children}</div>
            </div>
          </div>
        </div>
      ) : null}
    </>
  );
};
We need to collect the user’s name, email, and password on the registration page. However, we can augment this page’s functionality by writing its core code with React. In the components/RegisterForm.tsx file, add the following code:
// components/RegisterForm.tsx

import { useStore } from '@nanostores/react';
import React, { useState } from 'react';
import { errorRegister, loadingRegister, registerRequest } from '../state/auth';
import { Button } from './Button';
import { Loader } from './Loader';
import { Message } from './Message';

type RegisterFormProps = {};

export const RegisterForm: React.FC<RegisterFormProps> = () => {
  const [name, setName] = useState<string>('');
  const [email, setEmail] = useState<string>('');
  const [password, setPassword] = useState<string>('');
  const [confirmPassword, setConfirmPassword] = useState<string>('');
  const [message, setMessage] = useState<string>('');

  const loading = useStore(loadingRegister);
  const error = useStore(errorRegister);

  const handleRegister = (e: React.FormEvent<HTMLFormElement>) => {
    e.preventDefault();
    if (password !== confirmPassword) {
      setMessage('Passwords do not match');
      return;
    }
    setMessage('');
    registerRequest(name, email, password);
  };

  return (
    <>
      <form onSubmit={handleRegister} className='max-w-[500px] mx-auto py-6'>
        {message && <Message variant='danger'>{message}</Message>}
        {error && <Message variant='danger'>{error}</Message>}
        {loading && <Loader />}
        <div>
          <label htmlFor='name'>Name:</label>
          <input
            type='text'
            name='name'
            id='name'
            required
            placeholder='Enter name'
            className='border-2 border-slate-400 p-2 rounded-lg w-full'
            value={name}
            onChange={(e) => setName(e.target.value)}
          />
        </div>
        <br />
        <div>
          <label htmlFor='email'> Email:</label>
          <input
            type='email'
            name='email'
            id='email'
            required
            placeholder='Enter email'
            className='border-2 border-slate-400 p-2 rounded-lg w-full'
            value={email}
            onChange={(e) => setEmail(e.target.value)}
          />
        </div>
        <br />
        <div>
          <label htmlFor='password'> Password:</label>
          <input
            type='password'
            name='password'
            id='password'
            required
            placeholder='Enter password'
            className='border-2 border-slate-400 p-2 rounded-lg w-full'
            value={password}
            onChange={(e) => setPassword(e.target.value)}
          />
        </div>
        <br />
        <div>
          <label htmlFor='confirmPassword'>Confirm Password:</label>
          <input
            type='password'
            name='confirmPassword'
            id='confirmPassword'
            required
            placeholder='Confirm password'
            className='border-2 border-slate-400 p-2 rounded-lg w-full'
            value={confirmPassword}
            onChange={(e) => setConfirmPassword(e.target.value)}
          />
        </div>
        <p className='my-5 text-right'>
          Already have an account?{' '}
          <a href='/login' className='text-blue-500 underline'>
            Login
          </a>
        </p>
        <Button loading={loading}>Register</Button>
      </form>
    </>
  );
};
In the code above, we define some states for our form inputs, including name, email, password, confirmPassword, and message. Also, we extract the values in the loadingRegister and errorRegister global states and put them in variables.
We also created the handleRegister function, which accepts a form event and checks that the entered password matches the confirmPassword field. If the passwords match, we call the registerRequest function defined in the state/auth.ts file.
The jsx returns a form, a bunch of grouped labels and inputs, and a Submit button at the end.
Now, we can use the Heading, Layout, and RegisterForm components in the pages/register.astro file:
// pages/register.astro

---
import { Heading } from '../components/Heading';
import Layout from '../layouts/Layout.astro';
import { RegisterForm } from '../components/RegisterForm';
---

<Layout title='Astro Register' description='Register an account'>
  <div class='max-w-[1800px] mx-auto'>
    <Heading text='Register' variant='h1' textAlign='center' />
    <RegisterForm client:load />
  </div>
</Layout>
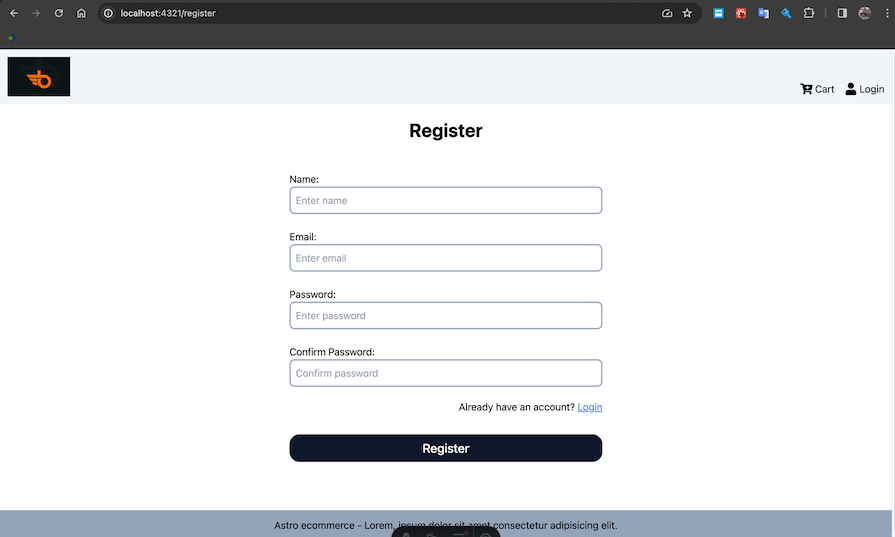
The registration page should now look like this:
The process for the login page is similar:
// components/LoginForm.tsx

import { useStore } from '@nanostores/react';
import React, { useState } from 'react';
import { errorLogin, loadingLogin, loginRequest } from '../state/auth';
import { Button } from './Button';
import { Message } from './Message';

type LoginFormProps = {};

export const LoginForm: React.FC<LoginFormProps> = () => {
  const [email, setEmail] = useState<string>('');
  const [password, setPassword] = useState<string>('');
  const loading = useStore(loadingLogin);
  const error = useStore(errorLogin);

  const handleLogin = (e: React.FormEvent<HTMLFormElement>) => {
    e.preventDefault();
    loginRequest(email, password);
  };

  return (
    <form onSubmit={handleLogin} className='max-w-[500px] mx-auto py-6'>
      {error && <Message variant='danger'>{error}</Message>}
      <div>
        <label htmlFor='email'> Email:</label>
        <input
          type='email'
          name='email'
          id='email'
          required
          placeholder='Enter email'
          className='border-2 border-slate-400 p-2 rounded-lg w-full'
          value={email}
          onChange={(e) => setEmail(e.target.value)}
        />
      </div>
      <br />
      <div>
        <label htmlFor='password'> Password:</label>
        <input
          type='password'
          name='password'
          id='password'
          required
          placeholder='Enter password'
          className='border-2 border-slate-400 p-2 rounded-lg w-full'
          value={password}
          onChange={(e) => setPassword(e.target.value)}
        />
      </div>
      <p className='my-5 text-right'>
        Don't have an account?{' '}
        <a href='/register' className='text-blue-500 underline'>
          Register
        </a>
      </p>
      <Button loading={loading}>Login</Button>
    </form>
  );
};
Note that in the handleLogin function, we call the loginRequest function to make the API call as we have defined in state/auth.ts.
We can use the above component in the pages/login.astro file like so:
// pages/login.astro

---
import { Heading } from '../components/Heading';
import { LoginForm } from '../components/LoginForm';
import Layout from '../layouts/Layout.astro';
---
<Layout title='Astro Login' description='Login an account'>
  <div class='max-w-[1800px] mx-auto'>
    <Heading text='Login' variant='h1' textAlign='center' />
    <LoginForm client:load />
  </div>
</Layout>
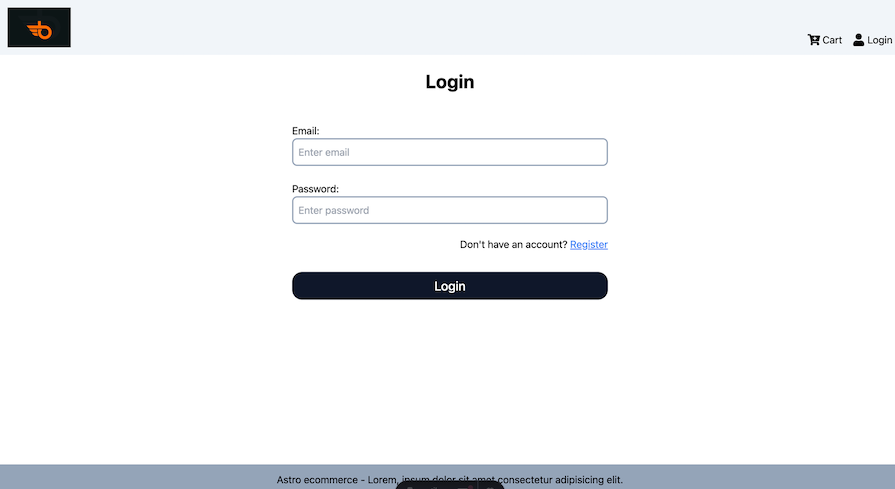
The login page should look like this:
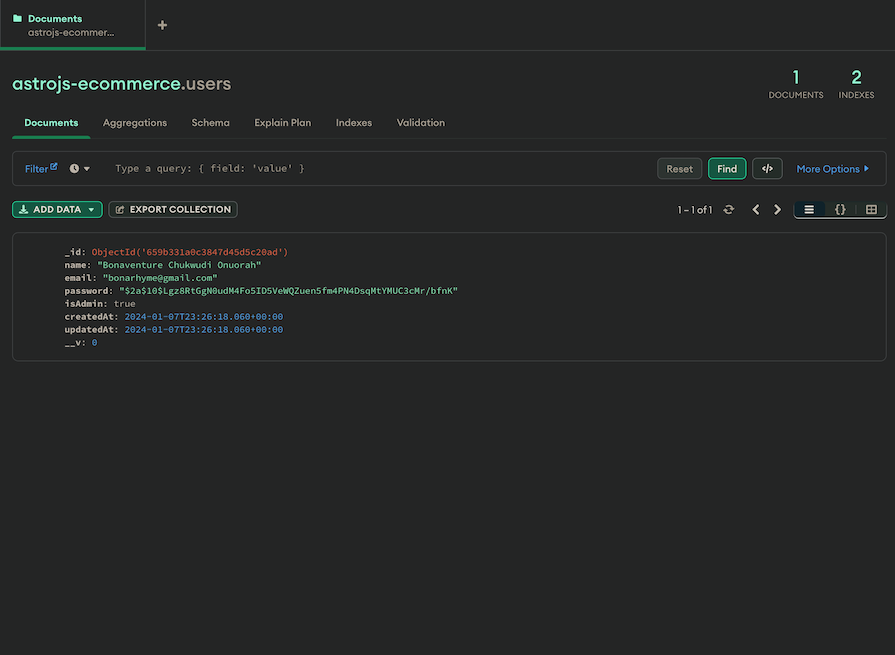
This next part is important! After creating a new user, go to your MongoDB database and update the user to an admin by setting isAdmin to true:
After that, you can log out and log in again to see new links on the nav:

The manage products page will contain a Create Product button, a dialog to create a product, and a table to view products in the database.
First, let’s set up the components/CreateProduct.tsx file:
// components/CreateProduct.tsx

import { useStore } from '@nanostores/react';
import React, { useCallback, useState } from 'react';
import { createProductRequest, errorCreateProduct, listProductRequest, loadingCreateProduct } from '../state/products';
import { Button } from './Button';
import { Heading } from './Heading';
import { Message } from './Message';
const categoryItems = ['phones', 'computers', 'electronics', 'phone accessories', 'fashion', 'bags'];
type CreateProductProps = {
  onClose(): void;
};
export const CreateProduct: React.FC<CreateProductProps> = ({ onClose }) => {
  const [name, setName] = useState<string>('');
  const [price, setPrice] = useState<string>('');
  const [brand, setBrand] = useState<string>('');
  const [category, setCategory] = useState<string>('');
  const [countInStock, setCountInStock] = useState<string>('');
  const [description, setDescription] = useState<string>('');
  const [image, setImage] = useState<string>('');
  const [message, setMessage] = useState<string>('');

  const error = useStore(errorCreateProduct);
  const loading = useStore(loadingCreateProduct);

  const handleCreateProduct = useCallback(
    async (e: React.FormEvent<HTMLFormElement>) => {
      e.preventDefault();
      if (!name || !price || !brand || !category || !countInStock || !description || !image) {
        setMessage('Missing inputs');
        return;
      }
      await createProductRequest(name, price, brand, category, countInStock, description, image).then((value) => {
        onClose();
        listProductRequest();
      });
    },
    [name, price, brand, category, countInStock, description, image]
  );

  return (
    <form onSubmit={handleCreateProduct} className='max-w-[500px] mx-auto py-6 pb-28'>
      <Heading text='Create Product' variant='h3' textAlign='center' />
      <br />
      {error && <Message variant='danger'>{error}</Message>}
      <div>
        <label htmlFor='name'>Product Name:</label>
        <input
          type='text'
          name='name'
          id='name'
          required
          placeholder='Enter name'
          className='border-2 border-slate-400 p-2 rounded-lg w-full'
          value={name}
          onChange={(e) => {
            console.log({ vall: e.target.value });
            setName(e.target.value);
            setMessage('');
          }}
        />
      </div>
      <br />
      <div>
        <label htmlFor='brand'>Brand:</label>
        <input
          type='text'
          name='brand'
          id='name'
          required
          placeholder='Enter brand'
          className='border-2 border-slate-400 p-2 rounded-lg w-full'
          value={brand}
          onChange={(e) => {
            setBrand(e.target.value);
            setMessage('');
          }}
        />
      </div>
      <br />
      <div>
        <label htmlFor='price'>Price:</label>
        <input
          type='number'
          name='price'
          id='price'
          required
          placeholder='Enter price'
          className='border-2 border-slate-400 p-2 rounded-lg w-full'
          value={price}
          onChange={(e) => {
            setPrice(e.target.value);
            setMessage('');
          }}
        />
      </div>
      <br />
      <div>
        <label htmlFor='category'>Category:</label>
        <select
          name='category'
          id='category'
          className='border-2 border-slate-400 p-2 rounded-lg w-full capitalize'
          value={category}
          onChange={(e) => {
            setCategory(e.target.value);
            setMessage('');
          }}
        >
          {categoryItems?.map((item) => {
            return <option value={item}>{item}</option>;
          })}
        </select>
      </div>
      <br />
      <div>
        <label htmlFor='countInStock'>Count in stock:</label>
        <input
          type='number'
          name='countInStock'
          id='countInStock'
          required
          placeholder='Enter count in stock'
          className='border-2 border-slate-400 p-2 rounded-lg w-full'
          value={countInStock}
          onChange={(e) => {
            setCountInStock(e.target.value);
            setMessage('');
          }}
        />
      </div>
      <br />
      <div>
        <label htmlFor='description'>Description:</label>
        <textarea
          name='description'
          id='description'
          className='border-2 border-slate-400 p-2 rounded-lg w-full'
          value={description}
          onChange={(e) => {
            setDescription(e.target.value);
            setMessage('');
          }}
        ></textarea>
      </div>
      <br />
      <div>
        <label htmlFor='image'>Image Url:</label>
        <input
          type='text'
          name='image'
          id='image'
          required
          placeholder='Enter image url'
          className='border-2 border-slate-400 p-2 rounded-lg w-full'
          value={image}
          onChange={(e) => {
            setImage(e.target.value);
            setMessage('');
          }}
        />
      </div>
      <br />
      {image && <img src={image} width={300} height={300} style={{ objectFit: 'cover' }} alt='Product image' />}
      {message && <Message variant='danger'>{message}</Message>}
      <br />
      <Button loading={loading}>Submit</Button>
    </form>
  );
};
This file begins with the usual import statements. Then, we have the list of category items and a prop type for our component containing only an onClose value.
In the component, we have various states, which — besides the message state — are used directly in the form. We also have the loading and error states derived from their respective global states for this product creation functionality.
The handleCreateProduct function checks that all the form states are present. If they’re not, we update the message state with an error message. Otherwise, we call the createProductRequest function defined in state/product.ts.
The createProductRequest function is asynchronous, so we can use .then to detect when the operation is successful. Once it succeeds, we call the onClose and listProductRequest functions defined in state/product.ts.
You may have noticed that we passed items to the dependency arrays. This is useful because we want the function to be able to run when the value of any of those items changes.
Now, let’s build the page. Add the following code to the components/AdminManageProducts.tsx file:
// components/AdminManageProducts.tsx

import { useStore } from '@nanostores/react';
import React, { useCallback, useEffect, useState } from 'react';
import {
  deleteProductRequest,
  errorDeleteProduct,
  errorProductList,
  listProductRequest,
  loadingDeleteProduct,
  loadingProductList,
  productListState,
} from '../state/products';
import { Button } from './Button';
import { CreateProduct } from './CreateProduct';
import { Dialog } from './Dialog';
import { Loader } from './Loader';
import { Message } from './Message';

type ManageProductsProps = {};

export const AdminManageProducts: React.FC<ManageProductsProps> = () => {
  const loadingList = useStore(loadingProductList);
  const errorList = useStore(errorProductList);
  const productList = useStore(productListState);
  const loadingDelete = useStore(loadingDeleteProduct);
  const errorDelete = useStore(errorDeleteProduct);
  const [openForm, setOpenForm] = useState<boolean>(false);

  const handleDelete = useCallback(async (id: string) => {
    deleteProductRequest(id).then(() => {
      listProductRequest();
    });
  }, []);

  useEffect(() => {
    listProductRequest();
  }, []);

  return (
    <div className='p-6'>
      <Button size='small' onClick={() => setOpenForm(true)}>
        Create Product
      </Button>
      <Dialog open={openForm} onClose={() => setOpenForm(false)}>
        <CreateProduct onClose={() => setOpenForm(false)} />
      </Dialog>
      {errorList && <Message variant='danger'>{errorList}</Message>}
      {loadingList && <Loader variant='large' />}
      {errorDelete && <Message variant='danger'>{errorDelete}</Message>}
      <div className='w-full my-8 max-w-[1800px] mx-auto overflow-auto'>
        <table className='table-auto border-4 w-full whitespace-nowrap'>
          <thead className='border-b-2'>
            <tr className='bg-gray-500 text-white '>
              <th className='text-left border-r-2 px-4 py-2'>Name</th>
              <th className='text-left border-r-2 px-4 py-2'>Brand</th>
              <th className='text-left border-r-2 px-4 py-2'>Price</th>
              <th className='text-left border-r-2 px-4 py-2'>Category</th>
              <th className='text-left border-r-2  px-4 py-2'>Count in stock</th>
              <th className='text-left border-r-2 px-4 py-2'>Action</th>
            </tr>
          </thead>
          <tbody>
            {productList?.products?.map((product) => {
              return (
                <tr className='capitalize border-b-2' key={product?._id}>
                  <td className='text-left border-r-2 px-4 py-2'>{product?.name}</td>
                  <td className='text-left border-r-2 px-4 py-2'>{product?.brand}</td>
                  <td className='text-left border-r-2 px-4 py-2'>${product?.price}</td>
                  <td className='text-left border-r-2 px-4 py-2'>{product?.category}</td>
                  <td className='text-left border-r-2 px-4 py-2'>{product?.countInStock}</td>
                  <td className='text-left border-r-2 px-4 py-2'>
                    <span className='flex gap-4'>
                      <a
                        href={`/product/${product?._id}`}
                        className='bg-slate-900 text-white rounded px-4 py-2  w-full max-w-[100px] flex gap-3 justify-center  cursor-pointer hover:bg-slate-800 text-sm'
                      >
                        View
                      </a>
                      <button
                        onClick={() => handleDelete(product?._id)}
                        disabled={loadingDelete}
                        className='bg-red-900 text-white rounded px-4 py-2  w-full max-w-[100px] flex gap-3 justify-center  cursor-pointer hover:bg-red-800 text-sm'
                      >
                        Remove {loadingDelete && <Loader variant='small' />}
                      </button>
                    </span>
                  </td>
                </tr>
              );
            })}
          </tbody>
        </table>
      </div>
    </div>
  );
};
In this component, we extract the states for listing and deleting products using useStore and the appropriate states defined in state/product.ts. Then, we define another state to control opening and closing the dialog.
We also have a handleDelete function that accepts an id and calls deleteProductRequest. After the delete operation is successful, we call the listProductRequest function. In the useEffect Hook, we call the listProductRequest function when the page loads for the first time.
In the jsx, we have a Create Product button that sets the openForm state to true. Then, we use the component/Dialog.tsx component and pass the CreateProduct component we created earlier as a child component.
Next, we have two Message components that render the errorList and errorDelete messages. We also have a Loader component controlled by the loadingList variable.
Lastly, we have a table with name, brand, and other table head values. Meanwhile, as part of the table’s body, we have a link that will navigate the user to a single product screen and a button that calls the handleDelete function.
With all of that set up, we can use the components/AdminManageProducts.tsx component in the pages/manage-products.astro file:
// pages/manage-products.astro
---
import { AdminManageProducts } from '../components/AdminManageProducts';
import { Heading } from '../components/Heading';
import Layout from '../layouts/Layout.astro';
---

<Layout title='Manage Products' description='Manage products'>
  <div class='max-w-[1800px] mx-auto'>
    <Heading text='Manage Products' variant='h1' textAlign='center' client:load />
    <AdminManageProducts client:load />
  </div>
</Layout>
Our Create Product dialog and form should work as shown below:
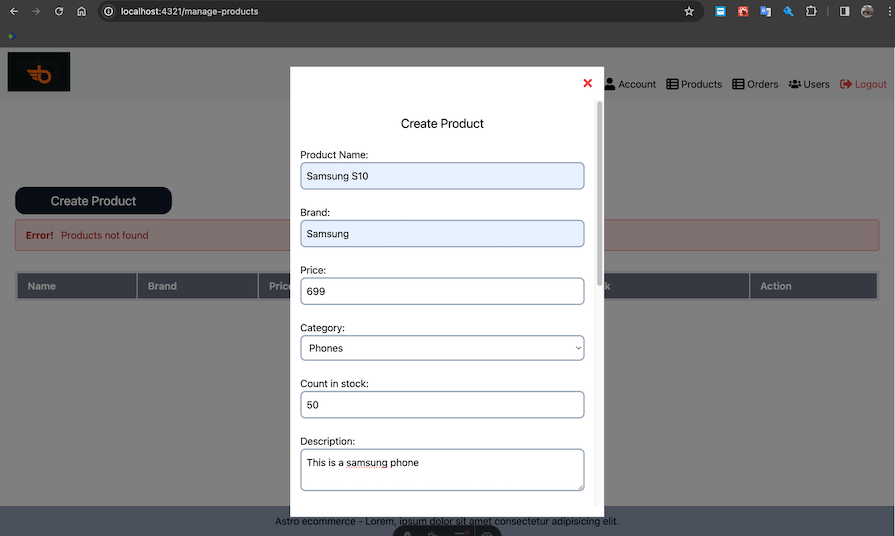
After submitting the product, you should see a table with your products, a View link, and a Remove button:
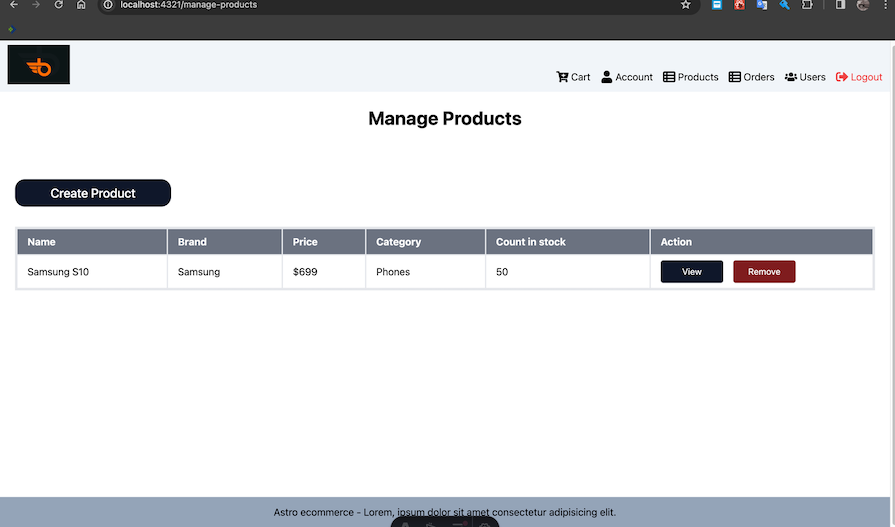
Try creating multiple products to test the delete functionality.
At the moment, clicking on the View button above might result in an error or show a blank screen. To fix that, let’s update our pages/product/[id].astro file. We also have to implement the Rating, AddReview, Select, and ProductDetails components, since we’ll use them on our page.
The Rating component will display a five-star rating system. Depending on the average value of all submitted ratings, it will show full, half, or blank stars. This component accepts value and text props:
value will show the item’s ratingtext will show any extra info about the rating, such as the review countAdd the following code inside the components/Rating.tsx file:
// components/Rating.tsx

import React from 'react';
import { IoMdStarOutline, IoMdStar, IoMdStarHalf } from 'react-icons/io';

type RatingProps = {
  value: number;
  text: string;
};

export const Rating: React.FC<RatingProps> = ({ value, text }) => {
  return (
    <div className=''>
      <div className='flex  text-yellow-500'>
        {value >= 1 ? (
          <IoMdStar size={20} />
        ) : value >= 0.5 ? (
          <IoMdStarHalf size={20} />
        ) : (
          <IoMdStarOutline size={20} />
        )}
        {value >= 2 ? (
          <IoMdStar size={20} />
        ) : value >= 1.5 ? (
          <IoMdStarHalf size={20} />
        ) : (
          <IoMdStarOutline size={20} />
        )}
        {value >= 3 ? (
          <IoMdStar size={20} />
        ) : value >= 2.5 ? (
          <IoMdStarHalf size={20} />
        ) : (
          <IoMdStarOutline size={20} />
        )}
        {value >= 4 ? (
          <IoMdStar size={20} />
        ) : value >= 3.5 ? (
          <IoMdStarHalf size={20} />
        ) : (
          <IoMdStarOutline size={20} />
        )}
        {value >= 5 ? (
          <IoMdStar size={20} />
        ) : value >= 4.5 ? (
          <IoMdStarHalf size={20} />
        ) : (
          <IoMdStarOutline size={20} />
        )}
      </div>
      {text && <span className='text-sm block pl-1 capitalize'>{text}</span>}
    </div>
  );
};
Next, the Select component returns a select tag that generates an array of numbers based on the length passed as prop. It also accepts value, onChange, and other props:
// component/Select.tsx

import React from 'react';
type SelectProps = {
  value: string | number;
  onChange(e: React.ChangeEvent<HTMLSelectElement>): void;
  name?: string;
  length: number;
  maxWidth?: string;
};

const Select: React.FC<SelectProps> = ({ value, onChange, name = 'count in stock', length, maxWidth = '100px' }) => {
  return (
    <select
      name={name}
      onChange={onChange}
      value={value}
      className='border-2 border-slate-400 p-2 rounded-lg w-full'
      style={{ maxWidth }}
    >
      {[...Array.from({ length }).keys()].map((num) => {
        return (
          <option key={num} value={num + 1}>
            {num + 1}
          </option>
        );
      })}
    </select>
  );
};
export default Select;
Now, let’s work on the addReview component. We want to enable users to select a rating value from one to five and add a comment about a product. After, the rating and comment values stored in the state are submitted to the server using the reviewProductRequest function defined in state/product.ts file.
This component will contain the loading and error states derived from errorReviewProduct and loadingReviewProduct. The jsx will contain Select and textarea elements for the rating and component inputs, respectively:
// components/AddReview.tsx

import { useStore } from '@nanostores/react';
import React, { useCallback, useState } from 'react';
import { errorReviewProduct, getProductRequest, loadingReviewProduct, reviewProductRequest } from '../state/products';
import { Button } from './Button';
import { Message } from './Message';
import Select from './Select';

type AddReviewProps = {
  id: string;
};

export const AddReview: React.FC<AddReviewProps> = ({ id }) => {
  const error = useStore(errorReviewProduct);
  const loading = useStore(loadingReviewProduct);
  const [comment, setComment] = useState<string>('');
  const [rating, setRating] = useState<string>('');

  const handleAddReview = useCallback(
    (e: React.FormEvent<HTMLFormElement>) => {
      e.preventDefault();
      if (!comment || !rating) {
        return;
      }
      reviewProductRequest(id, rating, comment).then(() => {
        getProductRequest(id);
        setComment('');
        setRating('');
      });
    },
    [id, rating, comment]
  );

  return (
    <div className='w-full'>
      <h2 className='text-xl   pt-6 pb-2 mx-auto uppercase'>Add Reviews</h2>
      <div>
        <form onSubmit={handleAddReview}>
          {error && <Message variant='danger'>{error}</Message>}
          <div className='flex flex-col'>
            <label htmlFor='rating'>Rating</label>
            <Select length={5} onChange={(e) => setRating(e.target.value)} value={rating} name='rating' />
          </div>
          <br />
          <div>
            <label htmlFor='comment'>Comment</label>
            <textarea
              name='comment'
              id='comment'
              className='border-2 border-slate-400 p-2 rounded-lg w-full'
              value={comment}
              onChange={(e) => {
                setComment(e.target.value);
              }}
              required
            ></textarea>
            <br />
            <Button size='small' loading={loading}>
              Submit
            </Button>
          </div>
        </form>
      </div>
    </div>
  );
};
Next, the components/ProductDetails.tsx component simply accepts an id as its prop. In the component, we’ll define the loadingProduct, errorProduct, and product variables derived from their respective analogs from the state/product.ts file.
We’ll get the product’s rating and reviewsCount from the product value. Similarly, we’ll get the cartItems from the cart defined in state/cart.ts. We’ll then define a qty state and handleAddToCart function that calls the addToCart function defined in state/cart.ts.
Our component houses two useEffect Hooks. In the first, we fetch the product details. In the second, we take the cartItem and set the initial value of the cart item’s qty that matches the id passed in. This approach sets any necessary initial data from a single point of truth.
In the returned jsx, we have some error and loading components, along with some tags to display the information from the fetched product. We also use the Rating and AddReview components we previously created and have a button that calls the handleAddToCart function. Lastly, we have another jsx to return the list of reviews:
// components/ProductDetails.tsx

import { useStore } from '@nanostores/react';
import React, { useCallback, useEffect, useState } from 'react';
import { FaArrowLeft } from 'react-icons/fa';
import { addToCart, cart } from '../state/cart';
import { errorGetProduct, getProductRequest, loadingGetProduct, productGetState } from '../state/products';
import { AddReview } from './AddReview';
import { Button } from './Button';
import { Heading } from './Heading';
import { Loader } from './Loader';
import { Message } from './Message';
import { Rating } from './Rating';
import Select from './Select';

type ProductDetailsProps = {
  id: string;
};
export const ProductDetails: React.FC<ProductDetailsProps> = ({ id }) => {
  const loadingProduct = useStore(loadingGetProduct);
  const errorProduct = useStore(errorGetProduct);
  const product = useStore(productGetState);
  const rating = product?.rating;
  const reviewsCount = product?.reviews?.length;
  const cartItems = useStore(cart);

  const [qty, setQty] = useState<string | number>('1');

  const handleAddToCart = useCallback(async (quantity: string | number) => {
    await addToCart(id, Number(quantity));
  }, []);

  useEffect(() => {
    getProductRequest(id);
  }, [id]);

  useEffect(() => {
    const cartItem = cartItems?.find((cartItem) => cartItem?.product === id);
    setQty(cartItem?.qty || 1);
  }, [cartItems]);

  return (
    <section>
      {errorProduct && <Message variant='danger'>{errorProduct}</Message>}
      {loadingProduct && <Loader variant='large' />}
      <Heading text={product?.name || ''} variant='h1' textAlign='center' />
      <a
        href='/'
        className='bg-slate-900 text-white rounded px-4 py-2  w-full max-w-[100px] flex gap-3 justify-center  cursor-pointer hover:bg-slate-800 text-sm items-center'
      >
        <FaArrowLeft size={15} /> Back
      </a>
      <div className='grid grid-cols-1 md:grid-cols-3 gap-8 py-6'>
        <article>
          <div>
            <img src={product.image} alt={product.name} className='w-full h-[500px] object-cover' />
          </div>
          <h2 className='text-xl md:text-2xl  pt-6 pb-2 mx-auto uppercase'>Customer Reviews</h2>
          {!product?.reviews?.length && <Message variant='info'>There are no Reviews</Message>}
          {product?.reviews?.map((review) => {
            return (
              <div className='border-2 mb-4 p-2'>
                <div>
                  <span>{review?.name}</span>
                  <span>
                    <Rating text={''} value={review?.rating} />
                  </span>
                </div>
                <p>{review?.comment}</p>
              </div>
            );
          })}
        </article>
        <article>
          <div>
            <h2 className='text-xl md:text-2xl  mx-auto border px-4 pt-4 pb-8 uppercase'>{product?.name}</h2>
            <div className='text-xl md:text-2xl  mx-auto border border-t-0 px-4 pt-4 pb-3'>
              <Rating value={rating} text={`${reviewsCount} reviews`} />
            </div>
            <div className='text-sm block  capitalize mx-auto border border-t-0 px-4 pt-4 pb-3'>
              Price: ${product?.price}
            </div>
            <div className='text-sm block  mx-auto border border-t-0 px-4 pt-4 pb-3'>
              Description: {product?.description}
            </div>
            <AddReview id={id} />
          </div>
        </article>
        <article>
          <div className='text-sm flex gap-4   mx-auto border border-t-0 px-4 pt-4 pb-3'>Price: ${product?.price}</div>
          <div className='text-sm flex gap-4   mx-auto border border-t-0 px-4 pt-4 pb-3'>
            Status: {product?.countInStock ? 'In Stock' : 'Out of Stock'}
          </div>
          <div className='text-sm flex gap-4 items-center  mx-auto border border-t-0 px-4 pt-4 pb-3'>
            Quantity:
            <Select length={product?.countInStock} onChange={(e) => setQty(e.target.value)} value={qty} />
          </div>
          <div className='text-sm flex gap-4   mx-auto border border-t-0 px-4 pb-3 justify-center'>
            <Button size='small' onClick={() => handleAddToCart(qty)} type='button'>
              ADD TO CART
            </Button>
          </div>
        </article>
      </div>
    </section>
  );
};
Now, let’s update our product/[id].astro file to match the below:
// product/[id].astro

---
import { ProductDetails } from '../../components/ProductDetails';
import Layout from '../../layouts/Layout.astro';
const id = Astro.url?.pathname?.split('/')[2];
---

<Layout title='Manage Products' description='Manage products'>
  <div class='max-w-[1800px] mx-auto px-4'>
    <ProductDetails client:load id={id || ''} />
  </div>
</Layout>
Notice that we’re grabbing the id from the url before passing it as a prop to the ProductDetails.tsx component. Now, navigating to a product screen should result in something like this:
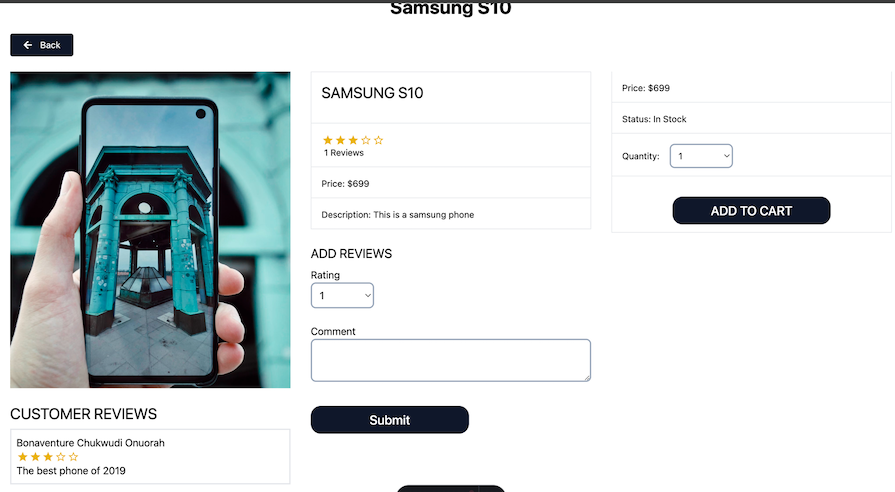
Note that you can now select a quantity and add the item to the cart.
The cart screen will house the cart items list. First, let’s build the CartItem component that will be responsible for updating the quantity of a cart item or removing the cart item entirely.
Open components/CartItem.tsx component and add this code:
// components/CartItem.tsx

import React, { useCallback, useState } from 'react';
import { addToCart, removeFromCart } from '../state/cart';
import type { ICartItem } from '../state/cart';
import Select from './Select';
import { FaTrash } from 'react-icons/fa';

export const CartItem: React.FC<ICartItem> = ({ image, name, price, product, qty, countInStock }) => {

  const [quantity, setQuantity] = useState<number | string>(qty);

  const handleCartQuantityUpdate = useCallback(async (quantity: string) => {
    await addToCart(product, Number(quantity));
  }, []);

  const handleRemoveFromCart = useCallback(async () => {
    await removeFromCart(product);
  }, []);

  return (
    <div className=' w-full max-w-[600px] border-4 mb-6 mx-auto p-4 bg-slate-50'>
      <article className='flex gap-6 items-center  w-full  flex-col md:flex-row'>
        <div>
          <div className='w-[100px] h-[100px] '>
            <img src={image} className='w-[100px] h-[100px] object-cover' />
          </div>
        </div>
        <div className='whitespace-nowrap'>
          <p>{name}</p>
        </div>
        <div>
          <p>${price}</p>
        </div>
        <div className='w-full min-w-[120px] mx-auto flex justify-center'>
          <Select
            length={countInStock}
            onChange={(e) => {
              handleCartQuantityUpdate(e.target.value);
              setQuantity(e.target.value);
            }}
            value={quantity.toString()}
            maxWidth={'120px'}
          />
        </div>
        <div>
          <FaTrash className='text-gray-700 cursor-pointer' size={20} onClick={handleRemoveFromCart} />
        </div>
      </article>
    </div>
  );
};
The CartItem component accepts the ICartItem type we previously defined in the state/cart.ts file. It also contains:
quantity state initialized from the product quantity received as a prophandleCartQuantityUpdate function that simply calls the addToCart function to update the quantity of the cart itemhandleRemoveFromCart function that calls the removeFromCart functionIn the jsx, we simply have a Select component to change the quantity and a trash icon that calls the handleRemoveFromCart, among other markups.
Next, let’s implement the CartList component. After importing dependencies, we will derive our cartItem from the cart global state. Then, we’ll calculate the subTotalQuantity and subTotalAmount, which we’ll eventually pass to the jsx.
In the jsx, we have a Message component with a link, which will only be displayed when there are no cart items. The other part of the jsx is the loop for the CartItem and also the link to navigate to the checkout screen. The components/CartList.tsx file should look similar to this:
// components/CartList.tsx

import { useStore } from '@nanostores/react';
import { useMemo } from 'react';
import { cart } from '../state/cart';
import type { ICartItem } from '../state/cart';
import { CartItem } from './CartItem';
import { Message } from './Message';

type CartListProps = {};

export const CartList: React.FC<CartListProps> = () => {
  const cartItems = useStore(cart);

  const subTotalQuantity = useMemo(() => {
    return cartItems?.reduce((cummulation, item) => cummulation + item.qty, 0);
  }, [cartItems]);

  //   Total amount of individual items
  const subTotalAmount = useMemo(() => {
    return cartItems
      ?.reduce((cummulation: number, item: ICartItem) => cummulation + item.qty * item.price, 0)
      .toFixed(2);
  }, [cartItems]);

  return (
    <section className='p-6'>
      {!cartItems?.length && (
        <Message variant='secondary'>
          You have selected no items{' '}
          <a href='/' className='underline text-blue-500'>
            Go Home
          </a>
        </Message>
      )}
      {cartItems?.length && (
        <div className='flex gap-10 justify-center'>
          <div>
            {cartItems?.map((cartItem) => {
              return (
                <CartItem
                  countInStock={cartItem?.countInStock}
                  image={cartItem?.image}
                  name={cartItem?.name}
                  price={cartItem?.price}
                  product={cartItem?.product}
                  qty={cartItem?.qty}
                />
              );
            })}
          </div>
          <div>
            <article className=' w-full max-w-[600px] border-4 mb-6 mx-auto bg-slate-50 py-4'>
              <h2 className='text-xl md:text-2xl  pb-2 px-4 mx-auto uppercase border border-t-0'>
                Subtotal ({subTotalQuantity}) items
              </h2>
              <div className='text-sm flex gap-4   mx-auto border border-t-0 px-4 pt-4 pb-3'>${subTotalAmount}</div>
              <div className='text-sm flex gap-4   mx-auto px-4 pb-3 justify-center'>
                <a
                  href='/checkout'
                  className='bg-slate-900 text-white  px-2 py-2  w-full max-w-[250px] flex gap-3 justify-center mt-8 cursor-pointer hover:bg-slate-800'
                >
                  PROCEED TO CHECKOUT
                </a>
              </div>
            </article>
          </div>
        </div>
      )}
    </section>
  );
};
Finally, the pages/cart.astro file will look similar to this:
// pages/cart.astro

---
import { Heading } from '../components/Heading';
import Layout from '../layouts/Layout.astro';
import { CartList } from '../components/CartList';
---

<Layout title='Cart Items' description='Cart Items'>
  <div class='max-w-[1800px] mx-auto'>
    <Heading text='Cart Items' variant='h1' textAlign='center' client:load />
    <CartList client:load />
  </div>
</Layout>
Here’s how the resulting cart component should look now:
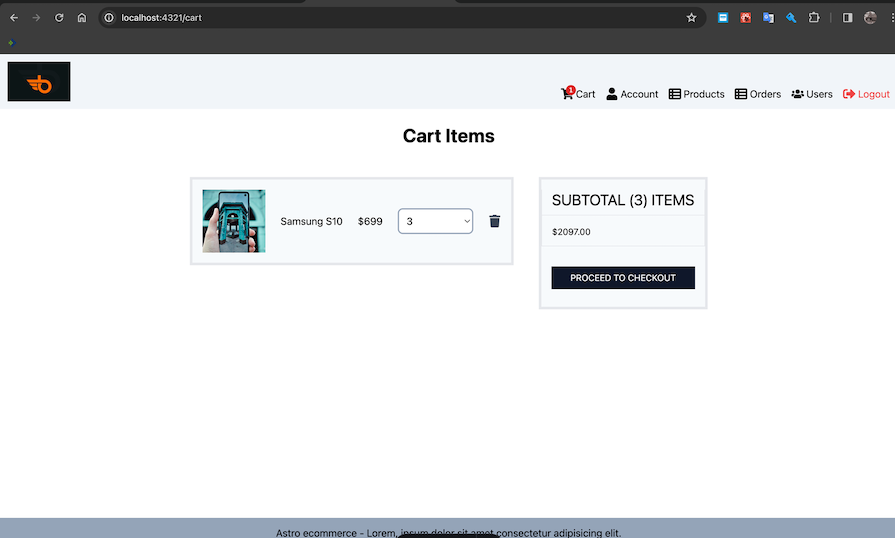
The checkout page contains three subpages: Shipping, Payment, and PlaceOrder. To assemble the pages properly, we’ll start by building the shipping page.
The shipping page simply contains a form for the user’s shipping address info — including address, city, postalCode, and country — all put in a local state.
After the form is filled, we simply save the address to the localStorage and redirect the user to a new page. On the initial render of the new page, we get the shipping address from the localStorage and store it to the local state.
To implement this screen, open the components/Shipping.tsx file and add the following code:
// components/Shipping.tsx

import React, { useCallback, useEffect, useState } from 'react';
import { Button } from './Button';
import { Heading } from './Heading';

type ShippingProps = {};
export const Shipping: React.FC<ShippingProps> = () => {
  const [address, setAddress] = useState<string>('');
  const [city, setCity] = useState<string>('');
  const [postalCode, setPostalCode] = useState<string>('');
  const [country, setCountry] = useState<string>('');

  const handleSaveShippingAddress = useCallback(
    (e: React.FormEvent<HTMLFormElement>) => {
      e.preventDefault();
      localStorage.setItem('shippingAddress', JSON.stringify({ address, city, postalCode, country }));
      window.location.replace('/checkout?segment=payment');
    },
    [address, city, postalCode, country]
  );

  useEffect(() => {
    // Once Page loads prefill info from storage
    const shippingStorage = localStorage.getItem('shippingAddress')
      ? JSON.parse(localStorage.getItem('shippingAddress') || '')
      : null;
    if (shippingStorage) {
      setAddress(shippingStorage?.address);
      setCity(shippingStorage?.city);
      setPostalCode(shippingStorage?.postalCode);
      setCountry(shippingStorage?.country);
    }
  }, []);

  return (
    <div>
      <form onSubmit={handleSaveShippingAddress} className='max-w-[500px] mx-auto py-6 pb-28'>
        <Heading text='Shipping Address' variant='h3' />
        <br />
        <div>
          <label htmlFor='address'>Address:</label>
          <input
            type='text'
            name='address'
            id='address'
            required
            placeholder='Enter address'
            className='border-2 border-slate-400 p-2 rounded-lg w-full'
            value={address}
            onChange={(e) => {
              setAddress(e.target.value);
            }}
          />
        </div>
        <br />
        <div>
          <label htmlFor='city'>City:</label>
          <input
            type='text'
            name='city'
            id='city'
            required
            placeholder='Enter city'
            className='border-2 border-slate-400 p-2 rounded-lg w-full'
            value={city}
            onChange={(e) => {
              setCity(e.target.value);
            }}
          />
        </div>
        <br />
        <div>
          <label htmlFor='postalCode'>Postal Code</label>
          <input
            type='text'
            name='postalCode'
            id='postalCode'
            required
            placeholder='Enter postal Code'
            className='border-2 border-slate-400 p-2 rounded-lg w-full'
            value={postalCode}
            onChange={(e) => {
              setPostalCode(e.target.value);
            }}
          />
        </div>
        <br />
        <div>
          <label htmlFor='country'>Country</label>
          <input
            type='text'
            name='country'
            id='country'
            required
            placeholder='Enter country'
            className='border-2 border-slate-400 p-2 rounded-lg w-full'
            value={country}
            onChange={(e) => {
              setCountry(e.target.value);
            }}
          />
        </div>
        <br />
        <Button>Save</Button>
      </form>
    </div>
  );
};
The payment page behaves in a similar way to the shipping page, but manages the payment method instead. We can open components/Payment.tsx and add the following code:
// components/Payment.tsx

import React, { useCallback, useEffect, useState } from 'react';
import { Button } from './Button';
import { Heading } from './Heading';

type PaymentProps = {};

export const Payment: React.FC<PaymentProps> = () => {
  const [paymentMethod, setPaymentMethod] = useState<string>('paystack');

  const handleSavePaymentMethod = useCallback((e: React.FormEvent<HTMLFormElement>) => {
    e.preventDefault();
    localStorage.setItem('paymentMethod', JSON.stringify({ paymentMethod }));
    window.location.replace('/checkout?segment=place-order');
  }, []);

  useEffect(() => {
    // Once Page loads prefill info from storage
    const paymentMethodStorage = localStorage.getItem('paymentMethod')
      ? JSON.parse(localStorage.getItem('paymentMethod') || '')
      : null;
    if (paymentMethodStorage) {
      setPaymentMethod(paymentMethodStorage?.paymentMethod);
    }
  }, []);

  return (
    <div>
      <form onSubmit={handleSavePaymentMethod} className='max-w-[500px] mx-auto py-6 pb-28'>
        <Heading text='Payment Method' variant='h3' />
        <br />
        <div className='flex gap-4'>
          <label htmlFor='paystack'>Address:</label>
          <input
            type='radio'
            name='paymentMethod'
            id='paystack'
            required
            className='border-2 border-slate-400 p-2 rounded-lg'
            value={'paystack'}
            checked={paymentMethod === 'paystack'}
            onChange={(e) => {
              setPaymentMethod(e.target.value);
            }}
          />
        </div>
        <br />
        <div className='flex gap-4'>
          <label htmlFor='paypal'>Paypal:</label>
          <input
            type='radio'
            name='paymentMethod'
            id='paypal'
            className='border-2 border-slate-400 p-2 rounded-lg'
            value={'paypal'}
            checked={paymentMethod === 'paypal'}
            disabled
            onChange={(e) => {
              setPaymentMethod(e.target.value);
            }}
          />
        </div>
        <br />
        <Button>Save</Button>
      </form>
    </div>
  );
};
PlaceOrder pageThe code for the components/PlaceOrder.tsx file is as follows:
// components/PlaceOrder.tsx

import { useStore } from '@nanostores/react';
import React, { useState, useEffect, useMemo, useCallback } from 'react';
import { cart } from '../state/cart';
import type { ICartItem } from '../state/cart';
import { Button } from './Button';
import { errorPlaceOrder, loadingPlaceOrder, placeOrderRequest } from '../state/order';
import { Loader } from './Loader';
import { Message } from './Message';

const formatWithDecimals = (value: number) => {
  return (Math.round(value * 100) / 100).toFixed(2);
};

type PlaceOrderProps = {};

export const PlaceOrder: React.FC<PlaceOrderProps> = () => {
  const cartItems = useStore(cart);
  const loading = useStore(loadingPlaceOrder);
  const error = useStore(errorPlaceOrder);
  const [address, setAddress] = useState<string>('');
  const [city, setCity] = useState<string>('');
  const [postalCode, setPostalCode] = useState<string>('');
  const [country, setCountry] = useState<string>('');
  const [paymentMethod, setPaymentMethod] = useState<string>('paystack');

  const priceSummation = useMemo(() => {
    const itemsPrice = formatWithDecimals(
      (cartItems || [])?.reduce((cummulation, item) => cummulation + item.price * item.qty, 0)
    );
    // Calculate shipping fee
    const shippingFee = 50;
    // calculate tax fee
    const taxFee = 0;
    const totalPrice = formatWithDecimals(Number(itemsPrice) + Number(shippingFee) + Number(taxFee));
    return {
      itemsPrice,
      shippingFee,
      taxFee,
      totalPrice,
    };
  }, [cartItems]);

  const handlePlaceOrder = useCallback(async () => {
    if (!address || !city || !postalCode || !country || !paymentMethod) {
      return;
    }
    const shippingAddress = { address, city, postalCode, country };
    await placeOrderRequest(
      cartItems || [],
      shippingAddress,
      paymentMethod,
      Number(priceSummation?.itemsPrice),
      priceSummation?.taxFee,
      Number(priceSummation?.totalPrice),
      priceSummation?.shippingFee
    );
  }, [address, city, postalCode, country, paymentMethod, priceSummation, cartItems]);

  useEffect(() => {
    // Once Page loads prefill info from storage
    const shippingStorage = localStorage.getItem('shippingAddress')
      ? JSON.parse(localStorage.getItem('shippingAddress') || '')
      : null;
    if (shippingStorage) {
      setAddress(shippingStorage?.address);
      setCity(shippingStorage?.city);
      setPostalCode(shippingStorage?.postalCode);
      setCountry(shippingStorage?.country);
    }
    // Once Page loads prefill info from storage
    const paymentMethodStorage = localStorage.getItem('paymentMethod')
      ? JSON.parse(localStorage.getItem('paymentMethod') || '')
      : null;
    if (paymentMethodStorage) {
      setPaymentMethod(paymentMethodStorage?.paymentMethod);
    }
  }, []);

  return (
    <div className='max-w-[900px] mx-auto py-6 pb-28'>
      {loading && <Loader variant='large' />}
      {error && <Message variant='danger'>{error}</Message>}
      <div className='flex gap-6 justify-center'>
        <div className='w-full max-w-[500px] flex-1'>
          <div className='border-b-2 p-4'>
            <h2 className='text-xl md:text-2xl  pt-6 pb-2 mx-auto uppercase text-gray-700'>Shipping Address </h2>
            <p className='text-gray-600'>
              {address}, {postalCode}, {city}, {country}.
            </p>
          </div>
          <div className='border-b-2 p-4'>
            <h2 className='text-xl md:text-2xl  pt-6 pb-2 mx-auto uppercase text-gray-700'>Payment Method </h2>
            <p className='text-gray-600 capitalize'>{paymentMethod}</p>
          </div>
          <div className='border-b-2 p-4'>
            <h2 className='text-xl md:text-2xl  pt-6 pb-2 mx-auto uppercase text-gray-700'>Order Items </h2>
            {cartItems?.map((cartItem, index) => (
              <PlaceOrderItem cartItem={cartItem} key={`${cartItem?.name}${index}`} />
            ))}
          </div>
        </div>
        <div className='w-[400px] py-6'>
          <div className='  text-gray-700'>
            <h2 className='text-xl md:text-2xl border-2   pb-2 mx-auto uppercase text-gray-700  p-4'>Order Summary</h2>
          </div>
          <div className='border-2 border-t-0 flex justify-between text-gray-600 p-2 py-4'>
            <p>Items Price:</p>
            <p className='text-left'>${priceSummation?.itemsPrice}</p>
          </div>
          <div className='border-2 border-t-0 flex justify-between text-gray-600 p-2 py-4'>
            <p>Shipping fee:</p>
            <p className='text-left'>${priceSummation?.shippingFee}</p>
          </div>
          <div className='border-2 border-t-0 flex justify-between text-gray-600 p-2 py-4'>
            <p>Tax fee:</p>
            <p className='text-left'>${priceSummation?.taxFee}</p>
          </div>
          <div className='border-2 border-t-0 flex justify-between text-gray-600 p-2 py-4'>
            <p>Total fee:</p>
            <p className='text-left'>${priceSummation?.totalPrice}</p>
          </div>
          <div className='text-sm flex gap-4   mx-auto border-2 border-t-0 px-4 pb-3 justify-center'>
            <Button
              size='small'
              type='button'
              disabled={!address || !city || !postalCode || !country || !paymentMethod || loading}
              onClick={handlePlaceOrder}
            >
              Place Order {loading && <Loader variant='small' />}
            </Button>
          </div>
        </div>
      </div>
    </div>
  );
};
type PlaceOrderItemProps = {
  cartItem: ICartItem;
};
const PlaceOrderItem: React.FC<PlaceOrderItemProps> = ({ cartItem }) => {
  return (
    <div className='text-gray-600 flex justify-between mb-4 items-end'>
      <div>
        <div style={{ width: '50px' }}>
          <img src={cartItem?.image} className='w-full h-full object-cover' />
        </div>
      </div>
      <div>
        <p>{cartItem?.name}</p>
      </div>
      <div>
        {cartItem?.qty} x ${cartItem?.price} = ${cartItem?.qty * cartItem?.price}
      </div>
    </div>
  );
};
The PlaceOrder page is where we take the details we have collected so far and save them to the server. After importing variables, we’ll define a utility function to round up numbers to two decimal places.
Then inside the component, we get:
cartItems from cartloading from loadingPlaceOrdererror from errorPlaceOrderAfter, we’ll define states to hold the details that we will be fetching from the localStorage. We’ll also have a priceSummation memo to calculate the itemsPrice, shippingFee, taxFee, and totalPrice.
We’ll set up a handlePlaceOrder function we can use to call the placeOrderRequest function in state/order. In the useEffect Hook, we are simply getting the shippingAddress and paymentMethod from the localStorage and setting it to the local state.
In the jsx, we’re simply displaying the details of the order items. Notably, we have the PlaceOrderItem component and a Place Order button users can click to place their orders. Now that the order placement logic is done, let’s handle payments in the next section.
CheckoutCart component and checkout.astro pageThe CheckoutCart component simply groups the shipping, payment, and place-order pages. It also contains a local navbar for navigating between the pages. Most importantly, it accepts a segment as a prop. The component should now look similar to this:
// components/CheckoutCart.tsx

import React from 'react';
import { Payment } from './Payment';
import { PlaceOrder } from './PlaceOrder';
import { Shipping } from './Shipping';

type CheckoutCartProps = {
  segment: string;
};

export const CheckoutCart: React.FC<CheckoutCartProps> = ({ segment }) => {
  return (
    <section className='px-4 '>
      <div className='flex justify-center gap-6 mb-8'>
        <a href='/checkout?segment=shipping' className={segment !== 'shipping' ? 'text-gray-500' : 'text-gray-800'}>
          Shipping
        </a>
        <a href='/checkout?segment=payment' className={segment !== 'payment' ? 'text-gray-500' : 'text-gray-800'}>
          Payment
        </a>
        <a
          href='/checkout?segment=place-order'
          className={segment !== 'place-order' ? 'text-gray-500' : 'text-gray-800'}
        >
          Place Order
        </a>
      </div>
      <div>
        {segment === 'shipping' && <Shipping />}
        {segment === 'payment' && <Payment />}
        {segment === 'place-order' && <PlaceOrder />}
      </div>
    </section>
  );
};
Meanwhile, the pages/checkout.astro page will extract the segment from the url and pass it to the CheckoutCart component:
// pages/checkout.astro

---
import { Heading } from '../components/Heading';
import Layout from '../layouts/Layout.astro';
import { CheckoutCart } from '../components/CheckoutCart';
const segment = Astro.url?.search?.split('=')[1] || 'shipping';
---

<Layout title='Checkout ' description='Checkout'>
  <div class='max-w-[1800px] mx-auto'>
    <Heading text='Checkout' variant='h1' textAlign='center' client:load />
    <CheckoutCart segment={segment} client:load />
  </div>
</Layout>
The checkout flow should now look similar to the below. First, the user will put in their shipping information:
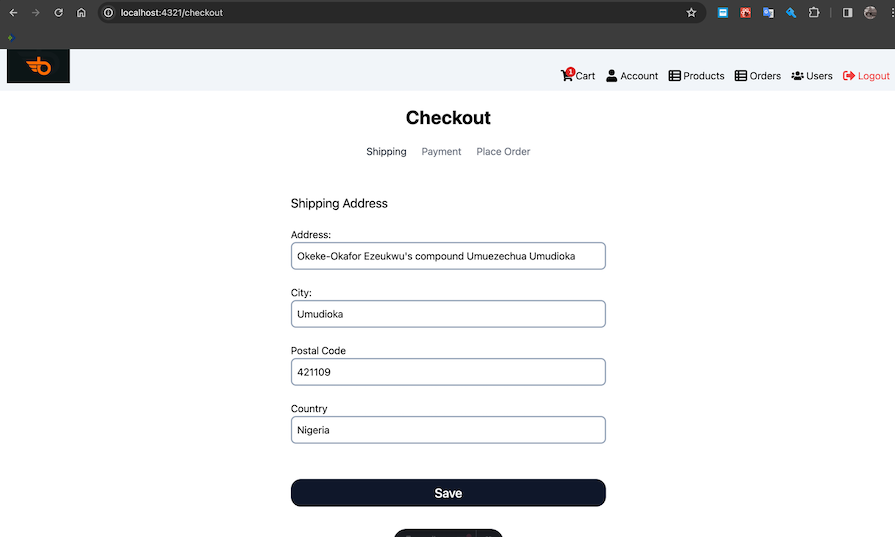
Next up is the payment method:
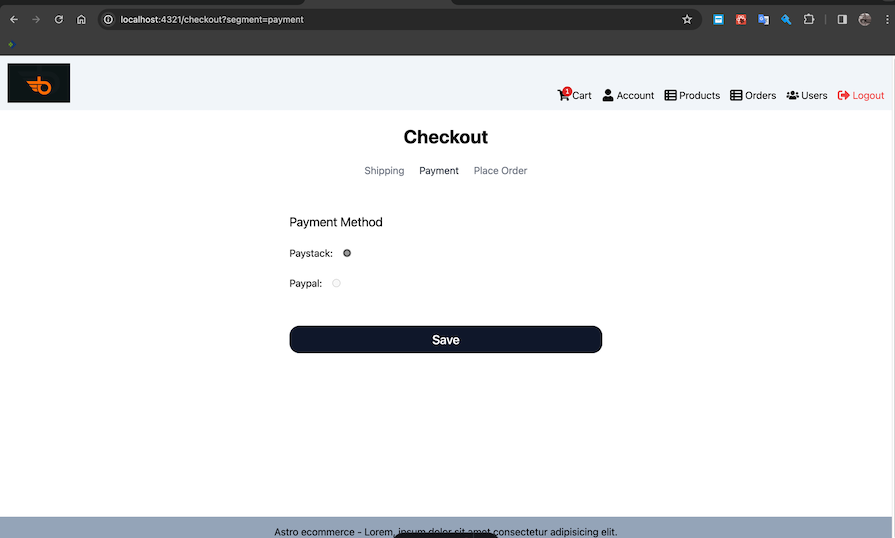
Finally, there is the order summary screen where the user can place their order:
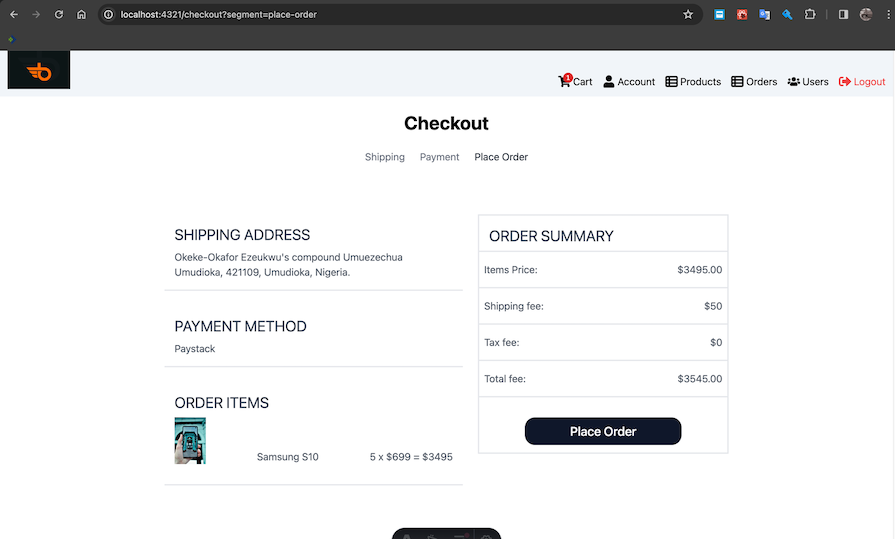
After clicking on the Place Order button in the page above, and once the order is successfully processed, users will be redirected to the order/:order-id page. At the moment, this screen hasn’t been built, so it will throw an error or display a white screen. Let’s add the order details screen now.
Before we add the components/OrderDetails.tsx screen, we must first implement the components/PaymentProcessor.tsx component. This component will implement our desired payment platform — Paypal, Paystack, etc.
For this tutorial, we’ll be using Paystack. In the components/PaymentProcessor.tsx file, add the following code:
// components/PaymentProcessor.tsx

import { useStore } from '@nanostores/react';
import React, { useCallback, useEffect, useState } from 'react';
import { PaystackButton } from 'react-paystack';
import { authState } from '../state/auth';
import type { IPaymentResult } from '../state/order';

type PaymentResponseType = {
  reference: string;
  trans: string;
  status: string;
  message: string;
  transaction: string;
  trxref: string;
  redirecturl: string;
};

type PaymentProcessorProps = {
  amount: number;
  onPlaceOrder(paymentResult: IPaymentResult): void;
};

export const PaymentProcessor: React.FC<PaymentProcessorProps> = ({ amount, onPlaceOrder }) => {
  const user = useStore(authState);
  const [paymentMethod, setPaymentMethod] = useState<string>('paystack');

  const config = {
    reference: new Date().getTime().toString(),
    email: user?.email,
    amount: amount * 100, //Amount is in the country's lowest currency. E.g Kobo, so 20000 kobo = N200
    publicKey: 'Your public key',
  };
  // you can call this function anything
  const handlePaystackSuccessAction = useCallback((reference: PaymentResponseType) => {
    // Place order here
    onPlaceOrder({
      message: reference?.message,
      reference: reference?.reference,
      status: reference?.status,
      transactionId: reference?.transaction,
    });
  }, []);

// Mock payment
  const handleMockSuccessAction = useCallback(() => {
    // Place order here
    onPlaceOrder({
      message: 'Approved',
      reference: 'Mock-1234',
      status: 'success',
      transactionId: 'Mock-1234',
    });
  }, []);

  // you can call this function anything
  const handlePaystackCloseAction = useCallback(() => {
    // implementation for  whatever you want to do when the Paystack dialog closed.
    console.log('closed');
  }, []);

  const componentProps = {
    ...config,
    text: 'Make Payment',
    onSuccess: (reference: PaymentResponseType) => handlePaystackSuccessAction(reference),
    onClose: handlePaystackCloseAction,
  };

  useEffect(() => {
    // Once Page loads prefill info from storage
    const paymentMethodStorage = localStorage.getItem('paymentMethod')
      ? JSON.parse(localStorage.getItem('paymentMethod') || '')
      : null;
    if (paymentMethodStorage) {
      setPaymentMethod(paymentMethodStorage?.paymentMethod);
    }
  }, []);

  return (
    <div>
      {paymentMethod === 'paystack' && (
        <PaystackButton
          {...componentProps}
          className='bg-slate-900 text-white rounded-2xl px-5 py-2 text-lg md:text-xl font-medium w-full  flex gap-3 justify-center cursor-pointer hover:bg-slate-800'
        />
      )}
      {/* USe this to mock payment */}
      {/*       {paymentMethod === 'paystack' && (
        <button
          onClick={handleMockSuccessAction}
          className='bg-slate-900 text-white rounded-2xl px-5 py-2 text-lg md:text-xl font-medium w-full  flex gap-3 justify-center cursor-pointer hover:bg-slate-800'
        >
          Make payment
        </button>
      )} */}
    </div>
  );
};
The PaymentProcessor component is used to process payment using a given platform. It accepts an amount and an onPlaceOrder callback function as props. The onPlaceOrder callback accepts a payment result type defined in state/order.ts and will be used to pass data back to our component’s parent.
Inside the PaymentProcessor component, we extract the authState and store it in a user variable. We then define a paymentMethod state, which we will update in the useEffect Hook. We also define a config object which contains the necessary as requested by the react-paystack library.
Note that the step above might be a different for you if you use another payment platform.
Then, we define the handlePaystackSuccessAction, which is automatically called when the payment is successful at Paystack. Finally, we assemble the values in the componentProps, which we then pass to the PaystackButton in the jsx.
You can head over to Paystack’s website to create a new account, generate a public key, and replace the publicKey placeholder in the config object above. However, if you are having issues using Paystack, you use the handleMockSuccessAction and the commented-out button in the jsx.
Having implemented the PaymentProcessor.tsx component, we can go ahead and implement the OrderDetails component:
// components/OrderDetails.tsx

import { useStore } from '@nanostores/react';
import React, { useCallback, useEffect } from 'react';
import {
  deliveryRequest,
  errorDelivery,
  errorGetOrder,
  errorPay,
  getOrderDetailsRequest,
  loadingDelivery,
  loadingGetOrder,
  loadingPay,
  orderGetState,
  payRequest,
} from '../state/order';
import type { IPaymentResult } from '../state/order';
import { Heading } from './Heading';
import { Loader } from './Loader';
import { Message } from './Message';
import { PaymentProcessor } from './PaymentProcessor';
import { authState } from '../state/auth';

type OrderDetailsProps = {
  id: string;
};

export const OrderDetails: React.FC<OrderDetailsProps> = ({ id }) => {
  const loadingOrder = useStore(loadingGetOrder);
  const errorOrder = useStore(errorGetOrder);
  const order = useStore(orderGetState);

  const user = useStore(authState);
  const isAdminLoggedIn = Boolean(user.isAdmin);

  const loadingPayment = useStore(loadingPay);
  const errorPayment = useStore(errorPay);

  const loadingDeliver = useStore(loadingDelivery);
  const errorDeliver = useStore(errorDelivery);

  const handleUpdatePaymentStatus = useCallback(
    async (paymentResult: IPaymentResult) => {
      // Make payment here
      payRequest(id, paymentResult).then(() => {
        getOrderDetailsRequest(id);
      });
    },
    [id]
  );

  const handleUpdateDeliveryStatus = useCallback(async () => {
    // Approved delivery status
    deliveryRequest(id).then(() => {
      getOrderDetailsRequest(id);
    });
  }, [id]);

  useEffect(() => {
    getOrderDetailsRequest(id);
  }, []);

  return (
    <section className='max-w-[1000px] mx-auto'>
      {errorOrder && <Message variant='danger'>{errorOrder}</Message>}
      {loadingOrder && <Loader variant='large' />}
      <Heading text={`Order Details: ${order?._id}`} variant='h1' textAlign='center' />
      <div className='grid grid-cols-1 md:grid-cols-2 gap-8 pb-8'>
        <div>
          <article>
            <Heading text='Shipping' variant='h2' />
            <p className='py-4 text-gray-600'>
              <strong>Name: </strong> {order?.user?.name}
            </p>
            <p className='pb-4 text-gray-600'>
              <strong>Email: </strong> <a href={`mailto:${order?.user?.email}`}>{order?.user?.email}</a>
            </p>
            <p className='pb-4 text-gray-600'>
              <strong>Address:</strong>
              {order?.shippingAddress?.address}, {order?.shippingAddress?.city} {order?.shippingAddress?.postalCode},{' '}
              {order?.shippingAddress?.country}
            </p>
            {order?.isDelivered ? (
              <Message variant='success'>
                <>Delivered on {order?.deliveredAt}</>
              </Message>
            ) : (
              <Message variant='secondary'>Not Delivered</Message>
            )}
          </article>
          <article className='mt-8'>
            <Heading text='Payment Method' variant='h2' />
            <p className='capitalize'>
              <strong>Method: </strong>
              {order.paymentMethod}
            </p>
            {order.isPaid ? (
              <Message variant='success'>
                <>Paid on {order.paidAt}</>
              </Message>
            ) : (
              <Message variant='secondary'>Not Paid</Message>
            )}
          </article>
          <article className='mt-8'>
            {!order?.orderItems?.length && <Message variant='danger'>You have no order items</Message>}
            <div className='flex flex-col'>
              {!order?.orderItems?.length && <Message variant='danger'>You have no order items</Message>}
              {order?.orderItems?.map((orderItem, index) => {
                return (
                  <div key={`${orderItem?.name}${index}`} className='flex gap-6 items-end'>
                    <div style={{ width: '100px', height: '100px' }}>
                      <img src={orderItem?.image} alt={orderItem?.name} className='w-full h-full object-cover' />
                    </div>
                    <div>
                      <a href={`/product/${orderItem?.product}`}>{orderItem?.name}</a>
                    </div>
                    <div>
                      <p>
                        {orderItem?.qty} x ${orderItem.price} = ${orderItem?.qty * orderItem?.price}
                      </p>
                    </div>
                  </div>
                );
              })}
            </div>
          </article>
        </div>
        <div>
          <article>
            <Heading text='Order Summary' variant='h2' />
            <div className='max-w-[300px] border-2 mt-4'>
              <div className='p-4 text-gray-600 flex justify-between items-center border-b-2'>
                <p>Items Price:</p>
                <p>${order?.itemsPrice}</p>
              </div>
              <div className='p-4 text-gray-600  flex justify-between items-center  border-b-2'>
                <p>Shipping fee:</p>
                <p>${order?.shippingPrice}</p>
              </div>
              <div className='p-4 text-gray-600 flex justify-between items-center  border-b-2'>
                <p>Tax:</p>
                <p>${order?.taxPrice}</p>
              </div>
              <div className='p-4 text-gray-600 flex justify-between items-center  border-b-2'>
                <p>Total Price</p>
                <p>${order?.totalPrice}</p>
              </div>
              {errorPayment && <Message variant='danger'>{errorPayment}</Message>}
              {loadingPayment && <Loader variant='small' />}
              <div className='p-4 text-gray-600 flex justify-between items-center  border-b-2'>
                {order?.isPaid ? <p>Payment Status:</p> : null}
                <p className={!order?.isPaid ? 'flex-1' : ''}>
                  {order?.isPaid ? (
                    'Paid'
                  ) : (
                    <PaymentProcessor amount={order?.totalPrice} onPlaceOrder={handleUpdatePaymentStatus} />
                  )}
                </p>
              </div>
              {errorDeliver && <Message variant='danger'>{errorDeliver}</Message>}
              {loadingDeliver && <Loader variant='small' />}
              {isAdminLoggedIn && (
                <div className='p-4 text-gray-600 flex justify-between items-center  border-b-2'>
                  {order?.isDelivered ? <p>Delivery Status:</p> : null}
                  <p className={!order?.isDelivered ? 'flex-1' : ''}>
                    {order?.isDelivered ? (
                      'Delivered'
                    ) : (
                      <button
                        onClick={handleUpdateDeliveryStatus}
                        className='bg-slate-900 text-white rounded-2xl px-5 py-2 text-lg md:text-xl font-medium w-full  flex gap-3 justify-center cursor-pointer hover:bg-slate-800'
                        disabled={!order?.isPaid || order?.isDelivered}
                      >
                        Mark As Delivered
                      </button>
                    )}
                  </p>
                </div>
              )}
            </div>
          </article>
        </div>
      </div>
    </section>
  );
};
By this time, you may have noticed a striking pattern that has made creating this site really easy, despite the length of the tutorial. We start by importing dependencies and components, then define the props. Then we define states, create functions, and use the useEffect Hook before rendering our jsx.
For our current component, we accept an id as part of the prop, then define loadingOrder, errorOrder, order states that derive their values from loadingGetOrder, errorGetOrder, and orderGetState, respectively. Then, we define the user and the isAdminLoggedIn state, among others.
We also have the handleUpdatePaymentStatus function, which we pass to the PaymentProcessor.tsx component. We then define the handleUpdateDeliveryStatus function, which admins can use to mark an order as delivered. Finally, we use the getOrderDetailsRequest API function in the useEffect Hook.
In the jsx, we render an error message with a message component and the loading component with a loading indicator. Then, we return the shipping address, payment method, and a list of orders, or an error message when no order item is available.
We also display the pricing and delivery information alongside the PaymentProcessor and Mark As Delivered button that is visible to admins.
The next step is to use our component in the pages/order/[id].astro component:
// pages/order/[id].astro

---
import Layout from '../../layouts/Layout.astro';
import { OrderDetails } from '../../components/OrderDetails';
const id = Astro.url?.pathname?.split('/')[2];
---

<Layout title='Manage Order' description='Manage Order'>
  <div class='max-w-[1800px] mx-auto px-4'>
    <OrderDetails client:load id={id || ''} />
  </div>
</Layout>
Our order screen should now look like the below:
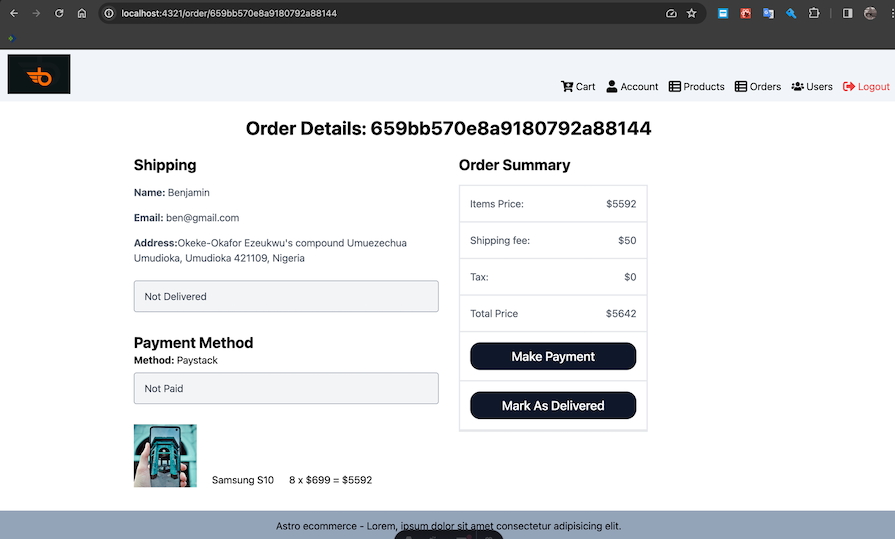
This admin-only page will contain a table listing all the orders in the system. The table will also contain a link to view an order’s details and another button to mark the order as delivered. Open the components/AdminManageOrder.tsx file and add the following:
import { useStore } from '@nanostores/react';
import React, { useCallback, useEffect } from 'react';
import { FaCheck, FaTimes } from 'react-icons/fa';
import {
  deliveryRequest,
  errorDelivery,
  errorOrderList,
  listOrdersRequest,
  loadingDelivery,
  loadingOrderList,
  orderListState,
} from '../state/order';
import { Loader } from './Loader';
import { Message } from './Message';

type AdminManageOrdersProps = {};

export const AdminManageOrders: React.FC<AdminManageOrdersProps> = () => {
  const loadingDeliver = useStore(loadingDelivery);
  const errorDeliver = useStore(errorDelivery);

  const loadingList = useStore(loadingOrderList);
  const errorList = useStore(errorOrderList);
  const orderList = useStore(orderListState);

  const handleUpdateDeliveryStatus = useCallback(async (id: string) => {
    // Approved delivery status
    deliveryRequest(id).then(() => {
      listOrdersRequest();
    });
  }, []);

  useEffect(() => {
    listOrdersRequest();
  }, []);

  return (
    <div className='p-6'>
      {errorDeliver && <Message variant='danger'>{errorDeliver}</Message>}
      {loadingDeliver && <Loader variant='large' />}
      {errorList && <Message variant='danger'>{errorList}</Message>}
      {loadingList && <Loader variant='large' />}
      <div className='w-full my-8 max-w-[1800px] mx-auto overflow-auto'>
        <table className='table-auto border-4 w-full whitespace-nowrap'>
          <thead className='border-b-2'>
            <tr className='bg-gray-500 text-white '>
              <th className='text-left border-r-2 px-4 py-2'>ID</th>
              <th className='text-left border-r-2 px-4 py-2'>User</th>
              <th className='text-left border-r-2 px-4 py-2'>Total</th>
              <th className='text-left border-r-2 px-4 py-2 whitespace-nowrap'>Payment status</th>
              <th className='text-left border-r-2  px-4 py-2 whitespace-nowrap'>Delivery Status</th>
              <th className='text-left border-r-2 px-4 py-2'>Action</th>
            </tr>
          </thead>
          <tbody>
            {orderList?.map((order) => {
              return (
                <tr className='capitalize border-b-2' key={order?._id}>
                  <td className='text-left border-r-2 px-4 py-2'>{order?._id}</td>
                  <td className='text-left border-r-2 px-4 py-2'>{order?.user?.name}</td>
                  <td className='text-left border-r-2 px-4 py-2'>${order?.totalPrice}</td>
                  <td className='text-left border-r-2 px-4 py-2'>
                    {order?.isPaid ? (
                      <FaCheck className='text-green-500' size={20} />
                    ) : (
                      <FaTimes className='text-red-500' size={20} />
                    )}
                  </td>
                  <td className='text-left border-r-2 px-4 py-2'>
                    {order?.isDelivered ? (
                      <FaCheck className='text-green-500' size={20} />
                    ) : (
                      <FaTimes className='text-red-500' size={20} />
                    )}
                  </td>
                  <td className='text-left border-r-2 px-4 py-2'>
                    <span className='flex gap-4 justify-between'>
                      {order?.isDelivered ? (
                        'Delivered'
                      ) : (
                        <button
                          onClick={() => handleUpdateDeliveryStatus(order?._id)}
                          disabled={loadingDeliver || order?.isDelivered || !order?.isPaid}
                          className='bg-blue-900 text-white rounded px-4 py-2  w-full max-w-[200px] flex gap-3 justify-center  cursor-pointer hover:bg-blue-800 text-sm'
                        >
                          Mark As Delivered
                          {loadingDeliver && <Loader variant='small' />}
                        </button>
                      )}
                      <a
                        href={`/order/${order?._id}`}
                        className='bg-slate-900 text-white rounded px-4 py-2  w-full max-w-[100px] flex gap-3 justify-center  cursor-pointer hover:bg-slate-800 text-sm'
                      >
                        View
                      </a>
                    </span>
                  </td>
                </tr>
              );
            })}
          </tbody>
        </table>
      </div>
    </div>
  );
};
In the component above, we define the loading and error states for marking an order as delivered and listing the orders. We also have a handleUpdateDeliveryStatus function that we will use to mark an order as delivered. In the useEffect Hook, we call the listOrdersRequest function.
In the jsx, we return a table that lists the order items we fetched.
Next, let’s use the components/AdminManageOrder.tsx page in the pages/manage-orders.astro page:
// pages/manage-orders.astro

---
import { AdminManageOrders } from '../components/AdminManageOrders';
import { Heading } from '../components/Heading';
import Layout from '../layouts/Layout.astro';
---

<Layout title='Manage Orders' description='Manage orders'>
  <div class='max-w-[1800px] mx-auto'>
    <Heading text='Manage Orders' variant='h1' textAlign='center' client:load />
    <AdminManageOrders client:load />
  </div>
</Layout>
The page we built should look like the below:
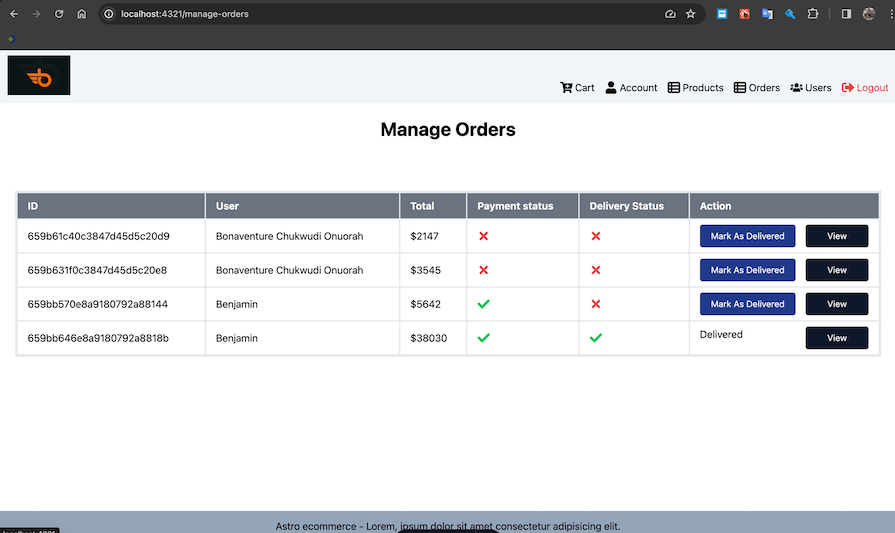
This is another admin page, but one of the Action buttons will call a handleMakeAdmin function that calls makeAdminRequest to make a user an admin. Let’s start by building out the AdminManageUsers component before using it in the /manage-users.astro page:
// components/AdminManageUsers.tsx

import { useStore } from '@nanostores/react';
import React, { useCallback, useEffect } from 'react';
import { FaCheck } from 'react-icons/fa';
import {
  errorUpdateUser,
  errorUsers,
  loadingUpdateUser,
  loadingUsers,
  makeAdminRequest,
  usersRequest,
  usersState,
} from '../state/user';
import { Loader } from './Loader';
import { Message } from './Message';

type AdminManageUsersProps = {};

export const AdminManageUsers: React.FC<AdminManageUsersProps> = () => {
  const loadingList = useStore(loadingUsers);
  const errorList = useStore(errorUsers);
  const usersList = useStore(usersState);

  const loadingUpdate = useStore(loadingUpdateUser);
  const errorUpdate = useStore(errorUpdateUser);

  const handleMakeAdmin = useCallback((id: string) => {
    makeAdminRequest(id).then(() => {
      usersRequest();
    });
  }, []);

  useEffect(() => {
    usersRequest();
  }, []);

  return (
    <div className='p-6'>
      {errorList && <Message variant='danger'>{errorList}</Message>}
      {loadingList && <Loader variant='large' />}
      {errorUpdate && <Message variant='danger'>{errorUpdate}</Message>}
      {loadingUpdate && <Loader variant='large' />}
      <div className='w-full my-8 max-w-[1800px] mx-auto overflow-auto'>
        <table className='table-auto border-4 w-full whitespace-nowrap'>
          <thead className='border-b-2'>
            <tr className='bg-gray-500 text-white '>
              <th className='text-left border-r-2 px-4 py-2'>ID</th>
              <th className='text-left border-r-2 px-4 py-2'>Name</th>
              <th className='text-left border-r-2 px-4 py-2'>Email</th>
              <th className='text-left border-r-2 px-4 py-2'>Admin</th>
            </tr>
          </thead>
          <tbody>
            {usersList?.map((user) => {
              return (
                <tr className='capitalize border-b-2' key={user?._id}>
                  <td className='text-left border-r-2 px-4 py-2'>{user?._id}</td>
                  <td className='text-left border-r-2 px-4 py-2'>{user?.name}</td>
                  <td className='text-left border-r-2 px-4 py-2'>{user?.email}</td>
                  <td className='text-left border-r-2 px-4 py-2'>
                    <span className='flex gap-4 justify-between'>
                      {user?.isAdmin ? (
                        <FaCheck className='text-green-500' size={20} />
                      ) : (
                        <button
                          onClick={() => handleMakeAdmin(user?._id || '')}
                          disabled={false}
                          className='bg-blue-900 text-white rounded px-4 py-2  w-full max-w-[200px] flex gap-3 justify-center  cursor-pointer hover:bg-blue-800 text-sm'
                        >
                          Make Admin
                          {loadingUpdate && <Loader variant='small' />}
                        </button>
                      )}
                    </span>
                  </td>
                </tr>
              );
            })}
          </tbody>
        </table>
      </div>
    </div>
  );
};
Now, let’s add it to the pages/manage-users.astro page:
// pages/manage-users.astro

---
import { AdminManageUsers } from '../components/AdminManageUsers';
import { Heading } from '../components/Heading';
import Layout from '../layouts/Layout.astro';
---

<Layout title='Manage Users' description='Manage Users'>
  <div class='max-w-[1800px] mx-auto'>
    <Heading text='Manage Users' variant='h1' textAlign='center' client:load />
    <AdminManageUsers client:load />
  </div>
</Layout>
The resulting page should now look like this:
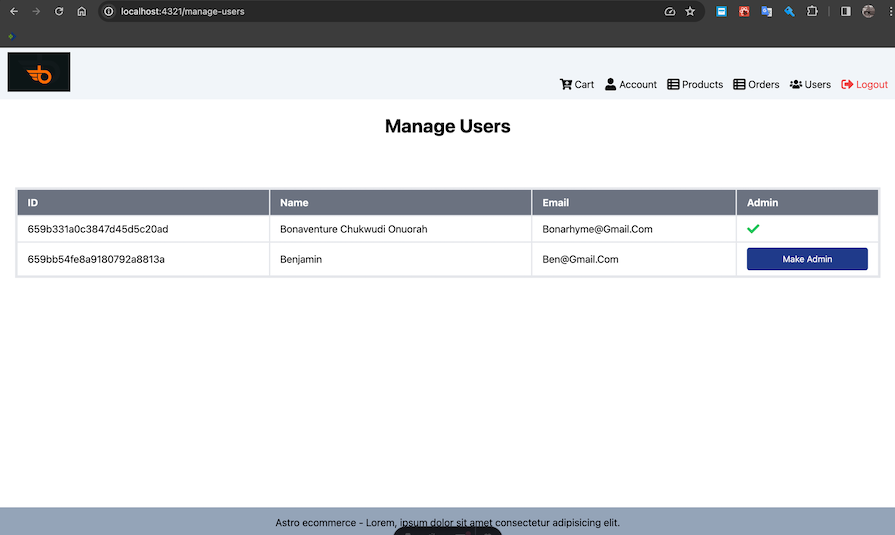
The account page will contain a form for modifying a user’s profile and listing a user’s orders in a table. Open the components/Profile.tsx file and add the following code:
// components/Profile.tsx

import { useStore } from '@nanostores/react';
import React, { useCallback, useEffect, useState } from 'react';
import { FaCheck, FaTimes } from 'react-icons/fa';
import { errorMyOrderList, listMyOrdersRequest, loadingMyOrderList, myOrderListState } from '../state/order';
import {
  errorGetProfile,
  errorUpdateProfile,
  getProfileState,
  loadingGetProfile,
  loadingUpdateProfile,
  profileGetRequest,
  profileUpdateRequest,
} from '../state/user';
import { Button } from './Button';
import { Heading } from './Heading';
import { Loader } from './Loader';
import { Message } from './Message';

type ProfileProps = {};

export const Profile: React.FC<ProfileProps> = () => {
  const loadingGet = useStore(loadingGetProfile);
  const errorGet = useStore(errorGetProfile);
  const profileGet = useStore(getProfileState);

  const loadingUpdate = useStore(loadingUpdateProfile);
  const errorUpdate = useStore(errorUpdateProfile);

  const loadingList = useStore(loadingMyOrderList);
  const errorList = useStore(errorMyOrderList);
  const orderList = useStore(myOrderListState);

  const [name, setName] = useState<string>('');
  const [email, setEmail] = useState<string>('');

  const handleUpdate = useCallback(async () => {
    profileUpdateRequest(name, email).then(() => {
      profileGetRequest();
    });
  }, [email, name]);

  useEffect(() => {
    profileGetRequest();
    listMyOrdersRequest();
  }, []);

  useEffect(() => {
    if (profileGet?.email) {
      setEmail(profileGet?.email);
      setName(profileGet?.name);
    }
  }, [profileGet]);

  return (
    <section className='p-6'>
      <div className=' mx-auto'>
        <div className='max-w-[500px] '>
          {errorGet && <Message variant='danger'>{errorGet}</Message>}
          {loadingGet && <Loader variant='large' />}
          {errorUpdate && <Message variant='danger'>{errorUpdate}</Message>}
          {loadingUpdate && <Loader variant='large' />}
          <Heading text='Update Profile' variant='h2' />
          <form onSubmit={handleUpdate} className='max-w-[500px] mx-auto py-6'>
            <div>
              <label htmlFor='name'>Name:</label>
              <input
                type='text'
                name='name'
                id='name'
                required
                placeholder='Enter name'
                className='border-2 border-slate-400 p-2 rounded-lg w-full'
                value={name}
                onChange={(e) => setName(e.target.value)}
              />
            </div>
            <br />
            <div>
              <label htmlFor='email'> Email:</label>
              <input
                type='email'
                name='email'
                id='email'
                required
                placeholder='Enter email'
                className='border-2 border-slate-400 p-2 rounded-lg w-full'
                value={email}
                onChange={(e) => setEmail(e.target.value)}
              />
            </div>
            <br />
            <Button>Save Changes</Button>
          </form>
        </div>
        <div className='max-w-[1800px] my-8 '>
          {errorList && <Message variant='danger'>{errorList}</Message>}
          {loadingList && <Loader variant='large' />}
          <div>
            <Heading text='My Orders' variant='h2' />
            <div className='w-full py-6  overflow-auto'>
              <table className='table-auto border-4 w-full whitespace-nowrap'>
                <thead className='border-b-2'>
                  <tr className='bg-gray-500 text-white '>
                    <th className='text-left border-r-2 px-4 py-2'>ID</th>
                    <th className='text-left border-r-2 px-4 py-2'>Total</th>
                    <th className='text-left border-r-2 px-4 py-2 whitespace-nowrap'>Payment status</th>
                    <th className='text-left border-r-2  px-4 py-2 whitespace-nowrap'>Delivery Status</th>
                    <th className='text-left border-r-2 px-4 py-2'>Action</th>
                  </tr>
                </thead>
                <tbody>
                  {orderList?.map((order) => {
                    return (
                      <tr className='capitalize border-b-2' key={order?._id}>
                        <td className='text-left border-r-2 px-4 py-2'>{order?._id}</td>
                        <td className='text-left border-r-2 px-4 py-2'>{order?.totalPrice}</td>
                        <td className='text-left border-r-2 px-4 py-2'>
                          {order?.isPaid ? (
                            <FaCheck className='text-green-500' size={20} />
                          ) : (
                            <FaTimes className='text-red-500' size={20} />
                          )}
                        </td>
                        <td className='text-left border-r-2 px-4 py-2'>
                          {order?.isDelivered ? (
                            <FaCheck className='text-green-500' size={20} />
                          ) : (
                            <FaTimes className='text-red-500' size={20} />
                          )}
                        </td>
                        <td className='text-left border-r-2 px-4 py-2'>
                          <span className='flex gap-4 justify-between'>
                            <a
                              href={`/order/${order?._id}`}
                              className='bg-slate-900 text-white rounded px-4 py-2  w-full max-w-[100px] flex gap-3 justify-center  cursor-pointer hover:bg-slate-800 text-sm'
                            >
                              View
                            </a>
                          </span>
                        </td>
                      </tr>
                    );
                  })}
                </tbody>
              </table>
            </div>
          </div>
        </div>
      </div>
    </section>
  );
};
In the component above, we extract three categories of global states: GetProfile, UpdateProfile, and MyOrderList. Then, we defined two states for name and email.
We also created a handleUpdate function that calls the profileUpdateRequest. In the first useEffect Hook, we call profileGetRequest and listMyOrdersRequest. In the second useEffect Hook, we use the fetched profile values to update the name and email states.
Now, we will include our Profile.tsx component inside our pages/account.astro page:
// pages/account.astro

---
import { Heading } from '../components/Heading';
import Layout from '../layouts/Layout.astro';
import { Profile } from '../components/Profile';
---
<Layout title='User Profile' description='User Profile'>
  <div class='max-w-[1800px] mx-auto'>
    <Heading text='User Profile' variant='h1' textAlign='center' client:load />
    <Profile client:load />
  </div>
</Layout>
Our account page should now look like the below:
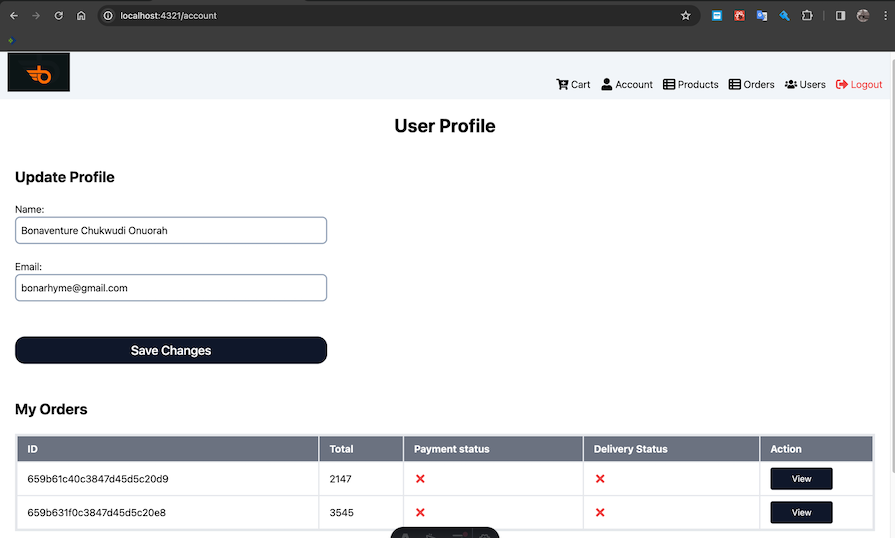
Now, we’ve built all the required pages for a functional ecommerce site. However, our site won’t be complete without a homepage.
Let’s start by updating the Showcase, Product, and ProductList components. Update the components/Showcase.tsx component file like so:
// components/Showcase.tsx

import React from 'react';

type ShowcaseProps = {};

export const ShowCase: React.FC<ShowcaseProps> = () => {
  return (
    <div className='border-2 border-slate-400 w-full max-w-[1800px] h-[500px] flex justify-center items-center text-3xl'>
      Showcase top products here or show any special ad here
    </div>
  );
};
Next, update the components/Product.tsx file:
// components/Product.tsx

import React from 'react';
import { type IProduct } from '../state/products';
import { Rating } from './Rating';

type ProductProps = {
  product: IProduct;
};

export const Product: React.FC<ProductProps> = ({ product }) => {
  return (
    <article className='my-3 p-3 rounded border w-[300px] bg-gray-100'>
      <a href={`/product/${product._id}`}>
        <img src={product.image} alt={product.name} className='w-full h-[350px] object-cover' />
      </a>
      <div className='p-3'>
        <a href={`/product/${product._id}`} className='text-lg font-semibold text-blue-500 hover:underline'>
          {product.name}
        </a>
        <div className='text-gray-500'>
          <Rating value={product?.rating} text={`${product?.numReviews} reviews`} />
        </div>
        <h3 className='text-2xl font-bold text-green-600'>${product.price}</h3>
      </div>
    </article>
  );
};
Now, update the components/ProductList.tsx file:
// components/ProductList.tsx

import { useStore } from '@nanostores/react';
import React, { useEffect } from 'react';
import { errorProductList, listProductRequest, loadingProductList, productListState } from '../state/products';
import { Heading } from './Heading';
import { Loader } from './Loader';
import { Message } from './Message';
import { Product } from './Product';

type ProductListProps = {};

export const ProductList: React.FC<ProductListProps> = () => {
  const loading = useStore(loadingProductList);
  const error = useStore(errorProductList);
  const productList = useStore(productListState);

  useEffect(() => {
    listProductRequest();
  }, []);

  return (
    <section className='my-8 px-5'>
      <Heading text='Amazing Products' />
      {loading && <Loader variant='large' />}
      {error && <Message variant='danger'>{error}</Message>}
      <div className='flex justify-center'>
        <div className='flex flex-wrap gap-8 mx-auto max-w-[1800px] '>
          {productList?.products?.map((product) => {
            return <Product product={product} key={product?._id} />;
          })}
        </div>
      </div>
    </section>
  );
};
With that done, we can add the following code to the index.astro file to build our homepage:
// pages/index.astro

---
import { ProductList } from '../components/ProductList';
import { ShowCase } from '../components/Showcase';
import Layout from '../layouts/Layout.astro';
---

<Layout title='Astro Ecommerce' description='We sell high quality stuff'>
  <div class='max-w-[1800px] mx-auto'>
    <ShowCase client:load />
    <ProductList client:load />
  </div>
</Layout>
Our homepage should now look similar to the below:
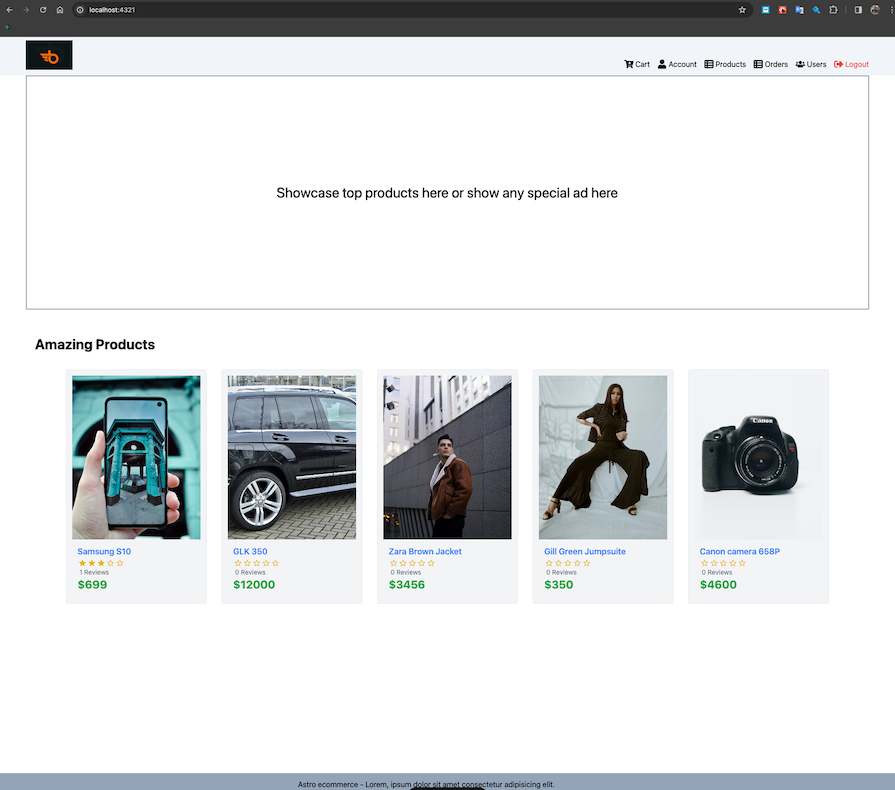
You can get the source code for the frontend on GitHub.
In this article, we focused on constructing an ecommerce site using Astro with React and TypeScript integrations. Additionally, we integrated the site with a custom server for a comprehensive understanding. We also delved into the significance of strong and static typings in frontend projects.
Thanks for reading! I hope you enjoyed this article, and be sure to leave a comment if you have any questions. Happy coding!
There’s no doubt that frontends are getting more complex. As you add new JavaScript libraries and other dependencies to your app, you’ll need more visibility to ensure your users don’t run into unknown issues.
LogRocket is a frontend application monitoring solution that lets you replay JavaScript errors as if they happened in your own browser so you can react to bugs more effectively.

LogRocket works perfectly with any app, regardless of framework, and has plugins to log additional context from Redux, Vuex, and @ngrx/store. Instead of guessing why problems happen, you can aggregate and report on what state your application was in when an issue occurred. LogRocket also monitors your app’s performance, reporting metrics like client CPU load, client memory usage, and more.
Build confidently — start monitoring for free.

Claude Code is deceptively capable. Point it at a codebase, describe what you need, and it’ll autonomously navigate files, write […]

Compare the top AI development tools and models of February 2026. View updated rankings, feature breakdowns, and find the best fit for you.

Broken npm packages often fail due to small packaging mistakes. This guide shows how to use Publint to validate exports, entry points, and module formats before publishing.

Discover what’s new in The Replay, LogRocket’s newsletter for dev and engineering leaders, in the February 11th issue.
Would you be interested in joining LogRocket's developer community?
Join LogRocket’s Content Advisory Board. You’ll help inform the type of content we create and get access to exclusive meetups, social accreditation, and swag.
Sign up now