
Created in 2017, Svelte is simple tool that compiles components into JavaScript during build time. This is quite different from the traditional frameworks we are accustomed to, which build applications from the browser. In addition to this unique approach, Svelte is quite small, only 4.1kb. It presents a great option for frontend developers.

In this article, we will learn about some of the benefits of Svelte while using it to build a CRUD application with Firebase as the back end. Using Svelte and Firebase together can get a bit tricky, so hopefully this tutorial can help if you get stuck.
The Replay is a weekly newsletter for dev and engineering leaders.
Delivered once a week, it's your curated guide to the most important conversations around frontend dev, emerging AI tools, and the state of modern software.
Let’s start by building a simple Svelte application that handles different case scenarios. For simplicity, we will be using Firebase to hold our data in the cloud.
We will also be using SvelteKit, a simple framework to bootstrap the application; it will help handle our routing and building the application at the very end:
npm init svelte@next bloggo // bloggo is the name of the app. You can change
Once the process has completed, run the following command to install dependencies:
npm install
Once that is complete, run the development server like so:
npm run dev — —open
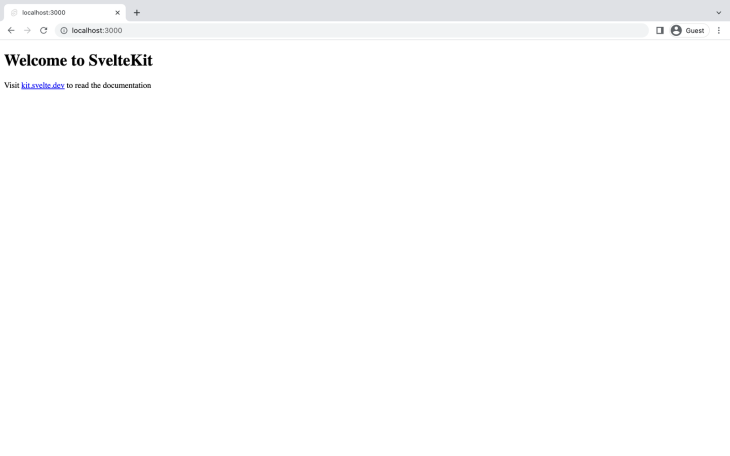
Once it is open you will see the following. This means the bootstrapping worked.
To backup the information, we will need to install Firebase with the following command:
npm install Firebase
Your package.json should look like this:
{
  "name": "bloggo",
  "version": "0.0.1",
  "scripts": {
    "dev": "svelte-kit dev",
    "build": "svelte-kit build",
    "package": "svelte-kit package",
    "preview": "svelte-kit preview",
    "prepare": "svelte-kit sync",
    "test": "playwright test",
    "lint": "prettier --ignore-path .gitignore --check --plugin-search-dir=. .",
    "format": "prettier --ignore-path .gitignore --write --plugin-search-dir=. ."
  },
  "devDependencies": {
    "@playwright/test": "^1.20.0",
    "@sveltejs/adapter-auto": "next",
    "@sveltejs/kit": "next",
    "prettier": "^2.5.1",
    "prettier-plugin-svelte": "^2.5.0",
    "svelte": "^3.44.0"
  },
  "type": "module",
  "dependencies": {
    "Firebase": "^9.6.10"
  }
}
Now, navigate to the Firebase console. Create a new application, then hit project settings in the top left corner.
Scroll all the way down create a web app, and get the Firebase config. If you can’t find the config information, you can always head back to project settings and get it from there.
Next, create a new file and name it Firebase.js within the src directory of your application. Paste the Firebase config inside.
Firebase is set up, and now we need to initialize the application to connect to our app. From within Firebase.js import the following:
import { initializeApp } from "Firebase/app"
Then, authorize our application using the config from Firebase like so:
// Initialize our Firebase for our application
 const app = initializeApp(FirebaseConfig);
To create better-looking user interface, we’ll be using Carbon Components Svelte, a component library that implements the Carbon Design System:
npm i -D carbon-components-svelte
Create a new folder in routes called auth and add login.svelte and register.svelte.
The login, register, and home page will reuse the same layout for better performance; this means the footer and nav will be the same across all pages
The layout looks like the following. The pages will be injected inside the slot:
<nav>
    <h2>
        Bloggy
    </h2>
    <ul>
        <li>
            <a href="/auth/login">Login</a>
        </li>
        <li>
            <a href="/auth/register">Sign Up</a>
        </li>
    </ul>
</nav>
<slot></slot>
<footer>
    <h2>bloggo</h2>
</footer>
<style>
    nav {
        display: flex;
        justify-content: end;
        padding: 1.3em 2em;
        background-color: whitesmoke;
        box-shadow: 0 6px 8px #D7E1E9;
    }
    nav h2 {
        font-weight: bold;
        font-size: 18px;
        color: black;
    }
    nav ul li {
        list-style: none;
        display: inline-block;
        padding-right: 1em;
    }
    li a  {
        text-decoration: none;
        color: black;
    }
    li a:hover {
        color: orange;
    }
    footer {
        background-color: #D7E1E9;
        padding: 2em;
        height: 20vh;
        display: flex;
        justify-content: center;
    }
</style>
Please note the layout is named starting with two underscores: __layout.svelte. This is to differentiate it from the rest of the pages.
To ensure code maintainability, create a new folder under source and name it components. Then, create a new folder under components called auth and under this folder, add two new files called sign_in.svelte and sign_up.svelte. These files will be handling our form submission. Go back to the auth folder under routing and import the components.
Now, the code for the login flow will look like this:
<script>
    import SignIn from "../../lib/auth/sign_in.svelte";
    import { Link } from "carbon-components-svelte";
</script>
<div>
    <div class="header">
        <h4>Login</h4>
    </div>
    <div class="signin-form">
        <SignIn />
        <div>Already have an account? <Link href="/auth/register">Sign Up</Link></div>
    </div>
</div>
<style>
     .header {
         width: 100vw;
         padding: 2em 0;
         min-height: 20vh;
         display: flex;
         justify-content: center;
         align-items: center;
         background-color: #E5F0FF;
     }
     .header h4 {
         color: black;
         font-weight: 600;
         font-size: 3rem;
     }
     .signin-form {
         min-height: 80vh;
         display: grid;
         place-items: center;
     }
</style>
The same goes for register.svelte:
<script>
    import SignUp from "../../lib/auth/sign_up.svelte";
    import { Link } from "carbon-components-svelte";
</script>
<div>
    <div class="header">
        <h4>Sign Up</h4>
    </div>
    <div class="form-container">
        <SignUp/>
        <div>Already have an account? <Link href="/auth/login">Sign In</Link></div>
    </div>
</div>
<style>
    .header {
         width: 100vw;
         padding: 2em 0;
         min-height: 20vh;
         display: flex;
         justify-content: center;
         align-items: center;
         background-color: #E5F0FF;
     }
     .header h4 {
         color: black;
         font-weight: 600;
         font-size: 3rem;
     }
     .form-container {
         min-height: 80vh;
         display: grid;
         place-items: center;
     }
</style>
Now, we will enable Firebase authentication from the Firebase console. This will allow us to make different authentication checks for a user using Facebook, Apple, or an anonymous account, but for this tutorial, we will be doing a basic email and password check.
Add the following code to the Firebase.js file at the root of the application:
import { initializeApp } from "Firebase/app";
import { getAuth } from "Firebase/auth";
import { collection, doc, getFirestore } from "Firebase/firestore/lite";

// Our fireabase config goes here
//...

// Initialize our Firebase for our application
let app = initializeApp(FirebaseConfig);
const auth = getAuth(app);
let db = getFirestore(app);
const userDoc = (userId) => doc(db, "users", userId)
export {
    auth,
}
We first initialize Firebase using initializeApp with the Firebase config. We can access authentication and Firebase services as get[service] and passing in our app, as seen above.
Now, go to the sign_up_form component inside the lib/auth folder. We will be using events to send the sign up form data to our registration page to sign up the user.
First, we bind the form values reactively to our variables and connect our sign up button to our dispatch function:
<script>
    import { Form, TextInput, PasswordInput, Button } from 'carbon-components-svelte';
    import { createEventDispatcher } from "svelte"
    let dispatch = createEventDispatcher()
    let username, email, password;

    function signup() {
        dispatch("signup", {
            username,
            email,
            password
        })
    }
</script>

<div class="form">
    <Form>
        <TextInput bind:value={username} labelText="Username" placeholder="Enter your username" name="username"/>
        <div class="space" />
        <TextInput bind:value={email} labelText="Email address" placeholder="Enter your email" type="email" name="email" />
        <div class="space" />
        <PasswordInput
            bind:value={password}
            tooltipAlignment="start"
            tooltipPosition="left"
            labelText="Password"
            placeholder="Enter password"
            name="password"
        />
        <div class="space" />
        <Button size="small" on:click={signup}>Sign Up</Button>
    </Form>
</div>
<style>
    .form {
        width: 400px;
    }
    .form .space {
        margin: .6em 0;
    }
</style>
Once the form data has been sent, we set up an event listener within the registration page, which is within the routes folder:
<svelte:head>
    <title>Register</title>
</svelte:head>
<div>
    <div class="header">
        <h4>Sign Up</h4>
    </div>
    <div class="form-container">
        {#if errors}
            {#each errors as error, i (i)}
                <div class="notification-block">
                    <p>{error}</p>
                </div>
            {/each}
        {/if}
        <SignUp on:signup={signUp} />
        <div>Already have an account? <Link href="/auth/login">Sign In</Link></div>
    </div>
</div>
Then, we can access the dispatched data from the event params passed to signUp:
<script>
    import SignUp from '../../lib/auth/sign_up_form.svelte';
    import { Link } from 'carbon-components-svelte';
    import { createUserWithEmailAndPassword, updateProfile } from 'Firebase/auth';
    import { goto } from '$app/navigation';
    import { auth, userDoc } from '../../Firebase';
    import { setDoc } from 'Firebase/firestore/lite';
  let errors;
async function signUp(event) {
        try {
            let user = await createUserWithEmailAndPassword(
                auth,
                event.detail.email,
                event.detail.password
            );
            await updateProfile(user.user, { displayName: event.detail.username });
            await setDoc(userDoc(auth.currentUser.uid), {
                username: user.user.displayName,
                email: user.user.email
            });
            await goto('/admin');
        } catch (e) {
            console.log('error from creating user', e);
        }
    }
</script>
Once the user is successfully registered we update the user profile and navigate them to the admin page using the async function goto.
The same goes for login. We set up a dispatch function inside the sign_in_form component, like so:
<script>
    import { Form, TextInput, PasswordInput, Button } from 'carbon-components-svelte';
import { createEventDispatcher } from 'svelte';
    let email, password;
    const dispatcher = createEventDispatcher()
    function login() {
        dispatcher('login', {
            email,
            password
        })
    }
</script>
<div class="form-container">
    <Form>
        <TextInput bind:value={email} type="email" labelText="Email" placeholder="Enter your email" name="email"/>
        <div class="space" />
        <PasswordInput
            labelText="Password"
            bind:value={password}
            placeholder="Enter password"
            tooltipAlignment="start"
            tooltipPosition="left"
            name="password"
        />
        <div class="space"></div>
        <Button size="small" on:click={login}>Sign In</Button>
    </Form>
</div>
<style>
    .form-container {
        width: 30%;
    }
    .form-container .space {
        margin: 20px 0;
    }
</style>
Using events is helpful because it allows you to do other things before submitting your data, such as validation. Child to parent communication becomes way easier this way.
Now, in the login page, write the following:
<script>
    import SignIn from "../../lib/auth/sign_in_form.svelte";
    import { Link } from "carbon-components-svelte";
    import { signInWithEmailAndPassword } from "Firebase/auth";
    import { auth, userDoc } from "../../Firebase";
    import { goto } from "$app/navigation";
    import { setDoc } from "Firebase/firestore/lite";
    let error;
    async function signIn(event) {
        try {
            let user = await signInWithEmailAndPassword(auth, event.detail.email, event.detail.password)
            await setDoc(userDoc(auth.currentUser.uid), { username: user.user.displayName, email: user.user.email })
            await goto("/admin")
        } catch (error) {
            console.log("error signin in", error.message)
          error = error.message
        }
    }
</script>
<svelte:head>
    <title>
        Login
    </title>
</svelte:head>
<div>
    <div class="header">
        <h4>Login</h4>
    </div>
    <div class="signin-form">
        {#if error}
            <div class="notification-block">
                <p>{error}</p>
            </div>
        {/if}
        <SignIn on:login={signIn}/>
        <div>Already have an account? <Link href="/auth/register">Sign Up</Link></div>
    </div>
</div>
<style>
     .header {
         width: 100vw;
         padding: 2em 0;
         min-height: 20vh;
         display: flex;
         justify-content: center;
         align-items: center;
         background-color: #E5F0FF;
     }
     .header h4 {
         color: black;
         font-weight: 600;
         font-size: 3rem;
     }
     .signin-form {
         min-height: 80vh;
         display: grid;
         place-items: center;
     }
     .notification-block {
         min-width: 20vw;
         padding: 1.2em .75em;
         border-radius: 5px;
         background-color: #FE634E;
     }
     .notification-block p {
         color: white;
     }
</style>
Our login and registration logic is done, but we need to prevent the user from accessing the admin page if they are not authenticated. Preventing access to a particular page means we need to do so before it has been loaded, which we can do within the load function in the module script available to every Svelte page.
Before this, we need to have a reactive way to check for the authentication changes. Luckily, Firebase provides this using the AuthStateChanged function. We can listen for this within the layout file and update the session in getStores.
To make sure it works, let’s load it within the onMount function. This will be called after the page mounts, but not before it has been rendered.
When the user is logged in, the session will be updated with the user data and removed once the user logs out. The session, in this case, is reactive and will update our Nav component:
<script>
    import 'carbon-components-svelte/css/white.css';
    import Nav from '../lib/nav.svelte';
    import { onAuthStateChanged } from 'Firebase/auth';
    import { navigating } from '$app/stores';
    import { onMount } from 'svelte';
    import { auth } from '../Firebase';
    import { getStores } from '$app/stores';
    import { Loading } from 'carbon-components-svelte';
    let { session } = getStores();
    onMount(() => {
        onAuthStateChanged(
            auth,
            (user) => {
                session.set({ user });
            },
            (error) => {
                session.set({ user: null });
                console.log(error);
            }
        );
    });
</script>
Our Nav will now be updated to change with the auth states. Svelte provides a convenient way of subscribing to our session changes reactively using $session:
<script>
    import { Button, Link } from 'carbon-components-svelte';
    import { getStores } from '$app/stores';
    import { signOut } from 'Firebase/auth';
    import { auth } from '../Firebase';
    import { goto } from '$app/navigation';
    let { session } = getStores();

    async function logOut() {
        await signOut(auth);
        await goto('/');
    }
</script>
<nav>
    <h2>
        {#if $session['user'] != null}
            <Link class="link" size="lg" href="/admin">Let's Create</Link>
        {:else}
            <Link class="link" size="lg" href="/">Bloggy</Link>
        {/if}
    </h2>
    <ul>
        {#if $session['user'] != null}

            <li>
                <Button size="sm" kind="danger" on:click={logOut}>Log Out</Button>
            </li>
            <li>
                <Link href="/admin/create-blog">Create a new post</Link>
            </li>

        {:else}
            <li>
                <Link href="/auth/login">Login</Link>
            </li>
            <li>
                <Link href="/auth/register">Sign Up</Link>
            </li>
        {/if}
    </ul>
</nav>
This is not persistent, and you need to add secure storage to keep the user logged in when you change tabs. But it will reroute the user if they try accessing the admin page or its children.
A basic application usually has four main characteristics: it can create, read, update, and delete data. In the next few sections, I will explain how we can handle these scenarios using Svelte and JavaScript in a clear and concise way.
To add a new document, we need to create the page first. Create an index.svelte file inside the admin folder; this will be our homepage once a user is authenticated. Now, create a new file called create-blog.svelte.
We need a form to add information about our new blog. Create a new folder under the lib folder and call it blog; this will contain any component related to blogs.
Next, add a new file called blog-form.svelte. Separating our forms from the pages allows separation of concerns, and we can reuse the same component to make updates.
Our blog form will look like the following. Just like the sign in form, we bind the form values to variables and use events to send the updated data to our “create blog” page:
<script>
    import {Form, TextArea, TextInput, Button} from "carbon-components-svelte"
    import { createEventDispatcher } from "svelte";
    const dispatcher = createEventDispatcher()
    export let title, summary, description;
    function dispatchBlog() {
        dispatcher("sendBlogDetails", {
            title,
            summary,
            description
        })
        title = "", summary = "", description = ""
    }
</script>
<div class="form-container">
    <Form>
        <TextInput bind:value={title} label="Blog title" placeholder="Enter the title of the blog" name="title" required/>
        <div class="space"></div>
        <TextInput bind:value={summary} label="Blog summary" placeholder="Summary" name="Summary" required/>
        <div class="space"></div>
        <TextArea bind:value={description} label="Blog description" placeholder="THE STORY!!!" name="description" required/>
        <div class="space"></div>
        <Button on:click={dispatchBlog}>Submit</Button>
    </Form>
</div>

<style>
    .form-container {
        max-width: 40%;
    }
    .space {
        margin: 1em 0;
    }
</style>
In this form, we export the variables because we will be reusing the form to update the blog.
Next, import the blog form component inside the “create blog” form:
<script>
import { goto } from '$app/navigation';
    import { addDoc, serverTimestamp } from 'Firebase/firestore/lite';
    import { auth, blogCollection } from '../../Firebase';
    import BlogForm from '../../lib/blog/blog-form.svelte';
    async function createNewBlog(event) {
        await addDoc(blogCollection, {...event.detail, owner: auth.currentUser.uid, timestamp: serverTimestamp()});
        await goto("/admin")
    }
</script>
<svelte:head>
    <title>Create Blog</title>
</svelte:head>
<div class="container">
    <div class="header">
        <h2>Create a new Blog</h2>
    </div>
    <BlogForm on:sendBlogDetails={createNewBlog} title={""} summary={""} description={""}/>
</div>
<style>
    .container {
        margin: 3em auto;
        width: 80%;
        min-height: 90vh;
    }
    .header {
        margin-bottom: 2em;
    }
</style>
To add a new document inside a blog collection, add the following code to Firebase.js and export it:
// ... Other code
const blogCollection = collection(db, "blogs");

export {
// Other exports
  blogCollection
}
The addDoc function provided by Firebase lite allows us to create documents within a particular collection and generate an ID for each. To allow ordering, we add a serverTimestamp.
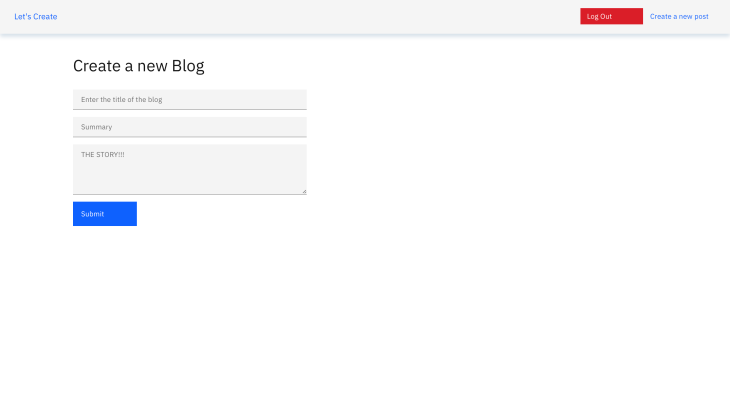
Here’s how the page looks once this is done.
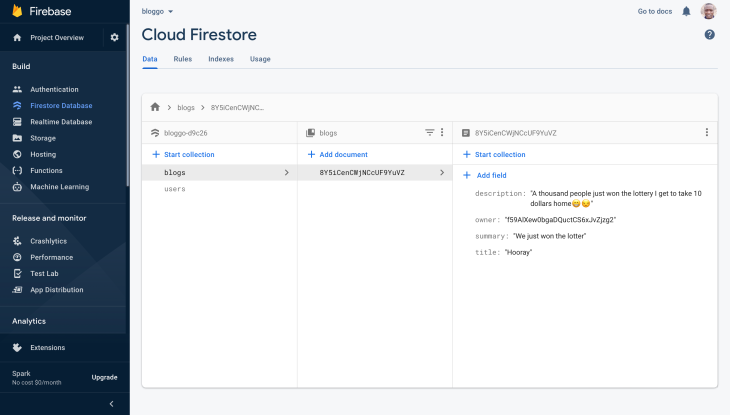
If we try creating a new blog, we can see it reads well on Firebase Firestore.
We can view the blogs we have written in our admin home page, but to make sure that we get the blogs once the page loads we need to do so within the load function. The function is called before the page loads and allows us to send data to the page using props.
Inside our index.svelte page in the admin directory, declare the load function inside a module script:
<script context="module">
import { deleteDoc, getDocs, query, where } from 'Firebase/firestore/lite';
import { blogCollection, blogDoc } from '../../Firebase';
    export async function load({ session }) {
        // Get the authenticated user from the current session
          let { user } = session
        // redirect the user to home page incase the user is not authenticated
          if (user == null) {
              return {
                  status: 302,
                  redirect: "/",
              }
          }

          // Access all blogs written by the user only
          const q = query(blogCollection, where("owner", "==", user.id))
          const querySnapshot = await getDocs(q)
          let blogs = [];
          // Use es6 spread operator to add the blogs and their id
          querySnapshot.forEach(blog => {
            blogs.push({...blog.data(), id: blog.id})
          })

          // send the blogs to the page
          return {
              status: 200,
              props: {
                  blogs
              }
          }
    }
</script>
We can access the blogs sent with the props using export:
<script>
    import BlogCard from '../../lib/blog/blog-card.svelte'

    export let blogs
</script>
Here’s our blog card. Create the file inside the lib/blog folder together with the blog form:
<script>
  export let id, title, summary;

  // Will come later
  function editBlog() {
  }

  // Will come later
  function deleteBlog() {}

</script>

<div class="card">
    <div class="title">
        <h2>{title}</h2>
    </div>
    <div class="content">
        <p>{summary}</p>
        <a href="/admin/blogs/{id}">Read more</a>
    </div>
    <div class="button-set">
        <button class="edit" on:click={editBlog}>Edit</button>
        <button class="delete" on:click={dispatchBlogDelete}>Delete</button>
    </div>
</div>
We can loop through the blogs we have received to access the details of each one:
<svelte:head>
    <title>Bloggy</title>
</svelte:head>
<div class="content">
    <div class="header">
        <h2>My Blogs</h2>
    </div>
    <div class="blogs">
        {#each blogs as blog}
            <BlogCard title={blog.title} summary={blog.summary} id={blog.id} on:deleteBlog={deleteBlog}/>
        {:else}
             <div class="center">
                 <h2>You don't have any blogs yet.</h2>
             </div>
        {/each}
    </div>
</div>

// Some styling 👍🏾
<style>
    .content {
        min-height: 90vh;
        padding: 1em;
        margin: 0 auto;
        max-width: 80%;
    }
    .header {
        padding: 1em 2em;
    }
    .header h2 {
        font-weight: 700;
    }
    .blogs {
        display: flex;
        flex-wrap: wrap;
    }
</style>
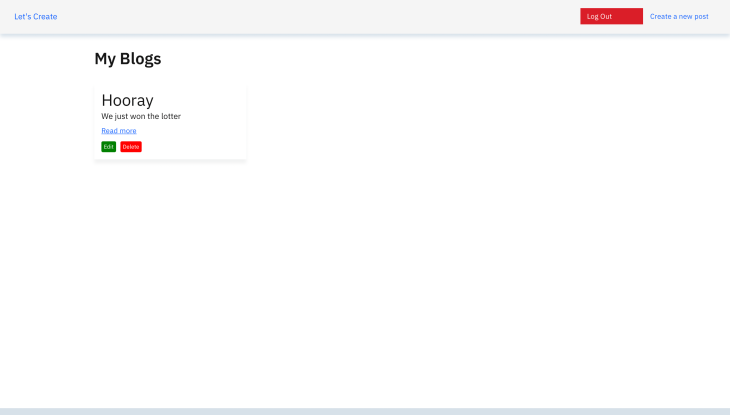
Here’s what we end up with once the user loads up the page.
To access the blog details, especially when the document has nested data or we need to show only a small portion, we need to access it using its ID. We can do so by adding a new file inside the admin/blog folder. Naming here is quite different; we need to name it based on the parameter we are expecting, so in this case, [id].svelte.
We will make use of the load function to get the blog details like so:
<script context="module">
    import { getDoc } from 'Firebase/firestore/lite';
    import { blogDoc } from '../../../Firebase';
    export async function load({ params }) {
        const docSnap = await getDoc(blogDoc(params.id));
        if (!docSnap.exists()) {
            return {
                status: 404,
                props: {
                    blog: null
                }
            };
        } else {
            return {
                status: 200,
                props: {
                    blog: { ...docSnap.data(), id: docSnap.id }
                }
            };
        }
    }
</script>
Then, we access it within our regular script and page:
><script>
    export let blog;
</script>
<svelte:head>
    <title>{blog.title ? blog.title : 'Bloggy'}</title>
</svelte:head>
<div class="container-blog-detail">
    {#if blog == null}
        <div class="center">
            <h2>Blog does not exist or has been deleted</h2>
        </div>
    {:else}
        <div>
            <h2>
                {blog.title}
            </h2>
            <p>{blog.summary}</p>
            <p class="description">{blog.description}</p>
        </div>
    {/if}Î
</div>
<style>
    .container-blog-detail {
        margin: 0 auto;
        width: 80%;
        padding: 2em 0;
        height: 80vh !important;
    }
    .center {
        display: grid;
        place-content: center;
    }
    .description {
        margin-top: 20px;
    }
</style>
When we try clicking the “read more” button in a particular blog card, it will reroute to the specific page with the ID as a parameter.
Updating our blog will make use of the same blog form, but on a different page. Create a new file called [id].svelte inside admin/blogs/update.
We can access the ID from the params passed in the load function:
<script context="module">
    import { getDoc, setDoc } from 'Firebase/firestore/lite';
    import { blogDoc } from '../../../../Firebase';
    export async function load({ params }) {
        const docSnap = await getDoc(blogDoc(params.id));
        if (!docSnap.exists()) {
            return {
                status: 404,
                redirect: "/admin"
            }
        } else {
            return {
                status: 200,
                props: {
                    blog: { ...docSnap.data(), id: docSnap.id }
                }
            };
        }
    }
</script>
Updating a document in Firebase requires use of setDoc with a reference to what you want to update. We can do that using the helper function we created earlier:
setDoc(blocDoc(blog.id), event.detail, {merge: true})
After passing the reference, we pass in the update and merge, which prevents the creation of a new document:
<script>
import { goto } from '$app/navigation';
    import BlogForm from "../../../../lib/blog/blog-form.svelte"
    export let blog
    async function updateBlogDetails(event) {
        setDoc(blogDoc(blog.id), event.detail, { merge: true })
        await goto("/admin")
    }
</script>
<svelte:head>
    <title>Update blog</title>
</svelte:head>
<div class="container">
    <div class="header">
        <h2>Update Blog</h2>
    </div>
    <BlogForm on:sendBlogDetails={updateBlogDetails} title={blog.title} summary={blog.summary} description={blog.description} />
</div>

<style>
    .container {
        margin: 3em auto;
        width: 80%;
        min-height: 90vh;
    }
    .header {
        margin-bottom: 2em;
    }
</style>
To edit a blog we need access to the ID, which we pass to all the blog cards. Now we can update the editBlog function inside blog-card.svelte:
async function editBlog() {
        await goto(`/admin/blogs/update/${id}`);
    }
We can now be redirected to the blog we want to update.
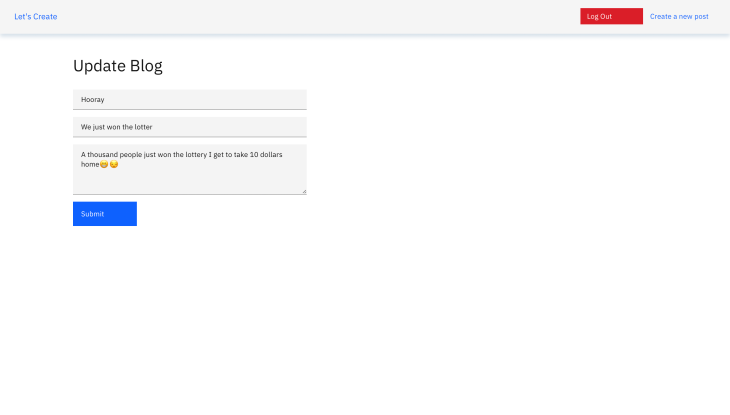
Deleting a blog will take the same functionality as the forms: dispatcher. We create a dispatcher using createEventDispatcher:
const dispatcher = createEventDispatcher();

function dispatchBlogDelete() {
  // Pass the blog id you want to delete
    dispatcher("deleteBlog", {
        id
    })
}

// Bind it to the click event in the delete button
<button class="delete" on:click={dispatchBlogDelete}>Delete</button>
Listen for the dispatch inside the admin page. We create our method for deleting the blog like so:
    // Delete a blog
    async function deleteBlog(event) {
        await deleteDoc(blogDoc(event.detail.id))
    }
Now, we can listen for the delete event:
<BlogCard title={blog.title} summary={blog.summary} id={blog.id} on:deleteBlog={deleteBlog}/>
Congratulations! 🎉 We now have a complete CRUD app that allows us to manipulate data.
Building applications couldn’t be any easier and fun to do with Svelte; you don’t even have to worry about SEO because it handles that too. You can access this project from Github using the following link.
Install LogRocket via npm or script tag. LogRocket.init() must be called client-side, not
server-side
$ npm i --save logrocket

// Code:

import LogRocket from 'logrocket';
LogRocket.init('app/id');
// Add to your HTML:

<script src="https://cdn.lr-ingest.com/LogRocket.min.js"></script>
<script>window.LogRocket && window.LogRocket.init('app/id');</script>

Compare the top AI development tools and models of February 2026. View updated rankings, feature breakdowns, and find the best fit for you.

Broken npm packages often fail due to small packaging mistakes. This guide shows how to use Publint to validate exports, entry points, and module formats before publishing.

Discover what’s new in The Replay, LogRocket’s newsletter for dev and engineering leaders, in the February 11th issue.

Cut React LCP from 28s to ~1s with a four-phase framework covering bundle analysis, React optimizations, SSR, and asset/image tuning.
Hey there, want to help make our blog better?
Join LogRocket’s Content Advisory Board. You’ll help inform the type of content we create and get access to exclusive meetups, social accreditation, and swag.
Sign up now
One Reply to "Building a CRUD application using Svelte and Firebase"
Thanks. This was very helpful.