Google recently launched LiteRT.js, a browser runtime for running on-device AI inference with WebAssembly and WebGPU.

LiteRT.js brings Google’s LiteRT runtime, formerly TensorFlow Lite, to the web. Instead of requiring a JavaScript-specific model format, it can run standard .tflite models directly in the browser while taking advantage of modern browser hardware acceleration.
In this tutorial, we’ll look at how LiteRT.js works and build an end-to-end optical character recognition (OCR) receipt scanner. The application will preprocess receipt photos, detect and recognize text locally, reconstruct the document layout, and pass the extracted text to an on-device Gemma model through LiteRT-LM to structure the result.
The full pipeline runs locally in the browser, so receipt data does not need to be sent to an external inference API.
You’ll need:
Before we build the scanner, let’s look at what LiteRT.js changes about running machine learning models in the browser.
TensorFlow Lite was originally designed for mobile and embedded systems, while TensorFlow.js was designed specifically for the web.
As browsers gained capabilities such as WebAssembly SIMD and WebGPU, however, the gap between native and browser-based inference narrowed. Google subsequently rebranded TensorFlow Lite as LiteRT as part of its broader AI Edge tooling.
LiteRT acts as both a model runtime and part of a broader conversion pipeline. Models originating in frameworks such as TensorFlow, PyTorch, and JAX can ultimately be deployed in the .tflite format, while LiteRT.js brings that runtime to the browser.
For web applications, the important distinction is that LiteRT.js can execute .tflite models using modern browser compute APIs rather than requiring models to target a JavaScript-specific execution environment.
LiteRT.js can target several execution paths:
| Backend | Role | Best suited for |
|---|---|---|
| WebAssembly + XNNPACK | CPU execution and fallback | Broad compatibility and CPU inference |
| WebGPU | GPU-accelerated compute | Parallel workloads such as neural network inference |
| WebNN | Emerging hardware abstraction | Direct access to available ML accelerators and NPUs |
WebAssembly provides the browser-side execution environment, while XNNPACK supplies optimized neural network operators.
With browser features such as SIMD and multithreading, this gives LiteRT.js a much faster CPU path than implementing the same numerical operations directly in JavaScript.
WebGPU gives browser applications access to general-purpose GPU compute. LiteRT.js can use that capability to execute highly parallel operations such as matrix multiplication on the user’s GPU.
This avoids many of the constraints associated with treating WebGL, which was designed primarily for graphics, as a general-purpose compute API.
WebNN is an emerging browser API for neural network acceleration. Where supported, it is intended to provide access to the device’s available ML hardware, including GPUs and NPUs.
Let’s initialize the React application and install the dependencies.
The application has two main stages:
If you haven’t already created the project, scaffold a React and TypeScript app with Vite:
npm create vite@latest document-scanner -- --template react-ts
Then install LiteRT.js:
npm install @litertjs/core
We’ll use @litertjs/tfjs-interop to pass tensors between TensorFlow.js and LiteRT.js:
npm install @litertjs/tfjs-interop
Install TensorFlow.js:
npm install @tensorflow/tfjs
Then add its WebGPU backend:
npm install @tensorflow/tfjs-backend-webgpu
Finally, install LiteRT-LM for the on-device language model:
npm install --save @litert-lm/core
The resulting stack looks like this:
| Package | Purpose |
|---|---|
@litertjs/core |
Loads and executes .tflite models |
@litertjs/tfjs-interop |
Shares tensors between TensorFlow.js and LiteRT.js |
@tensorflow/tfjs |
Tensor manipulation and supporting image operations |
@tensorflow/tfjs-backend-webgpu |
WebGPU backend for TensorFlow.js |
@litert-lm/core |
Runs the on-device language model |
The OCR pipeline needs three files:
You can find the OCR models, dictionary, and complete project in the GitHub repository.
The Gemma model is available from Hugging Face.
Place the required model files inside the project’s public/models/ directory.
The code used throughout this tutorial lives under src/, organized into three main directories:
src/
├── litert/
│   ├── runtime.ts
│   └── models.ts
├── ocr/
│   ├── preprocess.ts
│   ├── detect.ts
│   ├── ctc.ts
│   └── layout.ts
└── llm/
    ├── engine.ts
    └── structureWithLlm.ts
This separation keeps model initialization, OCR processing, and LLM inference independent from one another.
We’ll start with the ML runtime itself.
Two pieces need to be initialized before inference can run:
Initializing a machine learning backend is relatively expensive. React components can mount, unmount, and re-render frequently, so tying runtime initialization directly to component lifecycle can create duplicate GPU contexts and unnecessary memory pressure.
Instead, we’ll cache initialization at the module level with a shared Promise.
Create runtime.ts:
import {
  loadLiteRt,
  getWebGpuDevice,
  isWebGPUSupported
} from '@litertjs/core';
import * as tf from '@tensorflow/tfjs';
import { WebGPUBackend } from '@tensorflow/tfjs-backend-webgpu';
import { WASM_PATH } from '../ocr/config';

export interface RuntimeInfo {
  webgpu: boolean;
  tfjsBackend: string;
}

let runtimePromise: Promise<RuntimeInfo> | null = null;

export function initRuntime(): Promise<RuntimeInfo> {
  if (!runtimePromise) {
    runtimePromise = doInit().catch((err) => {
      runtimePromise = null;
      throw err;
    });
  }

  return runtimePromise;
}

async function doInit(): Promise<RuntimeInfo> {
  if (isWebGPUSupported()) {
    await tf.setBackend('webgpu');
    await tf.ready();
    await loadLiteRt(WASM_PATH);

    const device = getWebGpuDevice();

    if (device) {
      tf.removeBackend('webgpu');
      tf.registerBackend(
        'webgpu',
        () => new WebGPUBackend(device, device.adapterInfo)
      );

      await tf.setBackend('webgpu');
      await tf.ready();

      return {
        webgpu: true,
        tfjsBackend: tf.getBackend()
      };
    }
  }

  await loadLiteRt(WASM_PATH);
  await tf.setBackend('cpu');
  await tf.ready();

  return {
    webgpu: false,
    tfjsBackend: tf.getBackend()
  };
}
runtimePromise ensures that multiple callers share the same initialization work. If initialization fails, the promise is reset so a later request can try again.
When WebGPU is available, the application initializes the TensorFlow.js WebGPU backend and shares the GPU device with LiteRT.js. Otherwise, it falls back to CPU execution.
Once the runtime is ready, we can compile the .tflite model graphs.
Compilation prepares the model for a particular execution backend. Here, we’ll try the preferred accelerated backend first and fall back when compilation fails.
Create models.ts:
import { loadAndCompile } from '@litertjs/core';
import type {
  CompiledModel,
  TensorDetails
} from '@litertjs/core';

async function compileWithFallback(
  url: string,
  order: readonly Backend[]
): Promise<LoadedModel> {
  let lastErr: unknown;

  for (const accelerator of order) {
    try {
      const model = await loadAndCompile(url, { accelerator });

      const toSpec = (d: TensorDetails) => ({
        name: d.name,
        dtype: d.dtype,
        shape: Array.from(d.shape)
      });

      return {
        model,
        backend: accelerator,
        inputs: model.getInputDetails().map(toSpec),
        outputs: model.getOutputDetails().map(toSpec)
      };
    } catch (err) {
      lastErr = err;
    }
  }

  throw new Error(`Failed to compile ${url}: ${String(lastErr)}`);
}
The full models.ts implementation loads the detector, recognizer, and dictionary in parallel with Promise.all.
Before sending an image through the OCR models, we preprocess it to make recognition more reliable.
The pipeline:
The relevant part of preprocess.ts looks like this:
export function preprocess(
  source: CanvasImageSource,
  srcW: number,
  srcH: number
): Preprocessed {
  const scale = downscaleFactor(srcW, srcH);
  const w = Math.round(srcW * scale);
  const h = Math.round(srcH * scale);

  const img = toImageData(source, w, h);
  const luma = grayscale(img);
  contrastStretch(img, luma);

  return {
    image: img,
    scale
  };
}
downscaleFactor() limits the longest edge to 1600px, preventing unnecessarily large images from increasing inference cost.
Grayscale conversion reduces the image to luminance information, while contrast stretching increases the separation between text and its background.
The OCR pipeline has three stages:
The detection model finds text bounding boxes.
When WebGPU is available, we want to avoid repeatedly copying tensors between GPU and CPU memory. @litertjs/tfjs-interop provides runWithTfjsTensors, which lets TensorFlow.js tensors pass directly into the LiteRT.js execution path.
The relevant code in detect.ts looks like this:
import * as tf from '@tensorflow/tfjs';
import { runWithTfjsTensors } from '@litertjs/tfjs-interop';

export async function detect(
  det: LoadedModel,
  image: ImageData
): Promise<{ boxes: Box[] }> {
  const inLayout = {
    h: det.inputs[0].shape[2],
    w: det.inputs[0].shape[3],
    layout: 'nchw' as const
  };

  const input = buildInput(
    image,
    inLayout.w,
    inLayout.h,
    inLayout.layout
  );

  const outputs = await runWithTfjsTensors(det.model, [input]);
  input.dispose();

  const [region, affinity] = await Promise.all([
    outputs[0].data(),
    outputs[1].data()
  ]);

  tf.dispose(outputs);

  return {
    boxes: decodeCraftHeatmaps(
      region,
      affinity,
      inLayout.w,
      inLayout.h
    )
  };
}
buildInput() normalizes image values into the range expected by the model.
After inference, the model’s heatmaps are decoded into bounding boxes using connected-component grouping.
Once we’ve located the text regions, each region is cropped and passed to the recognition model.
The recognizer returns a probability distribution over character classes at each timestep. We then decode that output using Connectionist Temporal Classification (CTC).
The decoder in ctc.ts looks like this:
export function ctcGreedyDecode(
  logits: Float32Array,
  T: number,
  numClasses: number,
  chars: string[]
) {
  const path = new Int32Array(T);
  const probs = new Float32Array(T);

  for (let t = 0; t < T; t++) {
    path[t] = getArgmax(
      logits,
      t * numClasses,
      numClasses
    );

    probs[t] = getSoftmaxProbability(
      logits,
      t * numClasses,
      numClasses
    );
  }

  let out = '';
  let prev = -1;
  const blank = 0;

  for (let t = 0; t < T; t++) {
    const cls = path[t];

    if (cls !== prev && cls !== blank) {
      out += chars[cls] ?? '';
    }

    prev = cls;
  }

  return {
    text: out,
    confidence: calculateAvgConfidence(probs)
  };
}
The decoder takes the most likely character at each timestep, collapses repeated classes, and removes the CTC blank token.
Raw OCR output is not enough for receipts. We also need to preserve relationships such as an item name and its price appearing on the same row.
The application reconstructs that layout using the coordinates of each detected word.
In layout.ts:
export function reconstructLines(
  words: Word[],
  rowTolerance = 0.6
): Line[] {
  const byY = [...words].sort(
    (a, b) =>
      (a.box.y + a.box.h / 2) -
      (b.box.y + b.box.h / 2)
  );

  const rows: Row[] = [];

  for (const word of byY) {
    const matchedRow = findMatchingRow(
      rows,
      word,
      rowTolerance
    );

    if (matchedRow) {
      matchedRow.words.push(word);
    } else {
      rows.push({
        words: [word],
        centerSum: word.box.y + word.box.h / 2
      });
    }
  }

  return rows
    .map(formatAndInsertSpaces)
    .sort((a, b) => a.yCenter - b.yCenter);
}
The algorithm first groups words whose vertical positions overlap within a tolerance. It then sorts words horizontally and inserts spacing based on their physical distance from one another.
That gives the LLM a more useful representation of the receipt than a flat list of recognized strings.
OCR gives us text. The next step is turning that text into structured application data.
For a receipt, that might mean:
We’ll use an on-device Gemma model through LiteRT-LM to convert the reconstructed OCR output into JSON. If you’re interested in other approaches to building multi-turn AI agents, Genkit’s Agents API is worth exploring as a complementary option.
LLM runtimes and model resources are relatively large, so loading them as part of the initial application bundle would increase startup cost even for users who never use the feature.
Instead, we’ll dynamically import LiteRT-LM only when the user enables the Structure with LLM option.
The relevant part of engine.ts:
import type { Engine } from '@litert-lm/core';
import {
  LLM_MODEL_PATH,
  LLM_MAX_TOKENS,
  LLM_WASM_PATH
} from '../ocr/config';

let status: LlmStatus = 'unavailable';
let enginePromise: Promise<Engine | null> | null = null;

export function initLlmEngine(): Promise<Engine | null> {
  if (!enginePromise) {
    enginePromise = doInit().catch(() => {
      enginePromise = null;
      return null;
    });
  }

  return enginePromise;
}

async function doInit(): Promise<Engine | null> {
  const mod = await import('@litert-lm/core');

  await mod.getOrLoadGlobalLiteRtLm(LLM_WASM_PATH);

  return await mod.Engine.create({
    model: LLM_MODEL_PATH,
    mainExecutorSettings: {
      maxNumTokens: LLM_MAX_TOKENS
    }
  });
}
The module-level promise serves the same role as it did for the main LiteRT.js runtime: only one initialization runs at a time.
The dynamic import() also gives the bundler an opportunity to split the LLM runtime into a separate chunk rather than including it in the application’s initial JavaScript bundle. This kind of lazy evaluation is a common pattern in React applications for managing expensive resources.
Next, we provide a system prompt that defines the expected output format and target JSON schema.
structureWithLlm.ts handles the request:
import { getLlmEngine } from './engine';
import {
  SYSTEM_PROMPT,
  buildUserPrompt
} from './prompt';

export async function structureWithLlm(
  lines: Line[]
): Promise<ReceiptData> {
  const engine = await getLlmEngine();

  if (!engine) {
    return structureFallback(lines);
  }

  try {
    const convo = await engine.createConversation({
      preface: {
        messages: [
          {
            role: 'system',
            content: SYSTEM_PROMPT
          }
        ]
      }
    });

    const prompt = buildUserPrompt(lines);
    const raw = await convo.sendMessage(prompt);

    await convo.delete();

    const jsonText = extractJson(raw.content);

    return parseAndMapOcrConfidence(
      jsonText,
      lines
    );
  } catch (err) {
    return structureFallback(lines);
  }
}
If the LLM cannot initialize or fails during inference, the application falls back to a regex-based parser rather than failing the entire scan.
The result in the browser looks like this:
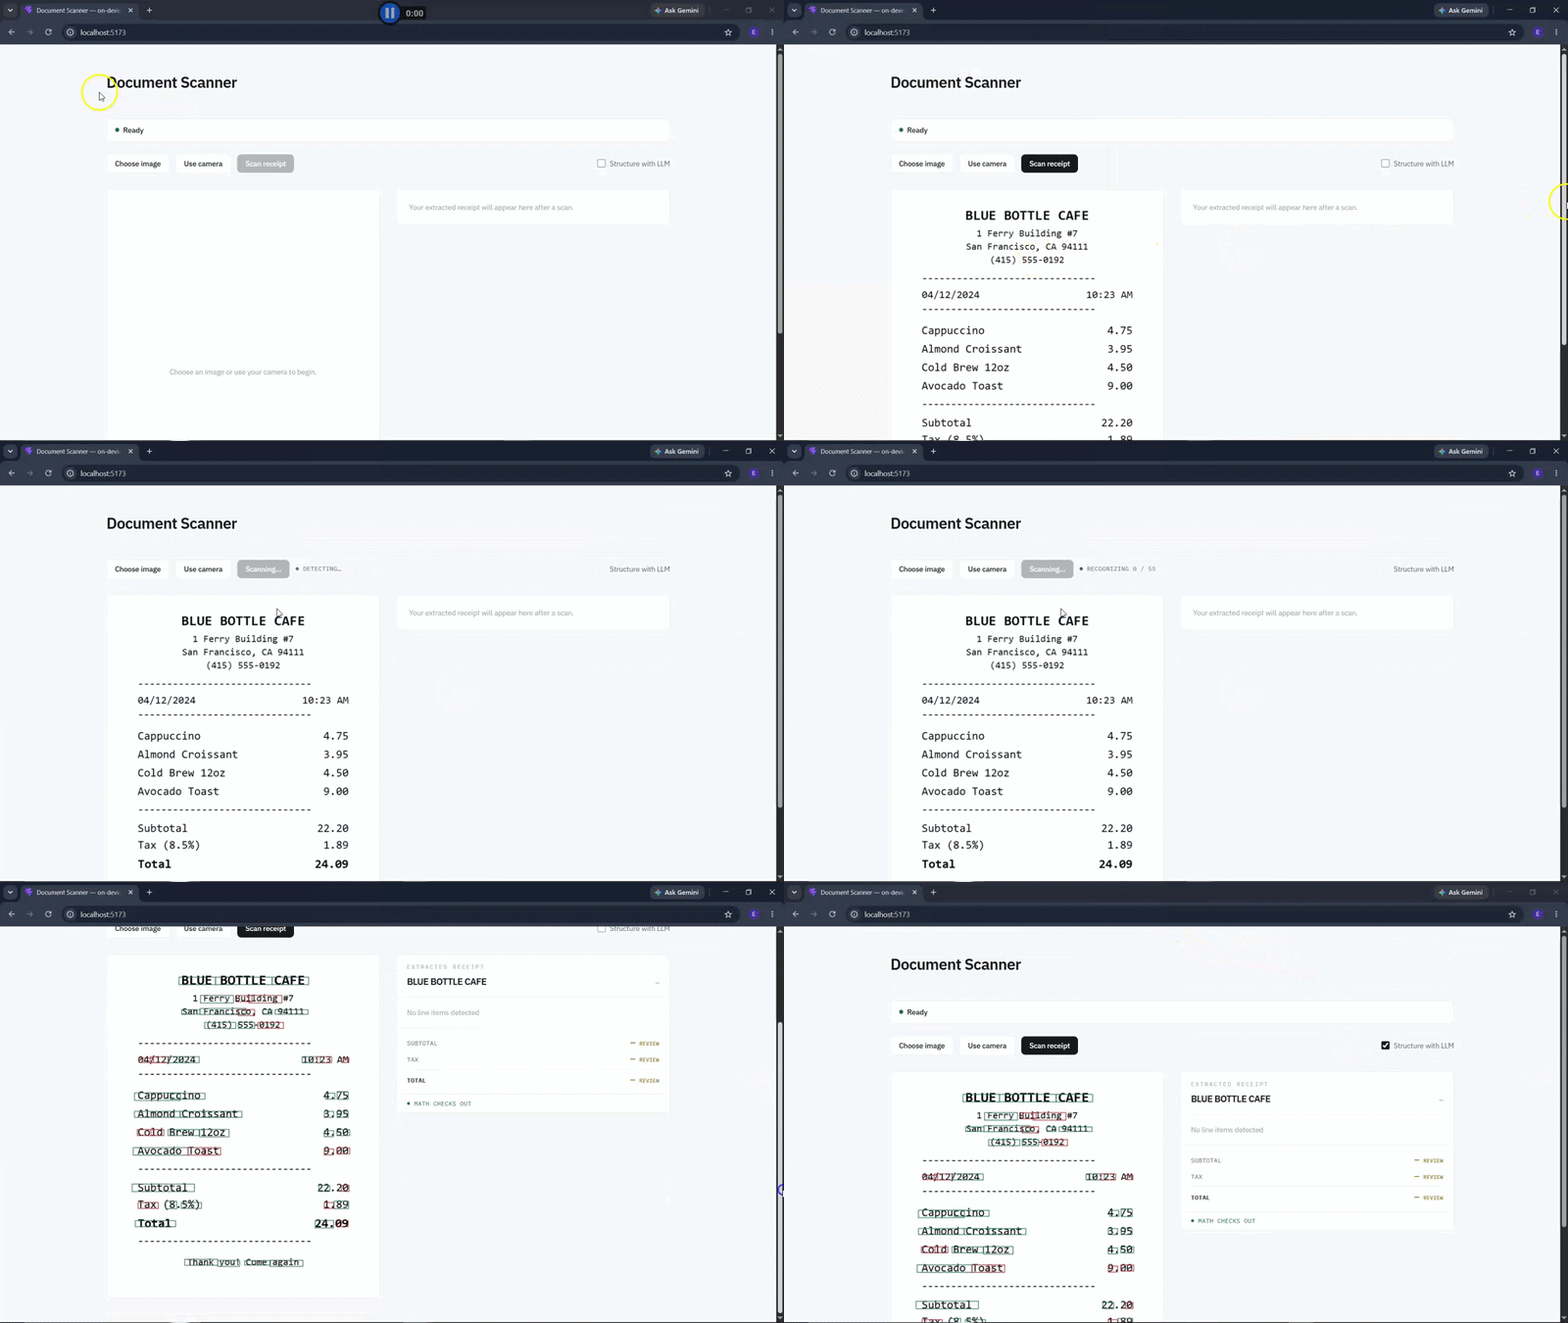
Note: The recognition model used in this demo achieves less than 50 percent recognition accuracy in the author’s testing. You can replace it with a more accurate OCR model without changing the overall LiteRT.js pipeline.
LiteRT.js is one of several options for running machine learning workloads in the browser.
The major differences are the model format, execution architecture, and hardware backends each runtime supports.
| Feature | LiteRT.js | TensorFlow.js | ONNX Runtime Web |
|---|---|---|---|
| Model format | .tflite |
TensorFlow.js model formats | .onnx |
| CPU execution | Wasm / optimized native kernels | JavaScript / Wasm backends | Wasm |
| GPU execution | WebGPU | WebGL / WebGPU, depending on backend | WebGPU |
| Framework interoperability | Models can originate from multiple ML frameworks through conversion | Strongest with TensorFlow ecosystem | Broad ONNX ecosystem |
| WebNN path | Emerging/support dependent | Support dependent | Support dependent |
The most important choice is often the model format you already use.
If you already have .tflite models or are targeting Android, mobile, embedded, and web from the same model pipeline, LiteRT.js is particularly attractive because the browser can use the same deployment format.
TensorFlow.js still has a broader JavaScript-native ecosystem and can be useful when tensor manipulation and model execution both live primarily in JavaScript. When evaluating your package manager and dependency setup for these kinds of ML projects, it’s worth considering how each tool affects install times and disk usage.
ONNX Runtime Web is a strong fit when your model pipeline already targets ONNX or you need compatibility with models originating across several training frameworks.
LiteRT.js gives web developers another practical path to running machine learning models directly on user devices.
In this tutorial, we built a browser-based receipt-processing pipeline that uses LiteRT.js for OCR inference, reconstructs the spatial layout of the recognized text, and optionally passes that result through an on-device language model with LiteRT-LM.
The architecture also demonstrates where LiteRT.js fits alongside existing browser tooling. TensorFlow.js still plays a useful role in tensor handling and interoperability here, while LiteRT.js handles .tflite model execution. That makes LiteRT.js less of a wholesale TensorFlow.js replacement and more of a new option for applications built around Google’s AI Edge model ecosystem.
Running inference locally also changes the application’s deployment model. Images and extracted text can remain on the user’s device, the application can continue working without a round trip to an inference API, and developers can avoid standing up a dedicated backend for every model request. For teams evaluating where AI fits into their broader product strategy, understanding what AI knowledge product managers need is increasingly relevant as these on-device capabilities mature.
You can find the complete project on GitHub.
If you’re interested in exploring how AI tooling compares more broadly, the AI dev tool power rankings offer a useful overview of the current landscape.

Compare the top AI development tools and models of October 2026. View updated rankings, feature breakdowns, and find the best fit for you.
Can AI agents debug React bugs across browsers? I tested Chrome, Safari, and Firefox debugging MCPs on four bugs to compare their findings, workflows, and effectiveness.
React 19.3 and modern CSS make several common patterns unnecessary. Here are 10 features that let you delete old React code and simplify your apps.
Explore the top AI agent frameworks in 2026 and compare how they handle tools, memory, structured output, streaming, and step limits.
Would you be interested in joining LogRocket's developer community?
Join LogRocket’s Content Advisory Board. You’ll help inform the type of content we create and get access to exclusive meetups, social accreditation, and swag.
Sign up now
 Learn more →