

For years, JPEG XL (JXL) was the image format that looked great on paper but didn’t work in most browsers. It’s a royalty-free successor to JPEG that supports lossy and lossless compression, progressive loading, animation, transparency, and HDR. It can also shrink existing JPEGs without any loss. Chrome dropped JPEG XL’s experimental support in 2022, and Firefox kept it behind a flag, so most developers moved on to WebP and AVIF. That changed in October 2026, when both Chrome 155 and Firefox 158 turned on JPEG XL decoding by default.
This article looks at whether it’s worth serving images as JXL on the web, mainly from the perspective of web performance. As I wanted a practical answer, I ran a small test comparing the file sizes of JXL, WebP, AVIF, and JPEG, how much recompressing existing JPEGs saves, and decoding speed on a low-end laptop. Beyond the findings and my recommendations, I’ll cover the main features of JPEG XL, the current state of browser support, and how to use it in production.
JPEG XL grew out of a joint effort by the JPEG committee, Google, and Cloudinary. It was first standardized as ISO/IEC 18181 in 2021 and 2022, combining two earlier image formats: Google’s PIK, a JPEG-like format for photos and the web, and Cloudinary’s FUIF (Free Universal Image Format), designed for web delivery. Both could handle lossy and lossless images, and they live on as JPEG XL’s two main coding modes:
Like classic JPEG, VarDCT splits the image into blocks and stores each one as a mix of simple patterns. However, JPEG always uses 8×8 blocks, while JPEG XL can pick from many block sizes up to 256×256 to fit the content (e.g., a few big blocks for smooth areas and small ones for detail).
Modular works roughly like PNG by predicting pixel values and storing only the differences. It also handles extra channels such as transparency. It’s the mode used for lossless images by default, although it can do lossy compression, too.
This is the decision of the encoder, not a rule of the format. By default, the cjxl command-line tool uses VarDCT for lossy and Modular for lossless compression, but you can force either one with -m.
Here’s how JPEG XL encoding and decoding work:
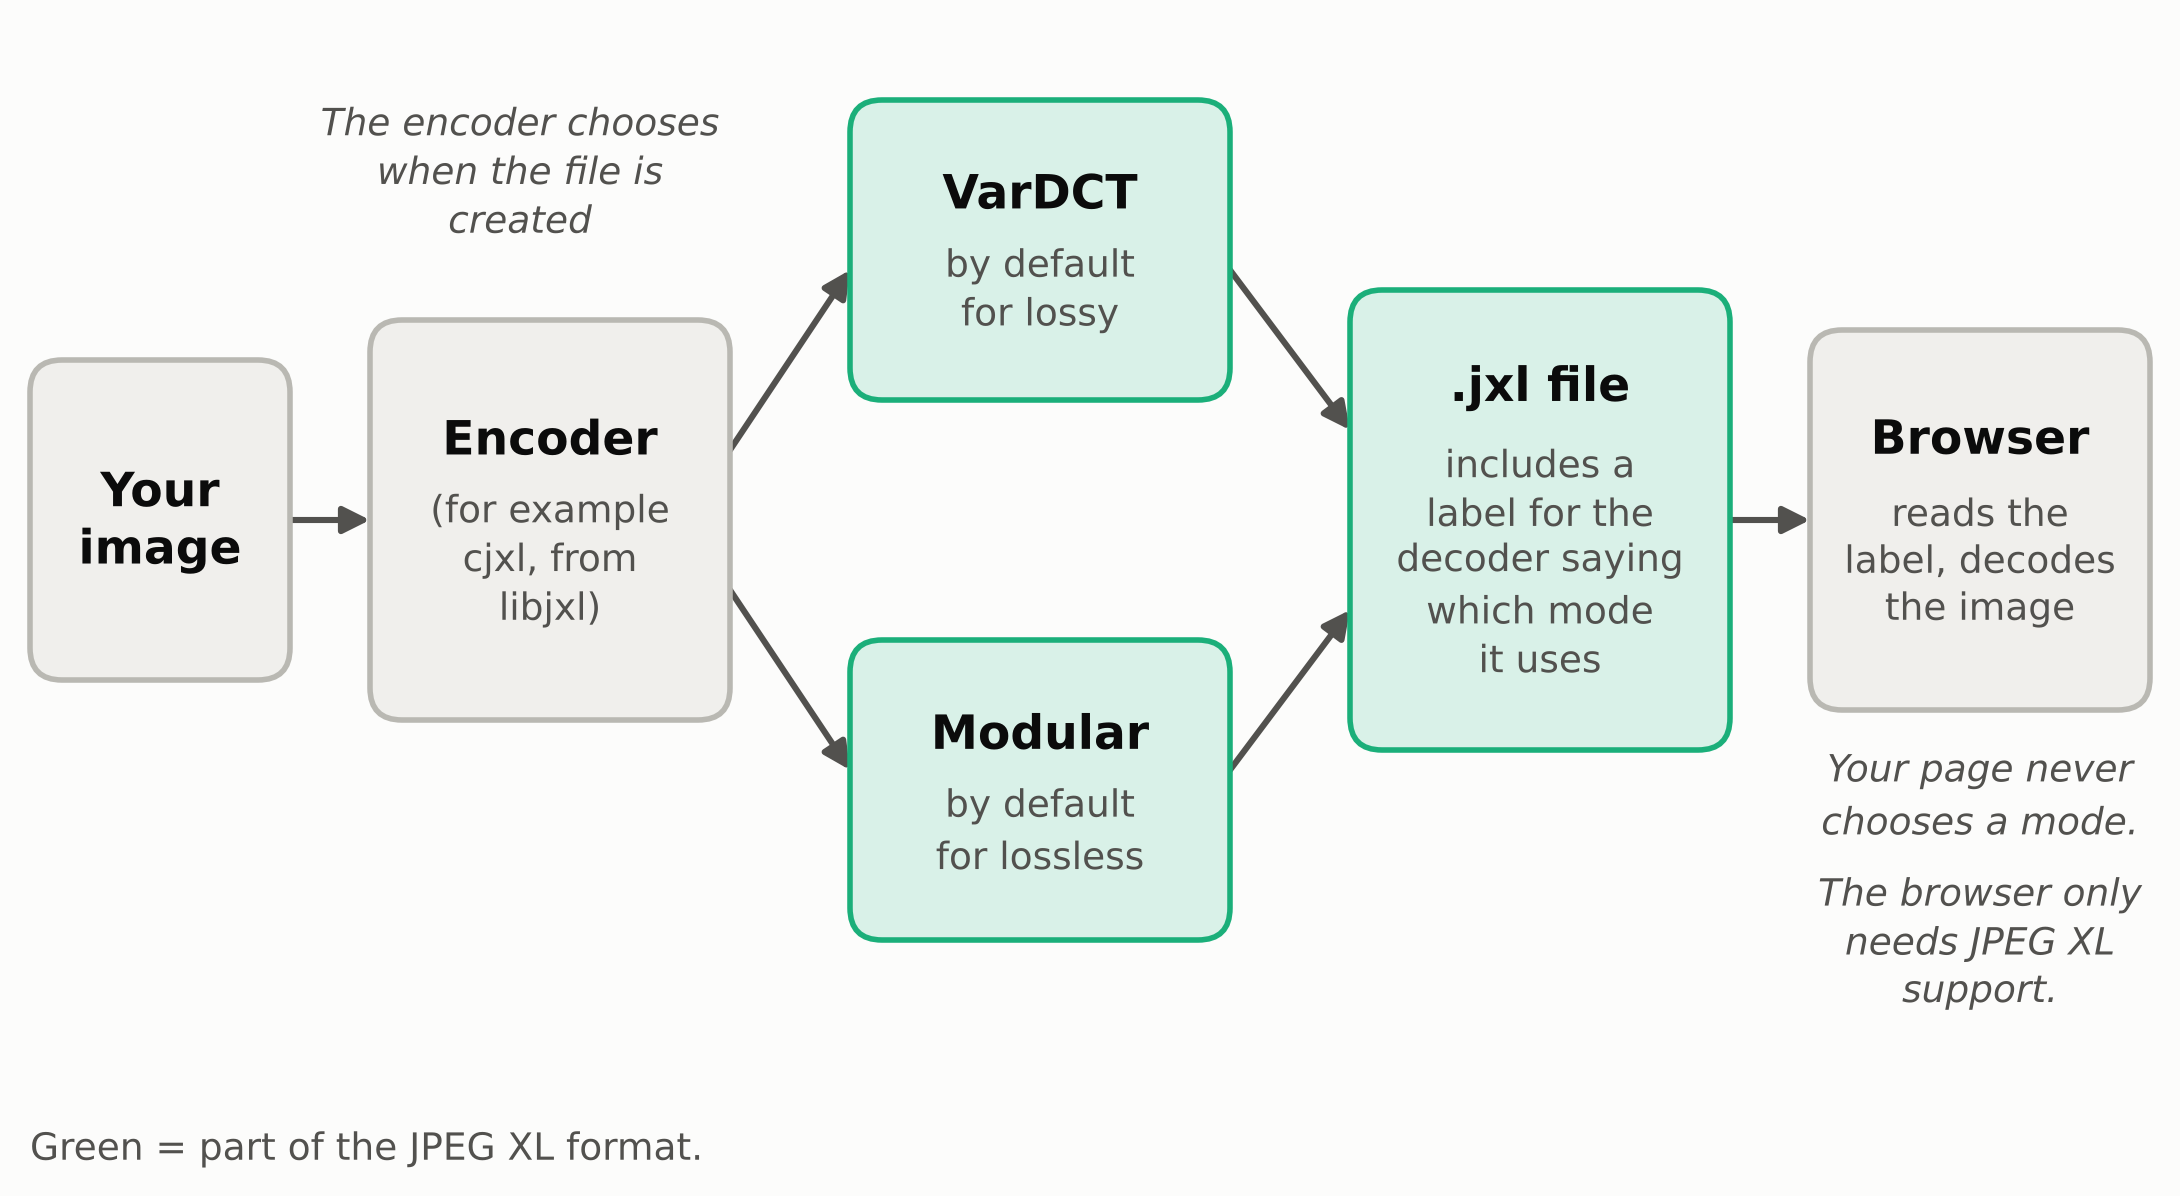
Encoding is done once on your server or in your build pipeline, and the encoder’s settings, such as quality, decide how big the .jxl file will be. Decoding, on the other hand, happens in each visitor’s browser every time the image loads. File size and decoding time together determine how fast the image appears.
Beyond its two coding modes, JXL has two features that make a difference for web performance:
We’ll look into the format’s main features later in the article.
In my tests, JPEG XL produced the smallest photo files at high quality and in lossless compression compared with WebP and AVIF. JXL also reduced the size of existing JPEGs without any quality loss. On the other hand, it was the slowest format to decode on average, in both Firefox and Chrome.
Here’s how the three image formats compare, from file size to features and browser support:
I tested six images of different kinds: a portrait, a building, a lake landscape, a bird, a VS Code screenshot of the jxl-rs source code, and a logo with transparency. Five are CC0 or public-domain images from Wikimedia Commons, and the screenshot is my own. Then, I prompted Claude Code (model: Sonnet 5.5 Medium) to write and run the scripts for the test. The scripts, the commands it ran, and the raw results are available in this GitHub repo.
The source images were lossless TIFF and PNG files, so none carried artifacts from an earlier JPEG compression. To make sure, a script (/scripts/prepare.py) measured how much brightness jumped along the 8×8 pixel grid that JPEG leaves behind, compared it with 7- and 9-pixel grids as a control, and searched each file’s metadata for JPEG in its editing history. (A seventh candidate image I wanted to include showed a clear grid in this check, so I left it out.)
The same script then made a working copy of each image (using Pillow, NumPy, and lcms2 for the color conversion): an 8-bit sRGB PNG, resized with Lánczos resampling so its long edge is at most 2,000 pixels (smaller images were left as they were). Each of the quality scores used in the test compares an encoded file with this working copy, not with the original image.
Then, I encoded each working copy with the following open-source tools (versions and settings are in the GitHub repo):
I ran each encoder at its default effort. JPEG and WebP used 4:2:0 chroma subsampling (reduced color detail), because WebP’s lossy mode supports nothing else and libjpeg-turbo uses it by default (the one exception is the screenshot’s JPEG, which is 4:4:4 because 4:2:0 couldn’t reach the quality target). AVIF used full color detail (4:4:4), which is avifenc’s default for color PNG input, and JXL has no such setting because it works in its own color space, XYB.
I encoded each working copy at two quality targets, 70 (high quality) and 85 (very high quality), measured with SSIMULACRA 2. This score estimates how visible the differences from the working copy are to the human eye (100 means the images are identical). For each image format, the script tried a quality setting, scored the result, and adjusted the setting until the score came within one point of the target. I used SSIMULACRA 2 instead of each encoder’s own quality settings because those don’t give the same visual quality in every format. For example, for the building image at target 70, the settings that reached about the same quality were 68 for JPEG, 75 for WebP, 50 for AVIF, and 56 for JXL.
For the JPEG baseline images, I encoded each image and target with both libjpeg-turbo (baseline JPEG) and MozJPEG (progressive JPEG), and used the smaller file. Both use optimized Huffman tables, which shrink the file without changing the picture. That makes the resulting JPEGs a tough baseline: a JPEG from a less optimized encoder would be larger, and the savings below would look bigger.
Now, let’s see the results.
At a quality target of 70, AVIF produced the smallest file on three of the four photos, and JPEG XL on the fourth (the portrait). The lake was close to a tie between AVIF and JPEG XL, and WebP had the weakest showing (on the portrait and the lake, it came out larger than the JPEG):
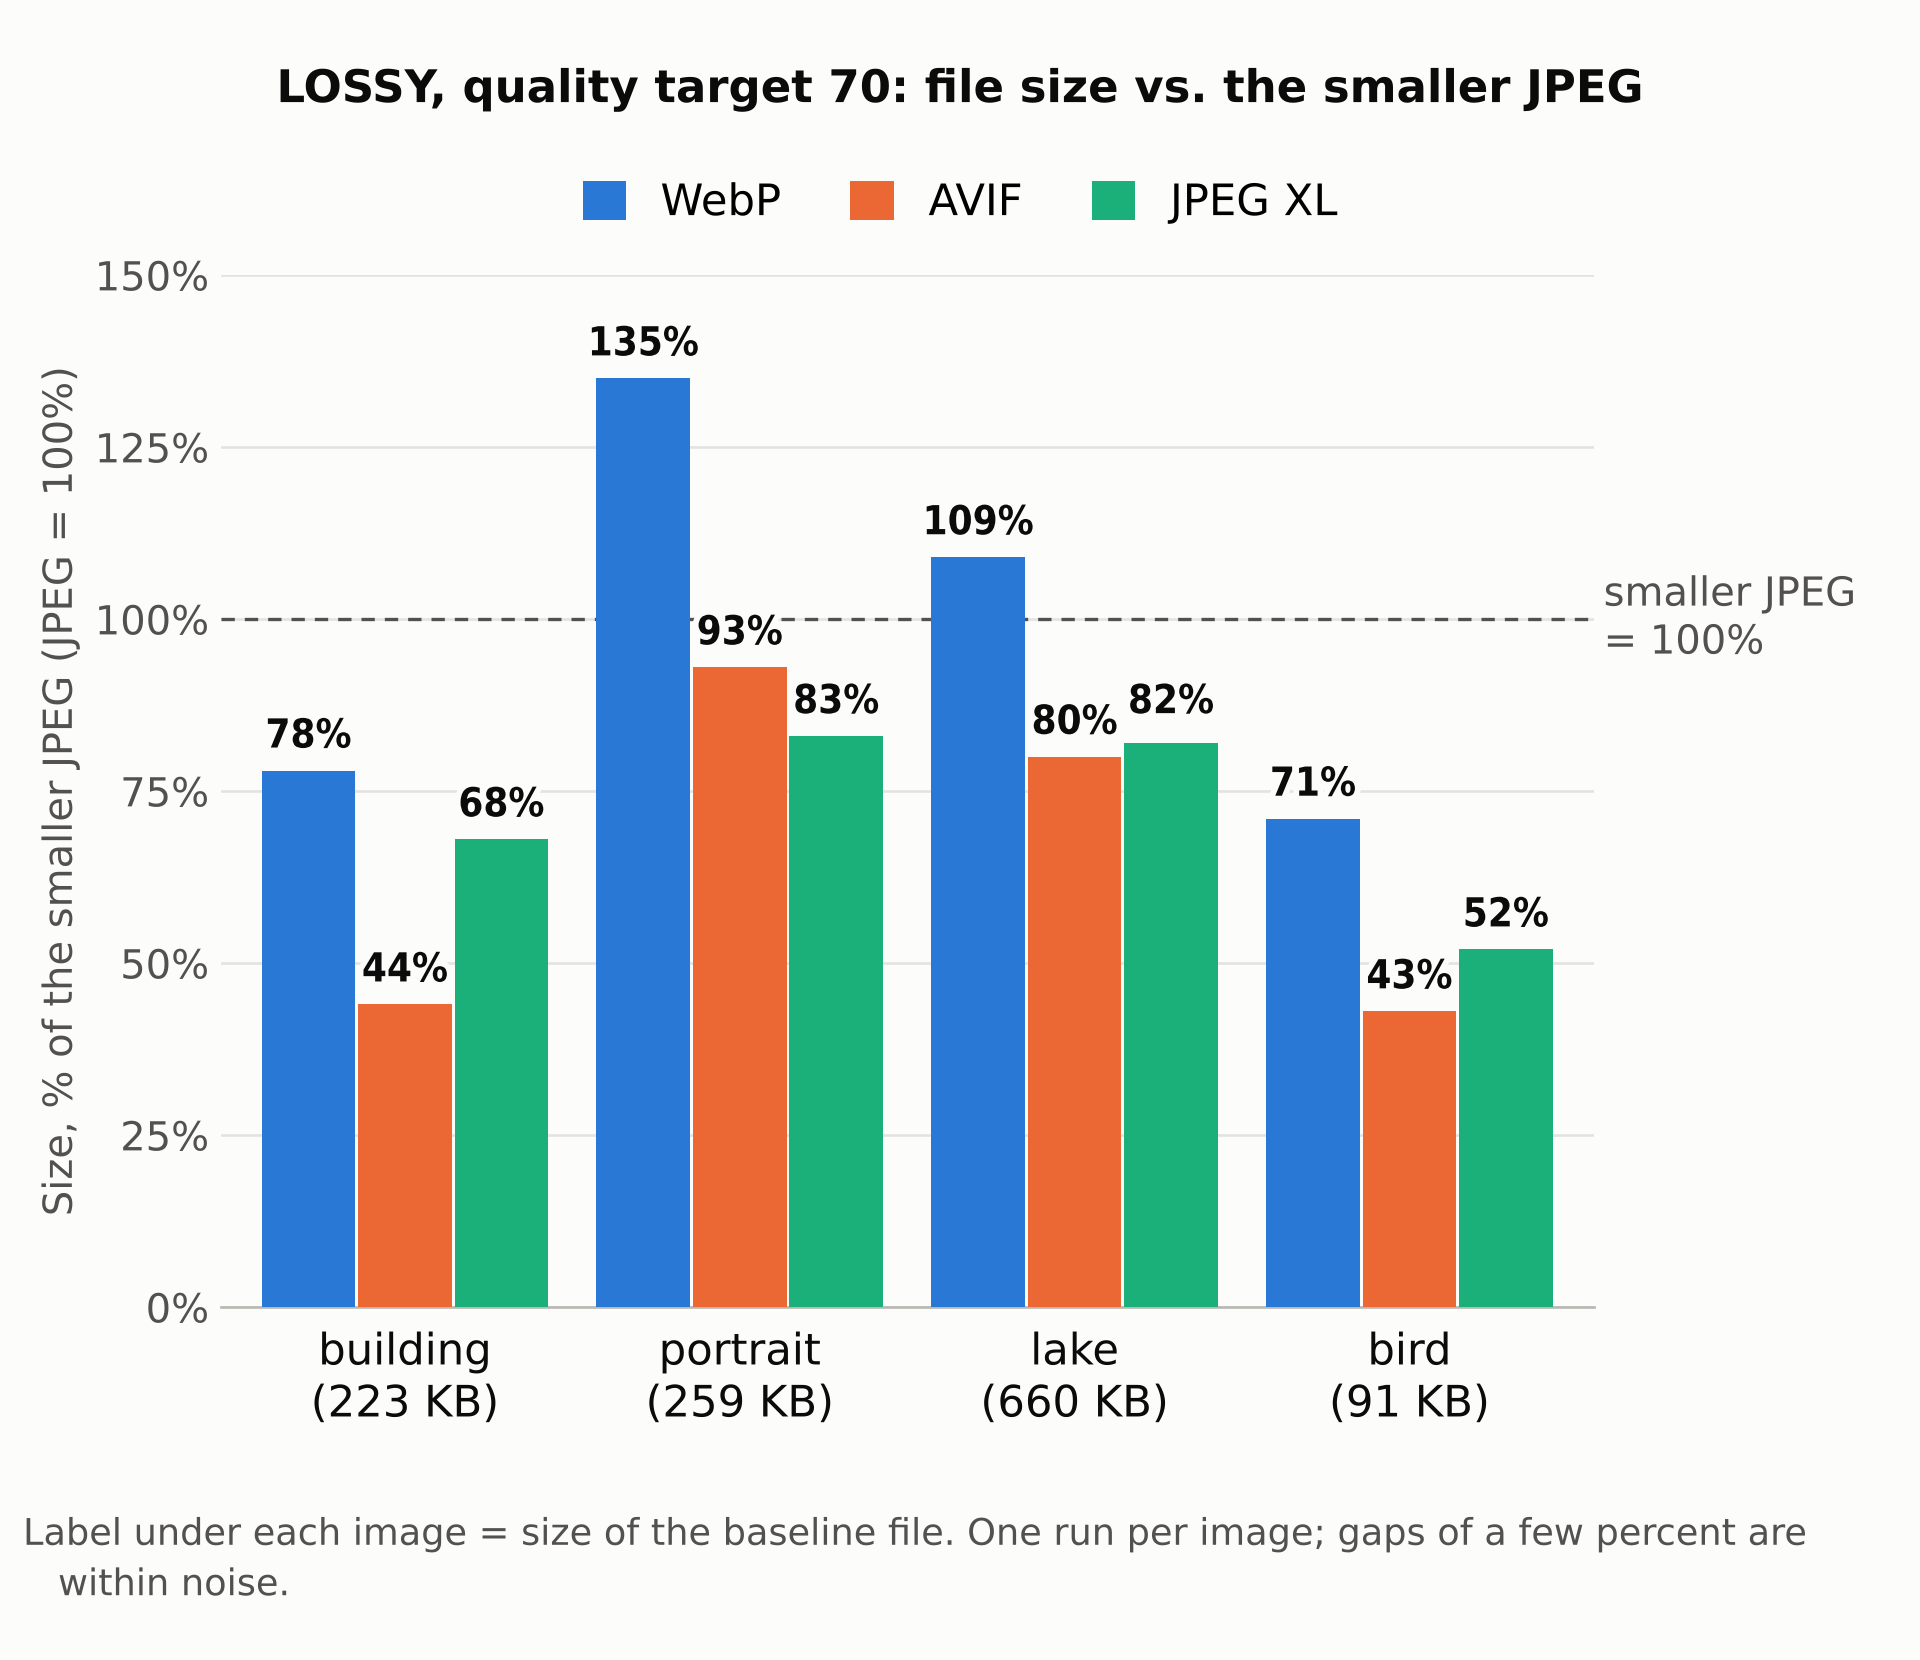
As you can see above, how much you save with each format depends a lot on the image. On the building and the bird, AVIF cut the file to less than half its JPEG size while on the portrait, the best format saved only 17%.
Note that I also encoded the screenshot and the logo at both quality targets (70 and 85), but I left them out of this comparison, since images with sharp edges, flat colors, and text behave differently from photos. Their lossy results are in the lossless section below and in the GitHub repo.
Now, let’s look at an example. Here is a crop of the bird at 2× zoom:
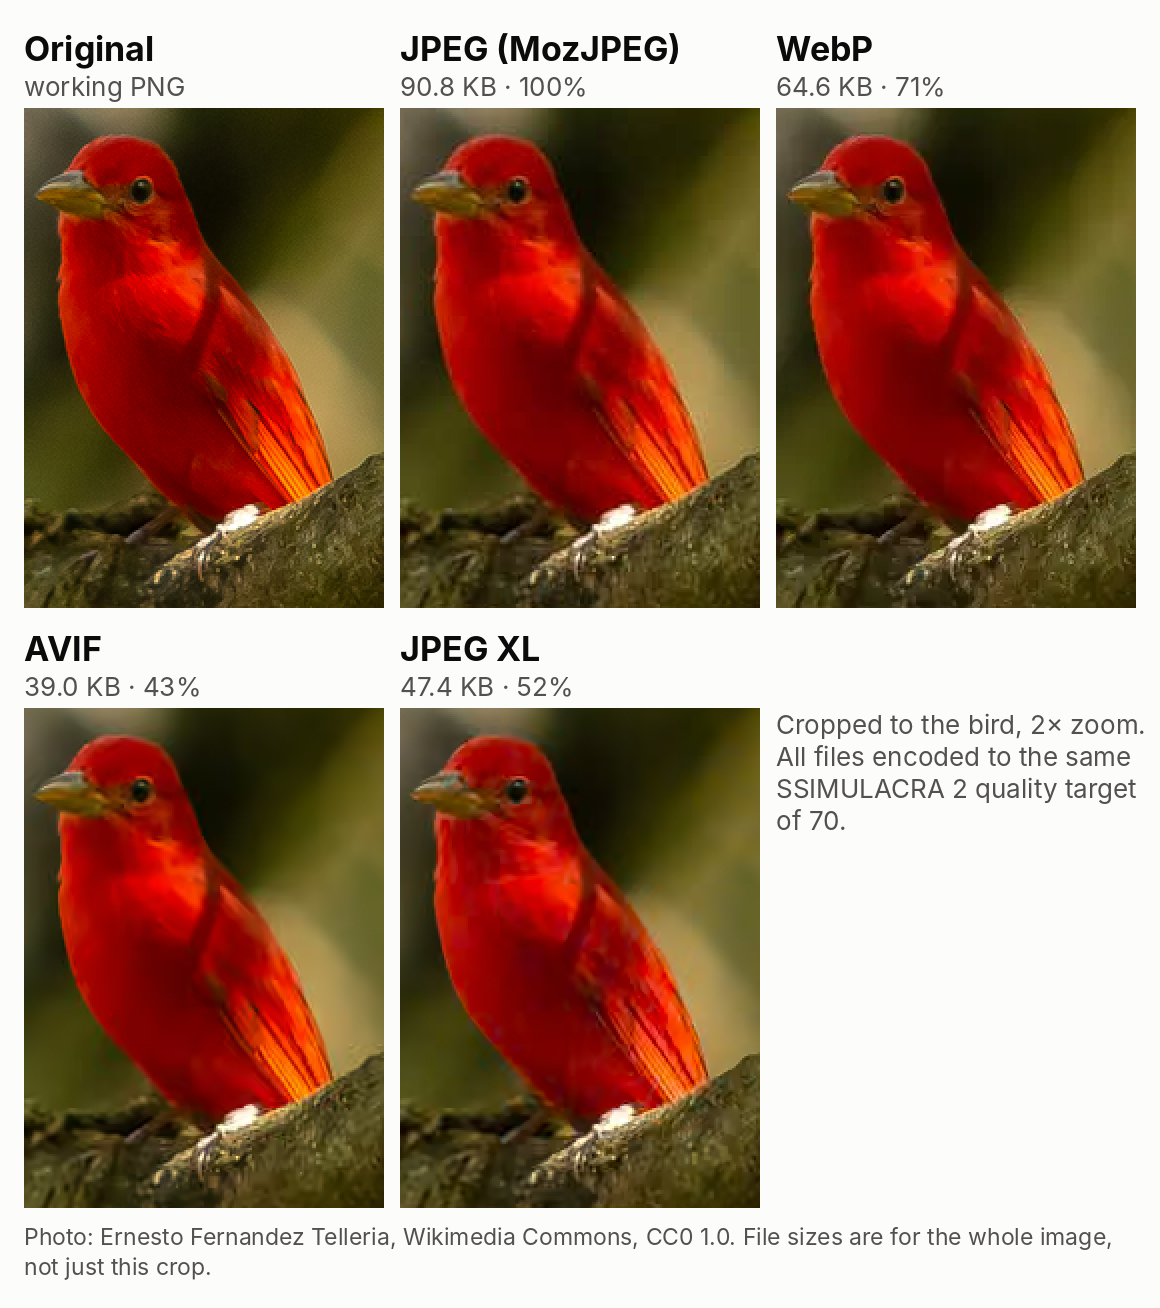
At the same quality target, the files look different up close. JPEG XL shows faint patches of slightly different red in the feathers, while AVIF and WebP are smoother but lose the fine feather texture. However, this is just my own reading, and you may see it differently.
Let’s look at the portrait, too, which was the only photo where JPEG XL produced the smallest file. It’s a harder case, because even JPEG XL saved only 17%. Here is a crop of the left eye at 2× zoom:
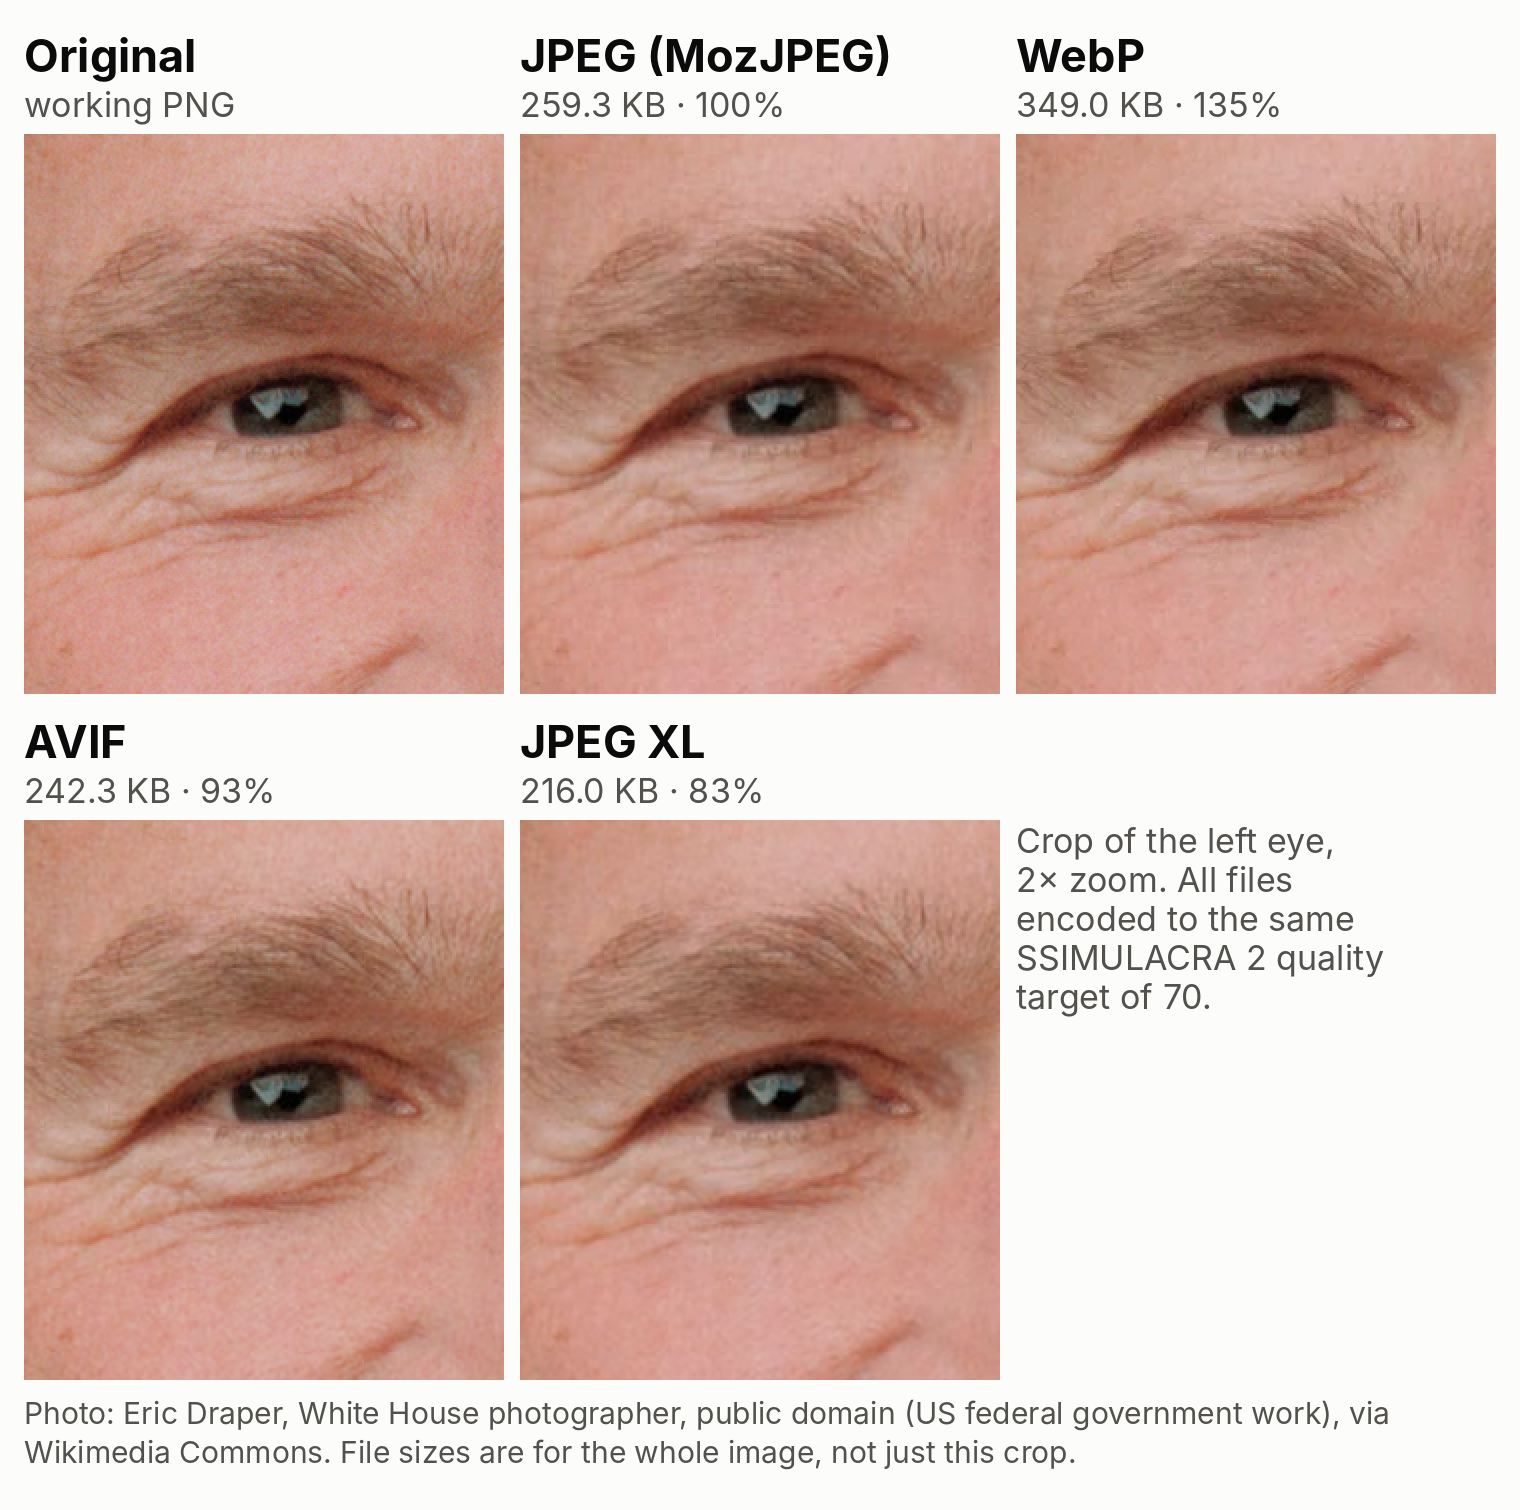
The original image has fine grain in the skin, and all four lossy files lose most of it. AVIF keeps a little more than the other formats, JPEG XL is probably the smoothest one, and JPEG and WebP show faint blotchy patches near the cheek. Again, this is just how I see it, and your view may differ.
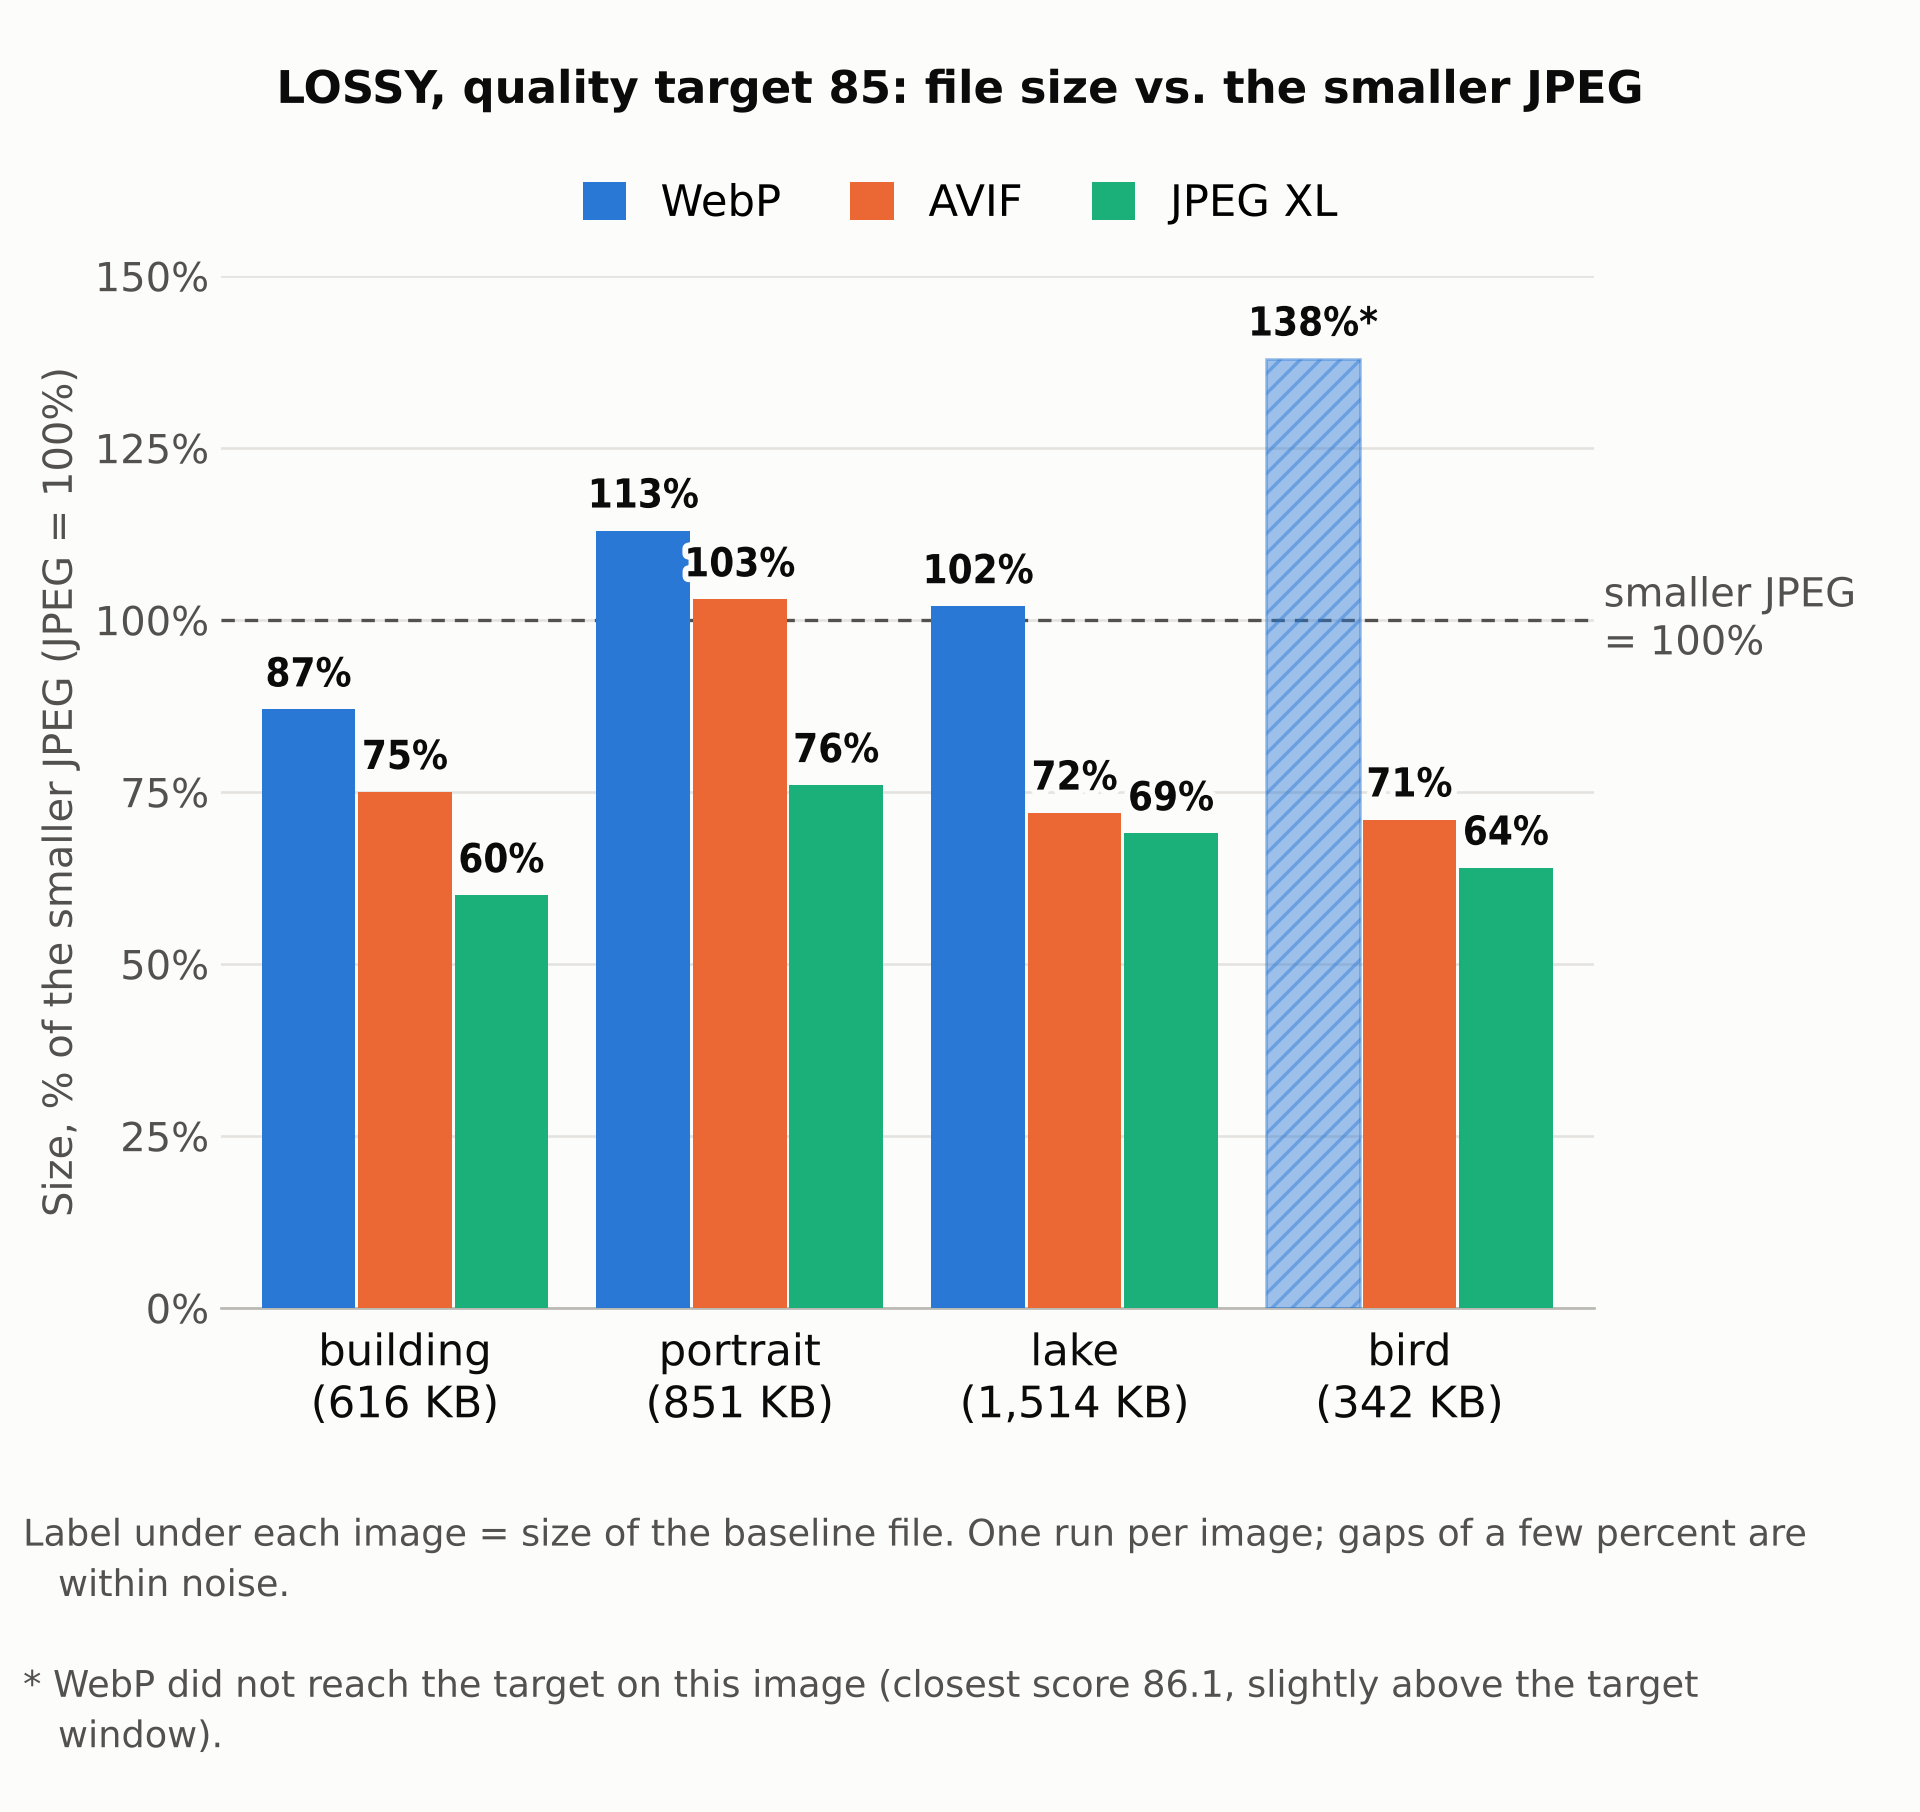
Quality 85 is closer to what you’d use for photos where detail matters, such as hero images or product shots. I used the same method and JPEG baseline images as at 70.
At quality 85, JPEG XL was the smallest format on all four photos. Unlike at 70, AVIF came second, and it was close to JPEG XL on the lake. On the portrait, AVIF and WebP were both larger than the JPEG. WebP came last on the building, portrait, and lake. On the bird, WebP’s closest file was above the quality target, so it isn’t a like-for-like comparison. I marked it with an asterisk and didn’t count it:
Now the files look much more alike than they did at 70. Here is the left-eye crop of the portrait again at quality 85:
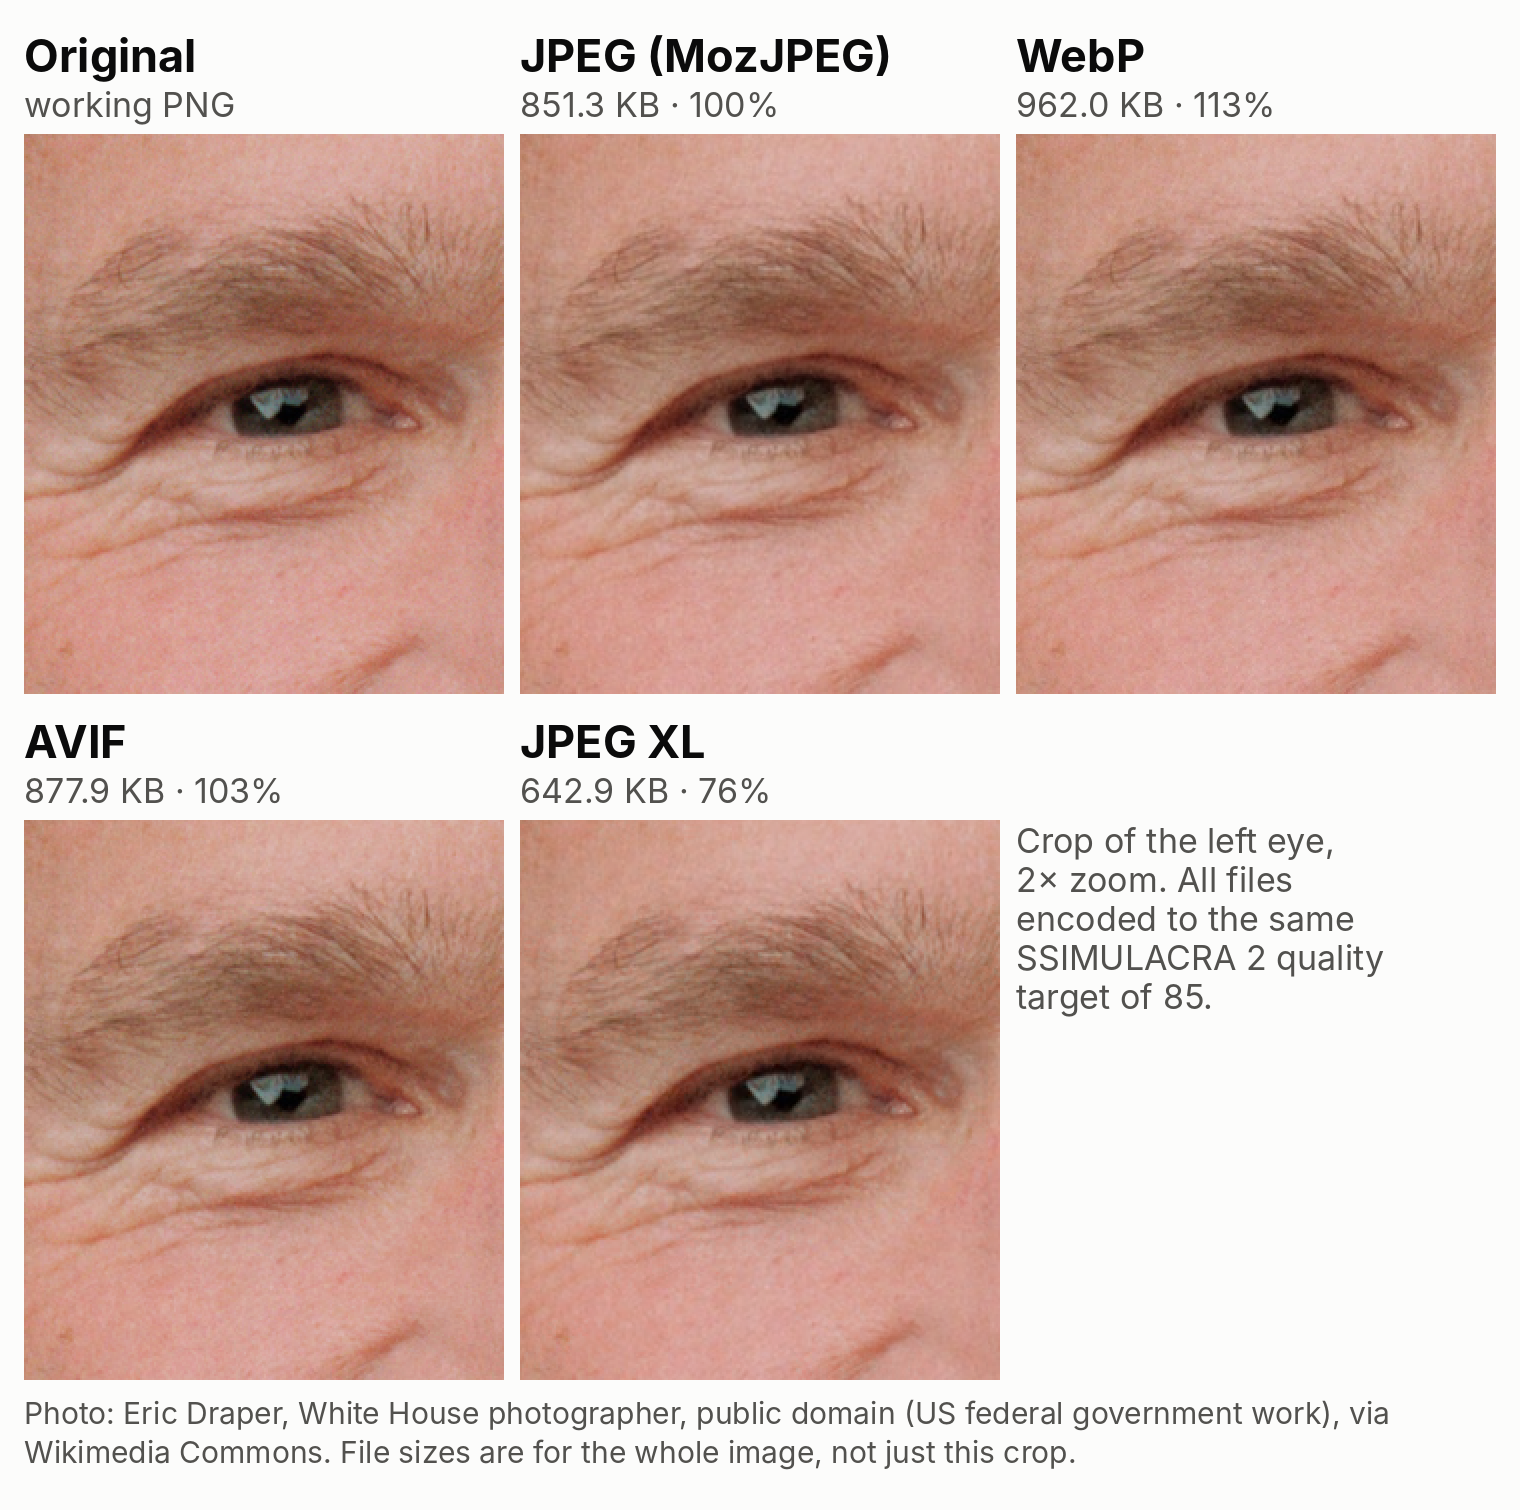
To me, the five crops look about the same. Compare the fine grain on the skin and the eyebrow hairs, and see what you think.
I skipped the bird here, because WebP didn’t reach the target on it. Here is a crop of the building facade at 2× zoom instead:
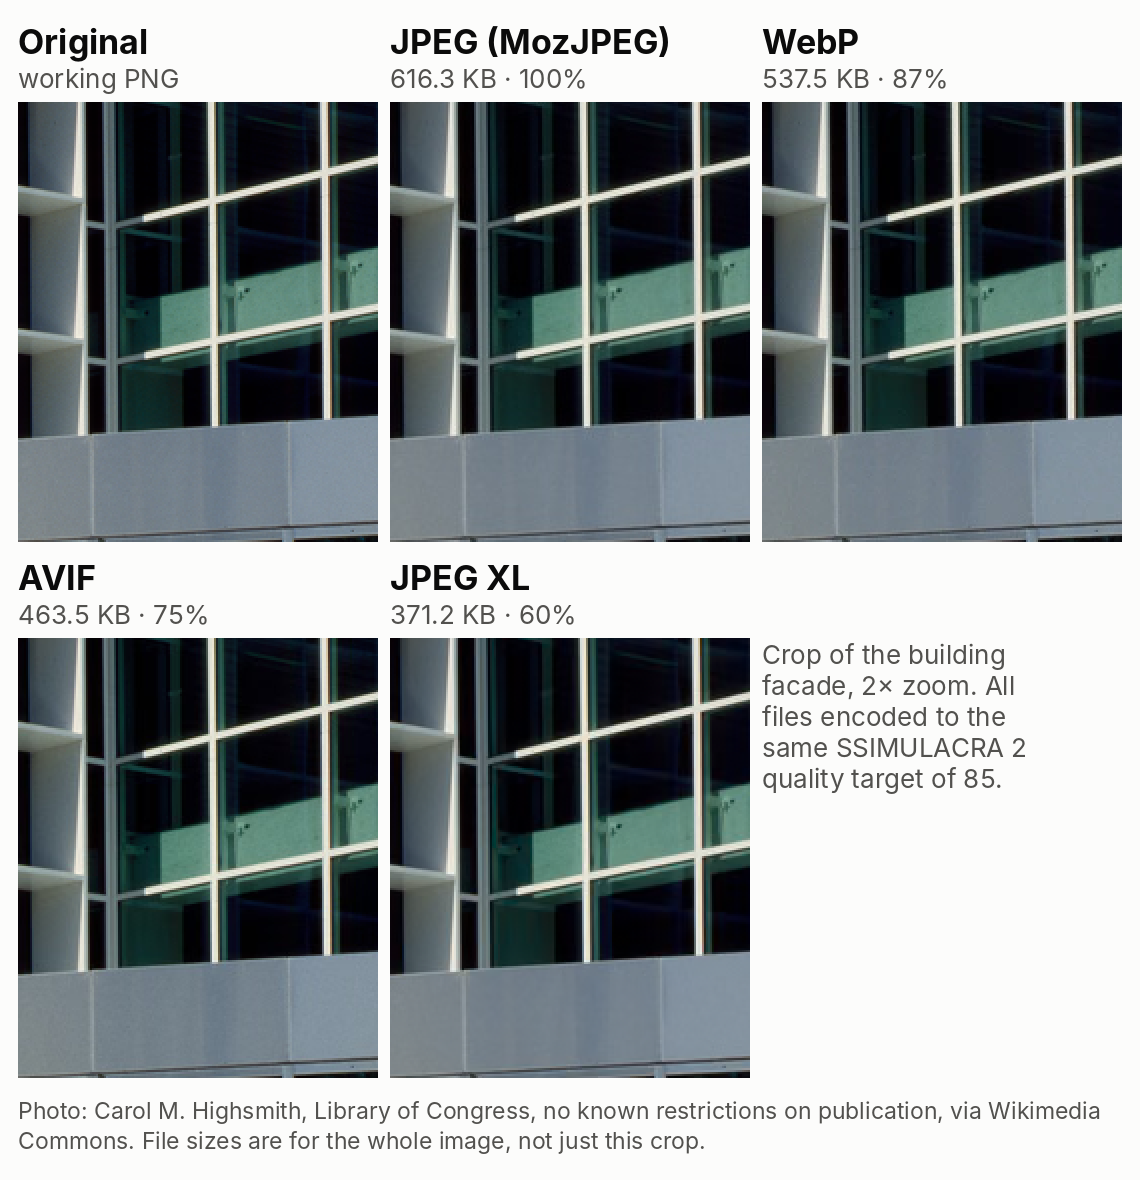
Here too, the five crops look about the same to me. Look at the grey metal panel and the green glass, where the original has fine grain. That is where a difference would be easiest to see, so decide for yourself.
Overall, here’s how the three formats compared on lossy photos at both quality targets (70 and 85):
Lossless compression means that decoding gives back exactly the same pixels as the working copy (metadata aside), so there is no quality target here. The baseline is the optimized PNG, which is the standard lossless image format on the web. I decoded every lossless file and checked that every visible pixel matches the working copy (commands in /scripts/lossless.py, per-file results in /results/lossless.csv in the repo).
On the four photos, JPEG XL produced the smallest files, with WebP close behind. AVIF was the weakest, about the same size as the PNG or even larger. On the screenshot, WebP was far ahead, and JPEG XL was larger than the PNG. AVIF came out much worse on both the screenshot and the logo:
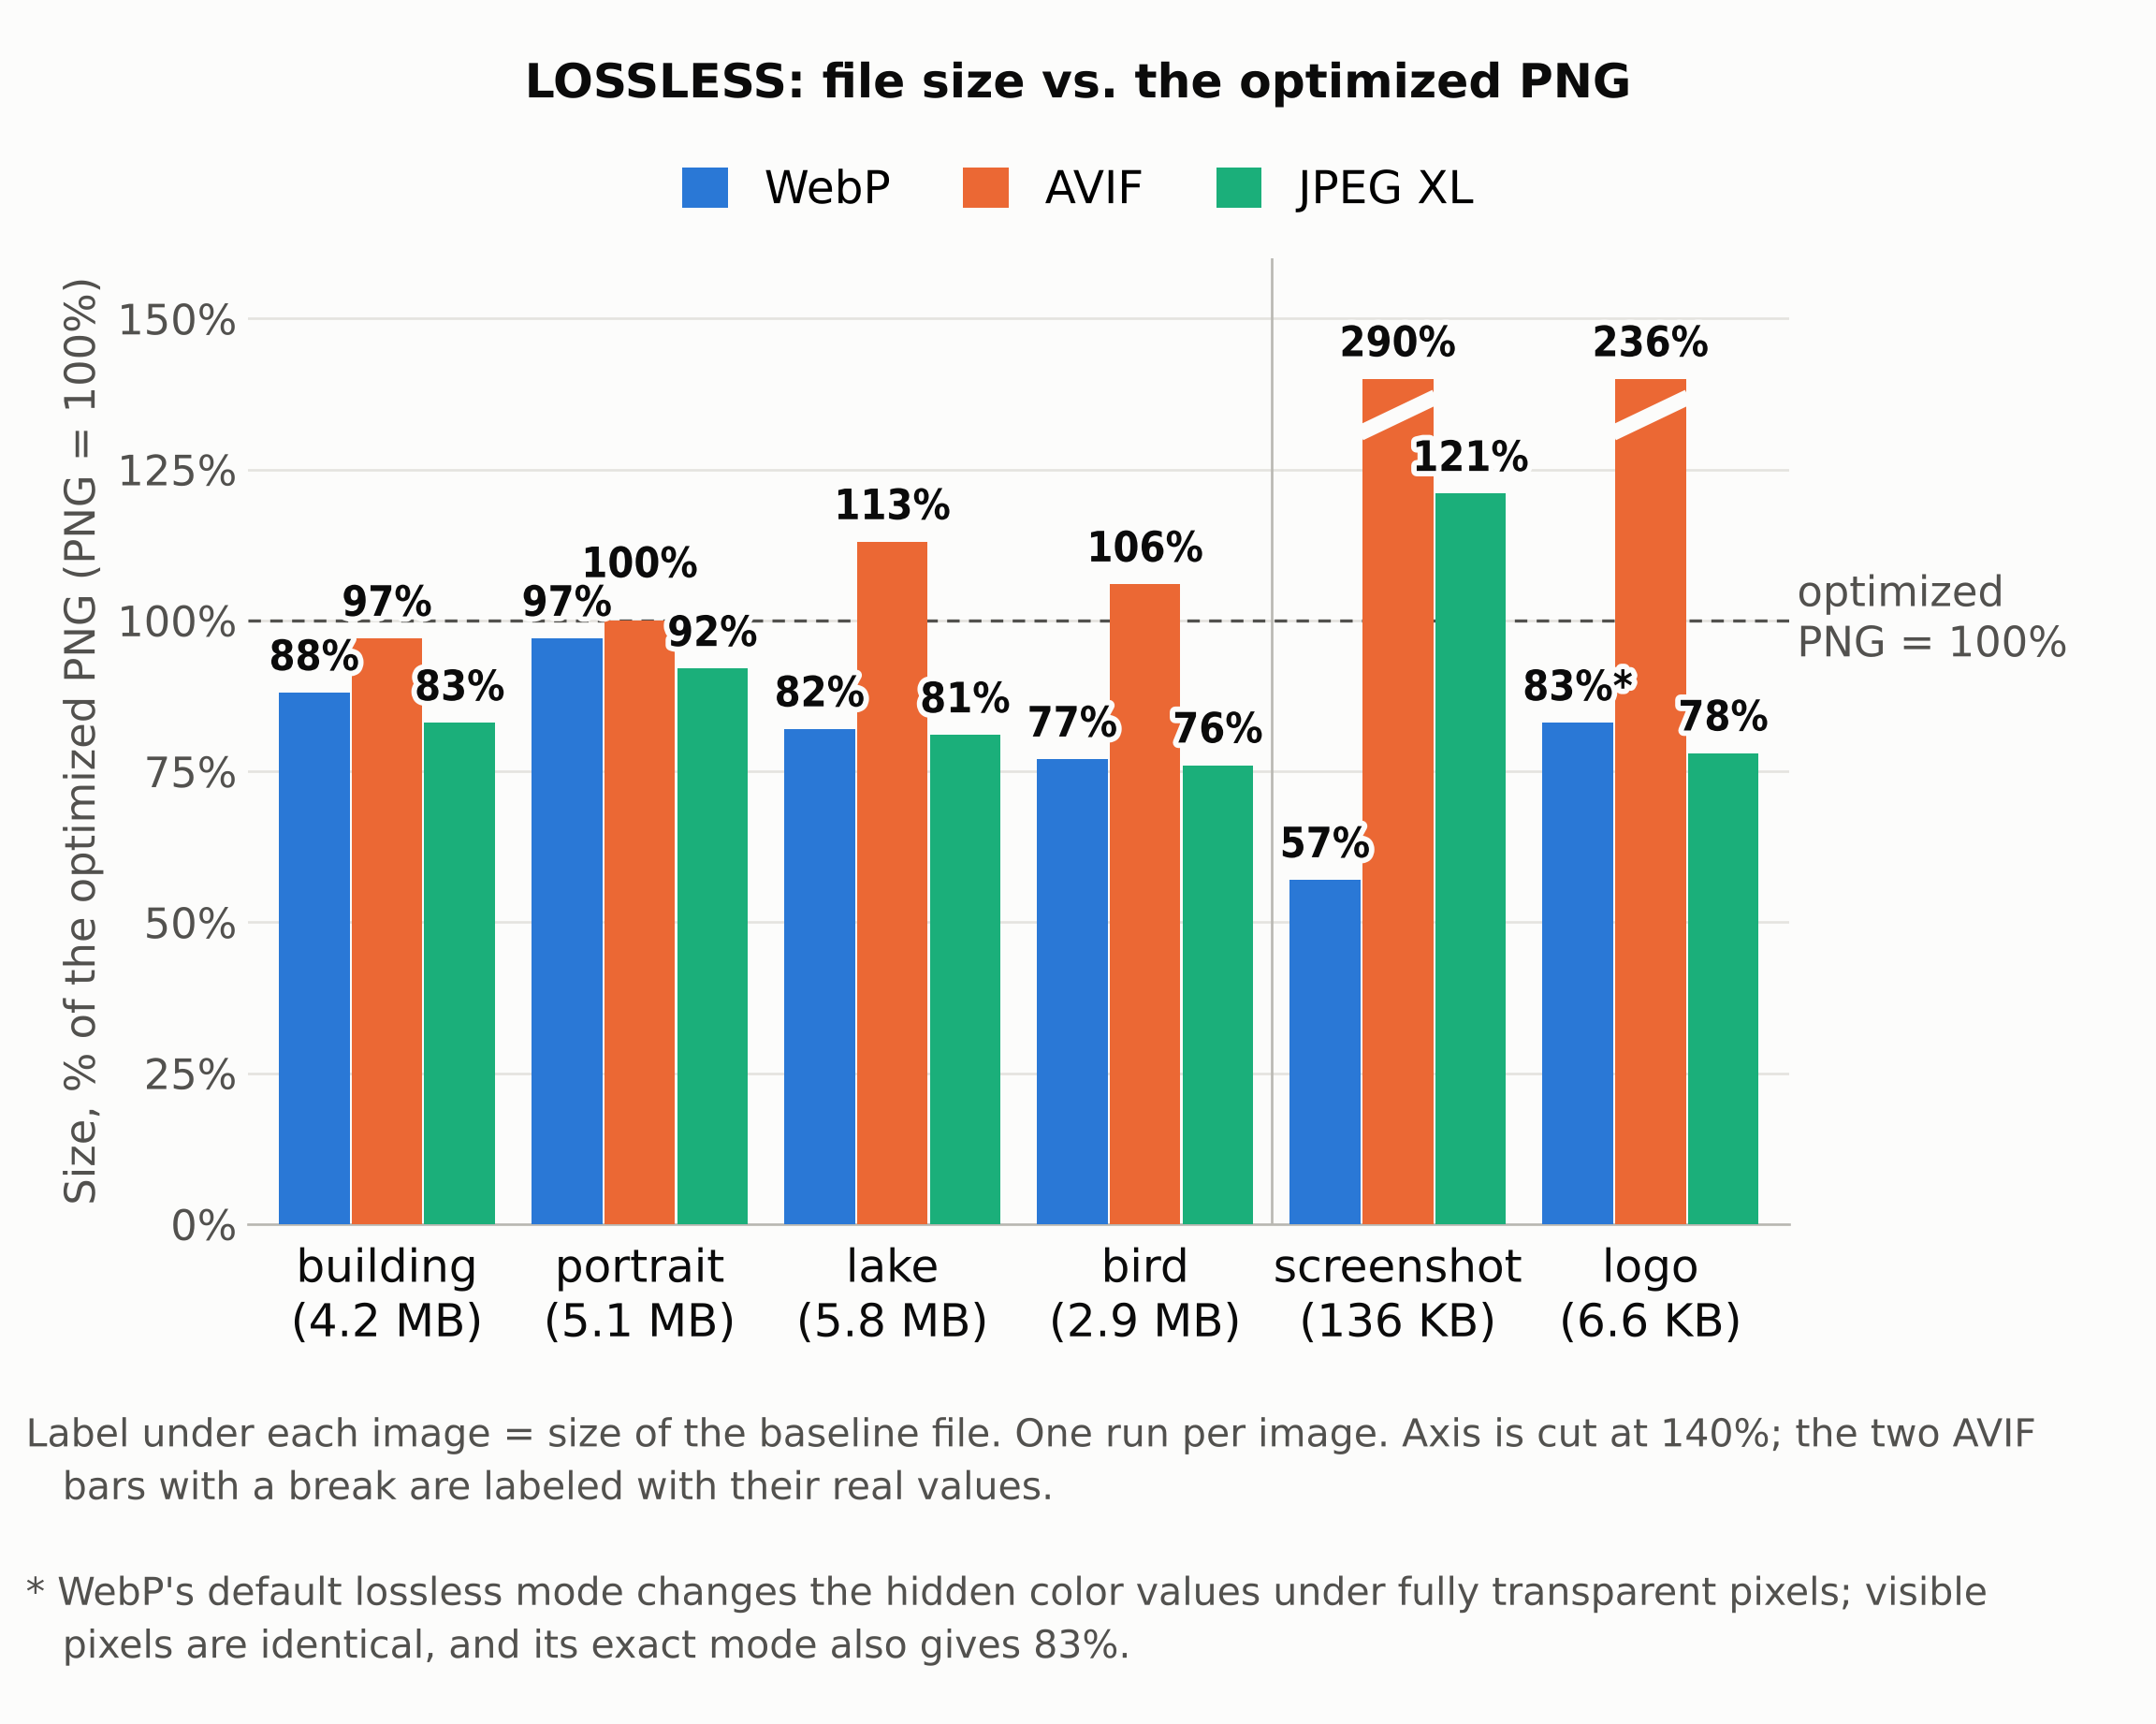
For JPEG XL, raising cjxl’s effort setting to -e 10 (from the default -e 7) got the screenshot’s size below the PNG, but it was still about a third larger than WebP (details in /results/round2/extras_jxl_effort.md in the repo).
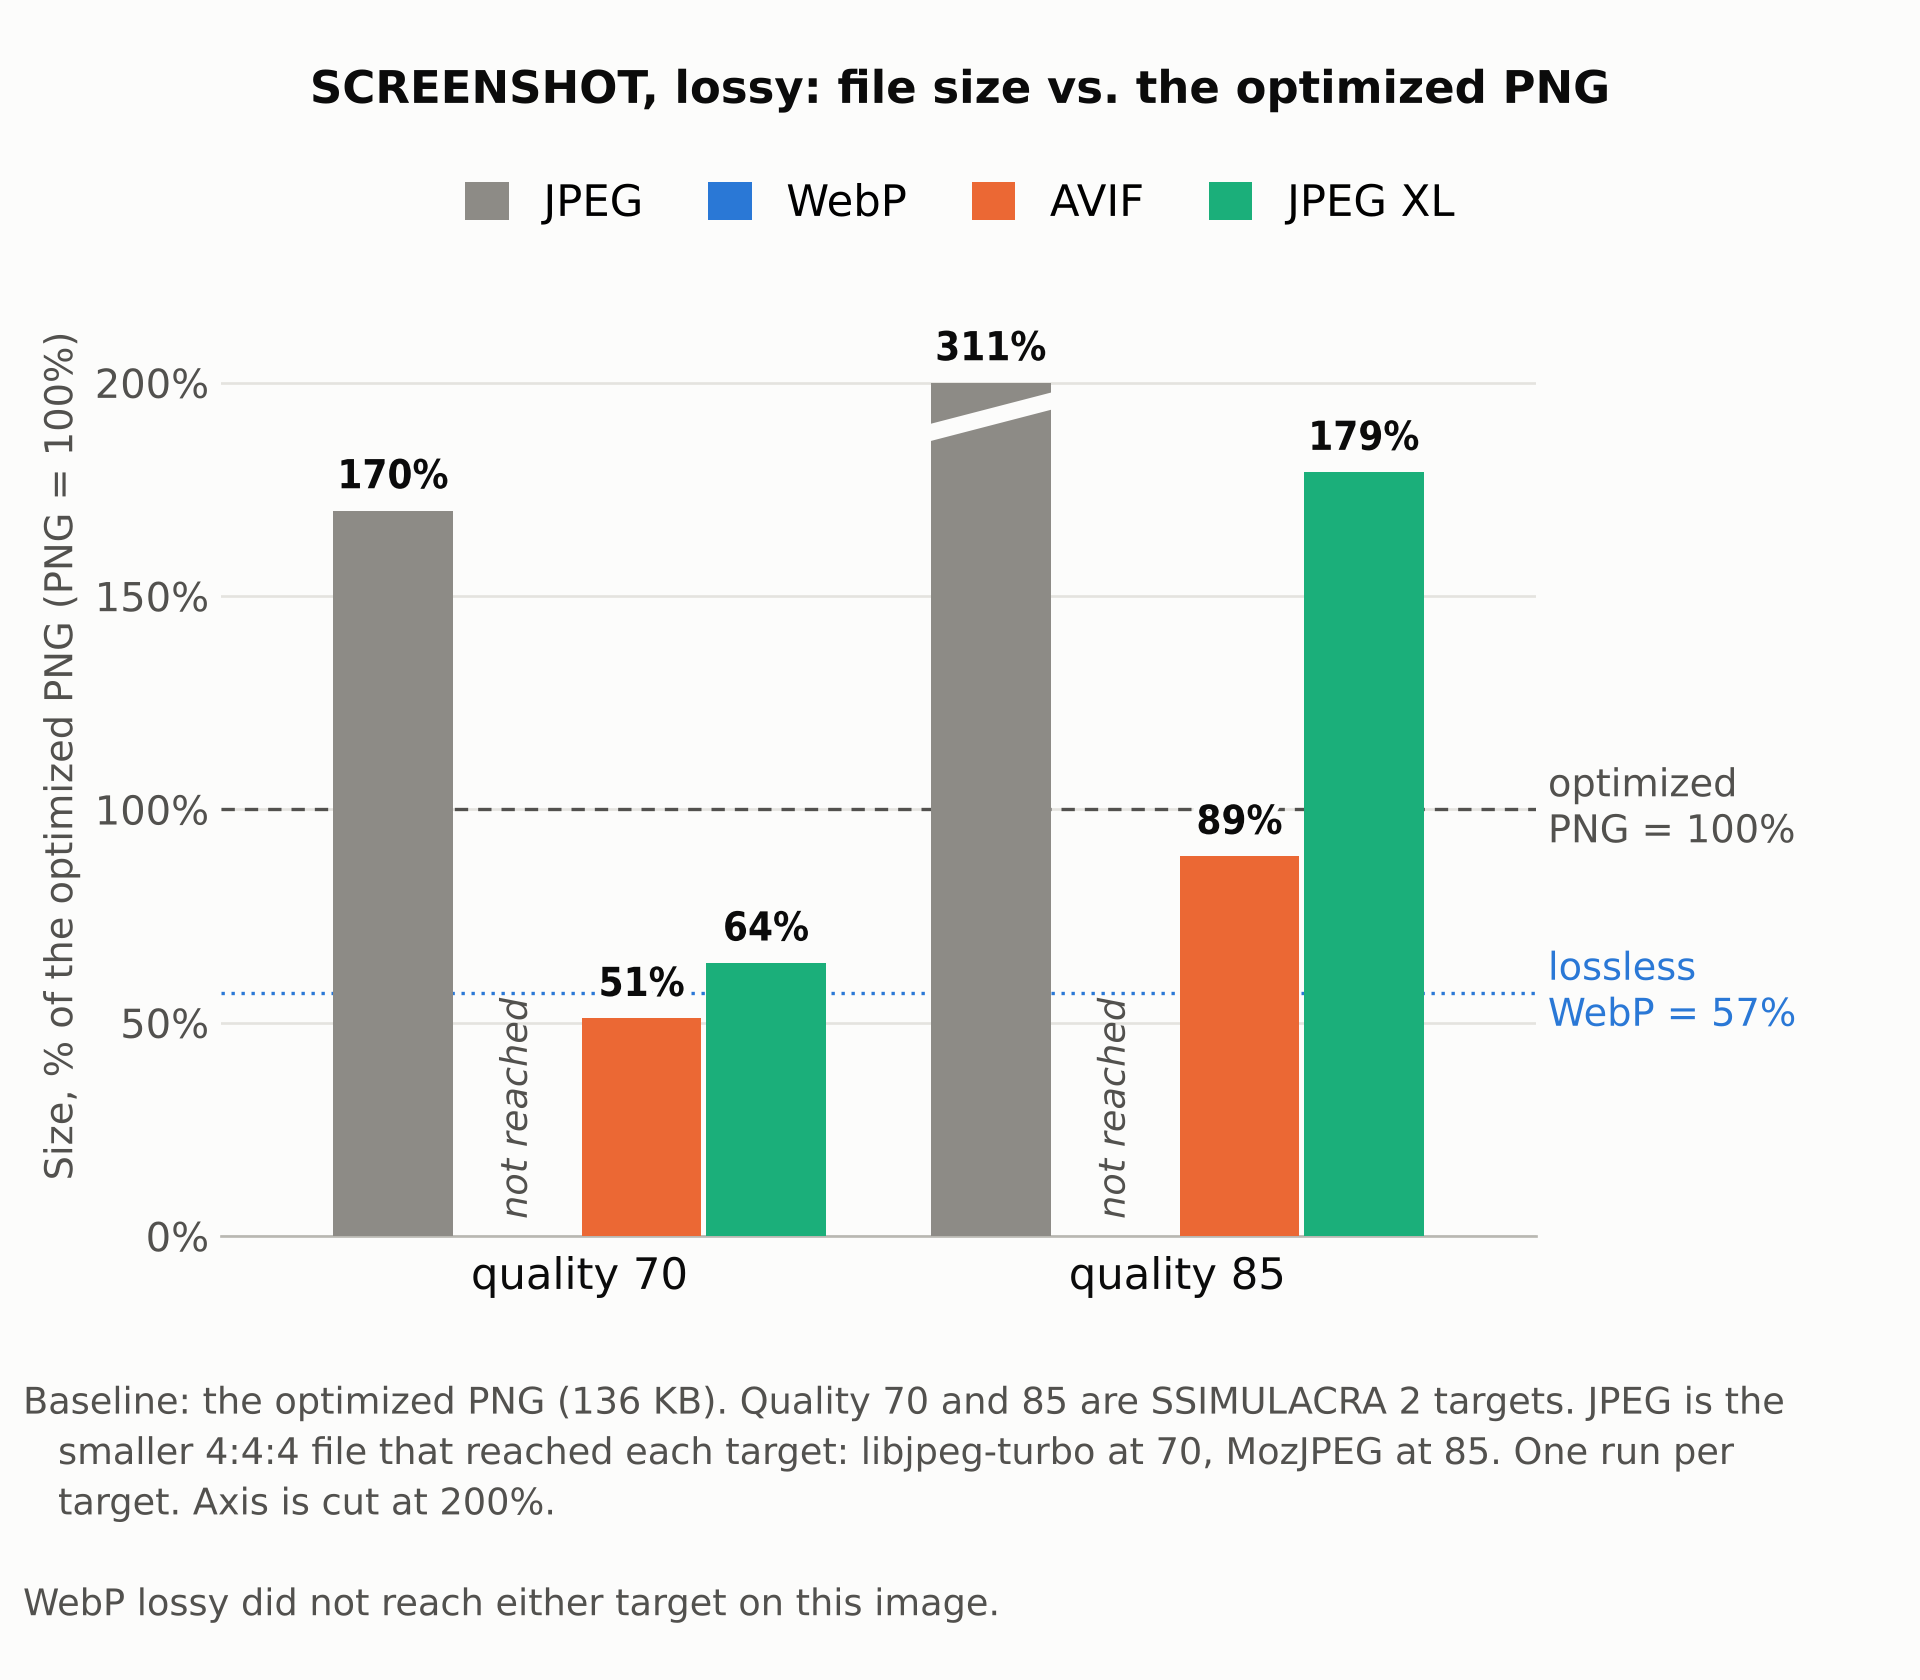
I also tried lossy compression on the screenshot and the logo, but it barely helped. On both, only AVIF at quality 70 came out smaller than the lossless files, and at quality 85 no lossy format beat them, so lossy compression doesn’t look worth it for screenshots and flat-color graphics. The chart below shows the screenshot, while you can find the logo’s numbers in the repo (/results/round2/article_table3_screenshot_logo.csv). Note that the screenshot’s JPEG is 4:4:4, because 4:2:0 couldn’t reach the quality target:
So which image format is the best for lossless images?
Many sites already have thousands of JPEGs that could be noticeably shrunk using JPEG XL’s lossless recompression feature, which converts a JPEG into a smaller .jxl file without changing a single pixel and can later turn it back into the exact original JPEG.
To test this feature, I created 16 JPEGs from the four photos, using the same two encoders (libjpeg-turbo and MozJPEG) at two fixed quality settings, 75 and 90. Since recompression doesn’t change the picture, these JPEGs didn’t need to be matched to a quality score, so I used each encoder’s own scale to get a mid-quality (75) and a high-quality (90) version of each photo. Note, however, that the same number doesn’t give the same image in both encoders; MozJPEG uses its own tuning, and at quality 90 it keeps full color detail (4:4:4). Then, I recompressed each JPEG into a JXL file with cjxl.
As you can see below, the recompressed JPEG XL files were 9% to 21% smaller than the original JPEGs, 16% smaller on average:
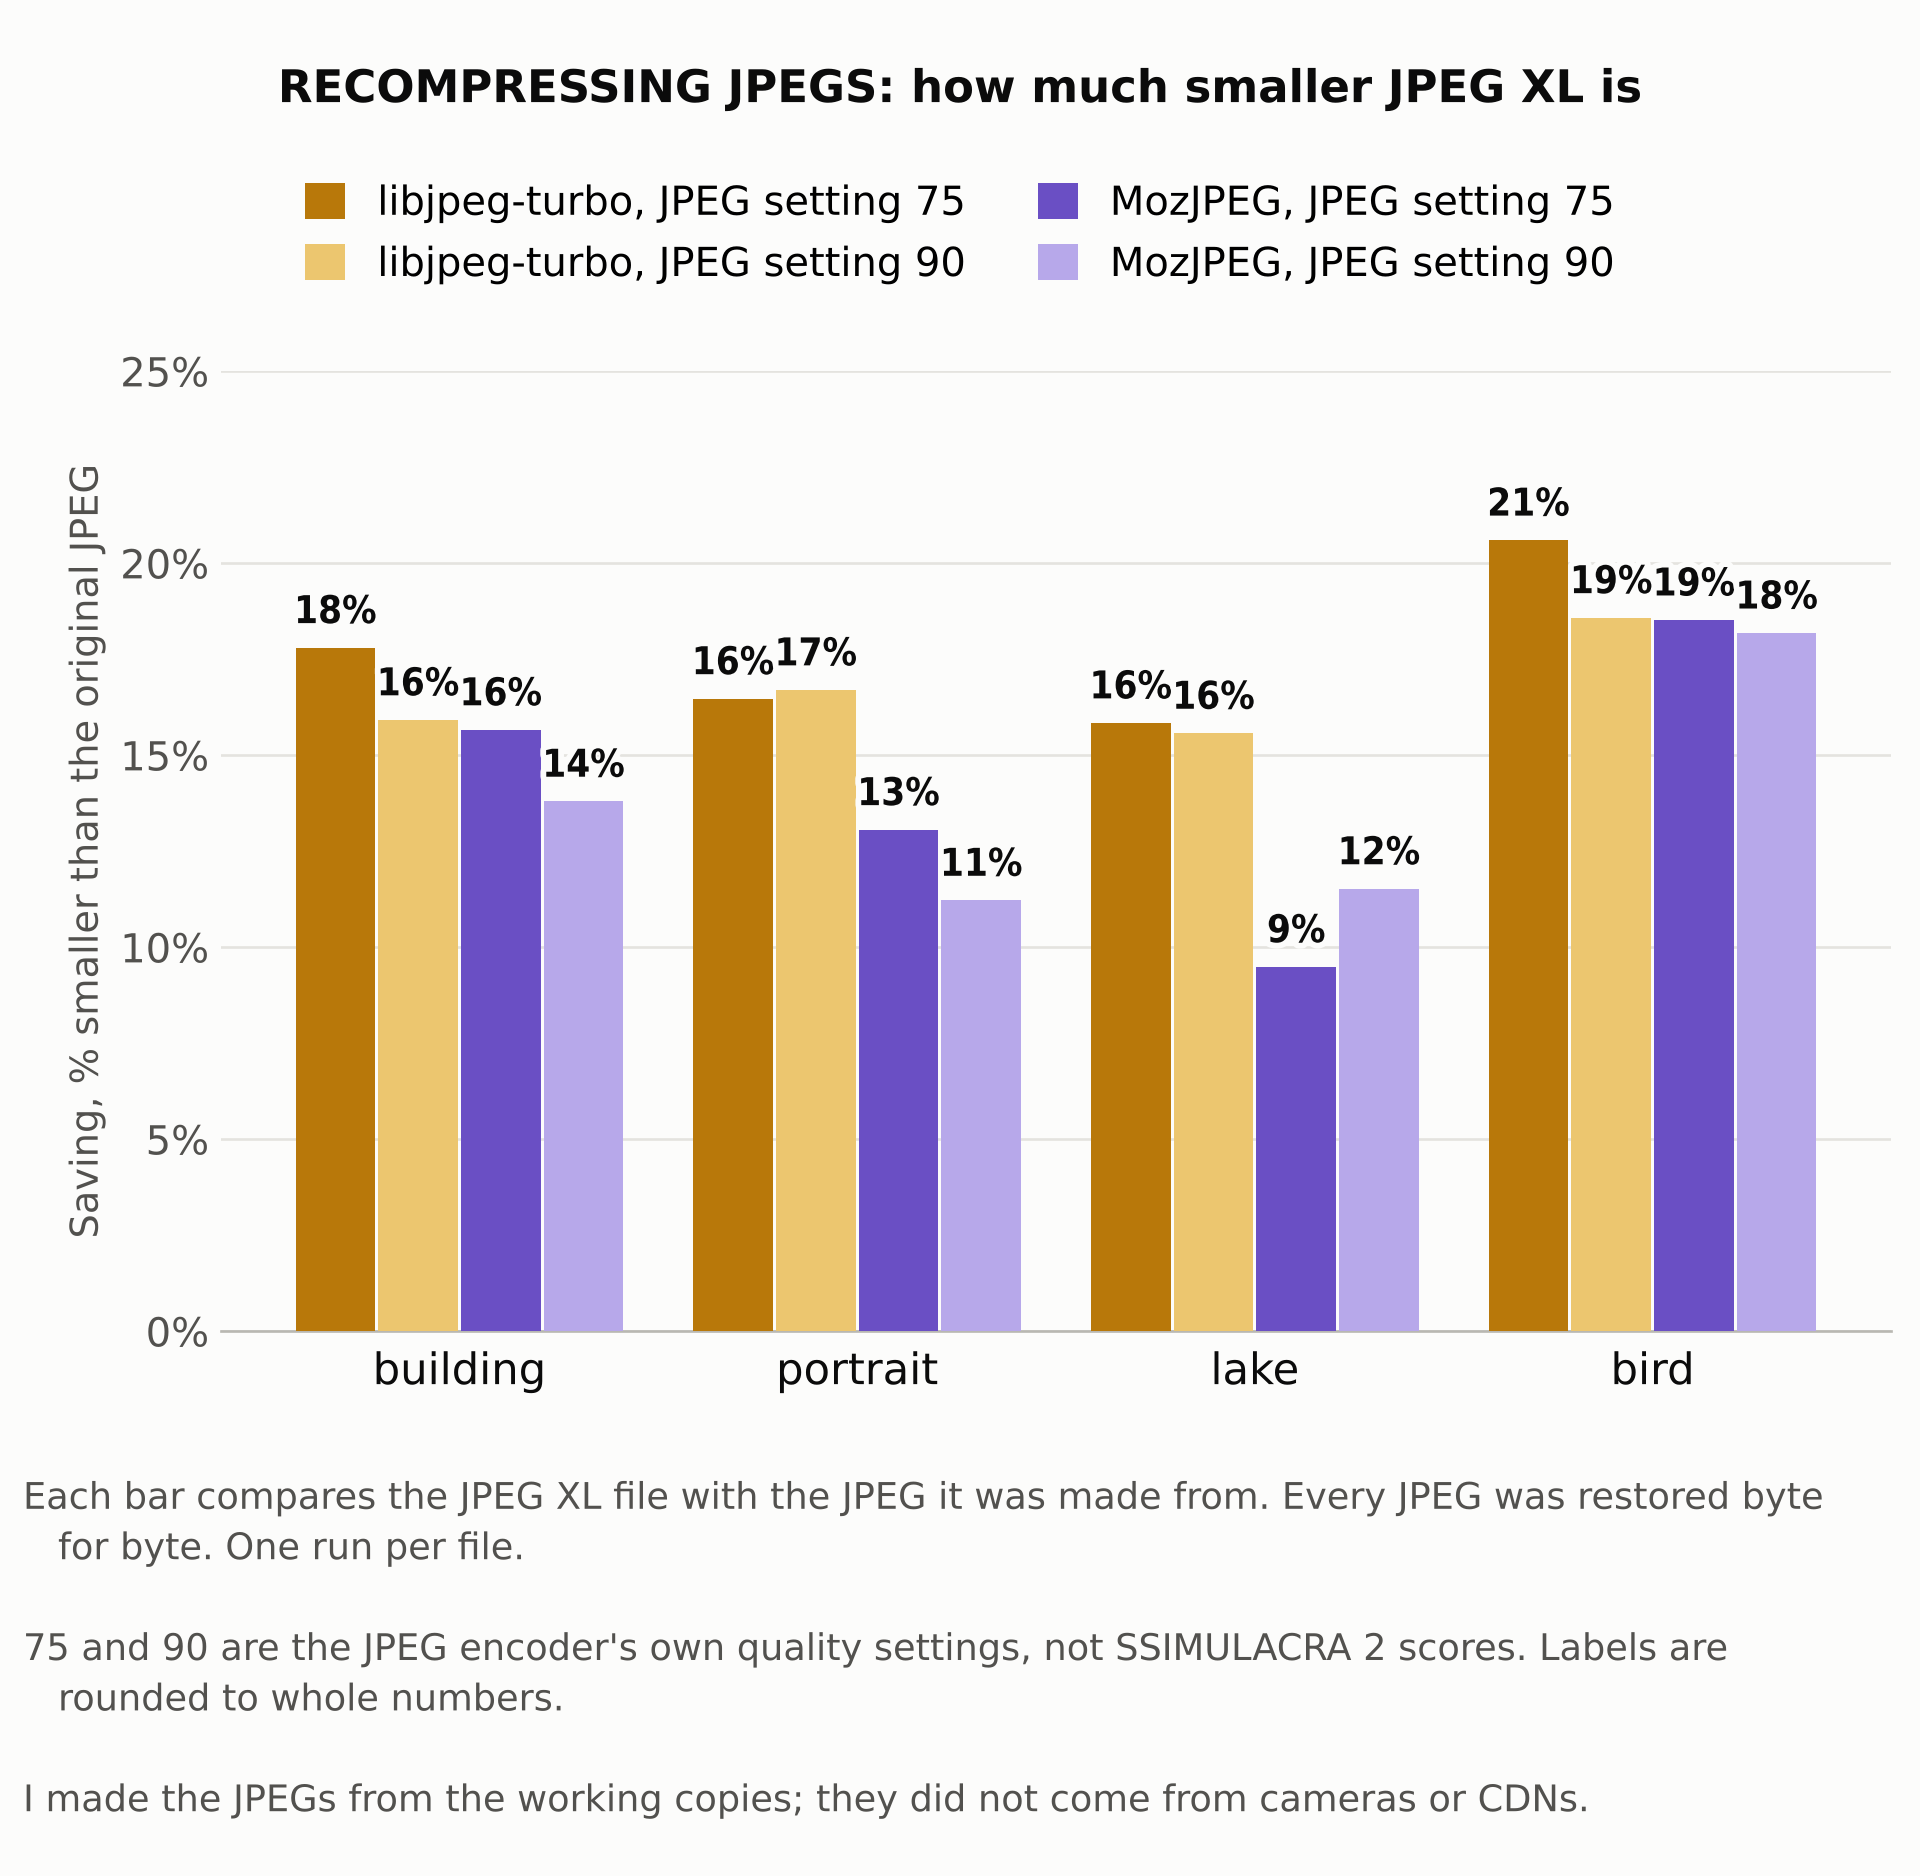
For comparison, lossy JXL files at quality 85 were 24% to 40% smaller than a JPEG of equal quality. Unlike recompression, though, lossy encoding changes the picture.
To verify the recompression was lossless, I restored every file to a JPEG and compared its SHA-256 hash with the original’s. All 16 matched, byte for byte (per-file hashes in /results/round2/recompression.csv; commands in /scripts/r2_recompress.py in the repo).
Remember that I made these JPEGs myself from my working copies, so files straight from a camera or phone may behave differently. The savings also depend on how well the JPEG was made. Files from MozJPEG, a more heavily optimized encoder, shrank 14% on average, compared with 17% for libjpeg-turbo.
All in all, if you have a large archive of JPEGs, recompression is the lowest-risk way to try JPEG XL. You save around 16%, nothing is lost, and the original JPEG can always be restored.
A smaller file doesn’t make a faster page if the browser spends longer decoding it, so I also timed decoding in Chrome 156 and Firefox 159 (the latest stable versions at the time of writing) on a cheap laptop (an Intel Celeron N4100, plugged in and set to “Best performance”) as a stand-in for low-end hardware. If you’re curious about the fast end, see Jake Archibald’s JPEG XL vs AVIF benchmark article, which uses a 2024 MacBook Pro with an M4 Pro chip.
I timed decoding of the 108 final files from the tests above (every lossy, lossless, and recompression file, including the JPEGs) using the img.decode() method, which decodes an image without displaying it, to isolate decoding from network and painting time. After two warm-up rounds, which I discarded, I timed each file over 15 rounds in shuffled order and took the median. I ran each browser twice and averaged the two medians for each file (see the test page in /speedtest/index.html and the raw results in /results/speedtest/ in the repo). The two runs agreed to within a few percent.
The table below shows the range of per-file medians across the four photos for the lossy files:
| Decode time per photo | JPEG (baseline)* | JPEG (progressive)* | WebP** | AVIF | JPEG XL |
|---|---|---|---|---|---|
| Chrome 156, quality 70 | 20–34 ms | 36–87 ms | 36–128 ms | 54–99 ms | 157–245 ms |
| Firefox 159, quality 70 | 26–40 ms | 38–97 ms | 52–136 ms | 56–80 ms | 162–258 ms |
| Chrome 156, quality 85 | 28–51 ms | 66–157 ms | 102–246 ms | 80–152 ms | 133–180 ms |
| Firefox 159, quality 85 | 34–52 ms | 78–160 ms | 118–236 ms | 69–112 ms | 137–186 ms |
*There are two JPEG columns because libjpeg-turbo writes baseline JPEGs, which decode in a single pass, and MozJPEG writes progressive JPEGs, which store the image in several passes from rough to detailed. Progressive files are smaller, but they’re slower for the browser to decode.
**At quality 85, WebP covers three photos, because it did not reach the target on the bird.
As the table above shows, JPEG XL was the slowest format at quality 70, taking 1.6–3.4× as long as AVIF for the browser to decode. At quality 85, the gap narrowed to 1.1–2×, but JPEG XL was still slower than AVIF, and about 3–5× slower than baseline JPEG.
Lossless files follow a similar pattern. JPEG XL took 4.1–6.1× as long to decode as the optimized PNG, against 1.3–2× for WebP and 2.2–5.2× for AVIF:
| Lossless, decode time per photo | PNG | WebP | AVIF | JPEG XL |
|---|---|---|---|---|
| Chrome 156 | 83–121 ms | 145–198 ms | 307–626 ms | 496–614 ms |
| Firefox 159 | 86–110 ms | 120–150 ms | 191–368 ms | 380–485 ms |
Recompressed .jxl files were also slower to decode than the JPEGs they came from. Files recompressed from libjpeg-turbo (baseline) took 2.4–3.7× as long as their originals, while images recompressed from MozJPEG (progressive) ranged from about a quarter faster to about twice as long (0.7–2.2×):
| Recompression, decode time per file* | Original JPEG (libjpeg-turbo) | Original JPEG (MozJPEG) | Recompressed from libjpeg-turbo | Recompressed from MozJPEG |
|---|---|---|---|---|
| Chrome 156 | 20–45 ms | 35–183 ms | 72–114 ms | 72–140 ms |
| Firefox 159 | 28–48 ms | 40–184 ms | 84–122 ms | 84–147 ms |
*Each recompression cell here covers eight files (the four photos at JPEG settings 75 and 90).
Overall, Archibald’s high-end results mostly match my low-end ones. On lossy photos, he also found JPEG XL slower to decode than AVIF, with the gap narrowing at higher quality. On lossless images, he found it slower than WebP, but by a smaller margin than on my laptop. The one real difference is recompression: on his machine, recompressed files decode as fast as the original JPEGs or faster (except for small images), while on mine they were slower.
Note, however, that my results come from just one slow machine, and my images and encoder settings differ from his. I also timed only decoding, not encoding time or memory use, which matter too. Browsers and encoders are still changing as well. Newer browser versions may decode JPEG XL at different speeds, and newer encoders or better settings may produce smaller files.
The table below compares the main features of the three image formats and rates how much each matters for a web page. The last column (“Relevance for the web”) is my own judgment. Note that I tested only compression and JPEG recompression; the rest of the table is based on each format’s official documentation:
| Feature | WebP | AVIF | JPEG XL | Relevance for the web |
|---|---|---|---|---|
| Lossy and lossless compression | Yes | Yes | Yes | High. Smaller files download faster, which speeds up page loads, including Largest Contentful Paint (LCP). |
| Transparency | Yes | Yes | Yes | High. Replaces PNG for logos and icons. |
| Animation | Yes | Yes | Yes | Low to medium. Video does animation better, except where you can’t use a video element. |
| Progressive loading | No. It loads incrementally instead, drawing the image from top to bottom as data arrives. | Optional. A file can include a low-quality first layer (made with avifenc --progressive), but regular files don’t, and decoders don’t have to show it. |
Yes, for lossy files. They start with a 1:8 preview, and the encoder can add more refinement steps. Lossless files need an optional extra step.* | Medium. Images can show up sooner on slow connections if the browser draws the early version. Browser support differs by format. |
| HDR (more than 8 bits per color) | No (8-bit only) | Yes (up to 12-bit) | Yes (up to 32-bit) | Low to medium. Only for HDR content on HDR screens. |
| Lossless recompression of existing JPEGs (restorable byte for byte) | No | No | Yes | High. Cut 9% to 21% from my test JPEGs with nothing lost. |
| Layers | No | Only for progressive loading | Yes (as frames) | Low. Layers are mainly for editing; a web page shows one merged picture. |
| Depth maps | No | Yes (as an auxiliary image) | Yes (as an extra channel) | Low. Used by cameras and 3D tools, not web pages. |
For progressive loading, the JPEG XL community has a demo page that shows each format loading over time at matched quality.
For web performance, only a few of these rows count. Smaller files are where all three formats compete, which is what the test results above measure. Transparency is supported by all three, so it doesn’t set them apart. The one feature that only JPEG XL has and that also helps performance is the lossless recompression of JPEGs you already have. Progressive loading, HDR, and animation matter somewhat, and the remaining rows are rarely relevant to web pages.
Chrome 155 and Firefox 158 decode .jxl files by default. Safari has supported JPEG XL since version 17, but only for still images, and it shows the image only after the full download, not as progressive previews. As of early November 2026, Edge doesn’t display JPEG XL files (I tested version 157). WebP and AVIF work in all four browsers.
The table below shows the earliest desktop version that supports each format:
| Format | Chrome | Edge | Firefox | Safari |
|---|---|---|---|---|
| WebP | 32 | 18 | 65 | 14 |
| AVIF | 85 | 121 | 93 | 16.4 |
| JPEG XL | 155 | Not supported | 158 | 17 (partial) |
Check Can I Use for current data on JPEG XL, since browser support can still change.
Since browser support isn’t universal, you can’t serve JPEG XL on its own. Use the <picture> element that lets the browser pick the first <source> it supports and fall back to the <img> if it supports none. What you list after JPEG XL depends on the kind of image:
For lossy photos, AVIF plus a JPEG fallback is usually enough. Add a JPEG XL source only if it beats AVIF for your images (which in my tests happened at quality 85 but not at 70, but your results may be different):
<picture>
  <source srcset="photo.jxl" type="image/jxl">
  <source srcset="photo.avif" type="image/avif">
  <img src="photo.jpg" alt="Description" width="1600" height="900">
</picture>
For lossless images, fall back to PNG instead of JPEG, since JPEG would change the pixels of the image and can’t carry transparency. As lossless AVIF was the weakest format, use WebP as the first fallback:
<picture>
  <source srcset="photo-lossless.jxl" type="image/jxl">
  <source srcset="photo-lossless.webp" type="image/webp">
  <img src="photo-lossless.png" alt="Description" width="1600" height="900">
</picture>
For a recompressed JPEG, skip AVIF and WebP, because re-encoding into another lossy format would add loss, and a lossless version would be much larger than the JPEG you already have:
<picture>
  <source srcset="photo.jxl" type="image/jxl">
  <img src="photo.jpg" alt="Description" width="1600" height="900">
</picture>
The table below shows what fallback to use for each type of JXL:
| JPEG XL file | First fallback | Last fallback |
|---|---|---|
| Lossy | AVIF (lossy) | JPEG |
| Lossless | WebP (lossless) | PNG |
| Recompressed JPEG | None | The original JPEG (the same image data, so no loss) |
Also check that your server sends .jxl files with the image/jxl media type, or some browsers may not display them.
To convert your existing JPEGs, cjxl recompresses a JPEG losslessly by default, and djxl restores the original (both tools come with libjxl):
cjxl photo.jpg photo.jxl
djxl photo.jxl restored.jpg
Compare the hash of the restored file with the original’s. If the two are the same, the files are identical:
# Linux
sha256sum photo.jpg restored.jpg

# macOS
shasum -a 256 photo.jpg restored.jpg

# Windows (PowerShell)
Get-FileHash -Algorithm SHA256 photo.jpg, restored.jpg
If you still have the original uncompressed images, encoding a new lossy JPEG XL from them usually gives smaller files than recompression, but the picture changes slightly, as with any lossy encoding. Either way, run the encoding in a build step or when an image is uploaded, instead of on each request, so visitors never have to wait for it.
For most sites, it’s time to add JPEG XL, but don’t drop your current formats yet, since browser support is still patchy. While Chrome and Firefox support it by default, Safari only partially, and Edge not at all, so every .jxl image needs a fallback.
What to serve depends on the kind of image:
.jxl file and fall back to the original JPEGHowever, there is one trade-off: decoding. On my low-end laptop, JPEG XL was among the slowest formats to decode, and slower than AVIF at both quality levels, by a wider margin at 70 than at 85. Lossless JPEG XL files also took longer to decode than WebP, and recompressed ones than the JPEGs they came from. Archibald’s benchmark on a fast MacBook points the same way, although the time difference is smaller on fast hardware.
So it mostly depends on your audience. If most of your visitors use recent phones and computers, the smaller files may outweigh the slower decoding. If many of them use old or low-end devices, however, test on them before you switch.
Switching isn’t all or nothing. Start with the images where JPEG XL helps most, keep the fallbacks, and let your own measurements decide how far to go.
Build a React research assistant with TanStack AI subagents, tool approvals, and conversation compaction.
Learn key lessons from real-world code migrations using AI coding agents.

Compare the top AI development tools and models of November 2026. View updated rankings, feature breakdowns, and find the best fit for you.

AI coding assistants can generate UI quite quickly, but they don’t know your design system. Here’s how you can teach them the ins and outs.
Would you be interested in joining LogRocket's developer community?
Join LogRocket’s Content Advisory Board. You’ll help inform the type of content we create and get access to exclusive meetups, social accreditation, and swag.
Sign up now
 Learn more →