
Offline functionality is becoming an increasingly important part of an app’s user experience. This is not just important for apps that function offline-first, but for web or mobile JavaScript apps that work with intermittent internet connectivity.
Making an application work without internet connection involves two things. First, the application files need to be stored locally. This can be done with Progressive Web Apps and Service Workers.
Second, a form of local storage must be used as the main data source of the application. This storage must be continuously synchronized with a remote data source. Luckily, there are databases like PouchDB, which store data locally and can be synced automatically with a CouchDB database in a server.
In this tutorial, we’re going to build an anonymous chat app with offline capabilities. It will look like this:
We’re going to use Create React App to automatically generate a progressive web app with React and RxDB, a reactive, client-side, and offline-first database that will sync with a server-side CouchDB database.
You will need:
For reference, you can find the entire source code of on this GitHub repository:
GitHub – eh3rrera/react-rxdb-example: Anonymous chat app built with React, RxDB and PouchDB that works offline.
Anonymous chat app built with React, RxDB and PouchDB that works offline. – eh3rrera/react-rxdb-example

Install (or upgrade to the latest version) create-react-app:
npm install -g create-react-app
Then, create a new app and cd into it:
create-react-app offline-anonymous-chat
cd offline-anonymous-chat
Now let’s install all the dependencies for our project by executing:
npm install --save concurrently moment pouchdb-adapter-http pouchdb-adapter-idb pouchdb-server react-toastify rxdb rxjs serve
Here’s the description of each dependency:
Next, edit the start script in the package.json file. Instead of:
"start": "react-scripts start",
It should be:
"start": "concurrently "npm run server" "react-scripts start"",
Also, we should add the server script:
"server": "pouchdb-server -d ./db",
This will execute the PouchDB server at the same time the application is running. The database file will be stored in the db directory. You can find all the configuration options for the database server here.
When you execute npm start, you can go to http://localhost:3000 (if it’s not opened automatically) to view the app generated by create-react-app:

For the database, you can view its web interface (Fauxton) by opening http://localhost:5984/_utils:
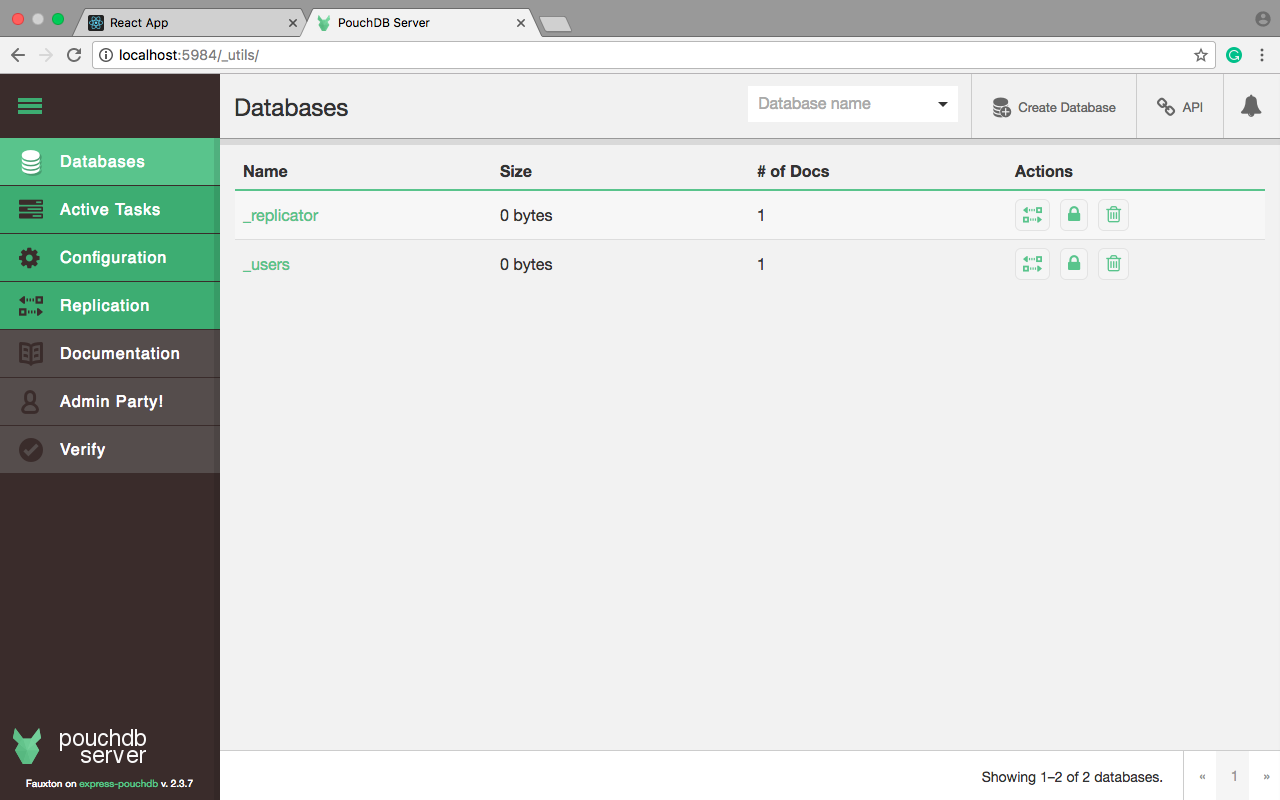
As you can see, there are just two databases created that are used internally by PouchDB.
In the next section, we’ll create the schema for our app database.
RxDB relies on PouchDB (in turn, inspired by CouchDB), which makes it a NoSQL document database, similar to MongoDB.
We can use schemas to define how the data will look and validate every inserted document. The data is organized into collections and every collection has its own schema.
For our app, we are going to use a collection named messages which will store the date the message was created and the message itself.
Schemas are defined using the JSON Schema standard. For our purposes, create the file src/Schema.js with the following content:
In the above schema:
string, id, and message. The first one is the primary key, and it represents the date the message was inserted as the number of milliseconds since the Unix epoch.message is required.You can learn more about schemas here.
Now let’s configure the local database.
Add the following imports to App.js:
In addition to importing the main RxDB module and the schema created in the previous section, we’re importing the module QueryChangeDetector.
As RxDB is a reactive database, you can subscribe to queries to receive new results in real-time, but executing a query every time this happens can impact performance, so the option QueryChangeDetector optimizes observed queries by getting new results from database events instead.
This option is currently in beta and disabled by default, but we can enable it with the following code:
No Title
No Description
We can also enable debugging so every time an optimization is made, a message in the console is shown.
Next, configure the adapters to use IndexDB as the storage engine, and enable syncing to a remote database over HTTP:
And declare as constants the URL of the remote database and the name of the local database:
No Title
No Description
Inside the class, let’s declare a method to create the database:
No Title
No Description
The database is created in an asynchronous way, but instead of using callbacks or promises, we’re going to use async/await for more concise and clean code. Here’s a good article comparing the three approaches of writing asynchronous code.
This way, we create the database passing a name, and adapter, and a password (which must have at least 8 characters):
No Title
No Description
Next, we enable the leader-election algorithm which makes sure that always exactly one tab is managing the remote data access (in case there are multiple tabs of the application at the same time). When the leader is elected, a crown will be shown next to the page’s title:
No Title
No Description
Then, we create the messages collection passing the schema:
No Title
No Description
Finally, let’s set up the replication feature and return the database object:
No Title
No Description
Now let’s integrate this method into our React app.
Let’s start by adding the imports for the component to show notifications and the moment library to handle dates:
No Title
No Description
Next, add the following constructor to the class:
No Title
No Description
We have two properties as the state of our component, one for new messages, and an array to store all the messages.
We also defined an array to store the handlers of the subscriptions we’re going to use so we can unsubscribe when necessary, along with the binding of the functions to add a new message and handle the text box’s changes for new messages.
In componentDidMount, let’s call the method createDatabase, and then subscribe to a query that returns all the messages sorted by id:
No Title
No Description
The method $() will return a RxJS observable which streams every change to the data returned by the query. If any messages are returned, a notification is shown and the state is changed.
Notice that we also add a reference to the subscription to the subs array. This way, when the component is about to be unmounted, we’ll use those references to unsubscribe from the observables:
No Title
No Description
Next, modify the render method so it looks like this:
No Title
No Description
As you can see, the rendering logic is simple.
The method renderMessages converts each message object into a div element showing the relative insertion date of the message with the help of the moment library (remember that the id represents the date in milliseconds) and the message:
No Title
No Description
This is the definition of the method handleMessageChange:
No Title
No Description
And to add a message, we create an object and insert it into the database in the following way, setting the state to an empty string for the next message:
No Title
No Description
Finally, probably is a good idea to show the replication events to understand what is going on. The method RxCollection.sync() returns a RxReplicationState object that can be used to observe events and to cancel the replication.
Modify the last part of the method createDatabase so it looks like this:
No Title
No Description
Some of these events emit an object, that’s why in some cases they are printed in the console in addition or instead of being shown as notifications. Here’s a description of each event:
change$. Triggered every time a document is replicated. It can emit a boolean or an object describing the change.docs$. Emits each replicated document.active$. Emits true or false depending on whether the replication is running or not.complete$. Emits true or false depending on whether the replication is completed or not (actually, only one-time-replications will complete).error$. Triggered when an error occurs during the replication process.Also, we added these subscriptions to the subs array so we can unsubscribe when necessary.
And that’s it. Let’s test the app.
Execute npm start and go to http://localhost:3000. You should see something like this:

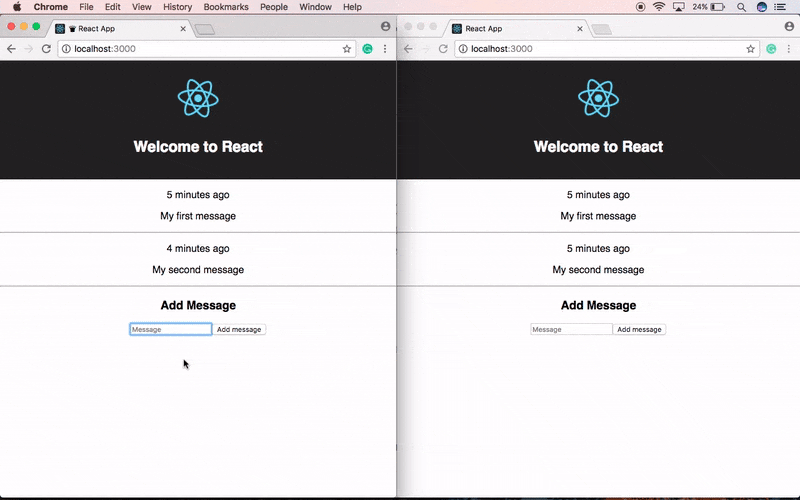
Start adding some messages. Notice the crown in the title, it indicates this tab is the leader. If you open another tab, and close the first one, now the other should have the crown:

Thanks to the reactive nature of RxDB (and the fact that all the tabs in a browser share the same local storage), the database state is broadcasted in real-time, which means that the changes in one tab will be reflected automatically in another tab:
Go to http://localhost:5984/_utils and now you should see the app’s database:

Click on the database name and then on the pencil icon of one of the documents to edit it:

The change made on the database web interface should be applied to the app almost instantly:

So it seems to be working fine, but does it work in offline mode?
The production build of the app generated by create-react-app is a fully functional, offline-first progressive web app.
There are some considerations we must take into account, but basically, we just have to build the application and serve it. Execute:
npm run build
This command creates a build directory with a production build of your app.
Now add the following scripts to the package.json file:
"http": "serve -p 3000 -s build",
"offline": "concurrently "npm run server" "npm run http""
And execute:
npm run offline
Since the app now will install a service worker and a manifest, probably you may want to test it using your browser’s incognito-mode, to avoid conflicts if you want to go back to the development version later.
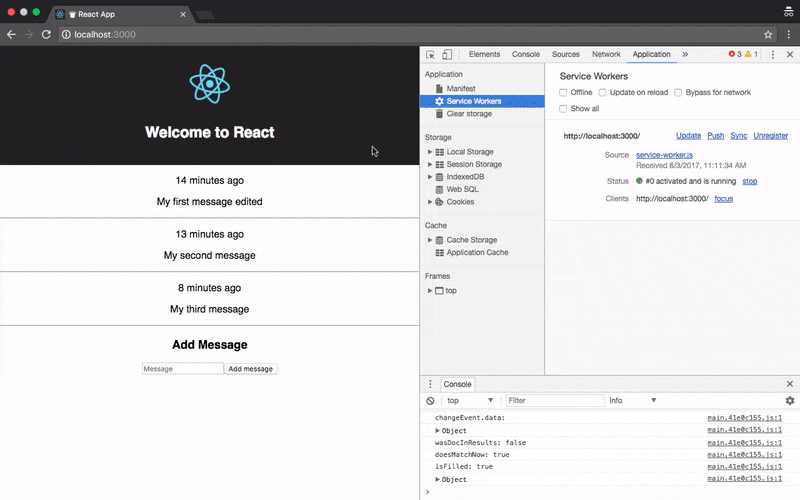
Once again, go to http://localhost:3000, the application will install the service worker and the browser will cache the files. If you’re using Chrome, you can check this by going to Developer Tools — Application and choose the sections Manifest and/or Service Workers:

Now go offline by either choosing the Offline option from the Service Worker panel, the Offline option of Developer Tools’ Network tab, or just disconnecting from the network.
When you reload the app, you should still be able to insert messages:
After inserting some messages, go back online. After a while, you should see some notifications about replication:

If you go to the database web interface, the database should contain the new documents:

RxDB has a lot of more features that were not covered here, like encryption, middleware hooks, or atomic update operations.
You can extend this application by implementing editing and deleting operations, or by synchronizing the data to a CouchDB server or an IBM Cloudant database.
Install LogRocket via npm or script tag. LogRocket.init() must be called client-side, not
server-side
$ npm i --save logrocket

// Code:

import LogRocket from 'logrocket';
LogRocket.init('app/id');
// Add to your HTML:

<script src="https://cdn.lr-ingest.com/LogRocket.min.js"></script>
<script>window.LogRocket && window.LogRocket.init('app/id');</script>

Learn how to use Fallow to analyze AI-generated code, detect dead code, duplicate logic, and complexity issues, and integrate automated code quality checks into your AI-assisted development workflow.

Learn how to protect full-stack projects from NPM supply chain attacks with a practical security checklist.

Explore 15 essential MCP servers for web developers to enhance AI workflows with tools, data, and automation.

Learn how contrast-color() automatically picks accessible text colors using native CSS, without JavaScript.
Hey there, want to help make our blog better?
Join LogRocket’s Content Advisory Board. You’ll help inform the type of content we create and get access to exclusive meetups, social accreditation, and swag.
Sign up now

