A roguelike game is a subgenre of role playing video games which is very often characterized by turn-based gameplay, randomly generated levels, and permanent death of the playable character. A popular product of this genre is Dungeons & Dragons, a role based game in which a bunch of characters embark on imaginary adventures in a fantasy setting.
Roguelike games have a lot of characterizing popular features. This often spurs casual and novice gamers to argue on the “real characteristics” of roguelike games.
Our blog post covers how to create one using Rot.js – a library that helps with the development of roguelike games in the browser environment.
The features honed by Rot.js are: RNG (for generating levels procedurally), pathfinding (for players and AI), FOV computation, and key bind configuration, just to name a few.
When looking at the state of roguelike games on the web, it is clear that a lot of roguelike games have been created and made available in the browser. Rot.js positions itself right at the middle of the conversation with its astonishingly easy-to-use functions.
Rot.js is a set of JavaScript libraries, designed to help with a roguelike development browser environment.
Rot.js was designed to help with the traditional chores of developing a roguelike game. It was modeled after “libtcod“, which provides a simple API to help developers with their future game’s true color, input, and utilities.
Rot.js lends the users very powerful canvas-based display, keyboard mapping, and unimaginable random map generation possibilities.
There exists a plethora of games made with Rot.js. These could serve for inspiration or showcase purposes.
We are going to build a simple roguelike game with Rot.js. Our aim is to harness the graphical, RNG, scheduling, and pathfinding APIs provided by Rotjs.
ROT.Display() provides a canvas-based output that can be configured to the game specifications.
The display is configured using these values:
width – horizontal size, in charactersheight – vertical size, in charactersfontSize – in pixelsfontFamilyfg – foreground colorbg – background colorspacing – spacing coefficientlayout –layouting algorithm; “rect” or “hex”These are extremely important because they are what the user sees and how your game is displayed.
Tile map
Rot.js also allows developers to create tiles which can be used to organize tiles, stack, or customize their colors and appearance to suit the game.
Tiles-style graphics are the ones seen in games like Pokemon on Gameboy. This is suitable if you want to use high-fidelity graphics in your game. It is very easy to implement with Rot.js: you simply reference characters to tiles. Glance through the docs for a better overview of how to slice your tileSet into different tiles.
Map creation
There exist several map generator tools in Rot.js. They are being utilized the same way:
ROT.Map. is instantiated as an object along with its size among other relevant options.create function, which takes a callback function. This callback function shall be called repeatedly and passed in the map’s information.x, y coordinates of a map’s cell and the value which corresponds to the type of generated cell.Rot.js is shipped with 3 different types of generators: Maze, Cellular and Dungeon. These can be tweaked and randomized to suit the game design you are aiming for.
Maze generator

This family of algorithms uses the following callback values:
0: empty space1: wallRot.js’ MAP function ships with 3 different maze generators: DividedMaze, Icey’s Maze and Eller’s Perfect Maze.
Cellular automata generator

These cow looking maps are known as cave systems. They can be created using Rot.js’ Cellular generator. As seen in the image above, the map’s shape doesn’t follow any particular geometry.
This complexity is achieved through the configurations made possible on the ROT.Map.Cellular API.
As with the other map types, cellular automata takes height and width arguments. Adding to this, we can configure: born, survive, topology, set(x, y, value) and- randomize(probabilty), which are detailed in the docs.
Dungeon generator

This family of map generators produces corridors and rooms.
The dungeon generator provided by Rot.js helps create the well known dungeon map effect characteristic of roguelike games. In our practical example below, we shall create our map with the dungeon generator.
While the built-in Math.random() function provides suitable results for game development purposes, it is quite weak. Most notably, it is not possible to seed the generator in order to reproduce a a proper sequence of values.
This is where the ROT.RNG object comes to play with its mathematical functions: getUniform(), getNormal(mean, stddev), getPercentage(), getItem(array), shuffle(array), getWeightedValue(), getState() and setState().
Rot.js offers several tools to help with event management, schedule turns, timing, and related measurements.
For event management, Rot provides an event queue that helps maintain a sorted priority list. The event queue provides a basic API for adding, removing, and retrieving stuff.
Rot.js has 3 built-in scheduling strategies (simple, speed, action-duration) which can each correspond to the game you are building. It is also very important to note that Rot.js supports an asynchronous game engine.
Asynchronous tasks can be handled using the native async await or promises available in JavaScript. ROT.Engine is ready for a promise-based async control flow: if any actor returns a “thenable” from its act() method, the engine locks itself and waits for the thenable to get resolved (via its then() method).
Pathfinding or pathing in game development is the plotting of the shortest route between two points. It is a practical variant of solving maze games — Wikipedia.
Pathing greatly helps roguelike games to have better AI, feel, and interaction. Rot.js implements pathing by following Djikstra’s Algorithm, which is based on finding the shortest route between two nodes in a graph.
Taking care of user input boils down to listening for proper keyboard events (keydown, keypress, keyup) and processing them. Rot.js does not offer any support methods or objects; instead, it defines a large set of ROT.KEYS.VK_* constants to distinguish between pressed keys.
You may want to check out the complete listing. This feature enables the users to “play” the game using emitted keyboard events from keys such as “W-A-S-D”, or any other.
Rot has quite handy functions extensions in ROT.Util, which may help with number and string manipulation.
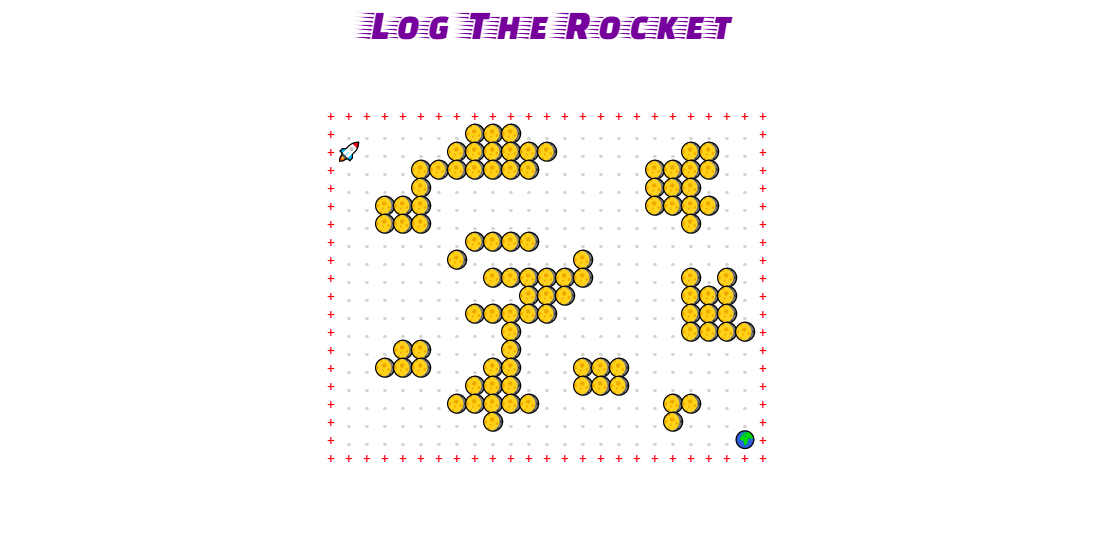
We aim to learn rogue by creating a little game that utilizes its main features in order to learn how each of them work. The game’s name is Log the Rocket.
To win this game, the player has to make the rocket find the earth and go to the next level of a generated cellular map. Awesome, right?
We are in a browser, so we obviously start with our basic HTML, CSS, and JavaScript file. Rot.js is a JavaScript library, thus it is installed or imported as a basic script in your HTML file.
<body>
  <script src="src/index.js"></script>
    <div class="center" id="canvas"></div>
</body>
Here, index.js will be the script containing Rot.js as an import. Rot.js’ display will be attached to the element with id canvas with the line let canvas = document.getElementById("canvas"); when the script will be run.
You may now include your CSS files, which contain the different imported fonts (if you need one) or other styles that will make the canvas look good.
When coding a game, it’s easier to go with this simple approach: prepare the game objects (world, game engine, colors, display, player etc) and initialize them with the attributes they shall work with.
In our game we have these 4 objects: displayOptions, colors, Game, GameWorld and Player. Among these, we have 3 dynamic objects and one static object (knowing this will help us structure our JavaScript code properly).
Our code will look like this:
const displayOptions = {
  // the display configuration for ROTJS (see above)
}

const colors = {
  // colors configuration for different characters
}

let Game = {
  // game attributes and functions
}

let GameWorld = {
  // attributes related to Map and play space
}

let Player = {
  // everything related to the player–the game won't play itself :)
}
I selected an object approach to keep things simple for the tutorial. However, any seasoned JavaScript developer will feel like these dynamic objects would be better if written with the class syntax (they are right).
Notice that the dynamic objects use let, which allows you to reassign certain attributes of the object (hence they are called dynamic), as opposed to const, which is read-only.
We can now fill our configuration attributes accordingly. We start with these because they enable the framework to get set up as seen above. They will be used all along the coding process.
const displayOptions = {
  // Configure the display
  bg: "white", // background
  fg: "dimGrey", // foreground
  fontFamily: "Fira Mono", // font (use a monospace for esthetics)
  width: 25,
  height: 20, // canvas height and width
  fontSize: 18, // canvas fontsize
  forceSquareRatio: true // make the canvas squared ratio
};

// Object containing colors per tile
// you may add as much as you want corresponding to characters
// they will then be customly applied to each character
const colors = {
  ".": "lightgrey" // the moveable path
};
Now that our game has the set up and configurations it needs, we have to start displaying stuff on our screen.
The elements of the global game engine (responsible for making the game “playable”) will go inside the Game object.
let Game = {
  map: [],
  win: false,
  // initialize the game at start time
  init: async function () {
    // we make the init function sleep to help load fonts
    await sleep(500).then(() => {
      // pass the configuration defined as arguments
      Display = new ROT.Display(displayOptions);
      let canvas = document.getElementById("canvas");
      // append the created display to the HTML element
      canvas.appendChild(Display.getContainer());
    });
    Display.clear(); // remove anything displayed
    this.createLevel(); // create level
    Player.init(); // initialize the player attributes
    this.engine(); // start the game engine
    this.draw();
  },
  engine: async function () {
    // this is responsible of watching the player move and updating
    // the display accordingly. It is all we need as engine
    while (true) {
      await Player.act();
      this.draw();
    }
  },
  // we seperate the generating function so as to help recall it anytime,
  // in case we need a new generated level
  createLevel: function () {
    GameWorld.generate();
  },

  draw: function () {
    Display.clear();
    GameWorld.draw();
    Player.draw();
  },

  // when the game is over, we end it.
  endGame: function () {
    this.win = true;
    Display.clear();
    Display.draw(8, 8, "You logged the rocket!", "violet");
  }
};
Above is the full Game object. Let’s briefly go through the different functions.
init creates the game display by passing in the options and starting the different functions that make the game workengine is what runs throughout the game. Here, we only need our player to move and update the UI accordinglycreateLevel will use the generation techniques we illustrated above — specifically, the cellular map generatordraw simply draws everything to the UI at the right moment using Rot.jsendgame will clear the UI once the game is won (the rocket touches the earth)Now that our game engine is created, we have to look at GameWorld.
In this object, we are going to randomly generate our map using Rot.js and use a little trick to make the walls block the player’s movement.
let GameWorld = {
  map: [],
  moveSpace: [],
  generate: function () {
    let map = [];
    for (let i = 0; i < displayOptions.width; i++) {
      map[i] = [];
      for (let j = 0; j < displayOptions.height; j++) {
        map[i][j] = "+"; // create the walls around the map
      }
    }
    let freeCells = []; // this is where we shall store the moveable space
    // we create a cellular map using RotJS
    let digger = new ROT.Map.Cellular(
      displayOptions.width - 2,
      displayOptions.height - 2
    );
    // randomize(probability) set all cells to "alive" with a
    // given probability (0 = no cells, 1 = all cells)
    digger.randomize(0.4);
    digger.create((x, y, value) => {
      if (value) {
        map[x + 1][y + 1] = "🌖"; // create the walls
      } else {
        freeCells.push({ x: x + 1, y: y + 1 });
        map[x + 1][y + 1] = "."; // add . to every free space just for esthetics
      }
    });

    // put the exit gate on the last free cell
    const lastFreeCell = freeCells.pop();
    map[lastFreeCell.x][lastFreeCell.y] = "🌍";
    this.map = map;
    this.freeCells = freeCells;
  },
  // make it impossible to pass through if across an obstacle
  isPassable: function (x, y) {
    if (GameWorld.map[x][y] === "+" || GameWorld.map[x][y] === "🌖") {
      return false;
    } else {
      return true;
    }
  },
  draw: function () {
    this.map.forEach((element, x) => {
      element.forEach((element, y) => {
        Display.draw(x, y, element, colors[element] || "red");
      });
    });
  }
};
Above is our GameWorld, which contains our map generator and map options.
generate is where everything happens. It is responsible of making the map different every time it re-renders following the given configuration+) with two for-loopsROT.Map.Cellular with a restraining width and height, hence the -2. This is to force the map into the predefined wallsisPassable will help us know if the player is trying to cross an obstacle or a wall in order to refuse that accesscolor static object predefined to draw and color the ASCII characters and default the rest to redAt last we create our Player: the one responsible for interacting with the game.
let Player = {
  x: null,
  y: null,
  init: function () {
    let playerStart = GameWorld.freeCells[0]; // put the player in the first available freecell
    this.x = playerStart.x;
    this.y = playerStart.y;
  },
  draw: function () {
    Display.draw(this.x, this.y, "🚀", "black");
  },
  act: async function () {
    let action = false;
    while (!action) {
      await new Promise((resolve) => setTimeout(resolve, 100));
      let e = await new Promise((resolve) => {
        window.addEventListener("keydown", resolve, { once: true });
      });
      action = this.handleKey(e);
    } //Await a valid movement
    // make it end when the rocket reaches the earth
    if (GameWorld.map[this.x][this.y] === "🌍") {
      Game.endGame();
      Game.createLevel();
      this.init();
    }
  },
  handleKey: function (e) {
    var keyCode = [];
    //Arrows keys
    keyCode[38] = 0; // key-up
    keyCode[39] = 2; // key-right
    keyCode[40] = 4; // key-down
    keyCode[37] = 6; // key-left
    var code = e.keyCode;
    if (!(code in keyCode)) {
      return false;
    }
    let diff = ROT.DIRS[8][keyCode[code]];
    if (GameWorld.isPassable(this.x + diff[0], this.y + diff[1])) {
      this.x += diff[0];
      this.y += diff[1];
      this.justMoved = true;
      return true;
    } else {
      return false;
    }
  }
};
init our player on the first available freecellOur last lines help us capture key events from our browser and load the game. These three lines are the deep connection between the script and the browser.
// listen to keystrokes
window.addEventListener(
  "keydown",
  function (e) {
    // space and arrow keys
    if ([32, 37, 38, 39, 40].indexOf(e.keyCode) > -1) {
      e.preventDefault();
    }
  },
  false
);
// load the game
window.onload = Game.init();
// focus on the canvas
window.focus();
Voilà! Our game is ready to be played. You can try it out on the link below, feel free to go through the full game code right here, fork it, and make additions or anything you want.
rot-js-log-rocket
rot-js-log-rocket by blurdylan using rot-js
Rot.js helped with the big task of creating a random map at each time, mapping the keys, and displaying everything in the browser.
Just from this little game, we were able to illustrate the following rogue features: RNG, input key mapping, and display. We may use Rot.js pathfinding and scheduling abilities if ever we need to add enemies and roles to play.
A lot good improvements could be made on our game:
What makes game development beautiful is that it goes as far as your creativity goes. You are able to build whatever you wish, provided you are using the right tools.
Libraries like Rot.js make game development using web tools much more accessible. Via a nimble library, it is possible to provide great abstraction to concepts and techniques that were previously extremely difficult to master and produce.
Install LogRocket via npm or script tag. LogRocket.init() must be called client-side, not
server-side
$ npm i --save logrocket

// Code:

import LogRocket from 'logrocket';
LogRocket.init('app/id');
// Add to your HTML:

<script src="https://cdn.lr-ingest.com/LogRocket.min.js"></script>
<script>window.LogRocket && window.LogRocket.init('app/id');</script>
Would you be interested in joining LogRocket's developer community?
Join LogRocket’s Content Advisory Board. You’ll help inform the type of content we create and get access to exclusive meetups, social accreditation, and swag.
Sign up now
Learn how OpenAPI can automate API client generation to save time, reduce bugs, and streamline how your frontend app talks to backend APIs.

Discover how the Interface Segregation Principle (ISP) keeps your code lean, modular, and maintainable using real-world analogies and practical examples.

<selectedcontent> element improves dropdowns

Learn how to implement an advanced caching layer in a Node.js app using Valkey, a high-performance, Redis-compatible in-memory datastore.


