
In today’s world, decisions are driven by data. Data is the new oil, and it’s evident the role that data plays in the world today.

However, data alone doesn’t do us much good. Insight is the real tool. The ability to quickly generate insights from seemingly meaningless data is a skill that grows in importance every single day.
Business intelligence skills represented in professions like data science and data analysis are in high demand. As a data scientist, your job is to derive insight from data and see things most people can’t and present it in a digestible format.
That’s where charts come in.
Charts are an integral part of working with data. They help condense large amounts of data into an easy-to-understand format. The data visualizations powered by charts tend to easily display insights to someone looking at the data for the first time, as well as represent findings to others who don’t get to see the data in it’s raw form.
A problem arises when we try to automate the process of deriving insights and displaying them with charts.
For most organizations, their data is everywhere (and of course) very unique. This makes building meaningful interfaces or dashboards to represent this data cumbersome.
This is where Cube.js shines.
Cube.js is an open source analytics framework that provides visualization agnostic frontend SDKs and API backed by analytical server infrastructure. This is fancy speak for “we help you visualize data with whatever frontend framework you like and give you a robust server to support it all.”
Note: I know it says analytics only, but hey, why stop there.
In this tutorial (as the title suggests), we will be building a Nuxt.js Dashboard Application to display insights from a database with Cube.js and Highcharts.
Our finished application will look like this:

Exciting!

The Replay is a weekly newsletter for dev and engineering leaders.
Delivered once a week, it's your curated guide to the most important conversations around frontend dev, emerging AI tools, and the state of modern software.
Have a look at the GitHub repo.
Cube.js is an open source modular framework to build analytical web applications. It is primarily used to build internal business intelligence tools.
The best thing about Cube.js is it’s ability to minimize developer effort when building custom and large-scale analytics features. It was built to to work with large-scale data sets and makes building analytics a delight by providing any (if not all) the required infrastructure.
Cube.js has a pretty straightforward workflow:
We’ll cruise through each step before we can get to building our dashboard in Nuxt.
To get through the article smoothly, you will need an LTS version of Node.js — either Yarn or npm and PostgreSQL installed on your device before hand. It’s also worth mentioning that you will need to have a basic understanding of JavaScript and Vue.js.
Let’s get started.
Installing the Cube.js CLI
Run yarn global add cubejs-cli to install the Cube.js CLI. This is used for various Cube.js workflows.
Connect your database
We’re going to use a SQL data dump of World country, language, and city data for our database.
Run the following commands in your terminal do download the dump and add it to a new database you define:
createdb sample-data
curl https://raw.githubusercontent.com/malgamves/nuxt-dashboard/master/world.sql > world.sql
psql --dbname sample-data -f world.sql
We then setup a new Cube.js project with the -d flag to specify that we’re using a PostgreSQL database.
Run the following command in your terminal to do so:
cubejs create database -d postgres
When your project setup is done, a new folder called database will be created. Navigate to it and edit your .env file.
Your .env file will look like this:
CUBEJS_DB_HOST=<Host Name>
CUBEJS_DB_NAME=<Database Name>
CUBEJS_DB_USER=<Postgres User>
CUBEJS_DB_PASS=<Postgres Password>
...
if you’re working locally, CUBEJS_DB_HOST should be localhost unless you changed your config.
Similarly, CUBEJS_DB_NAME will be sample-data, as that is the new database we created from our data dump. Then, per your credentials, give CUBEJS_DB_USER and CUBEJS_DB_PASS their appropriate values.
After editing your .env file, restart your Cube.js server by running yarn dev in your terminal. You can then open up http://localhost:4000 in your browser.
Cube.js has a web app that helps us explore or data, define data schemas and model the data.
You can imagine this as some sort of sandbox to play around with possible visualizations before building out our custom ones.
Cube.js has various ways of deploying your backend. This guide is a good resource. For now, we’ll do this locally.
Define Data Schema
If you’re not already there, navigate to http://localhost:4000.
Under the Schema tab, tick all three boxes under public, click the + and then select Generate Schema.

This generates a cube.js schema to model raw data into meaningful business definitions.
All that’s left is to visualize our data now.
Visualize Results
Cube.js on https://localhost:4000 gives us access to some sort of sandbox application to play around with the data in our database.
We want to visualize the “Country Language Count” measure and observe that with the “Country Language isofficial” dimension to create a pie chart.
So in the build section, click measure and select “Country Language Count”. Then, click on dimension and select “Count Language isofficial”. A table with values should appear. However, we want a pie chart so change the chart type from a table to a pie chart:
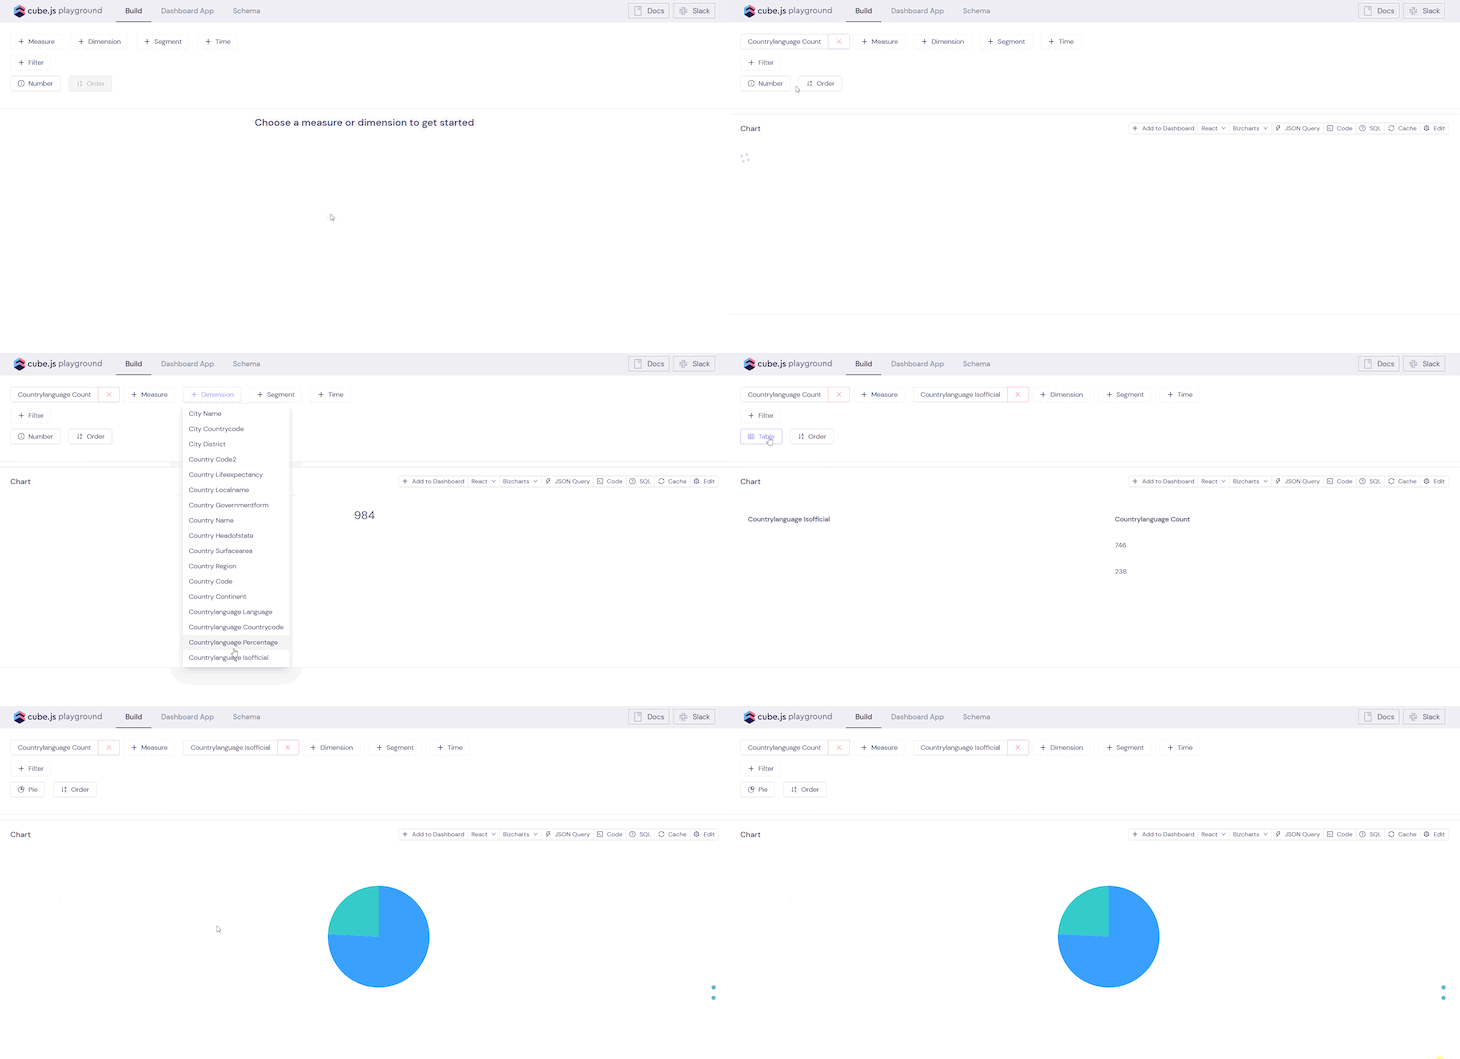
Going forward, it’s important to differentiate between measures and dimensions as these will help us build our charts in the Nuxt frontend.
We have an idea of what our charts will be like and the data we want to display. Now, we now have to display the charts in our custom frontend with Nuxt.js using the Cube.js client.
We’re getting started with our Nuxt frontend now.
In your project root, initialize your project frontend by running yarn create nuxt-app cubejs-nuxt-dashboard to put together the project.
If you have problems with config options, this should help you pick:
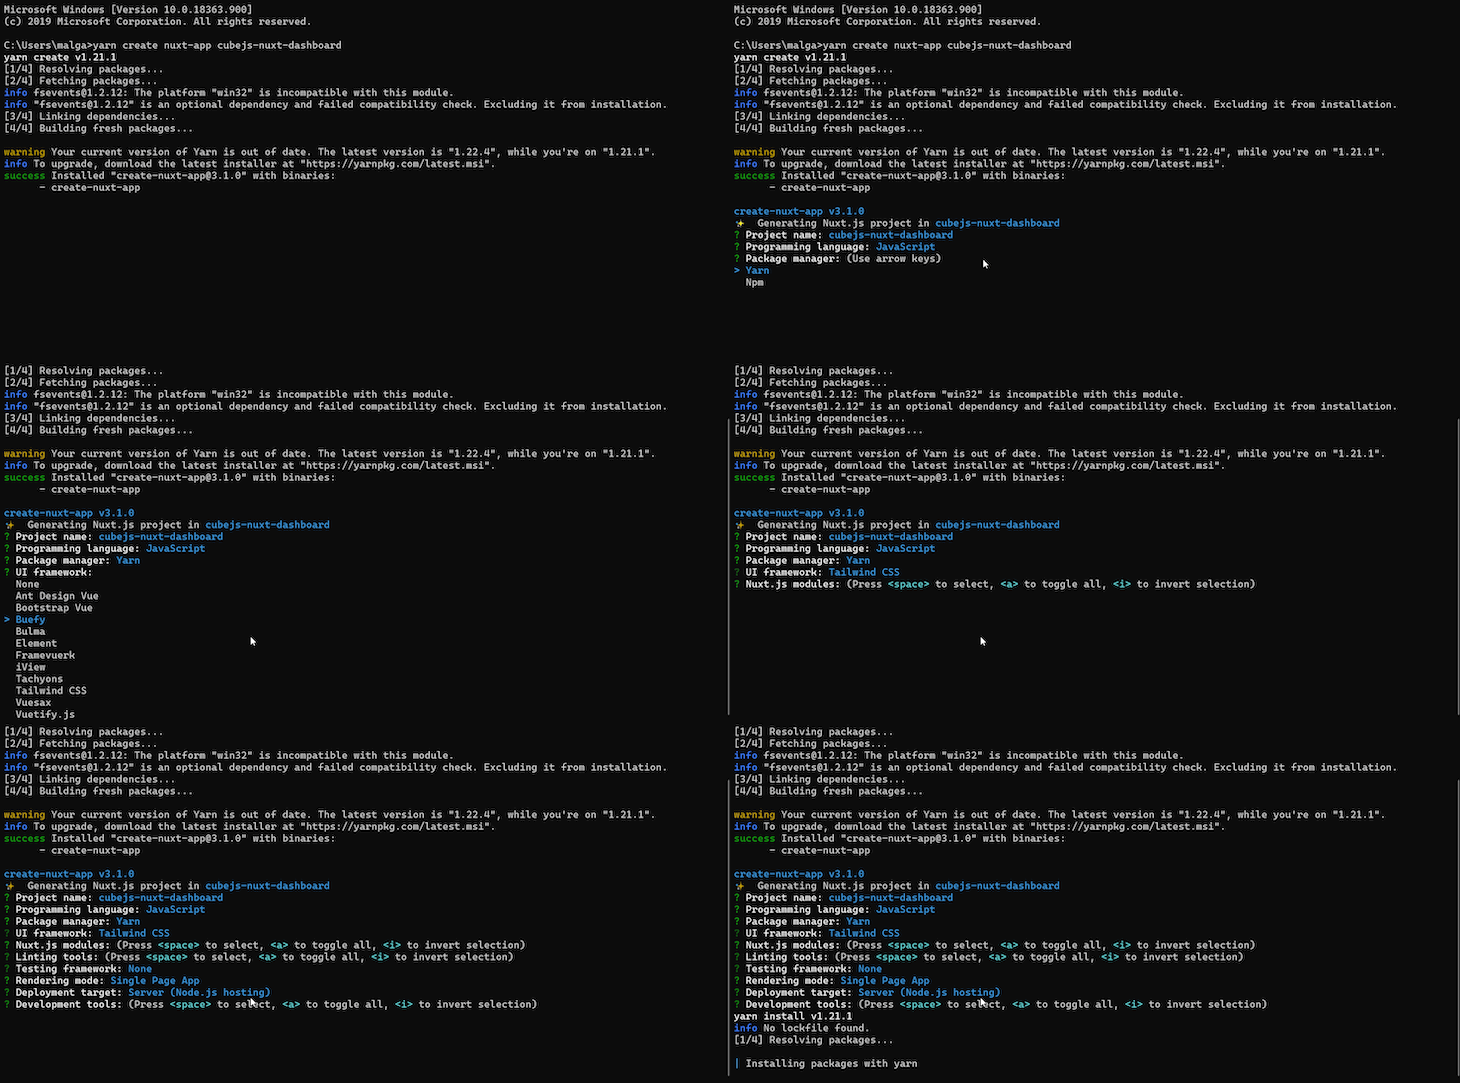
Note: Be sure to pick Tailwind CSS as your preferred UI library, as that is what we use for styling.
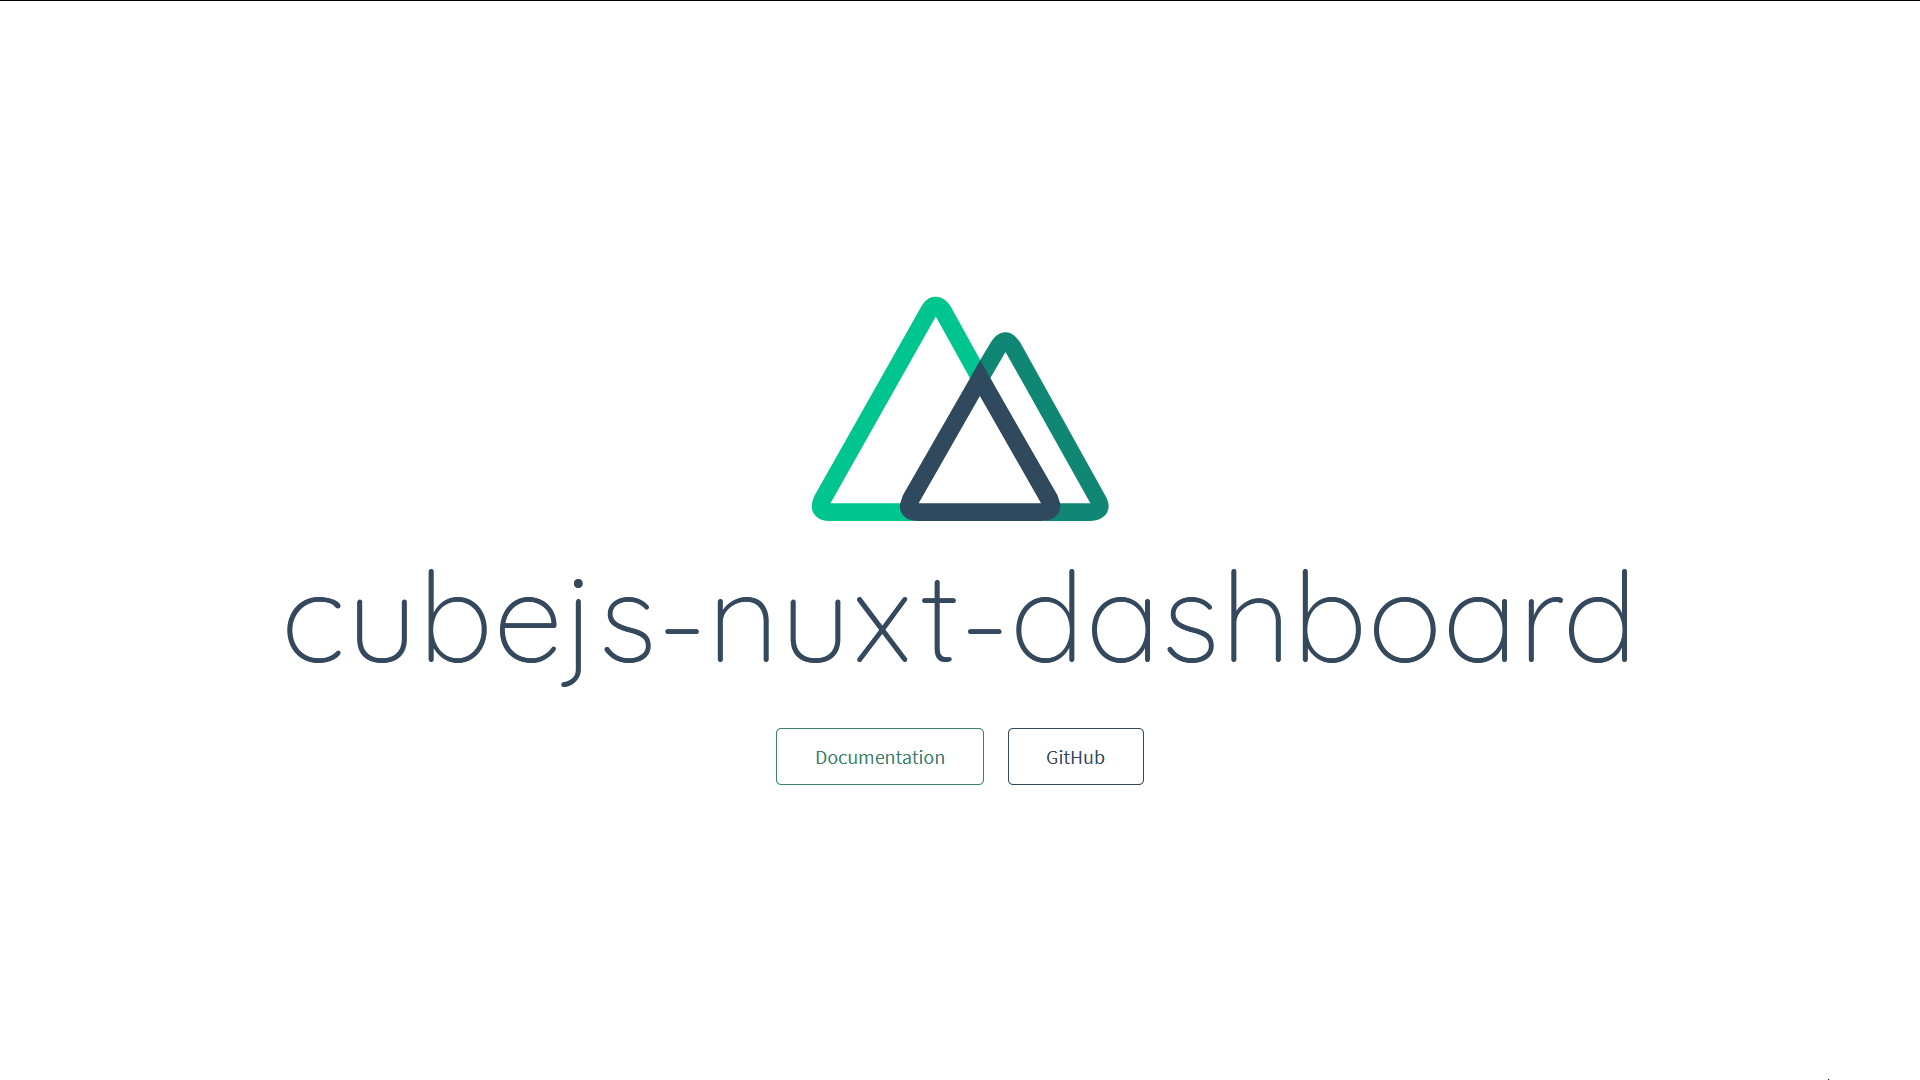
After you initialize the Nuxt application, a new folder called cubejs-nuxt-dashboard will be created. Run cd cubejs-nuxt-dashboard to navigate to it.
We can start building out the components that will make up our application. In ./components, create a new folder called containers, then create a file called Base.vue and paste the following code in it:
<template>
   <!-- Base Container to store all components -->
  <div class="container w-full mx-auto pt-10">
    <div class="w-full px-4 md:px-0 md:mt-8 mb-16 text-gray-800 leading-normal">
      <slot></slot>
    </div>
  </div>
</template>
Base.vue will make sure every component we add to it stays within the screen and is well aligned.
Navbars are nice, so we’ll create one.
In ./layouts, create a new file called navbar.vue and paste the following code in it:
<template>
  <nav id="header" class="bg-white fixed w-full z-10 top-0 shadow">
    <div
      class="w-full container mx-auto flex flex-wrap items-center mt-0 pt-3 pb-3 md:pb-0"
    >
      <div class="w-1/2 pl-2 md:pl-0">
        <a
          class="text-gray-900 text-base xl:text-xl no-underline hover:no-underline font-bold"
          href="#"
        >
          <i class="fas fa-sun text-orange-600 pr-3"></i> Amazing Inc. Global
          Dashboard
        </a>
      </div>
    </div>
  </nav>
</template>
We want our navbar to be part of our layout and appear on every page route, so we’ll add it to the ./layouts/default.vue.
We import the navbar component and add it to our layout right above <nuxt />, where all the pages in ./pages go. Your default.vue file should look like this after:
<template>
  <div>
    <navbar />
    <nuxt />
  </div>
</template>

<script>
import Navbar from "~/layouts/navbar.vue";
export default {
  components: {
    Navbar
  },
  head: {
    title: "Amazing Inc. Global Dashboard"
  }
};
</script>
....
Our navbar is up. Now we can get started with setting up the Cube.js client. Navigate to ./pages and paste the following code in index.vue:
<template>
  <BaseContainer>
    <h1> Hi </h1>
  </BaseContainer>
</template>
<script>
// Importing Cube.js client libraries
import cubejs from "@cubejs-client/core";
import { QueryRenderer } from "@cubejs-client/vue";
import BaseContainer from "~/components/containers/Base.vue";

// Our Cube.js Key and API URL
const cubejsApi = cubejs(
  "Your API Key ",
  { apiUrl: "http://localhost:4000/cubejs-api/v1" }
);
export default {
  components: {
    QueryRenderer,
    BaseContainer,
  },
  data() {
    return {
      cubejsApi,
      // Defining Cube.js querys
      continentQuery: {
        measures: ["Country.count"],
        dimensions: ["Country.continent"]
      },
      cityQuery: {
        measures: ["City.count"]
      },
      languageCountQuery: {
        measures: ["Countrylanguage.count"]
      },
      countryQuery: {
        measures: ["Country.count"]
      },
      languageQuery: {
        measures: ["Countrylanguage.count"],
        dimensions: ["Countrylanguage.isofficial"]
      }
    };
  },
  methods: {},
  mounted() {}
};
</script>
In the code above, we initialize the Cube.js client and import QueryRenderer, which we’ll use to pass data from Cube.js into our charts.
We also add our Cube.js API key (you can find this in ./database) and define a few queries. Notice the use of measure and dimensions from before.
These queries and strings associated with them specify the data you are trying to get back from the database so that you can directly visualize it with whatever charting library you chose.
After initializing Cube.js and defining the queries that will be used by our visualizations in index.vue, we have to create components to display results of these queries. We’ll start with displaying numbers on cards from the queries with only measures.
By exploring the data from the database, you notice we have Country, Language, and City data. We want to get the count for each of these items and display each.
In ./components, create a new file called CityCard.vue and paste the following code in it:
<template>
  <!-- A card to display cube.js data -->
  <div class="w-full  p-3">
    <div class="bg-white border rounded shadow p-2">
      <div class="flex flex-row items-center">
        <div class="flex-1 text-right md:text-center">
          <h5 class="font-bold uppercase text-gray-500">{{ title }}</h5>
          <h3 class="font-bold text-3xl">
            {{ chartdata }}
          </h3>
        </div>
      </div>
    </div>
  </div>
</template>
<script>
export default {
  props: {
    resultSet: {
      type: Object,
      required: true
    },
    title: {
      type: String,
      required: true
    }
  },
  computed: {
    chartdata() {
      // Storing cube.js query result
      const result = this.resultSet.loadResponse.data[0]["City.count"];
      return result;
    }
  }
};
</script>
In this file, we take in resultSet and title as props. resultSet is the response from our Cube.js query.
We then parse the response in chartdata() and return a result which contains the figures we want to display.
Similarly, we create two more cards called CountryCard.vue and LanguageCard.vue and paste the code above in them only replacing “City.count” with “Country.count” in CountryCard.vue, and with “Countrylanguage.count” in LanguageCard.vue.
Before we can see how the application looks, we need to add some code to our ./pages/index.vue file:
<template>
  <BaseContainer>
    <div class="flex justify-center">
      <!-- Using Cube.js Query Renderer to pass query results as props -->
      <query-renderer :cubejs-api="cubejsApi" :query="languageCountQuery">
        <template v-slot="{ loading, resultSet }">
          <LanguageCard
            title="Number of Languages"
            v-if="!loading"
            :result-set="resultSet"
          />
        </template>
      </query-renderer>
      <!-- Using Cube.js Query Renderer to pass query results as props -->
      <query-renderer :cubejs-api="cubejsApi" :query="cityQuery">
        <template v-slot="{ loading, resultSet }">
          <CityCard
            title="Number of Cities"
            v-if="!loading"
            :result-set="resultSet"
          />
        </template>
      </query-renderer>
      <!-- Using Cube.js Query Renderer to pass query results as props -->
      <query-renderer :cubejs-api="cubejsApi" :query="countryQuery">
        <template v-slot="{ loading, resultSet }">
          <CountryCard
            title="Number of Countries"
            v-if="!loading"
            :result-set="resultSet"
          />
        </template>
      </query-renderer>
    </div>
  </BaseContainer>
</template>
<script>
// Importing Cube.js client libraries
import cubejs from "@cubejs-client/core";
import { QueryRenderer } from "@cubejs-client/vue";
// Importing our application components
import BaseContainer from "~/components/containers/Base.vue";
import CityCard from "~/components/CityCard.vue";
import CountryCard from "~/components/CountryCard.vue";
import LanguageCard from "~/components/LanguageCard.vue";

...

export default {
  components: {
    QueryRenderer,
    BaseContainer,
    CityCard,
    CountryCard,
    LanguageCard
  },

...
};
</script>
It should look something like this now:
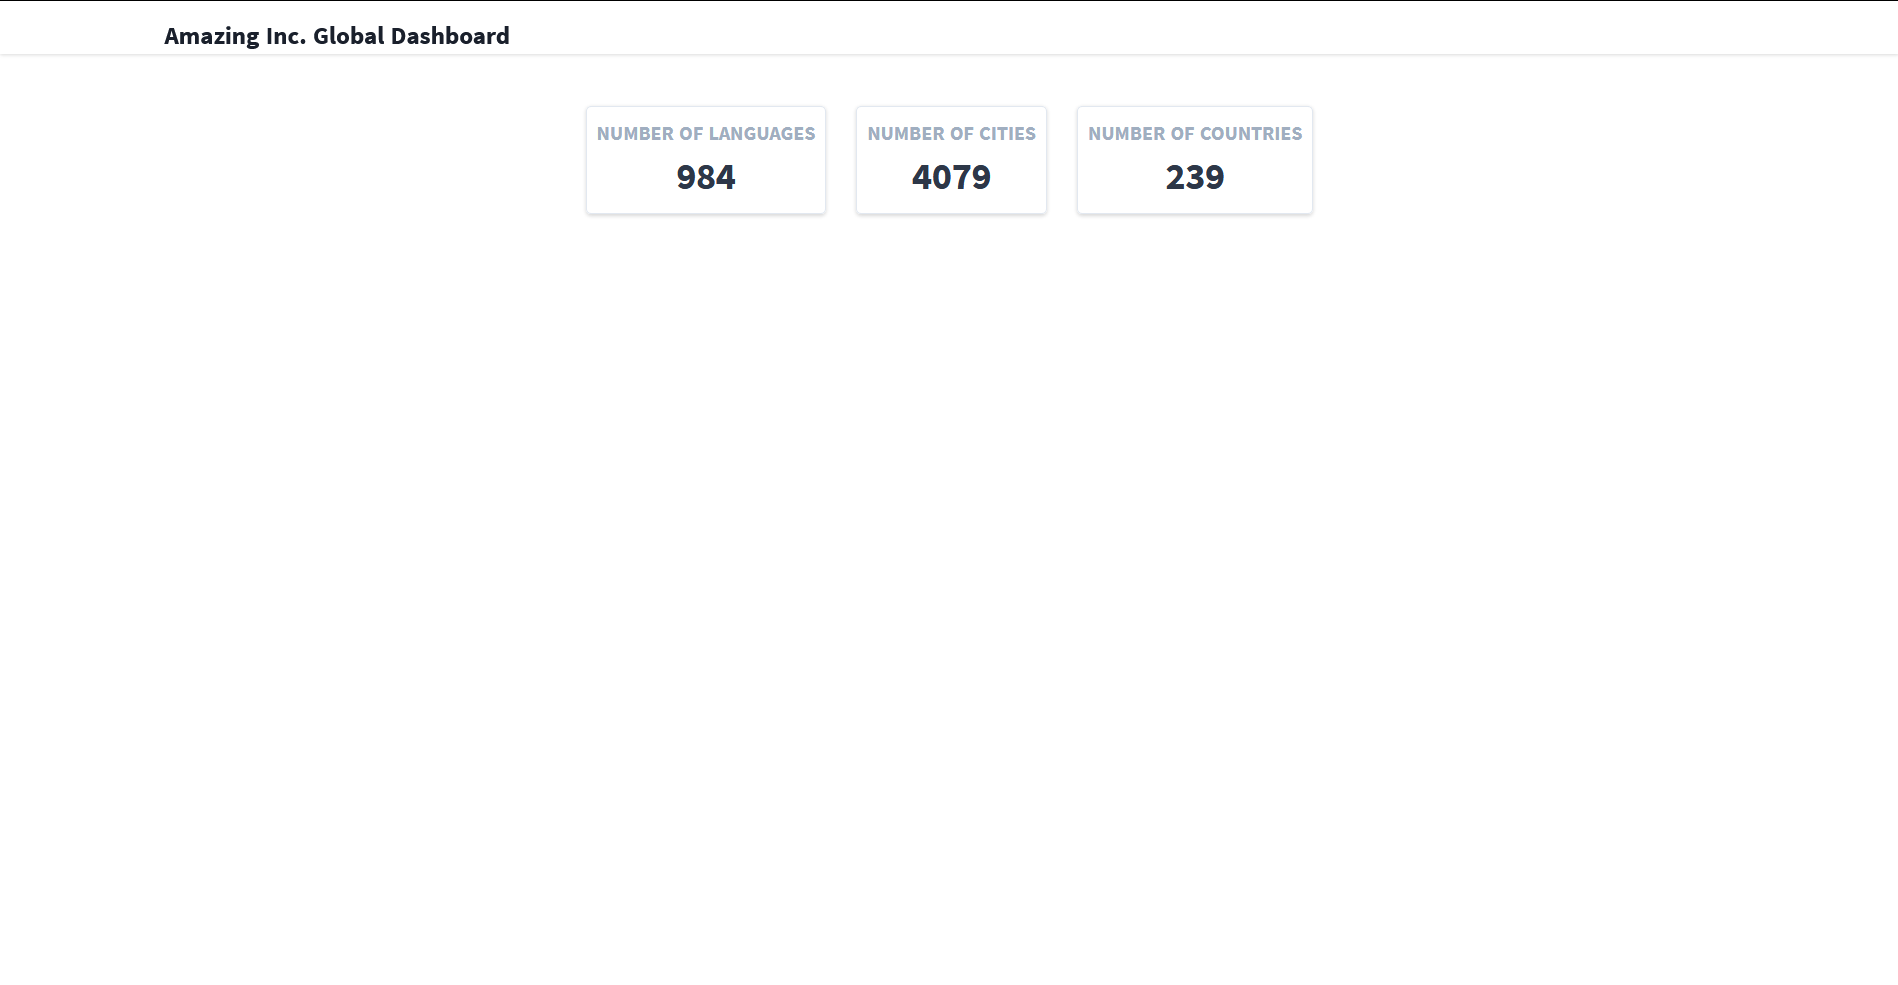
Cube.js is connected and working which means we can add our charts now.
We’ll start out with our Pie chart. Our charts will be powered by a JavaScript charting library called Hightcharts. Navigate to ./cubejs-nuxt-dashboard and run yarn add vue2-highcharts to install Highcharts.
In ./components, create a file called PieChart.vue:
<template>
  <!-- An Pie chart using Highcharts -->
  <div class="w-full md:w-1/2 p-3">
    <vue-highcharts :options="chartdata" ref="pieChart"></vue-highcharts>
  </div>
</template>
<script>
// Importing Highcharts
import VueHighcharts from "vue2-highcharts";
export default {
  components: {
    VueHighcharts
  },
  props: {
    resultSet: {
      type: Object,
      required: true
    }
  },
  computed: {
    chartdata() {
      // Storing cube.js query result
      const result = this.resultSet.loadResponse.data;
      const setOne = [];
      result.forEach(function(item) {
        setOne.push(
          item["Countrylanguage.isofficial"].toString(),
          parseInt(item["Countrylanguage.count"])
        );
      });
      const setTwo = setOne.splice(0, 2);
      const pieData = [];
      pieData.push(setOne);
      pieData.push(setTwo);
      // This is the graphs data input,
      // edit this to change the graph
      const chartdata = {
        chart: {
          type: "pie",
          options3d: {
            enabled: true,
            alpha: 45
          }
        },
        title: {
          text: "Global Count of Official Languages"
        },
        plotOptions: {
          pie: {
            innerSize: 100,
            depth: 45
          }
        },
        series: [
          {
            name: "Number of languages",
            data: pieData
          }
        ]
      };
      return chartdata;
    }
  }
};
</script>
Just like the cards, we have resultSet as props. resultSet is the response from our Cube.js query.
We then parse the response in chartdata(), perform some data manipulations to make the data we received easily added to the charts. We then return chartdata, which will be used as a data input for our chart.
Things work pretty similarly for our bar chart. In ./components, create a file called BarChart.vue and paste the following code in it:
<template>
  <!-- An Bar chart using Highcharts -->
  <div class="w-full md:w-1/2 p-3">
      <vue-highcharts :options="chartdata" ref="barChart"></vue-highcharts>
  </div>
</template>
<script>
// Importing Highcharts
import VueHighcharts from "vue2-highcharts";
import Highcharts from "highcharts";
export default {
  components: {
    VueHighcharts,
  },
  props: {
    resultSet: {
      type: Object,
      required: true
    }
  },
  computed: {
    chartdata() {
      // Storing cube.js query result
      const result = this.resultSet.loadResponse.data;
      const data = [];
      const fin = [];
      const labels = [];
      result.forEach(function(item) {
        labels.push(item["Country.continent"]);
        data.push(parseInt(item["Country.count"]));
      });
      for (let i = 0; i < data.length; i++) {
        fin.push({
          Continent: labels[i],
          Count: data[i]
        });
      }
      // This is the charts data input,
      // edit this to change the chart
      const chartdata = {
        chart: {
          type: "bar"
        },
        title: {
          text: "Global Country Count by Continent"
        },
        xAxis: {
          categories: labels,
          title: {
            text: null
          }
        },
        yAxis: {
          min: 0,
          title: {
            text: "Number of Countries",
            align: "high"
          },
          labels: {
            overflow: "justify"
          }
        },
        plotOptions: {
          bar: {
            dataLabels: {
              enabled: true
            }
          }
        },
        legend: {
          layout: "horizontal",
          align: "right",
          verticalAlign: "top",
          x: -40,
          y: 80,
          floating: true,
          borderWidth: 1,
          backgroundColor:
            (Highcharts.theme && Highcharts.theme.legendBackgroundColor) ||
            "#FFFFFF",
          shadow: true
        },
        credits: {
          enabled: false
        },
        series: [
          {
            name: "Current Data",
            data: data
          }
        ]
      };
      return chartdata;
    }
  }
};
</script>
We’ve built out our two chart components. Now we can add them to our index.vue file:
<template>
  <BaseContainer>
    ...
    <div class="flex flex-row flex-wrap flex-grow mt-2">
      <!-- Using Cube.js Query Renderer to pass query results as props -->
      <query-renderer :cubejs-api="cubejsApi" :query="continentQuery">
        <template v-slot="{ loading, resultSet }">
          <Bar v-if="!loading" :result-set="resultSet" />
        </template>
      </query-renderer>
      <!-- Using Cube.js Query Renderer to pass query results as props -->
      <query-renderer :cubejs-api="cubejsApi" :query="languageQuery">
        <template v-slot="{ loading, resultSet }">
          <Pie v-if="!loading" :result-set="resultSet" />
        </template>
      </query-renderer>
    </div>
  </BaseContainer>
</template>
<script>
// Importing Cube.js client libraries
import cubejs from "@cubejs-client/core";
import { QueryRenderer } from "@cubejs-client/vue";
// Importing our application components
import BaseContainer from "~/components/containers/Base.vue";
import Bar from "~/components/BarChart.vue";
import Pie from "~/components/PieChart.vue";
import CityCard from "~/components/CityCard.vue";
import CountryCard from "~/components/CountryCard.vue";
import LanguageCard from "~/components/LanguageCard.vue";
...
export default {
  components: {
    Bar,
    Pie,
    QueryRenderer,
    BaseContainer,
    CityCard,
    CountryCard,
    LanguageCard
  },
  ...
};
</script>
You should run your application now and…
Finito!

We’ve just built an application with Nuxt.js and Cube.js. We went through adding a database to Cube.js and leveraging it’s “sandbox” to play around with data before creating custom visualizations with Highcharts. This is a very basic example of Cube.js functionality alongside a very basic database.
There is so much more you can do with Cube.js — changing or using other databases, changing charting libraries etc..
If you go ahead and build something do share it with me on my Twitter and or just say hi — no pressure. I hope you enjoyed the tutorial.
Till next time.
Install LogRocket via npm or script tag. LogRocket.init() must be called client-side, not
server-side
$ npm i --save logrocket

// Code:

import LogRocket from 'logrocket';
LogRocket.init('app/id');
// Add to your HTML:

<script src="https://cdn.lr-ingest.com/LogRocket.min.js"></script>
<script>window.LogRocket && window.LogRocket.init('app/id');</script>

@container scroll-state: Replace JS scroll listeners nowCSS @container scroll-state lets you build sticky headers, snapping carousels, and scroll indicators without JavaScript. Here’s how to replace scroll listeners with clean, declarative state queries.

Explore 10 Web APIs that replace common JavaScript libraries and reduce npm dependencies, bundle size, and performance overhead.

Russ Miles, a software development expert and educator, joins the show to unpack why “developer productivity” platforms so often disappoint.

Discover what’s new in The Replay, LogRocket’s newsletter for dev and engineering leaders, in the February 18th issue.
Hey there, want to help make our blog better?
Join LogRocket’s Content Advisory Board. You’ll help inform the type of content we create and get access to exclusive meetups, social accreditation, and swag.
Sign up now