Metaprogramming is a programming technique that allows a program to treat another program’s data like its own data. For example, a program can be designed to read, generate, analyze, or modify other programs while running, as well as modify itself. A proxy is a feature of metaprogramming that enhances the behavior of a function by passing different functions as a parameter, essentially allowing developers to trick the JavaScript language.

In this article, we’ll learn how JavaScript proxies work, then we’ll build a weather forecasting application using JavaScript proxy objects. To follow along with this tutorial, you’ll need basic knowledge of JavaScript. Let’s get started!
traps method
A proxy acts as a layer between an operation object, or a handler, and a target object, which are used to intercept and redefine fundamental operations or traps, like getting, setting, and defining properties. Proxy objects are commonly used to log property accesses, validate, format, sanitize inputs, and more.
A proxy()object is a wrapper for a target object, through which the properties of the target object can be accessed and modified with the help of traps. A proxy is used for two main goals, which guide how to actually use proxy objects:
target objecttarget objectWe can use a proxy for the following operations:
let proxy = new Proxy(target, handler);
target and handler are the two parameters passed to the proxy() object:
target: The original object you’d like to proxyhandler: Contains methods that control the behavior of the target objectThe target object is the wrapped object, the handler is the function used on the target object, and traps methods are used inside the handler to perform operations on the target object.
traps methodtraps are handler methods that are triggered when some actions are performed on the target object through the proxy() object. The traps method can retrieve data from a RESTful API and then be used to validate, format, and store the RESTful data response into the target object. Let’s take a brief look at some of the common traps methods and how we can use traps to validate RESTful API responses:
set() trapThe set() trap is triggered whenever the property of the target object is to be modified using the proxy() object. It can be used to control the behavior of the target object.
Let’s learn how to use the set() trap to fetch data from an API, then validate the response data before we store the data in the target object. As an example, we’ll demonstrate how to use the genderize.io API in JavaScript proxy objects, a free API that statistically predicts a male or female gender association of a given name using existing population ratios:
let person = {
        name: "",
             gender: "",
        probability: "",
        count: ""
}

const handler = {
   set(target, property, value) {

     fetch('https://api.genderize.io/?name='+value)
     .then(response => (response.json()))
    .then(data => {
     if (typeof value === 'string') {
       if(data.name !=='undefined'){
            target['name']=data.name
            target['gender']=data.gender
            target[probability]=data.probability
            target[count]=data.count
       }else {
          target['name']=''
          target['gender']=''
          target[probability]=''
          target[count]=''
      }
 }else{
               throw new TypeError('The value of "name" must be a string.')
 }
    });

    }
};

const proxyPerson = new Proxy(person, handler);
proxyPerson.name ="popoola"
From the above example, the set() trap is used to validate the name, fetch the gender, and then update the properties of the person object with the data that we retrieve from the API.
get() trapThe get() trap is triggered when the property of the target object is to be accessed via the proxy() object. There are many ways to use this trap; for one, we can use it to restrict access to certain properties or return only parts of the values.
Let’s demonstrate how we can use the get() trap to return a custom value from the target object:
let person = {
                 name: "",
                  gender: "",
                  probability: "",
                  count: ""
}

const handler = {
     get(target, property) {
         if(property==='userDetails'){
                return`${target.name} is a ${target.gender}`
         }elseif(property==='userInfo'){
                If (target.name==="Male"){
Return  "the user is a man"
              }else{
Return  " the user is a woman"
         }
         }else{


                return target[property]
        }

       console.log(target[property])
     return target[property];

    }
}

const proxyPerson = new Proxy(person, handler);

console.log(proxyPerson.userDetails);
console.log(proxyPerson.gender);
The person object does not have a property userDetails and userInfo. Therefore, we use the get() trap to return a custom value based on the properties that we have for the person object.
trapsThe list below includes the other traps available from the proxy() object:
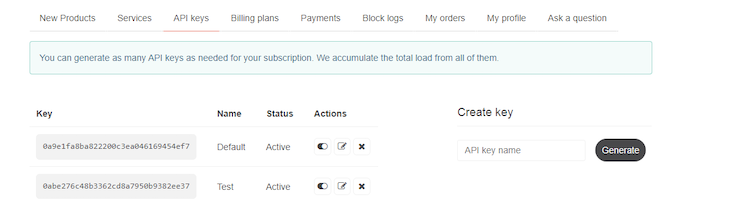
construct: Traps usage of the new operatorgetPrototypeOf: Traps an internal call to [[GetPrototypeOf]]setPrototypeOf: Traps a call to Object.setPrototypeOfisExtensible: Traps a call to Object.isExtensiblepreventExtensions: Traps a call to Object.preventExtensionsgetOwnPropertyDescriptor: Traps a call to Object.getOwnPropertyDescriptorTo get your API key, visit https://openweathermap.org/api and sign up. If you click on API key, you should see something like the image below:
To demonstrate how to use a JavaScript proxy object to build a REST client application, let’s create a weather forecast application that allows users to search for any address, then provides the weather details of the address.
index.htmlCreate the index.html page and add the following HTML code to it:
<!DOCTYPE html>
<html>
<head>
<title></title>
</head>
<style>
table {
  font-family: arial, sans-serif;
  border-collapse: collapse;
  width: 100%;
}

td, th {
  border: 1px solid #dddddd;
  text-align: left;
  padding: 8px;
}

tr:nth-child(even) {
  background-color:#dddddd;
}
</style>

<body>
<h1 style="text-align:center;"> Weather forecast </h1>
<div style="float:left;width:300px;height:200px;background-coor:red;margin-left:50px">        <label>enter city name</label>
          <input type="text" value="" id="city" onchange="check('state')"><br>
            <label>enter state name</label>
          <input type="text" value="" id="state"onchange="check('country')"><br>
          <label>enter country name</label>
            <input type="text" value="" id="country"onchange="{proxyPerson.name ='load'}"> <br>

                  <input type="submit" id="load" onclick ="{proxyPerson.name}" value="weather forecast">
</div>
<div style="float:right;width:300px;height:200px;background-coor:red;margin-right:50px;">


<table>
  <tr>
    <td>location</td>
    <td><span id="location"></span></td>
  </tr>
  <tr>
  <td>Status</td>
  <td><span id="status"></span></td>
  </tr>
  <tr>
  <td>Description</td>
  <td><span id="description"></span></td>
  </tr>
  <tr>
  <td>Pressure</td>
  <td><span id="pressure"></span></td>
  </tr>
  <tr>
  <td>Humidity</td>
  <td><span id="humidity"></span></td>
  </tr>
  <tr>
  <td>temperature </td>
  <td><span id="temperature"></span></td>
  </tr>
</table>
</div>
</body>

<script type="text/javascript" src="proxy.js"></script>
</html>
The code above is the interface; it has three input fields where users will enter a city, state, and country to retrieve weather forecasts for the city.
proxy.jsNow that our interface is ready, let’s create a proxy.js file, which will contain all the functionality of the application. Add the following code to proxy.js:
function check(id){
document.getElementById(id).value ="";
}

let location = {
    name: "",
    lat: "",
    lon: ""
}

const handler = {

   set(target, property, value) {

       let apikey  = '0abe276c48b3362cd8a7950b9382ee37'
       let city = document.getElementById("city").value;
       let state = document.getElementById("state").value;
       let country = document.getElementById("country").value;

       if(city!="" && state!="" && country !=""){

     fetch('https://api.openweathermap.org/geo/1.0/direct?q='+city+','+state+','+country+'&limit=1&appid='+apikey )
     .then(response => (response.json()))
    .then(data => {

       target\['name'] = data[0\]['name']
       target\['lat'] = data[0\]['lat']
       target\['lon'] = data[0\]['lon']
       console.log(target['lat'])


    });

     }else {

     alert("please enter a valid location ")
     }
    },

    get(target, property) {
    let apikey  = '0abe276c48b3362cd8a7950b9382ee37'
    let lat = target['lat'];
    let lon = target['lon'];
    if(lat!=""&& lon!=""){
    fetch('https://api.openweathermap.org/data/2.5/weather?lat='+lat+'&lon='+lon+'&appid='+apikey)
    .then(response => (response.json()))
    .then(data => {
    document.getElementById("location").innerHTML = data['name'];
   document.getElementById("description").innerHTML = data\['weather'\][0]['description']
   document.getElementById("status").innerHTML =  data\['weather'\][0]['main']
   let  icon = data\['weather'\][0]['icon']

   document.getElementById("temperature").innerHTML = data\['main'\]['temp']
   document.getElementById("pressure").innerHTML =  data\['main'\]['pressure']
    document.getElementById("humidity").innerHTML = data\['main'\]['humidity']

    });

    }else{
    alert("please enter a valid location")
    }
    }

};
const proxyPerson = new Proxy(location, handle)
When creating the proxyPerson object, we pass in the location object as the original object that we want to proxy. We then pass in a handler object as the second argument, which controls the behavior of the location object.
We use the set() trap to retrieve the user’s address from the city, as well as the input fields for state and country. Then, we send a request to the openweathermap.org endpoint to get the address’s latitude and longitude. Finally, we update the location object’s properties with the city name, latitude, and longitude. We obtain the latitude and longitude from the location object using the get() trap, then fetch the weather details from the openweathermap.org endpoint, and finally display the weather details on the page.
In this article, we leaned what proxies are and how they function, exploring some typical proxy traps, and finally building a weather forecast application using JavaScript proxy objects. Hopefully, you have a better understanding of how proxy objects in JavaScript can improve your code. I hope you enjoyed this tutorial! Please leave a comment if you have any questions.
Debugging code is always a tedious task. But the more you understand your errors, the easier it is to fix them.
LogRocket allows you to understand these errors in new and unique ways. Our frontend monitoring solution tracks user engagement with your JavaScript frontends to give you the ability to see exactly what the user did that led to an error.

LogRocket records console logs, page load times, stack traces, slow network requests/responses with headers + bodies, browser metadata, and custom logs. Understanding the impact of your JavaScript code will never be easier!

Enabled React Compiler v1.0 on a production Next.js app. Here’s every warning, breakage, and silent opt-out I documented — and what actually worked.

We built the same app in TanStack Start RSC and Next.js RSC. TanStack shipped 40% less JS and built 4x faster — but Next.js is still the safer production bet.

From RSC vulnerabilities and the Vercel breach to TypeScript 7.0 Beta and AI agents — the nine frontend storylines that defined H1 2026, ranked.

AI tools generate working React code fast, but miss race conditions, empty states, debouncing, and accessibility. Here’s how to catch bugs before production.
Would you be interested in joining LogRocket's developer community?
Join LogRocket’s Content Advisory Board. You’ll help inform the type of content we create and get access to exclusive meetups, social accreditation, and swag.
Sign up now

