Navigation is one of the biggest challenges when sharing code across platforms, particularly between web and mobile. The web relies on URLs to represent the navigation state, whereas mobile apps often use a combination of nested navigation patterns, such as stacks, tabs, modals, and drawers. This difference in navigation patterns can make it difficult to share code across platforms, as developers need to find a way to reconcile these different approaches.

Solito is a library that combines these different approaches into a shared API that developers can use to create a more seamless experience for both web and mobile.
In this guide, we’ll investigate Solito’s features and benefits. We’ll also build a Next.js app and a React Native app with Solito and demonstrate how easily the library enables the navigation code to be shared between web and native apps.
Jump ahead:
The Replay is a weekly newsletter for dev and engineering leaders.
Delivered once a week, it's your curated guide to the most important conversations around frontend dev, emerging AI tools, and the state of modern software.
Solito is a tiny wrapper around React Navigation and Next.js, enabling developers to share navigation code across platforms. Solito helps developers to ensure that the navigation experience is consistent across different platforms. By having a single, unified approach to navigation, developers can simplify their codebase, reduce the amount of duplicated code, and ultimately build better cross-platform apps.
Solito is also built to run in isolation between platforms, using React Navigation on Native and Next.js Router on Web. This approach allows each platform to do what it does best and eliminates the need to import code that is not being used.
Solito takes into account the differences between Web and Native navigation patterns. Web navigation is flat, with one screen mounted at a time, while native navigation patterns are more complex and involve stacked, tabbed, and modal screens that can preserve local state and scroll position.
Solito uses URLs as the source of truth for triggering page changes. It enables developers to create different header, footer, and sidebar UIs for their website and native app, depending on the platform. This allows developers to match their users’ expectations based on the platform they are using rather than trying to make the user experience the same on every platform.
Solito does not get in the way of how developers implement their screens and allows developers to have complete control over their navigation patterns, making it a flexible solution for building cross-platform apps.
In this guide, we’ll build a simple news app using Solito and the Spaceflight News API.
The monorepo includes the following packages:
The folder structure is opinionated and includes the following:
apps folder for entry points for each app
packages folder for shared packages across apps
app folder containing most files for importfeatures folder for organizing code by feature instead of using a screens folderprovider folder containing providers that wrap the app and some no-ops for Webnavigation folder for navigation-related code for React NativeOther folders can also be included inside the packages folder if required.
Run the following command to create a starter monorepo setup with all the configs pre-configured:
npx create-solito-app@latest news-app
Next, let’s create the required API functions to get the data from the Spaceflight News API:
// packages/app/api/news.ts

import { News } from "app/types/news";

const API_URL = `https://api.spaceflightnewsapi.net/v3/articles`

export const getLatestNews = async (): Promise<News[]> => {

    const req = new Request(`${API_URL}`);

    const res = await fetch(req);
    const data = await res.json();

    return data || [];

}

export const getNews = async (id: number): Promise<News> => {

    const req = new Request(`${API_URL}/${id}`);

    const res = await fetch(req);
    const data = await res.json();

    return data || [];

}
Following is the type definition for a single News object:
// packages/app/types/news.ts

export interface News {
    id: number;

    title: string;

    summary: string;

    newsSite: string;

    imageUrl: string;

    url: string;
}
By creating shared UI components inside the packages/ directory, Solito allows us to write our UI code once and use it in both our React Native app and our Next.js website. This is possible because of the monorepo structure, which enables us to share code across apps by organizing it into shared packages.
Next, we’ll create a home screen that will display a list of news items using the <FlatList /> component:
// packages/app/features/home/screen.tsx

import { getLatestNews } from 'app/api/news'
import { News } from 'app/types/news'
import { Text, useSx, View, H1, P, Row, A, FlatList, H2, Image } from 'dripsy'
import { useEffect, useState } from 'react'
import { ListRenderItem, Platform } from 'react-native'
import { TextLink } from 'solito/link'

export function HomeScreen() {
  const sx = useSx()

  const [latestNews, setLatestNews] = useState<News[]>([])

  useEffect(() => {
    getLatestNews().then((data) => {
      setLatestNews(data)
    })
  }, [])

  const renderItem: ListRenderItem<News> = ({ item }) => (
    <View sx={{ paddingHorizontal: 16, marginBottom: 20 }}>
      <View
        sx={{
          padding: 16,
          borderWidth: 1,
          borderColor: '#ddd',
          borderRadius: 8,
        }}
      >
        {item.imageUrl && (
          <View sx={{ minHeight: 300, marginBottom: 16 }}>
            <Image
              source={{ uri: item.imageUrl }}
              height={400}
              width={800}
              resizeMode={'cover'}
              alt={item.title}
              sx={{ flex: 1, borderRadius: 8 }}
            />
          </View>
        )}
        <TextLink href={`latest-news/${item.id}`}>
          <H2 sx={{ color: '#444', fontSize: 18 }}>{item.title}</H2>
        </TextLink>
      </View>
    </View>
  )

  return (
    <View>
      {Platform.OS === 'web' && (
        <View sx={{ paddingHorizontal: 16 }}>
          <H1 sx={{ marginBottom: 10 }}>Latest News</H1>
        </View>
      )}
      <FlatList
        sx={{ marginTop: 16 }}
        data={latestNews}
        renderItem={renderItem}
        keyExtractor={(item: News) => item.id}
      />
    </View>
  )
}
The HomeScreen component, which is located inside the packages/app/screens file, is an example of a shared UI component that can be used by both a native app and a website. This approach helps to reduce code duplication and makes it easier to maintain a project over time.
In the above code, the <TextLink /> component imported from Solito is a drop-in replacement for the Next.js <Link /> component.
Next, we’ll create a screen for displaying additional details about the new article:
// packages/app/features/latest-news/detail-screen.tsx

import { getNews } from 'app/api/news'
import { News } from 'app/types/news'
import { View, Text, Image, H1, P, Pressable } from 'dripsy'
import { useEffect, useState } from 'react'
import { createParam } from 'solito'
import { Link, TextLink } from 'solito/link'

const { useParam } = createParam<{ id: string }>()

export function NewsDetailScreen() {
  const [id] = useParam('id')

  const [data, setData] = useState<News>()

  useEffect(() => {
    if (id) getNews(Number(id)).then((news) => setData(news))
  }, [id])

  if (!data) return <></>

  return (
    <View sx={{ flex: 1, padding: 16 }}>
      <View
        sx={{
          borderWidth: 1,
          borderColor: '#ddd',
          borderRadius: 8,
          padding: 16,
        }}
      >
        {data.imageUrl && (
          <View sx={{ minHeight: 300, marginBottom: 10 }}>
            <Image
              source={{ uri: data.imageUrl }}
              height={400}
              width={800}
              resizeMode={'cover'}
              alt={data.title}
              sx={{ flex: 1, borderRadius: 8 }}
            />
          </View>
        )}

        <H1 sx={{ color: '#444', fontSize: 22, marginBottom: 10 }}>
          {data.title}
        </H1>
        <P>{data.summary}</P>
        <P> - by {data.newsSite}</P>
      </View>
      <View sx={{ marginTop: 10 }}>
        <Link href="/">
          <Pressable
            sx={{
              backgroundColor: '#000',
              padding: 10,
              width: 100,
              borderRadius: '8px',
              alignItems: 'center',
              justifyContent: 'center',
            }}
          >
            <Text sx={{ color: '#fff' }}>Go Home</Text>
          </Pressable>
        </Link>
      </View>
    </View>
  )
}
Similar to the <TextLink /> component, Solito’s <Link /> component (shown in the above code) is a drop-in replacement for the Next.js <Link /> component.
Solito’s useParam hook is a utility that can be used to read screen parameters on both Next.js and React Native platforms. This hook can read query parameters as well as dynamic route parameters. For example, a Next.js dynamic route might have a structure like /latest-news/[id].tsx, and useParam('id') could be used to access its value.
On the native side, the useParam hook can read React Navigation params for the corresponding screen. Additionally, it allows us to update the parameter, using query parameters on both web and React state for iOS/Android.
To add a screen as a Next.js page in Solito, we simply create .tsx file inside the apps/next/pages directory and import the shared screen component we need from the packages/app/features directory:
// apps/next/pages/index.tsx

import { HomeScreen } from 'app/features/home/screen'

export default HomeScreen


// apps/next/pages/latest-news/[id].tsx

import { NewsDetailScreen } from 'app/features/latest-news/detail-screen'

export default NewsDetailScreen
Now we can open our terminal and use the following command to run the Next.js app in a development environment:
> npm run web
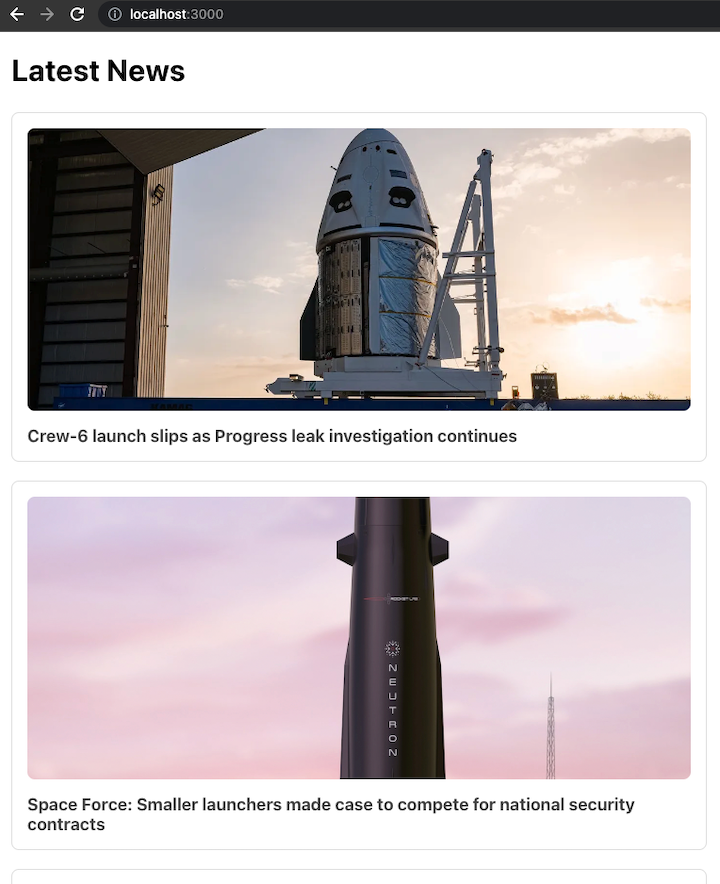
Here’s the resulting webpage:

Now that the app is up and running on the web, let’s set up the screens for the native platform.
Open packages/app/navigation/native/index.tsx file and add the screens in the navigation stack using the <Stack.Screen /> component. The name prop is especially important, since it will be used by Solito to map the URL with the screen name:
// packages/app/navigation/native/index.tsx

import { createNativeStackNavigator } from '@react-navigation/native-stack'

import { HomeScreen } from '../../features/home/screen'
import { NewsDetailScreen } from '../../features/latest-news/detail-screen'

const Stack = createNativeStackNavigator<{
  home: undefined
  'user-detail': {
    id: string
  }
}>()

export function NativeNavigation() {
  return (
    <Stack.Navigator
      screenOptions={{
        headerStyle: {
          backgroundColor: '#000',
        },
        headerTitleStyle: {
          color: '#fff',
        },
      }}
    >
      <Stack.Screen
        name="home"
        component={HomeScreen}
        options={{
          title: 'Latest News',
        }}
      />
      <Stack.Screen
        name="user-detail"
        component={NewsDetailScreen}
        options={{
          title: 'News',
        }}
      />
    </Stack.Navigator>
  )
}
React Navigation’s linking feature enables us to map a URL to a native screen:
// packages/app/provider/navigation/index.tsx

import { DefaultTheme, NavigationContainer } from '@react-navigation/native'
import * as Linking from 'expo-linking'
import { useMemo } from 'react'

export function NavigationProvider({
  children,
}: {
  children: React.ReactNode
}) {
  return (
    <NavigationContainer
      theme={{
        ...DefaultTheme,
        colors: {
          ...DefaultTheme.colors,
          background: '#fff',
        },
      }}
      linking={useMemo(
        () => ({
          prefixes: [Linking.createURL('/')],
          config: {
            initialRouteName: 'home',
            screens: {
              home: '',
              'news-detail': 'news/:id',
            },
          },
        }),
        []
      )}
    >
      {children}
    </NavigationContainer>
  )
}
The linking.config.screens property maps the screen name to the URL:
screens: {
  home: '',
  'news-detail': 'news/:id',
}
At this point, the native setup is complete.
We can start the Expo server by running the following command:
> npm run native
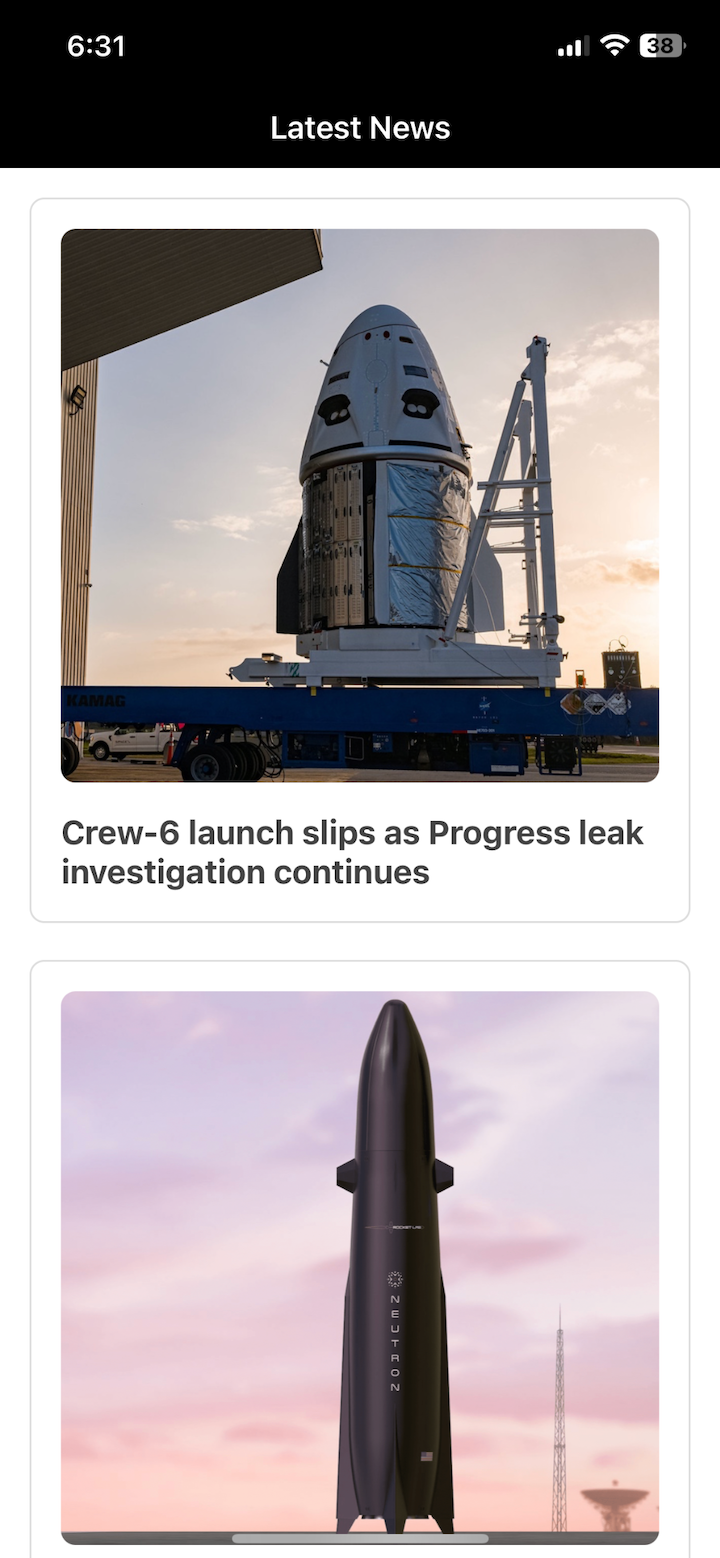
Here’s the resulting page:

Solito is a must-have tool for any developer building cross-platform apps with Next.js and React Native. It offers a unified API for navigation, with all the features of Next.js useRouter and Link, plus additional utilities like useParam. With Solito, you can easily transition your React Native app into a Next.js site and vice versa without sacrificing the native navigation experience.

LogRocket's Galileo AI watches sessions for you and and surfaces the technical and usability issues holding back your React Native apps.
LogRocket also helps you increase conversion rates and product usage by showing you exactly how users are interacting with your app. LogRocket's product analytics features surface the reasons why users don't complete a particular flow or don't adopt a new feature.
Start proactively monitoring your React Native apps — try LogRocket for free.

@container scroll-state: Replace JS scroll listeners nowCSS @container scroll-state lets you build sticky headers, snapping carousels, and scroll indicators without JavaScript. Here’s how to replace scroll listeners with clean, declarative state queries.

Explore 10 Web APIs that replace common JavaScript libraries and reduce npm dependencies, bundle size, and performance overhead.

Russ Miles, a software development expert and educator, joins the show to unpack why “developer productivity” platforms so often disappoint.

Discover what’s new in The Replay, LogRocket’s newsletter for dev and engineering leaders, in the February 18th issue.
Hey there, want to help make our blog better?
Join LogRocket’s Content Advisory Board. You’ll help inform the type of content we create and get access to exclusive meetups, social accreditation, and swag.
Sign up now