Why would anyone want to collect more data when there is so much already? Even though the magnitude of information is alarmingly large, you often find yourself looking for data that is unique to your needs.
For example, what would you do if you wanted to collect info on the history of your favorite basketball team or your favorite ice cream flavor?
Enterprise data collection is essential in the day-to-day life of a data scientist because the ability to collect actionable data on trends of the modern-day means possible business opportunities.
In this tutorial, you’ll learn about web crawling via a simple online store.
Let’s review basic HTML anatomy. Nearly all websites on the Internet are built using the combination of HTML and CSS code (including JavaScript, but we won’t talk about it here).
Below is a sample HTML code with some critical parts annotated.
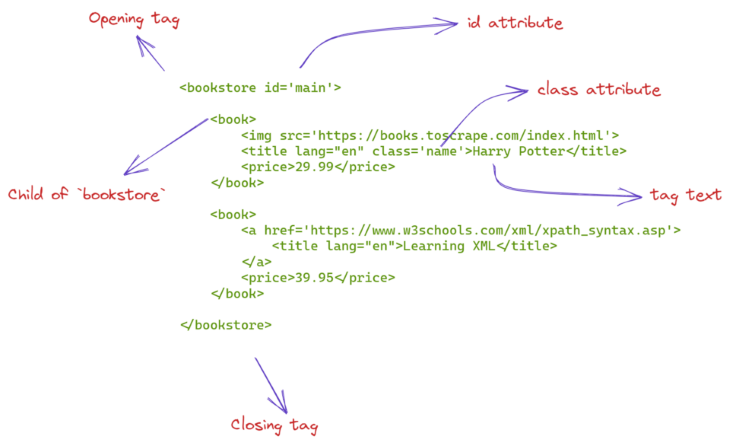
The HTML code on the web will be a bit more complicated than this, however. It will be nearly impossible to just look at the code and figure out what it’s doing. For this reason, we will learn about more sophisticated tools to make sense of massive HTML pages, starting with XPath syntax.
The whole idea behind web scraping is to use automation to extract information from the massive sea of HTML tags and their attributes. One of the tools, among many, to use in this process is using XPath.
XPath stands for XML path language. XPath syntax contains intuitive rules to locate HTML tags and extract information from their attributes and texts. For this section, we will practice using XPath on the HTML code you saw in the above picture:
sample_html = """
<bookstore id='main'>

   <book>
       <img src='https://books.toscrape.com/index.html'>
       <title lang="en" class='name'>Harry Potter</title>
       <price>29.99</price>
   </book>

   <book>
       <a href='https://www.w3schools.com/xml/xpath_syntax.asp'>
           <title lang="en">Learning XML</title>
       </a>
       <price>39.95</price>
   </book>

</bookstore>
"""
To start using XPath to query this HTML code, we will need a small library:
pip install lxml
LXML allows you to read HTML code as a string and query it using XPath. First, we will convert the above string to an HTML element using the fromstring function:
from lxml import html

source = html.fromstring(sample_html)

>>> source
<Element bookstore at 0x1e612a769a0>
>>> type(source)
lxml.html.HtmlElement
Now, let’s write our first XPath code. We will select the bookstore tag first:
>>> source.xpath("//bookstore")
[<Element bookstore at 0x1e612a769a0>]
Simple! Just write a double forward slash followed by a tag name to select the tag from anywhere of the HTML tree. We can do the same for the book tag:
>>> source.xpath("//book")
[<Element book at 0x1e612afcb80>, <Element book at 0x1e612afcbd0>]
As you can see, we get a list of two book tags. Now, let’s see how to choose an immediate child of a tag. For example, let’s select the title tag that comes right inside the book tag:
>>> source.xpath("//book/title")
[<Element title at 0x1e6129dfa90>]
We only have a single element, which is the first title tag. We didn’t choose the second tag because it is not an immediate child of the second book tag. But we can replace the single forward slash with a double one to choose both title tags:
>>> source.xpath("//book//title")
[<Element title at 0x1e6129dfa90>, <Element title at 0x1e612b0edb0>]
Now, let’s see how to choose the text inside a tag:
>>> source.xpath("//book/title[1]/text()")
['Harry Potter']
Here, we are selecting the text inside the first title tag. As you can see, we can also specify which of the title tags we want using brackets notation. To choose the text inside that tag, just follow it with a forward slash and a text() function.
Finally, we look at how to locate tags based on their attributes like id, class, href, or any other attribute inside <>. Below, we will choose the title tag with the name class:
>>> source.xpath("//title[@class='name']")
[<Element title at 0x1e6129dfa90>]
As expected, we get a single element. Here are a few examples of choosing other tags using attributes:
>>> source.xpath("//*[@id='main']")  # choose any element with id 'main'
[<Element bookstore at 0x1e612a769a0>]
>>> source.xpath("//title[@lang='en']")  # choose a title tag with 'lang' attribute of 'en'.
[<Element title at 0x1e6129dfa90>, <Element title at 0x1e612b0edb0>]
I suggest you look at this page to learn more about XPath.
For this tutorial, we will be scraping this online store’s computers section:
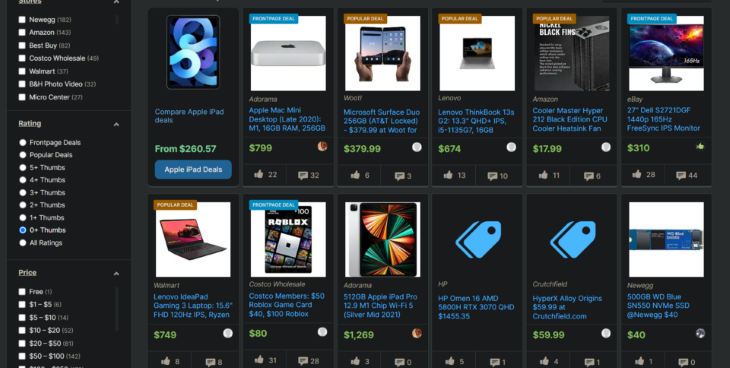
We will be extracting every item’s name, manufacturer, and price. To make things easier, we will create a class with these attributes:
class StoreItem:
   """
   A general class to store item data concisely.
   """

   def __init__(self, name, price, manufacturer):
       self.name = name
       self.price = price
       self.manufacturer = manufacturer
Let’s initialize the first item manually:
item1 = StoreItem("Lenovo IdeaPad", 749, "Walmart")
Now, let’s get down to the serious business. To scrape the website, we will need its HTML source. Achieving this requires using another library:
pip install requests
Requests allow you to send HTTPS requests to websites and, of course, get back the result with their HTML code. It is as easy as calling its get method and passing the webpage address:
import requests

HOME_PAGE = "https://slickdeals.net/computer-deals/?page=1"
>>> requests.get(HOME_PAGE)
<Response [200]>
If the response comes with a 200 status code, the request was successful. To get the HTML code, we use the content attribute:
r = requests.get(HOME_PAGE)

source = html.fromstring(r.content)

>>> source
<Element html at 0x1e612ba63b0>
Above, we are converting the result to an LXML compatible object. As we probably repeat this process a few times, we will convert it into a function:
def get_source(page_url):
   """
   A function to download the page source of the given URL.
   """
   r = requests.get(page_url)
   source = html.fromstring(r.content)

   return source
source = get_source(HOME_PAGE)

>>> source
<Element html at 0x1e612d11770>
But, here is a problem — any website contains tens of thousands of HTML code, which makes visual exploration of the code impossible. For this reason, we will turn to our browser to figure out which tags and attributes contain the information we want.
After loading the page, right-click anywhere on the page and choose Inspect to open developer tools:

Using the selector arrow, you can hover over and click on parts of the page to find out the element below the cursor and figure out their associated attributes and info. It will also change the bottom window to move to the location of the selected element.
As we can see, all stored items are within li elements, with a class attribute containing the words fpGridBox grid. Let’s choose them using XPath:
source = get_source(HOME_PAGE)

li_list = source.xpath("//li[contains(@class, 'fpGridBox grid')]")
>>> len(li_list)
28
Because the class names are changing, we are using part of the class name that is common in all li elements. As a result, we have selected 28 li elements, which you can double-check by counting them on the web page itself.
Now, let’s start extracting the item details from the li elements. Let’s first look at how to find the item’s name using the selector arrow:
The item names are located inside tags with class names that contain the itemTitle keyword. Let’s select them with XPath to make sure:
item_names = [
   li.xpath(".//a[@class='itemTitle bp-p-dealLink bp-c-link']") for li in li_list
]

>>> len(item_names)
28
As expected, we got 28 item names. This time, we are using chained XPath on li elements, which requires starting the syntax with a dot. Below, I will write the XPath for other item details using the browser tools:
li_xpath = "//li[contains(@class, 'fpGridBox grid')]"  # Choose the `li` items

names_xpath = ".//a[@class='itemTitle bp-p-dealLink bp-c-link']/text()"
manufacturer_xpath = ".//*[contains(@class, 'itemStore bp-p-storeLink')]/text()"
price_xpath = ".//*[contains(@class, 'itemPrice')]/text()"
We have everything we need to scrape all the items on the page. Let’s do it in a loop:
li_list = source.xpath(li_xpath)

items = list()
for li in li_list:
   name = li.xpath(names_xpath)
   manufacturer = li.xpath(manufacturer_xpath)
   price = li.xpath(price_xpath)

   # Store inside a class
   item = StoreItem(name, price, manufacturer)
   items.append(item)
>>> len(items)
28
We now have all items on this page. However, if you scroll down, you’ll see the Next button, indicating that there are more items to scrape. We don’t want to visit all pages manually one by one because there can be hundreds.
But if you pay attention to the URL when we click on the Next button every time:

The page number changes at the end. Now, I’ve checked that there are 22 pages of items on the website. So, we will create a simple loop to iterate through the pagination and repeat the scraping process:
from tqdm.notebook import tqdm  # pip install tqdm

# Create a list to store all
items = list()
for num in tqdm(range(1, 23)):
   url = f"https://slickdeals.net/computer-deals/?page={num}"
   source = get_source(url)  # Get HTML code

   li_list = source.xpath(li_xpath)

   for li in li_list:
       name = clean_text(li.xpath(names_xpath))
       manufacturer = clean_text(li.xpath(manufacturer_xpath))
       price = clean_text(li.xpath(price_xpath))

       # Store inside a class
       item = StoreItem(name, price, manufacturer)
       items.append(item)
I am also using the tqdm library, which displays a progress bar when wrapped around an iterable:
Let’s check how many items we have:
>>> len(items)
588
588 computers! Now, let’s store the items we have into a CSV file.
To store the data, we will use the Pandas library to create a DataFrame and save it to a CSV:
import pandas as pd

df = pd.DataFrame(
   {
       "name": [item.name for item in items],
       "price": [item.price for item in items],
       "manufacturer": [item.manufacturer for item in items],
   }
)

df.head()
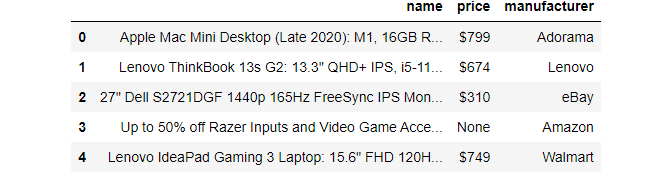
There you go! Let’s finally save it to a file:
df.to_csv("data/scaped.csv", index=False)
This tutorial was a straightforward example of how to use a web crawler in Python. While mastering the tools you learned today will be more than enough for most of your scraping needs, you may need a few additional tools for particularly nasty websites.
Specifically, I suggest you learn about BeautifulSoup if you don’t feel like learning XPath syntax, as BeautifulSoup offers an OOP approach to querying the HTML code.
For websites that require logging in or changes dynamically using JavaScript, you should learn one of the best libraries in Python , Selenium. Finally, for enterprise web scraping, there is Scrapy, which covers pretty much every aspect there is to web scraping. Thanks for reading!
Install LogRocket via npm or script tag. LogRocket.init() must be called client-side, not
server-side
$ npm i --save logrocket

// Code:

import LogRocket from 'logrocket';
LogRocket.init('app/id');
// Add to your HTML:

<script src="https://cdn.lr-ingest.com/LogRocket.min.js"></script>
<script>window.LogRocket && window.LogRocket.init('app/id');</script>

Explore why npm dependencies are a major supply chain security risk and how to protect JavaScript apps from compromised packages and transitive threats.

Enabled React Compiler v1.0 on a production Next.js app. Here’s every warning, breakage, and silent opt-out I documented — and what actually worked.

We built the same app in TanStack Start RSC and Next.js RSC. TanStack shipped 40% less JS and built 4x faster — but Next.js is still the safer production bet.

From RSC vulnerabilities and the Vercel breach to TypeScript 7.0 Beta and AI agents — the nine frontend storylines that defined H1 2026, ranked.
Would you be interested in joining LogRocket's developer community?
Join LogRocket’s Content Advisory Board. You’ll help inform the type of content we create and get access to exclusive meetups, social accreditation, and swag.
Sign up now

