Tauri is a set of tools that lets you build cross-platform desktop apps using frontend frameworks. When combined with React and Vite, it can be used to build extremely fast binaries for all desktop platforms.

Developers can use Tauri to write secure, lean, and fast cross-platform desktop apps with web technologies. Electron has for many developers typically been the go-to framework for these apps, but Tauri is now well-positioned to compete.
In this post, we will build a simple pomodoro timer, and I invite you to follow along with this tutorial at your own pace.
The Replay is a weekly newsletter for dev and engineering leaders.
Delivered once a week, it's your curated guide to the most important conversations around frontend dev, emerging AI tools, and the state of modern software.
It is “blazingly fast” (their words, not mine; but follow the link to see benchmarks and decide for yourself) because it uses Rust as its backend (vs. Node), produces smaller binaries, and is more secure than Node is.
It uses the WebView that the underlying OS provides to render the application’s UI — this is one of the reasons why the application binaries are smaller (as compared to Electron). The WRY library from the Tauri toolkit provides a unified interface to interact with WebViews provided by different operating systems. The WRY library uses the Tao crate for cross-platform window management.
Tauri brings it all together and enables developers to write powerful and performant desktop applications.
Before we get started, we need to install a couple of things.
To install Rust, open your terminal and run:
curl --proto '=https' --tlsv1.2 -sSf https://sh.rustup.rs | sh
If you are on Windows, please follow these instructions.
npm is a package manager for Node. It comes bundled with Node, so if you have Node installed on your system, you are likely to have npm as well.
If you don’t have Node, install it using Homebrew,
brew install node
With npm and Rust installed, we are all set to start developing apps using Tauri!
Since the prerequisites are now installed, we can start developing our pomodoro timer desktop app. The folks at Tauri have made scaffolding an app super easy with the create-tauri-app npm package.
To get started, run:
npx create-tauri-app
After running this command, you will be required to enter some information:
For this tutorial app, I went with the following, found below 👇
pomodoroPomodoro Timer Appcreate-vitereact-ts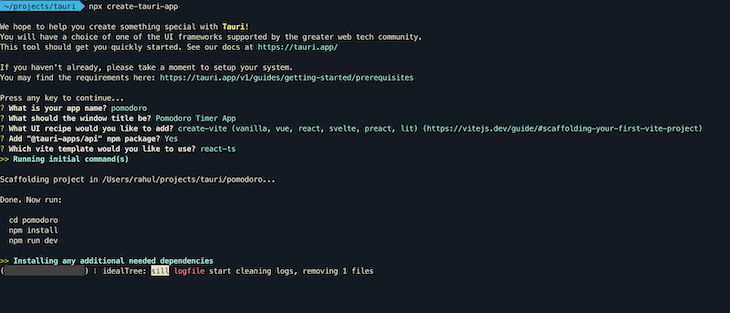
Hitting “Enter” will then install all the necessary packages and output a scaffolded project under the folder with the same name as the project name.
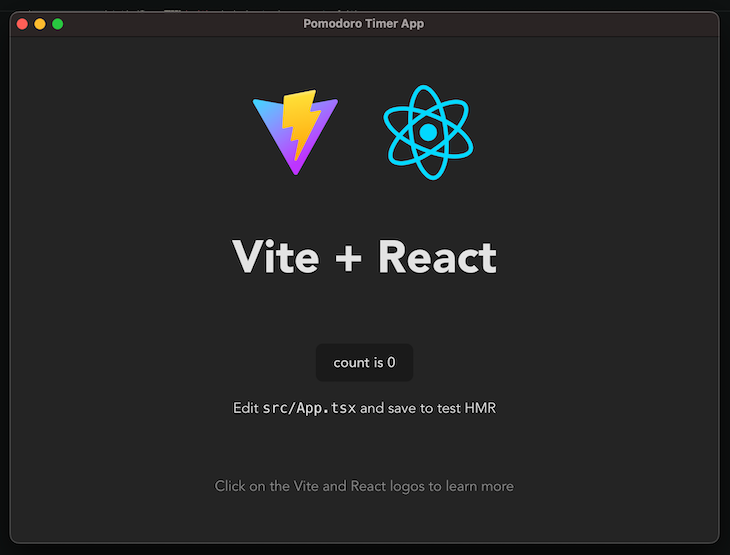
We are now all set to run the project for the very first time!
To run the project, run:
cd pomodoro // cding into the project folder
npm run tauri dev //running the app
This will first start the frontend server and then will download crates (if necessary) and compile the Rust backend. Once compiled without any errors, the app will start and you will be greeted with something like this:
The project folder contains a lot of important files and folders. The two that we will deal with in this tutorial are:
src foldersrc-tauri/tauri.config.json fileRunning the app for the first time will take some time because the app needs to download and compile the necessary rust crates.
(Note: for folks using macOS for development: if you run the command to start the app and the app window appears over a full-screen app, you won’t be able to move the app window. This is a known bug and can be tracked here)
We will use ChakraUI for UI components and styling. To set up ChakraUI, follow their getting started guide.
We will be building the UI below.
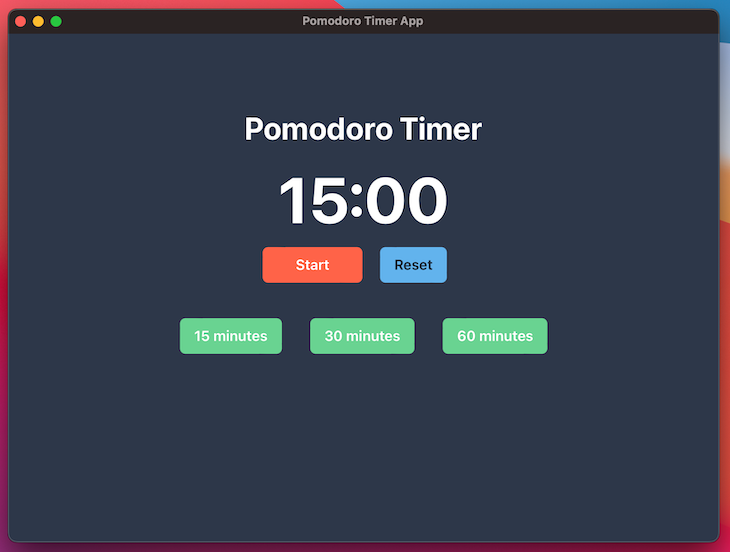
Below are the requirements for our app:
To start, head over to src/App.tsx.
// src/App.tsx
import { Button, Flex, Text } from "@chakra-ui/react";
import { useEffect, useState } from "react";

function App() {
  const [time, setTime] = useState(0);
  const [timerStart, setTimerStart] = useState(false);
  const buttons = [
    {
      value: 900,
      display: "15 minutes",
    },
    {
      value: 1800,
      display: "30 minutes",
    },
    {
      value: 3600,
      display: "60 minutes",
    },
  ];
  const toggleTimer = () => {
    setTimerStart(!timerStart);
  };
  useEffect(() => {
    const interval = setInterval(() => {
      if (timerStart) {
        if (time > 0) {
          setTime(time - 1);
        } else if (time === 0) {
          // TODO: Send notification to user.
          clearInterval(interval);
        }
      }
    }, 1000);
    return () => clearInterval(interval);
  }, [timerStart, time]);
  return (
    <div className="App" style={{ height: "100%" }}>
      <Flex
        background="gray.700"
        height="100%"
        alignItems="center"
        flexDirection="column"
      >
        <Text color="white" fontWeight="bold" marginTop="20" fontSize="35">
          Pomodoro Timer
        </Text>
        <Text fontWeight="bold" fontSize="7xl" color="white">
          {`${
            Math.floor(time / 60) < 10
              ? `0${Math.floor(time / 60)}`
              : `${Math.floor(time / 60)}`
          }:${time % 60 < 10 ? `0${time % 60}` : time % 60}`}
        </Text>
        <Flex>
          <Button
            width="7rem"
            background="tomato"
            color="white"
            onClick={toggleTimer}
          >
            {!timerStart ? "Start" : "Pause"}
          </Button>
          {/* TODO: Add Button to reset timer */}
        </Flex>
        <Flex marginTop={10}>
          {buttons.map(({ value, display }) => (
            <Button
              marginX={4}
              background="green.300"
              color="white"
              onClick={() => {
                setTimerStart(false);
                setTime(value);
              }}
            >
              {display}
            </Button>
          ))}
        </Flex>
      </Flex>
    </div>
  );
}
export default App;
Here, we are using ChakraUI’s built-in components for setting up the layout for buttons and text. The setTimeout in the useEffect Hook drives the UI by setting state every passing second.
The effect reruns:
timerStart and time state values)timerStart state value)setTimeout triggers an update to the time value, see line number 29)To display the time in consistent format (mm:ss), we need to do some math gymnastics. It’s certainly not perfect, but it does the job.
There are two to-dos here:
But, before we start working on these items, we need to add the native APIs we will be calling in the src-tauri/tauri.config.json file. If we don’t do this step, we won’t be able to trigger the native elements.
So, head over to src-tauri/tauri.config.json and add this to tauri.allowlist:
  "tauri": {
    "allowlist": {
      // other allowed items
      "notification": {
        "all": true
      },
      "dialog": {
        "all": true
      }
    }
  }
(Note: for the sake of simplicity, everything is allowed for dialog and notification. We can be more specific to avoid unwanted access)
// src/App.tsx
import { Button, Flex, Text } from "@chakra-ui/react";
import { useEffect, useState } from "react";
+ import { sendNotification } from "@tauri-apps/api/notification";
+ import { ask } from "@tauri-apps/api/dialog";
function App() {
  const [time, setTime] = useState(0);
  const [timerStart, setTimerStart] = useState(false);
  const buttons = [
    {
      value: 900,
      display: "15 minutes",
    },
    {
      value: 1800,
      display: "30 minutes",
    },
    {
      value: 3600,
      display: "60 minutes",
    },
  ];
  const toggleTimer = () => {
    setTimerStart(!timerStart);
  };
+ const triggerResetDialog = async () => {
+   let shouldReset = await ask("Do you want to reset timer?", {
+     title: "Pomodoro Timer App",
+     type: "warning",
+   });
+   if (shouldReset) {
+     setTime(900);
+     setTimerStart(false);
+   }
+ };
  useEffect(() => {
    const interval = setInterval(() => {
      if (timerStart) {
        if (time > 0) {
          setTime(time - 1);
        } else if (time === 0) {
+         sendNotification({
+           title: `Time's up!`,
+           body: `Congrats on completing a session!🎉`,
+         });
          clearInterval(interval);
        }
      }
    }, 1000);
    return () => clearInterval(interval);
  }, [timerStart, time]);
  return (
    <div className="App" style={{ height: "100%" }}>
      <Flex
        background="gray.700"
        height="100%"
        alignItems="center"
        flexDirection="column"
      >
        <Text color="white" fontWeight="bold" marginTop="20" fontSize="35">
          Pomodoro Timer
        </Text>
        <Text fontWeight="bold" fontSize="7xl" color="white">
          {`${
            Math.floor(time / 60) < 10
              ? `0${Math.floor(time / 60)}`
              : `${Math.floor(time / 60)}`
          }:${time % 60 < 10 ? `0${time % 60}` : time % 60}`}
        </Text>
        <Flex>
          <Button
            width="7rem"
            background="tomato"
            color="white"
            onClick={toggleTimer}
          >
            {!timerStart ? "Start" : "Pause"}
          </Button>
+         <Button
+           background="blue.300"
+           marginX={5}
+           onClick={triggerResetDialog}
+         >
+           Reset
+         </Button>
        </Flex>
        <Flex marginTop={10}>
          {buttons.map(({ value, display }) => (
            <Button
              marginX={4}
              background="green.300"
              color="white"
              onClick={() => {
                setTimerStart(false);
                setTime(value);
              }}
            >
              {display}
            </Button>
          ))}
        </Flex>
      </Flex>
    </div>
  );
}
export default App;
Tauri offers a JS/TS API package for calling functions from the Rust backend. The necessary packages are already installed by the create-tauri-app utility, so we can directly import the npm package and use it in our frontend code.
For triggering a notification:
sendNotification function from the notification moduleFor triggering a dialog:
ask function from the dialog moduleawait it to get the value the user clicked onFinally, to run the app, run npm run tauri dev.
Building the application for distribution can be achieved by running:
cargo tauri build
This will build the application and create a binary under src-tauri/target/release.
Now, the app is ready to be published!
That’s it! Thank you for reading my walkthrough on building an app using Tauri with Vite and React. If you have any questions/suggestions feel free to reach out to me on Twitter @rahulnpadalkar. You can find the GitHub repo with all the code here.
Install LogRocket via npm or script tag. LogRocket.init() must be called client-side, not
server-side
$ npm i --save logrocket

// Code:

import LogRocket from 'logrocket';
LogRocket.init('app/id');
// Add to your HTML:

<script src="https://cdn.lr-ingest.com/LogRocket.min.js"></script>
<script>window.LogRocket && window.LogRocket.init('app/id');</script>

Learn how sibling-index() enables clean, JavaScript-free stagger animations using native CSS.

useEffect breaks AI streaming responses in ReactSee why useEffect breaks AI streaming in React, and how moving stream state outside React fixes flicker and stale updates.

A real-world debugging session using Claude to solve a tricky Next.js UI bug, exploring how AI helps, where it struggles, and what actually fixed the issue.

CSS wasn’t built for dynamic UIs. Pretext flips the model by measuring text before rendering, enabling accurate layouts, faster performance, and better control in React apps.
Hey there, want to help make our blog better?
Join LogRocket’s Content Advisory Board. You’ll help inform the type of content we create and get access to exclusive meetups, social accreditation, and swag.
Sign up now

