In this article, we will learn what native UI components are and how to build and use them in React Native.

Native UI components are the way to go if you want to convert your existing native Java or Objective-C component to a React Native component while reusing your native code logic.
Ready? Let’s get started.
React Native is a JavaScript framework created and maintained by Facebook used for developing natively rendered mobile applications. It is based on React, a JavaScript library for building user interfaces for web browsers.
React Native is not just limited to mobile apps. We can also develop macOS and Windows desktop applications with React Native, with the help of third-party libraries like react-native-windows.
Under the hood, React Native uses native components like UIView and UIImageView in iOS and exports them to the JavaScript layer. We use these components in our daily development process.
For example, when we use the View component in JSX, we are consuming UIView from iOS in our JavaScript code. Similarly, for the Image component, we use the UIImage component from iOS, so that all the components we use in React Native have a native declaration.
React Native already wraps all the major and widely used UI components, such as ScrollView, Button, and Switch.
But what about components that are not already wrapped, or, if we want to reuse a custom native component that we’ve built for a native app? Well, we can wrap those components to create our native UI component.
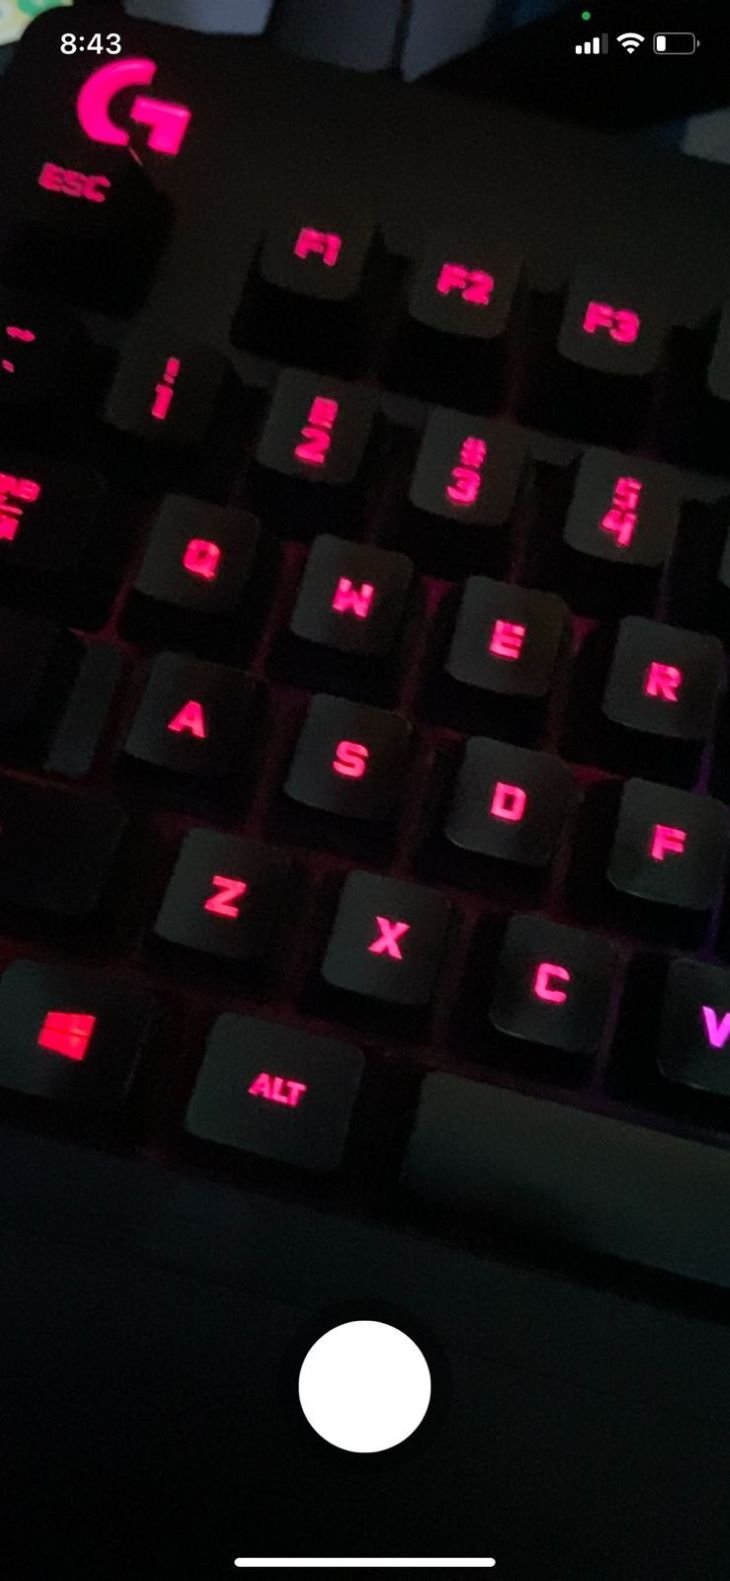
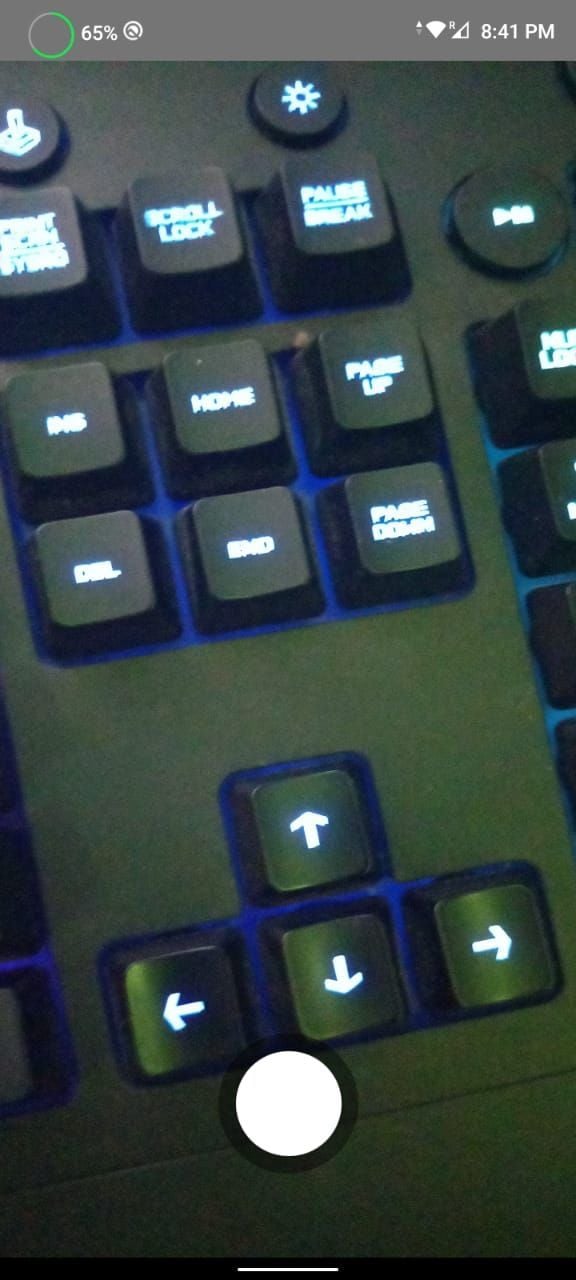
In this article, we’ll create a native UI component called CameraView that renders a live camera feed from the device camera to the UI. It will also capture images from the camera and save them to a user’s device. You can see the full repo here.
We will be creating a UI similar to the given below:
If you are here just to see the code then you can check it out here.
First, we need to create a bare React Native project. Open your terminal and change the current working directory to your preferred folder. There, type this command to create a new React Native project:
react-native init <your-project-name>
Or, if you want to create a project with a specific version of React Native, you can do so by adding a version flag with the version in command:
react-native init <your-project-name> --version 0.63.0
Now, go into the directory of the new project we just created so we can install pods for the iOS application:
cd ios
pod install
Now, let’s run the app!
We will run our app through XCode and Android studio. Go to the iOS directory of your project in finder with the below step:
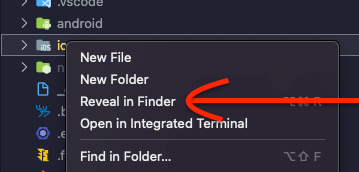
Inside the iOS directory, you will see a <your-project-name>.xc workspace file. Open it.

If you have connected your iOS device correctly to your system, you should see your device name in the XCode window. To run the app on your device, select your device and click the play button to build and run the app.
After the build is successful, you will see some boilerplate UI in your application. Now, we need to run the application on an Android device.
Open your Android project in Android studio follow these steps:


Once the app runs, you’ll see a UI similar to the one in iOS, which is the default boilerplate code for React Native projects.
We’ve now successfully run our app on both iOS and Android.
To create a common native UI component for both Android and iOS, we need to modify two files from JavaScript:
App.jsCameraView.jsFirst, remove the boilerplate JS and JSX code in App.js.
import React from 'react';
import { View, StyleSheet } from 'react-native';

const App = () => {
  return (
    <View style={styles.container} />
  );
};

const styles = StyleSheet.create({
  flex: 1,
  backgroundColor: 'white'
});

export default App;
For now, this is the only code that we need to change. Let’s write from Java code to create the CameraView component for Android.
According to React Native’s official documentation, there are five steps to creating an Android UI component:
ViewManager subclasscreateViewInstance method@ReactProp (or @ReactPropGroup) annotation. Note: we will not be using thesecreateViewManagers of the applications packageSeems easy, right?
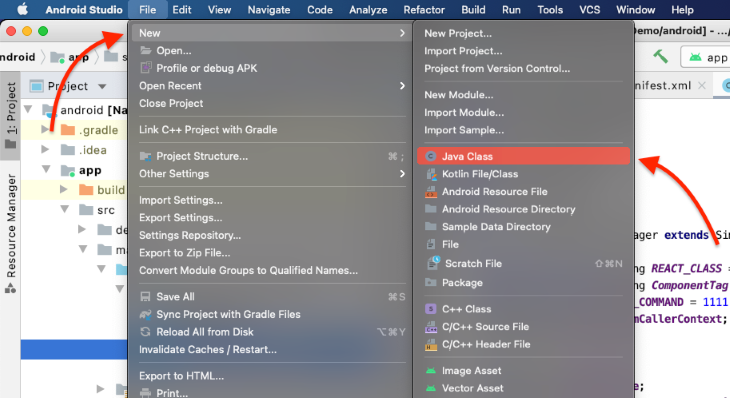
Now, switch to the Android Studio window, where we’ll create a Java class that extends the ViewManger subclass. In our case, we’ll use the SimpleViewManager class with a type of TextureView, which we will use to render our camera feed.
Click File, New, then Java Class in the sub-menu:
You will then be prompted to fill in the class name of the new Java class.
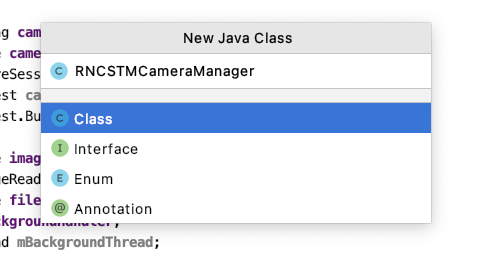
Type in RNCSTMCameraManager inside the file name and press Enter. Now that we have a fresh Java class, we need to extend it with the SimpleViewManager class.
We’ll create a view from it to use it in React Native, and we’ll need to give it a name in the getName() method so we can access this view from JavaScript.
Here’s what your RNCSTMCameraManager.java file will look like:
/** All the imports will be here */

public class RNCSTMCameraManager extends SimpleViewManager<TextureView> {

    public static final String REACT_CLASS = "RNCSTMCamera";
    public static final String ComponentTag = "RNCSTMCamera";
    ReactApplicationContext mCallerContext;
    TextureView textureView;

    public RNCSTMCameraManager(ReactApplicationContext reactContext) {
        mCallerContext = reactContext;
        textureView = new TextureView(reactContext);
    }

    @Override
    public String getName() {
        return REACT_CLASS;
    }
}
We’ve added four global variables:
REACT_CLASS: the name with which our component will be accessed in JS code. In this case, we have named it RNCSTMCameraComponentTag: A tag name used to print in logs to easily track and debug our codemCallerContext: In Android, a context is used to access various underlying native features. To access these features, we need a context called ReactApplicationContexttextureView: The view which we will return to JavaScript, and this is the view where our live camera feed will be displayedWe now need to implement the createViewInstance method, which is responsible for returning a View that we’ll display on the UI.
@Override
public TextureView createViewInstance(ThemedReactContext context) {
    return textureView;
}
Our native UI component will render a TextureView, but we have not added any properties or styles to it, so it will appear as a blank white screen.
TextureViewNow, we need to access the device camera and return the live feed in TextureView, as well as add the image capture feature. But before proceeding, we need to make some changes to our AndroidManifest.xml file. We need permissions to:
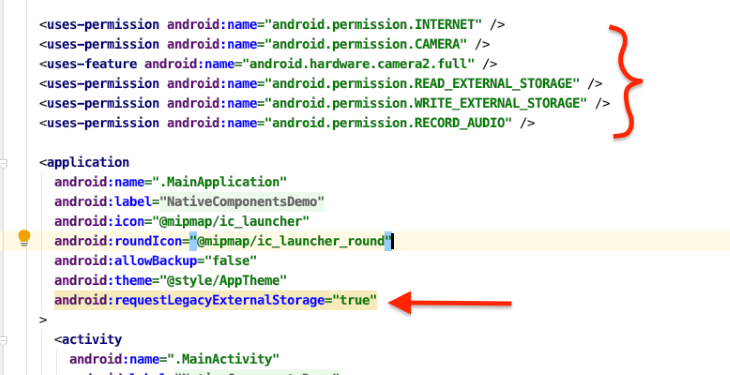
LegacyExternalStorage filesLet’s add these permissions inside the manifest tag of AndroidManifest.xml.
<uses-permission Android:name="Android.permission.CAMERA" />
<uses-feature Android:name="Android.hardware.camera2.full" />
<uses-permission Android:name="Android.permission.READ_EXTERNAL_STORAGE" />
<uses-permission Android:name="Android.permission.WRITE_EXTERNAL_STORAGE" />
<uses-permission Android:name="Android.permission.RECORD_AUDIO" />
Then add this property to the application tag:
Android:requestLegacyExternalStorage="true"
Our AndroidManifest.xml file should look like this now.
After we’ve implemented these changes, we need to write the logic to access the device camera and return its feed in TextureView to be able to capture an image and save it.
The file will look like this:
/** All the imports will go here */

public class RNCSTMCameraManager extends SimpleViewManager<TextureView> {

    public static final String REACT_CLASS = "RNCSTMCamera";
    public static final String ComponentTag = "RNCSTMCamera";
    public final int CAPTURE_COMMAND = 1111;
    ReactApplicationContext mCallerContext;
    TextureView textureView;

    public String cameraId;
    CameraDevice cameraDevice;
    CameraCaptureSession cameraCaptureSession;
    CaptureRequest captureRequest;
    CaptureRequest.Builder captureRequestBuilder;

    private Size imageDimensions;
    private ImageReader imageReader;
    private File file;
    Handler mBackgroundHandler;
    HandlerThread mBackgroundThread;

    TextureView.SurfaceTextureListener textureListener = new TextureView.SurfaceTextureListener() {
        @Override
        public void onSurfaceTextureAvailable(@NonNull SurfaceTexture surface, int width, int height) {
            try {
                openCamera();
            } catch (CameraAccessException e) {
                Log.d(ComponentTag, "Error in onSurfaceTextureAvailable:"+e);
            }
        }

        @Override
        public void onSurfaceTextureSizeChanged(@NonNull SurfaceTexture surface, int width, int height) {

        }

        @Override
        public boolean onSurfaceTextureDestroyed(@NonNull SurfaceTexture surface) {
            return false;
        }

        @Override
        public void onSurfaceTextureUpdated(@NonNull SurfaceTexture surface) {

        }
    };

    public RNCSTMCameraManager(ReactApplicationContext reactContext) {
        mCallerContext = reactContext;
        textureView = new TextureView(reactContext);
        if(checkCameraHardware(reactContext))  getCameraPermissions(reactContext);
    }

    @Override
    public String getName() {
        return REACT_CLASS;
    }

    /** Check if this device has a camera */
    private boolean checkCameraHardware(Context context) {
        if (context.getPackageManager().hasSystemFeature(PackageManager.FEATURE_CAMERA)){
            // this device has a camera
            return true;
        } else {
            // no camera on this device
            return false;
        }
    }

    private void getCameraPermissions(Context context) {
        if (ContextCompat.checkSelfPermission(context, Manifest.permission.CAMERA)
                == PackageManager.PERMISSION_DENIED){
            ActivityCompat.requestPermissions(mCallerContext.getCurrentActivity(), new String[] {Manifest.permission.CAMERA}, 100);
        }
    }

    private final CameraDevice.StateCallback stateCallback = new CameraDevice.StateCallback() {
        @Override
        public void onOpened(@NonNull CameraDevice camera) {
            cameraDevice = camera;
            try {
                createCameraPreview();
            } catch (CameraAccessException e) {
                Log.d(ComponentTag, "Error in onOpened:"+e);
            }
        }

        @Override
        public void onDisconnected(@NonNull CameraDevice camera) {
            cameraDevice.close();
        }

        @Override
        public void onError(@NonNull CameraDevice camera, int error) {
            cameraDevice.close();
            cameraDevice = null;
        }
    };

    private void createCameraPreview() throws CameraAccessException {
        SurfaceTexture surfaceTexture = textureView.getSurfaceTexture();
        surfaceTexture.setDefaultBufferSize(imageDimensions.getWidth(),imageDimensions.getHeight());
        Surface surface = new Surface(surfaceTexture);
        captureRequestBuilder = cameraDevice.createCaptureRequest(CameraDevice.TEMPLATE_PREVIEW);
        captureRequestBuilder.addTarget(surface);

        cameraDevice.createCaptureSession(Arrays.asList(surface), new CameraCaptureSession.StateCallback() {
            @Override
            public void onConfigured(@NonNull CameraCaptureSession session) {
                if(cameraDevice == null) return;
                cameraCaptureSession = session;
                try {
                    updatePreview();
                } catch (CameraAccessException e) {
                    e.printStackTrace();
                }
            }

            @Override
            public void onConfigureFailed(@NonNull CameraCaptureSession session) {
                Log.d(ComponentTag, "onConfigure failed");
            }
        }, null);
    }

    private void updatePreview() throws CameraAccessException {
        if(cameraDevice == null) return;
        captureRequestBuilder.set(CaptureRequest.CONTROL_MODE, CameraMetadata.CONTROL_MODE_AUTO);
        cameraCaptureSession.setRepeatingRequest(captureRequestBuilder.build(),null, mBackgroundHandler);
    }

    private  void openCamera() throws CameraAccessException {
        Log.d(ComponentTag, "Open Camera was called from onSurface Available");
        CameraManager cameraManager = (CameraManager) mCallerContext.getSystemService(Context.CAMERA_SERVICE);
        cameraId = cameraManager.getCameraIdList()[1];
        CameraCharacteristics cameraCharacteristics = cameraManager.getCameraCharacteristics(cameraId);
        StreamConfigurationMap map = cameraCharacteristics.get(CameraCharacteristics.SCALER_STREAM_CONFIGURATION_MAP);
        imageDimensions = map.getOutputSizes(SurfaceTexture.class)[0];

        if(ActivityCompat.checkSelfPermission(mCallerContext, Manifest.permission.CAMERA) != PackageManager.PERMISSION_GRANTED){
            ActivityCompat.requestPermissions(mCallerContext.getCurrentActivity(), new String[] { Manifest.permission.CAMERA }, 101);
        }
        if(ActivityCompat.checkSelfPermission(mCallerContext, Manifest.permission.WRITE_EXTERNAL_STORAGE) != PackageManager.PERMISSION_GRANTED){
            ActivityCompat.requestPermissions(mCallerContext.getCurrentActivity(), new String[] { Manifest.permission.WRITE_EXTERNAL_STORAGE }, 101);
        }

        cameraManager.openCamera(cameraId, stateCallback,null);
    }

    @Override
    public TextureView createViewInstance(ThemedReactContext context) {
        textureView.setSurfaceTextureListener(textureListener);
        return textureView;
    }

    private void takePicture() throws CameraAccessException {
        Log.d(ComponentTag, "takePicture is initiated!");
        if(cameraDevice == null) return;
        CameraManager cameraManager = (CameraManager) mCallerContext.getSystemService(Context.CAMERA_SERVICE);
        CameraCharacteristics cameraCharacteristics = cameraManager.getCameraCharacteristics(cameraDevice.getId());
        Size[] jpegSizes = null;
        jpegSizes = cameraCharacteristics.get(CameraCharacteristics.SCALER_STREAM_CONFIGURATION_MAP).getOutputSizes(ImageFormat.JPEG);
        int width = 1080;
        int height = 1440;
        if(jpegSizes != null & jpegSizes.length > 0){
            width = jpegSizes[0].getWidth();
            height = jpegSizes[0].getHeight();
        }

        ImageReader imageReader = ImageReader.newInstance(width, height, ImageFormat.JPEG, 1);
        List<Surface> outputSurfaces = new ArrayList<>(2);
        outputSurfaces.add(imageReader.getSurface());
        outputSurfaces.add(new Surface(textureView.getSurfaceTexture()));
        final CaptureRequest.Builder captureRequestBuilder = cameraDevice.createCaptureRequest(CameraDevice.TEMPLATE_STILL_CAPTURE);
        captureRequestBuilder.addTarget(imageReader.getSurface());
        captureRequestBuilder.set(CaptureRequest.CONTROL_MODE, CameraMetadata.CONTROL_MODE_AUTO);

        Long timeStampInLong = System.currentTimeMillis();
        String timeStamp = timeStampInLong.toString();

        file = new File(Environment.getExternalStoragePublicDirectory(Environment.DIRECTORY_DCIM)+"/"+timeStamp+".jpg");
        ImageReader.OnImageAvailableListener readerListener = new ImageReader.OnImageAvailableListener() {
            @Override
            public void onImageAvailable(ImageReader reader) {
                Image image = null;
                image = reader.acquireLatestImage();
                ByteBuffer byteBuffer = image.getPlanes()[0].getBuffer();
                byte[] bytes = new byte[byteBuffer.capacity()];
                byteBuffer.get(bytes);
                try {
                    saveImageBytes(bytes);
                } catch (IOException e) {
                    e.printStackTrace();
                }finally {
                    if(image != null) image.close();
                }
            }
        };
        imageReader.setOnImageAvailableListener(readerListner, mBackgroundHandler);

        final  CameraCaptureSession.CaptureCallback captureCallback = new CameraCaptureSession.CaptureCallback() {
            @Override
            public void onCaptureCompleted(@NonNull CameraCaptureSession session, @NonNull CaptureRequest request, @NonNull TotalCaptureResult result) {
                super.onCaptureCompleted(session, request, result);
                Log.d(ComponentTag, "Image is saved!");
                new AlertDialog.Builder(mCallerContext.getCurrentActivity())
                        .setTitle("Photo Saved!")
                        .setMessage("The photo has been successfully saved to your Photos Gallery.")
                        .setPositiveButton("👍", null)
                        .setIcon(Android.R.drawable.ic_menu_gallery)
                        .show();
                try {
                    createCameraPreview();
                } catch (CameraAccessException e) {
                    e.printStackTrace();
                }
            }
        };

        cameraDevice.createCaptureSession(outputSurfaces, new CameraCaptureSession.StateCallback() {
            @Override
            public void onConfigured(@NonNull CameraCaptureSession session) {
                try {
                    session.capture(captureRequestBuilder.build(), captureCallback, mBackgroundHandler);
                } catch (CameraAccessException e) {
                    e.printStackTrace();
                }
            }

            @Override
            public void onConfigureFailed(@NonNull CameraCaptureSession session) {

            }
        }, mBackgroundHandler);
    }

    private void saveImageBytes(byte[] bytes) throws IOException {
        OutputStream outputStream = null;
        outputStream = new FileOutputStream(file);
        outputStream.write(bytes);
        outputStream.close();
    }

    /**
     * Map the "captureImage" command to an integer
     */
    @Nullable
    @Override
    public Map<String, Integer> getCommandsMap() {
        return MapBuilder.of("captureImage", CAPTURE_COMMAND);
    }

    /**
     * Handle "captureImage" command called from JS
     */
    @Override
    public void receiveCommand(@NonNull TextureView root, String commandId, @Nullable ReadableArray args) {
        super.receiveCommand(root, commandId, args);
        int reactNativeViewId = args.getInt(0);
        int commandIdInt = Integer.parseInt(commandId);

        switch (commandIdInt) {
            case CAPTURE_COMMAND:
                try {
                    takePicture();
                } catch (CameraAccessException e) {
                    e.printStackTrace();
                }
                break;
            default: {}
        }
    }
}
You can download the full source code here.
Notice we’ve added boilerplate code to access the camera and also included the getCommandsMap() and receiveCommand() functions. These are the functions used to track if we have received any command in the native UI component.
When they receive a certain command, they execute a particular logic. Think of it similar to Redux, when we receive a TYPE then dispatch an ACTION to execute specific logic.
Here, when we receive the CAPTURE_COMMAND, we call the takePicture() method to capture an image and save it to a user’s photo gallery.
Let’s register our viewManager next. First, create a package file that implements ReactPackage and will return an instance of our RNCSTMCameraManager through its createViewManagers method.
Now, export it to JavaScript code using the getPackages() method of MainApplication.java.
Create an RNCSTMCameraManagerPackage.java file using the same process we used to create the RNCSTMCameraManager.java file. After creating it, add the following code:
/** Imports will be here */

public class RNCSTMCameraManagerPackage implements ReactPackage {

    @NonNull
    @Override
    public List<NativeModule> createNativeModules(@NonNull ReactApplicationContext reactContext) {
        List<NativeModule> nativeModules = new ArrayList<>();
        return nativeModules;
    }

    @Override
    public List<ViewManager> createViewManagers(
            ReactApplicationContext reactContext) {
        return Arrays.<ViewManager>asList(
                new RNCSTMCameraManager(reactContext)
        );
    }
}
Now, add the package to the getPackages() method of MainApplication.java:
@Override
protected List<ReactPackage> getPackages() {
  @SuppressWarnings("UnnecessaryLocalVariable")
  List<ReactPackage> packages = new PackageList(this).getPackages();
  // Packages that cannot be autolinked yet can be added manually here, for example:
   packages.add(new RNCSTMCameraManagerPackage()); // Add this line to add our package
  return packages;
}
🎉 That’s it! We’ve successfully created an Android native UI component.
Let’s access it in our JavaScript code. Go to VSCode, open App.js, and add this code:
import React, { useRef } from 'react';
import {
  findNodeHandle,
  Platform,
  Pressable,
  StyleSheet,
  UIManager,
  View
} from 'react-native';
import { CameraView } from './CameraView';

const App = () => {
  const componentRef = useRef(null);
  const dispatchCaptureCommand = () => {
        UIManager?.dispatchViewManagerCommand(
          findNodeHandle(componentRef?.current),
          UIManager?.RNCSTMCamera?.Commands?.captureImage?.toString(),
          [findNodeHandle(componentRef?.current)],
        )
  };
  return (
    <View style={styles.container}>
      <CameraView ref={componentRef} style={styles.cameraView} />
      <View style={styles.captureBtnContainer}>
        <Pressable style={styles.captureBtn} onPress={dispatchCaptureCommand} />
      </View>
    </View>
  );
};

const styles = StyleSheet.create({
  container: {
    flex: 1,
    backgroundColor: 'white',
  },
  cameraView: {
    flex: 1,
  },
  captureBtnContainer: {
    backgroundColor: '#0006',
    position: 'absolute',
    bottom: 60,
    alignSelf: 'center',
    alignItems: 'center',
    justifyContent: 'center',
    height: 100,
    width: 100,
    borderRadius: 60,
  },
  captureBtn: {
    height: 75,
    width: 75,
    borderRadius: 37.5,
    backgroundColor: '#fff',
  },
});

export default App;
You can see we have used a CameraView component that we’re importing from CameraView.
Create a new JS file in the same directory and name it CameraView.js, then paste the following:
import {requireNativeComponent} from 'react-native';

const CameraView = requireNativeComponent('RNCSTMCamera');

export {CameraView};
We are accessing our native Android UI component using requireNativeComponent from React Native and exporting it as CameraView.
Our JavaScript side implementation is also finished for Android. You can now test the application by running on your Android device using Android studio.
According to official documentation, we’ll need to complete these steps to create an iOS native UI component:
RCTViewManager to create a manager for the componentRCT_EXPORT_MODULE() marker macro-(UIView *)view methodSimilar to Android, we also need to create a manager for our component that will extend the RCTViewManager class. We’ll export it through the RCT_EXPORT_MODULE() marker macro. -(UIView *)view is the method that returns what to display in the UI.
We will create two types of files in iOS for exporting our native UI component to JS code:
UIViewFor both files, we will have two files: an .h (header) file and an .m (implementation) file.
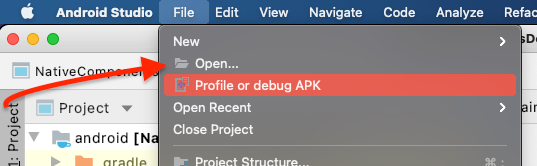
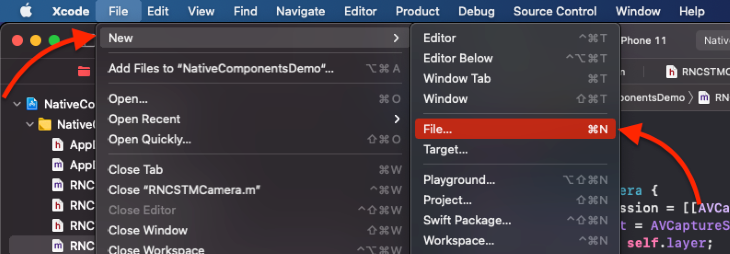
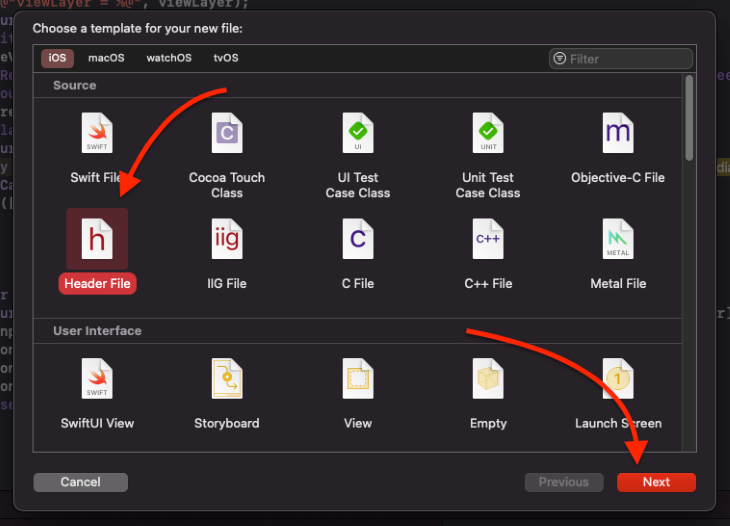
Switch to the XCode window. Click on File in the title bar, then New, then File in the sub-menu.
Set the source type to Header File and click Next in the Choose template dialog.
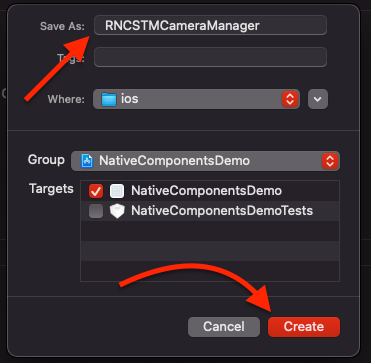
Save the file as RNCSTMCameraManager and click Create.
Add the below code to RNCSTMCameraManager.h.
#import "AVFoundation/AVFoundation.h"
#import <React/RCTViewManager.h>

@interface RNCSTMCameraManager : RCTViewManager

@end
In this file, we have just declared the class RNCSTMCameraManager, which extends RCTViewManager. Its implementation will be in the .m file.
To create RNCSTMCameraManager.m, follow the same steps that we followed for creating the header file but select the type of source code to Objective-C.
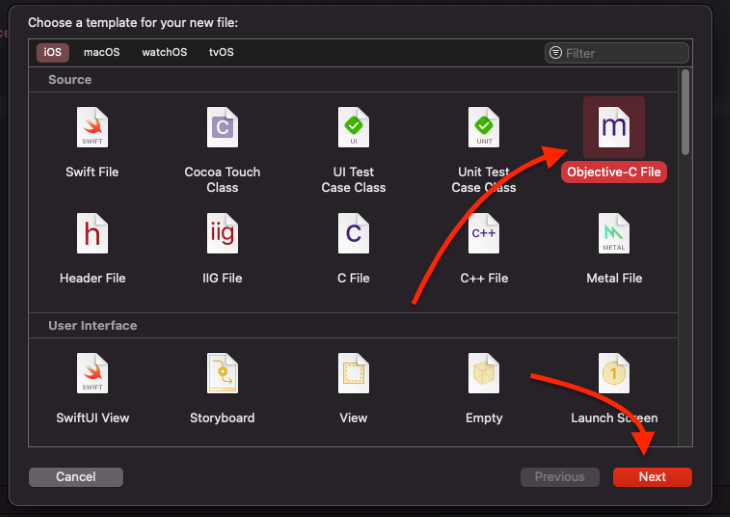
Save as RNCSTMCameraManager, click Next, and then add the app target and click Create.
Add the following code:
#import "RNCSTMCameraManager.h"
#import "RNCTSTMCamera.h"
#import "React/RCTUIManager.h"
#import "React/RCTLog.h"

@implementation RNCSTMCameraManager

RCT_EXPORT_MODULE(RNCSTMCamera)

- (UIView *)view
{
  return [[RNCSTMCamera alloc] initWithFrame:CGRectMake(UIScreen.mainScreen.bounds.origin.x,
    UIScreen.mainScreen.bounds.origin.y,
    UIScreen.mainScreen.bounds.size.width,
    UIScreen.mainScreen.bounds.size.height)];
}

+ (BOOL)requiresMainQueueSetup {
    return YES;
}

@end
We tell JavaScript that we can access this class using RNCSTMCamera in the RCT_EXPORT_MODULE marker macro, and return an instance of the RNCSTMCamera class inside the view method, which returns a UIView.
We’ve also added a requiresMainQueueSetup method, which will run our component on the main thread.
You will also notice that we are returning an RNCSTMCamera class that we haven’t created yet, so let’s do so. Create a .h header file named RNCSTMCamera for the declarations of the RNCSTMCamera class and add the following code to it:
#import "UIKit/UIKit.h"
#import "AVFoundation/AVFoundation.h"

@interface RNCSTMCamera : UIView

@property (strong, nullable) AVCapturePhotoOutput *photoOutput;

@end
We’ve added the photoOutput property of type AVCapturePhotoOutput, which is used to capture photos.
Now, let’s create an implementation of this class. Follow the same steps to create an Objective-C implementation (.m) file and name this file RNCSTMCamera. To access the device camera and return its live feed, add this code:
#import "RNCTSTMCamera.h"
#import "AVFoundation/AVFoundation.h"

@implementation RNCSTMCamera

- (instancetype)initWithFrame:(CGRect)frame
{
  _photoOutput = [[AVCapturePhotoOutput alloc] init];
  self = [super initWithFrame:frame];
  if (self) {
    NSLog(@"RNCSTMCamera was initialized in init with Frame");
    [self initializeCamera];
  }
  return self;
}

- (void) initializeCamera {
  AVCaptureSession *session = [[AVCaptureSession alloc] init];
  session.sessionPreset = AVCaptureSessionPresetHigh;
  CALayer *viewLayer = self.layer;
  AVCaptureVideoPreviewLayer *captureVideoPreviewLayer = [[AVCaptureVideoPreviewLayer alloc] initWithSession:session];
  captureVideoPreviewLayer.frame = CGRectMake(UIScreen.mainScreen.bounds.origin.x,UIScreen.mainScreen.bounds.origin.y,UIScreen.mainScreen.bounds.size.width,UIScreen.mainScreen.bounds.size.height);
  [captureVideoPreviewLayer setVideoGravity:AVLayerVideoGravityResizeAspectFill];
  [self.layer addSublayer:captureVideoPreviewLayer];
  AVCaptureDevice *device = nil;
  NSArray *devices = [AVCaptureDevice devicesWithMediaType:AVMediaTypeVideo];
  for(AVCaptureDevice *camera in devices) {
      if([camera position] == AVCaptureDevicePositionFront) {
          device = camera;
          break;
      }
  }
  NSError *error = nil;
  AVCaptureDeviceInput *input = [AVCaptureDeviceInput deviceInputWithDevice:device error:&error];
  if (!input) NSLog(@"ERROR: trying to open camera: %@", error);
  [session addInput:input];
  [session addOutput:_photoOutput];
  [session startRunning];
  [self setClipsToBounds:true];
}

@end
When we call initWithFrame, we call the initializeCamera method, which starts an AVCaptureSession. We then create an AVCaptureVideoPreviewLayer and initialize it with AVCaptureSession.
Once the AVCaptureVideoPreviewLayer is ready, then we add AVCaptureVideoPreviewLayer as a sublayer to our root UIView and set the AVCaptureDevice to the front camera.
Next, we create an AVCaptureDeviceInput object that decides which feed to display in the session, then add photoOutput as an output to the session for capturing the photo from the device camera. Finally, we start the session.
To access the camera and be able to write in a user’s photo library, we need to add the following permissions to the info.plist file:

To receive the capture photo command, open RNCSTMCameraManager.m and add the following:
RCT_EXPORT_METHOD(captureImage: (nonnull NSNumber *)viewTag)
{
  [self.bridge.uiManager addUIBlock:^(RCTUIManager *uiManager, NSDictionary<NSNumber *, UIView *> *viewRegistry) {
    RNCSTMCamera *view = viewRegistry[viewTag];

    if ([view isKindOfClass:[UIView class]]) {
      NSLog(@"Capture Command was called");
      [self capturePhoto:view];
    } else {
      RCTLogError(@"view type must be UIView");
    }
  }];
}

-(void) capturePhoto:(RNCSTMCamera*) view{
  AVCapturePhotoSettings *settings = [AVCapturePhotoSettings photoSettingsWithFormat:@{AVVideoCodecKey: AVVideoCodecTypeJPEG}];
  [view.photoOutput capturePhotoWithSettings:settings delegate:self];
}

#pragma mark - AVCapturePhotoCaptureDelegate
- (void)captureOutput:(AVCapturePhotoOutput *)output didFinishProcessingPhoto:(AVCapturePhoto *)photo error:(nullable NSError *)error
{
  NSData *imageData = [photo fileDataRepresentation];
  UIImage *image = [UIImage imageWithData:imageData];
  NSLog(@"image is: %@",image);
  UIImageWriteToSavedPhotosAlbum(image, NULL, NULL, NULL);
  UIAlertView *alert = [[UIAlertView alloc] initWithTitle:@"Photo Saved!" message:@"The Photo has been successfully saved in your photo library." delegate:self cancelButtonTitle:NULL otherButtonTitles:@"👍", nil];
  [alert show];
}
Here, we’ve exported captureImage to JS code, so, when called, it will check for type UIView. Then, we call capturePhoto to capture the image from the photoOutput property of the RNCSTMCamera class.
We’ve also added a macro to override AVCapturePhotoCaptureDelegate, which is triggered when we call captureWithSettings. In this method, we are converting AVCapturePhoto to imageData using fileDataRepresentation. Then, we use that data to create an UIImage and save it to the photo library.
Our final step is to send the command to capture the photo for iOS. Open App.js in VSCode and change the code in dispatchCaptureCommand to the following:
const dispatchCaptureCommand = () => {
  Platform.OS === 'Android'
    ? UIManager?.dispatchViewManagerCommand(
        findNodeHandle(componentRef?.current),
        UIManager?.RNCSTMCamera?.Commands?.captureImage?.toString(),
        [findNodeHandle(componentRef?.current)],
      )
    : UIManager.dispatchViewManagerCommand(
        findNodeHandle(componentRef?.current),
        UIManager.getViewManagerConfig('RNCSTMCamera').Commands.captureImage,
        [],
      );
};
You can see we are using different syntax for sending the command in iOS. This is because there is some different logic for underlying view management in iOS.
Building and using native UI components in React Native can be pretty handy if you are looking to implement a feature for your React Native application that is not supported out of the box. It’s also extremely useful if you’re converting your existing native iOS and Android applications to React Native. Thanks for reading!

LogRocket's Galileo AI watches sessions for you and and surfaces the technical and usability issues holding back your React Native apps.
LogRocket also helps you increase conversion rates and product usage by showing you exactly how users are interacting with your app. LogRocket's product analytics features surface the reasons why users don't complete a particular flow or don't adopt a new feature.
Start proactively monitoring your React Native apps — try LogRocket for free.

Debug RSC hydration mismatches in production with Next.js instrumentation, Suspense isolation, HTML diffing, and CI smoke tests.

Explore why npm dependencies are a major supply chain security risk and how to protect JavaScript apps from compromised packages and transitive threats.

Enabled React Compiler v1.0 on a production Next.js app. Here’s every warning, breakage, and silent opt-out I documented — and what actually worked.

We built the same app in TanStack Start RSC and Next.js RSC. TanStack shipped 40% less JS and built 4x faster — but Next.js is still the safer production bet.
Would you be interested in joining LogRocket's developer community?
Join LogRocket’s Content Advisory Board. You’ll help inform the type of content we create and get access to exclusive meetups, social accreditation, and swag.
Sign up now

