
Location-aware applications, which can simplify locating nearby businesses and services, are becoming more common in modern web development. For example, think of popular apps like Uber and Airbnb. Uber is able to connect a user with the closest driver by implementing a geolocation feature that compares the user’s location with the location of all the drivers in their database.

When implementing the geolocation feature in these types of applications, the bulk of the work lies in coding the location comparison logic that returns a set of results based on some pre-defined criteria. For example, you may return a list of restaurants that are at most 100m away from a user’s current location.
To avoid writing custom logic for this location comparison, we can use Typesense. In this tutorial, we’ll learn firsthand how to use Typesense and make it abstract the location comparison task. We’ll build a simple nearby-hotels web application that lists the hotels closest to a user’s location. Let’s get started!
The Replay is a weekly newsletter for dev and engineering leaders.
Delivered once a week, it's your curated guide to the most important conversations around frontend dev, emerging AI tools, and the state of modern software.
Typesense is a search solution that allows you to integrate search functionality into your project without having to write your own custom search logic. You’re basically outsourcing that component of your project.
When you deploy your code to Heroku, for example, you’re allowing a third-party to handle your infrastructure concerns while you focus on writing code. Similarly, when you use Firebase Authentication in your project, again, you are allowing an external agent to handle your entire authentication logic while you focus on other things.
Typesense uses a similar model. When you add Typesense into your project, you’re allowing Typesense to implement search in your project. Even though the search bar or filter icons for users to submit a query will live in your application, Typesense handles processing the query and returning the desired result.
When a third party implements certain components of your project on your behalf, it is primarily known as the X as a service model, where X is the component being implemented. For example, Heroku runs the compute as a service model because it implements infrastructure on your behalf. Typesense runs the search as a service model, offering an out-of-the-box search solution that you can plug into your project.
Other search as a service offerings include Algolia, Elasticsearch, Amazon Elasticsearch, Azure Search, and more. However, Typesense offers a mix of features that is unparalleled. It is open source, lightweight, ruthlessly fast, and easy to integrate.
You can find the complete source code for this tutorial on GitHub.
There are two steps to using Typesense. First, we’ll create a cluster, which essentially is the space on Typesense where we can store and access our data. Then, we’ll add the data that users would be searching against to the cluster configured in the first step, in our case, a list of hotels.
We’ll create a cluster that will store a list of all the hotels available on our platform. In addition to persisting our data, our cluster would also allow us to retrieve and update our data via REST API endpoints.
We could either launch our cluster using Typesense’s official Docker image or via their cloud service. In this guide, we’ll go with their cloud service because it’s easier to work with in my opinion.
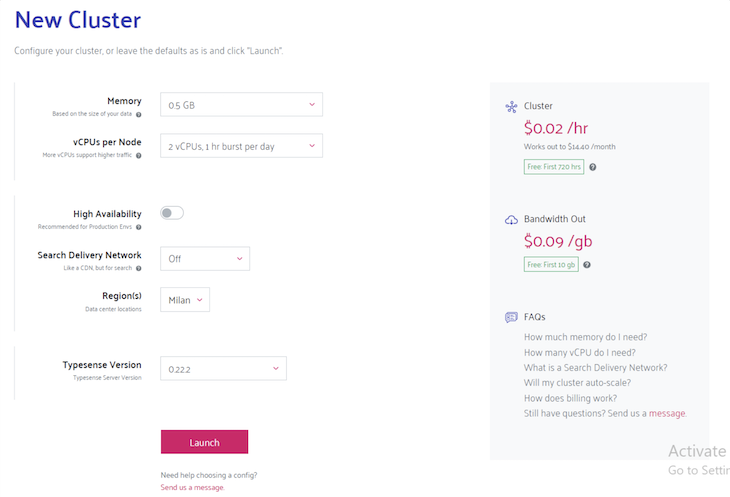
Head over to the Typesense cloud and log in with GitHub. Click the launch button to provision a new cluster. Use the default settings of the cluster, shown in the image below. Spinning up the cluster might take a while, so you can relax and wait for the system to do its thing:
Once the provisioning is done, you should see the content displayed in the image below on your screen. Click the Generate API Keys button at the top, which will download a text file that you need to keep somewhere safe:
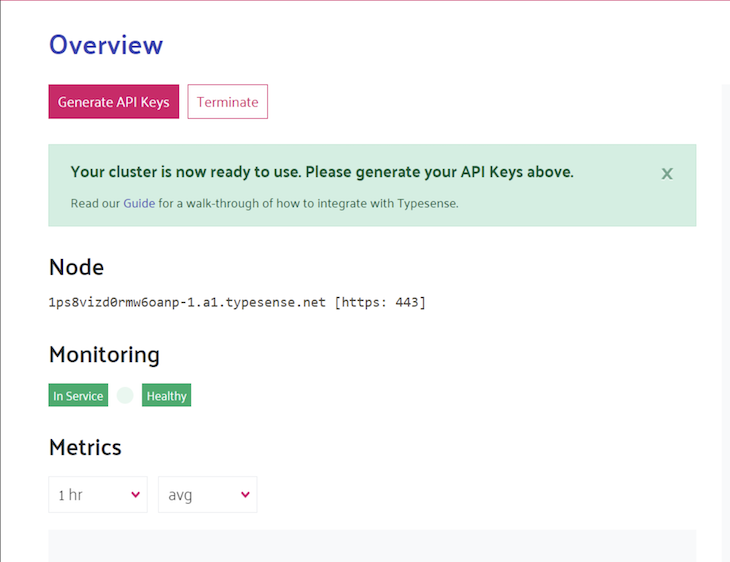
We’ll need the generated API key later. With that, we’re done spinning up our Typesense server.
Let’s initialize a new Vue project. Launch your system’s terminal window and navigate to any directory you wish to create your Vue project in. Run the command vue create nearby-hotels in your terminal. In the command, nearby-hotels is the name of our project, but you could change it to anything you want.
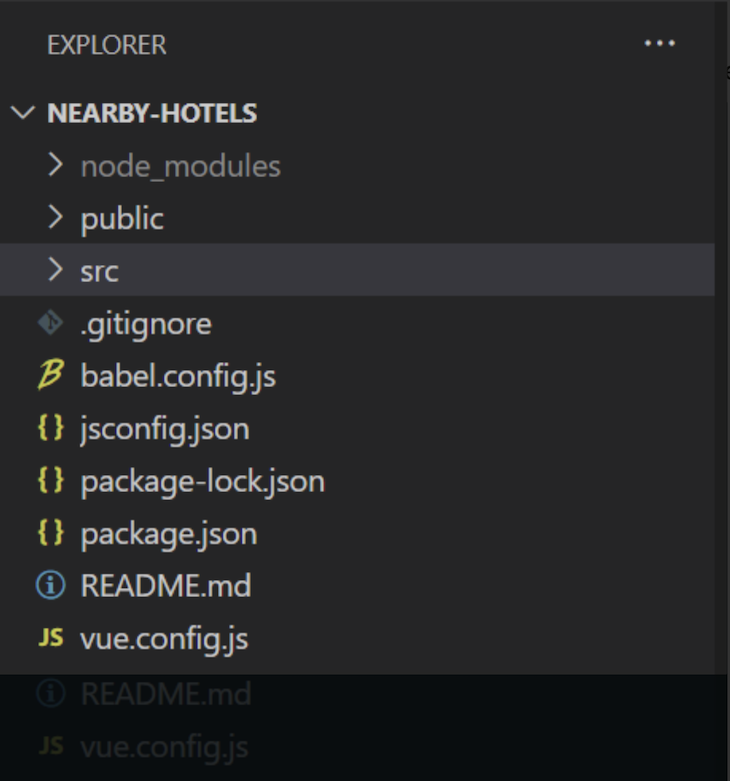
With the command above, you’ll be prompted to configure certain things. Go ahead and select the defaults and add Vue Router to the project. A project with the structure shown in the image below will be generated for you:
Run the command vue run serve in your project’s root directory to fire up Vue’s development server and test things out.
Now that we have our Typesense cluster and our project set up locally, we can add the data we need to our cluster. In terms of search engines, this step is called indexing. We break down our indexing task into three sub-tasks:
To communicate with our Typesense server, we need to create an instance of our Typesense client with our secret keys from the text file we downloaded in a previous step. Install the typesense package by running the command npm i typesense. Then, create a file called typesense.js in your project’s root directory and add the content below to it:
import 'dotenv/config';
import { Client } from 'typesense';

// Create a new client
const client = new Client({
        nodes: [
          {
                        host: "your typesense host here. starts with xxx.a1.typesense.net",
                        port: 443,
                        protocol: "https",
          },
        ],
        apiKey: "your typesense admin key here",
        connectionTimeoutSeconds: 2,
});
export default client;
We’ve used our Typesense credentials to initialize a Typesense client. Because we exported the client, we should be able to access it in any file in our project. We’ll use this client to connect to our Typesense server; it has the methods for all API operations.
Create a hotels.jsonl file in your project’s root directory where we’ll store the list of hotels we want to upload to our Typesense server. Copy the content of this file to your newly created file. Don’t edit the content; just copy and paste it as is.
To upload the prepared data to our Typesense server, we’ll use a script. Go to your project’s root directory, create a new file called indexer.js, and add the code below:
import * as fs from "fs";
import * as readline from "readline";

import client from "./typesense.js";

const hotelsSchema = {
  name: "hotels",
  fields: [
    { name: "hotel_name", type: "string" },
    { name: "address", type: "string" },
    { name: "coordinates", type: "geopoint" },
  ],
};
In Typesense, a group of stored data is called a collection. Each data in a collection is called a document. In our case, we’ll have a collection of hotels, and each hotel in that collection is a document. Note that all the documents in a collection follow the same structure with the same number of fields and field types. To enforce this constraint, we’d need to define the structure of our collection upfront.
We’ll create a collection based on the structure we’ve defined with client.collections().create(hotelsSchema. Next, we read each line from our hotels.json file and create a document based on the content of that line in our Typesense collection with the snippet client.collections('hotels').documents().create(hotelDocument);:
client
  .collections()
  .create(hotelsSchema)
  .then(function () {
    readline
      .createInterface({
        input: fs.createReadStream("hotels.jsonl"),
        terminal: false,
      })
      .on("line", function (line) {
        let hotelDocument = JSON.parse(line);

        client.collections("hotels").documents().create(hotelDocument);
      });
  });
Run the command node indexer.js in your project’s root directory to execute your script. If no error message is shown in your CLI, your script has been successfully executed. To confirm, log into your Typesense dashboard and click on clusters on the navbar. You should see the screen below:
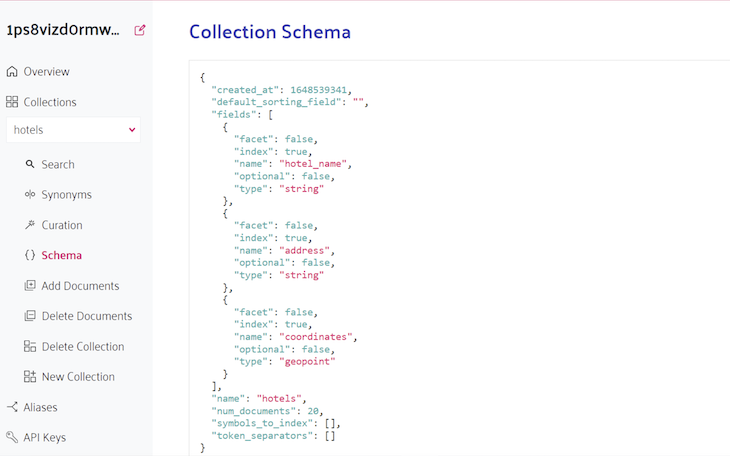
Notice how Typesense reports that we have 20 documents in our hotels collection, which is accurate.
With that, we’re done indexing our data.
To get a fully working UI, we’ll create three Vue components:
HomePage: Our index pageHotel: Used in rendering each hotel to the DOMNearbyHotelsPage: Displays a list of ten hotels closest to the user. The Hotel component will be imported and used in this componentHomePage componentFirst go to public/index.html and add the content below in between the head tags. Do not override the content of the head tag:
<!-- Bootstrap CSS -->
<link
      crossorigin="anonymous"
      href="<https://stackpath.bootstrapcdn.com/bootstrap/4.1.1/css/bootstrap.min.css>"
      integrity="sha384-WskhaSGFgHYWDcbwN70/dfYBj47jz9qbsMId/iRN3ewGhXQFZCSftd1LZCfmhktB"
      rel="stylesheet"
 />

 <link
        rel="stylesheet"
        href="<https://use.fontawesome.com/3b7fb1f2e6.css>"
 />
We import the Bootstrap 4 and Font Awesome libraries from their respective CDNs. Next, delete all the files in src/views and create a HomePage.vue file in that directory with the following content:
<template>
  <div class="container-fluid">
    <div class="row text-center mt-5 mb-5 px-5">
      <div class="col-12 col-md-6 mr-md-auto ml-md-auto">
        <h1>Welcome to Our Nearby Hotels Application</h1>
      </div>
    </div>

    <div class="row text-left mt-5 px-5">
      <div class="col-12 col-md-6 mr-md-auto ml-md-auto">
        <button class="btn-block shadow text-center">
          <div class="text">
            <i class="fa fa-map-marker" aria-hidden="true"></i>
            view nearby hotels
          </div>
        </button>
      </div>
    </div>
  </div>
</template>

<style scoped>
button {
  background-color: #1da462;
  color: white !important;
  font-weight: bold;
  font-size: 1.5rem;
  color: white;
  border: none;
  border-radius: 1rem;
  cursor: pointer;
}
</style>

<script>
export default {
  name: "home-page",
};
</script>
Override the content of src/router/index.js with the content below:
import Vue from "vue";
import VueRouter from "vue-router";
import HomeView from "../views/HomePage.vue";

Vue.use(VueRouter);

const routes = [
  {
    path: "/",
    name: "home",
    component: HomeView,
  },
];

const router = new VueRouter({
  mode: "history",
  base: process.env.BASE_URL,
  routes,
});

export default router;
Override the content of src/App.vue with the content below:
<template>
  <div id="app">
    <router-view />
  </div>
</template>

<style>
#app {
  font-family: Avenir, Helvetica, Arial, sans-serif;
  min-height: 100vh;
  display: flex;
  flex-direction: column;
  justify-content: center;
  align-items: center;
  color: #2c3e50;
}
</style>
Now, run your development server and point your browser to localhost:8080. You should be greeted with the page shown in the image below:
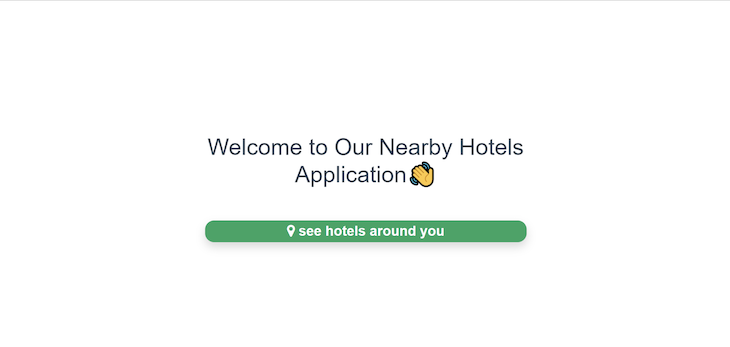
That’s all we need for the HomePage component. Next, we’ll work on our Hotel component.
Hotel componentFirst, delete all the files in src/components and create a Hotel.vue file in that directory with the following content:
<template>
  <div class="m-3">
    <div id="HotelImageBackground">
      <img
        src="../assets/hotel.jpg"
        class="img-fluid"
        :alt="hotel.name + ' image'"
      />
    </div>

    <div class="text-left mt-2">
      <div>
        <span id="hotelName">{{ hotel.hotel_name }}</span>
      </div>
      <div>
        <span id="address" class="mt-0">
          <i class="fa fa-map-marker" aria-hidden="true"></i>
          {{ hotel.address }}
        </span>
      </div>
    </div>
  </div>
</template>

<script>
export default {
  name: "hotel-single",

  props: {
    hotel: {
      type: Object,
      required: true,
    },
  },
};
</script>

<style scoped>
#address {
  font-weight: 400;
  font-size: 0.9rem;
  color: #bfc1c2;
}

#hotelName {
  font-size: 1.2rem;
  font-weight: bolder;
}

#hotelImageBackground {
  height: 300px;
  overflow: hidden;
  display: flex;
  justify-content: center;
  flex-flow: column;
  background-color: #dcdcdc;
}

@media only screen and (max-width: 640px) {
  #hotelName {
    font-size: 1rem;
    font-weight: bold;
  }
  #address {
    font-size: 0.8rem;
    font-weight: 400;
    color: #bfc1c2;
  }
}
</style>
Download the image here and move it to src/assets. We are using the image in the code above. We’ll use this component in the NearbyHotelsPage component that we’ll create soon.
NearbyHotelsPage componentCreate a component called NearbyHotelsPage.vue in src/views with the content below:
<template>
  <div class="container">
    <div class="row text-center mt-5 mb-5 px-5">
      <div class="col-12 col-md-6 mr-md-auto ml-md-auto">
        <h1>Hotels Around You</h1>
        <small>
          <router-link to="/">Back to Home</router-link>
        </small>
      </div>
    </div>

    <div class="row" id="card-wrapper">
      <div
        class="col-md-3 col-12 border shadow-sm m-2"
        v-for="hotel in hotels"
        :key="hotel.document.id"
        id="card"
      >
        <Hotel :hotel="hotel.document" />
      </div>
    </div>
  </div>
</template>

<script>
import Hotel from "@/components/Hotel.vue";
import client from "../../typesense.js";

export default {
  name: "nearby-hotels",

  data() {
    return {
      hotels: [],

      // Lagos, Nigeria Coordinates
      userLatitude: 6.465422,
      userLongitude: 3.406448,

      // New York Coordinates
      // userLatitude: 40.71427,
      // userLongitude: -74.00597,
    };
  },

  components: {
    Hotel,
  },

  methods: {
    getHotels() {
      const searchParams = {
        q: "*",
        query_by: "hotel_name",
        filter_by: `coordinates:(${this.userLatitude}, ${this.userLongitude}, 1000 km)`,
        sort_by: `coordinates(${this.userLatitude}, ${this.userLongitude}):asc`,
      };

      client
        .collections("hotels")
        .documents()
        .search(searchParams)
        .then((results) => {
          console.log(`server response: ${results}`);
          this.hotels = results["hits"];
          console.log(`hotels: ${this.hotels}`);
        })
        .catch((error) => {
          console.log(error);
        });
    },
  },

  mounted() {
    this.getHotels();
  },
};
</script>

<style>
#card-wrapper {
  min-height: 50vh;
  display: flex;
  justify-content: center;
  align-items: center;
}
</style>
Let’s make sense of some things in the component above:
data() {
    return {
      hotels: [],

      // Lagos, Nigeria Coordinates
      userLatitude: 6.465422,
      userLongitude: 3.406448,

      // New York Coordinates
      // userLatitude: 40.71427,
      // userLongitude: -74.00597,
    };
  }
In the data() section of our component, we’ve initialized three variables, userLatitude, UserLongitude, and hotels.
Remember, the goal is to get a list of hotels that are within a certain distance from the user’s location. The userLatitude and userLongitude variables specify the user’s current location.
In production scenarios, we wouldn’t hard code this. The hotels array is where we will store the list of hotels retrieved from Typesense:
const searchParams = {
        q: "*",
        query_by: "hotel_name",
        filter_by: `coordinates:(${this.userLatitude}, ${this.userLongitude}, 1000 km)`,
        sort_by: `coordinates(${this.userLatitude}, ${this.userLongitude}):asc`,
      };
We declared the searchParams variable above in the getHotels() method. We’ll pass searchParams to Typesense, which is how we tell Typesense our query conditions.
For example, the filter_by: coordinates:(${this.userLatitude}, ${this.userLongitude}, 1000 km) in the SearchParams tells Typesense to grab hotels that are within 1000km of the coordinates passed, this.userLatitude and this.userLongitude.
After the filtering is done, the sort_by: coordinates(${this.userLatitude}, ${this.userLongitude}):asc passed in the searchParams tells Typesense to sort the filtered list of hotels in order of how close they are to the user’s coordinates passed to Typesense:
client
        .collections("hotels")
        .documents()
        .search(searchParams)
        .then((results) => {
          console.log(`server response: ${results}`);
          this.hotels = results["hits"];
          console.log(`hotels: ${this.hotels}`);
        })
        .catch((error) => {
          console.log(error);
        });
    },
In the code snippet above, we make our actual call to the Typesense server and store the results in the hotels variable we initially declared.
Everything else in the NearbyHotelsPage component is styling and HTML. However, one thing we need to note is in the code below:
// Lagos, Nigeria Coordinates
userLatitude: 6.465422,
userLongitude: 3.406448,

// New York Coordinates
// userLatitude: 40.71427,
// userLongitude: -74.00597,
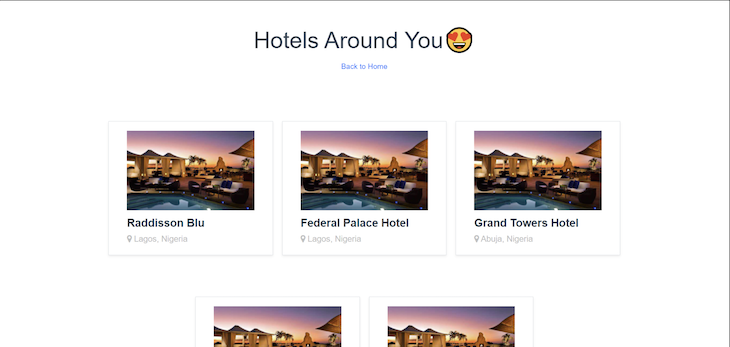
We are currently passing Lagos coordinates as the user’s location. If you fire up your development server with npm run serve and navigate to the nearby-hotels page, you should see a list of hotels in Nigeria, starting with the ones in Lagos, as shown in the image below:
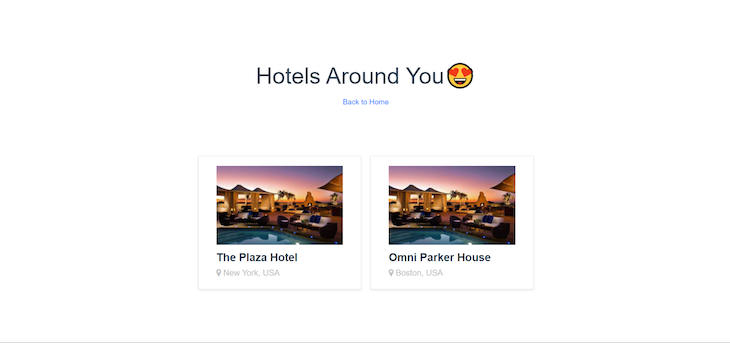
If instead, you choose to use the New York coordinates by commenting out the first set of coordinates, then you should see hotels in the US starting with the ones in New York, as shown in the image below:
Now, we have a working nearby-hotels application. Yay!
There are certain things we did in our basic application that we wouldn’t dare do in an application that would actually be used by people.
The major thing we’d definitely change is how we are handling the user’s coordinates. It is currently hardcoded, but ideally, we’d have some logic that automatically detects and updates the user’s current coordinates.
Next, instead of using a script to index a predefined list of hotels, we’d have a UI through which hotel owners or system admins could add new hotels to our Typesense server. You could either choose to post new hotels directly to Typsense, or you could first send the data to your backend and then create a copy of the data on Typsense.
Lastly, as mentioned earlier, we’d need to keep our secret keys in a .env file for example.
In this guide, we explained how Typesense is fundamentally a search-as-a-service solution, and what search-as-a-service means to begin with. We then proceeded to explore Typesense’s geolocation feature by building a basic nearby-hotels web application.
The goal is to show you how you could leverage Typesense’s geolocation feature to build your custom, location-aware application without having to set up your own backend component that deals with all the geospatial-related logic.
That’s all I have for you. If you want to share your thoughts on this tutorial with me or simply just connect, you can find and follow me on GitHub, LinkedIn, or Twitter.
Debugging Vue.js applications can be difficult, especially when users experience issues that are difficult to reproduce. If you’re interested in monitoring and tracking Vue mutations and actions for all of your users in production, try LogRocket.

LogRocket lets you replay user sessions, eliminating guesswork by showing exactly what users experienced. It captures console logs, errors, network requests, and pixel-perfect DOM recordings — compatible with all frameworks.
With Galileo AI, you can instantly identify and explain user struggles with automated monitoring of your entire product experience.
Modernize how you debug your Vue apps — start monitoring for free.

React Server Components and the Next.js App Router enable streaming and smaller client bundles, but only when used correctly. This article explores six common mistakes that block streaming, bloat hydration, and create stale UI in production.

Gil Fink (SparXis CEO) joins PodRocket to break down today’s most common web rendering patterns: SSR, CSR, static rednering, and islands/resumability.

@container scroll-state: Replace JS scroll listeners nowCSS @container scroll-state lets you build sticky headers, snapping carousels, and scroll indicators without JavaScript. Here’s how to replace scroll listeners with clean, declarative state queries.

Explore 10 Web APIs that replace common JavaScript libraries and reduce npm dependencies, bundle size, and performance overhead.
Would you be interested in joining LogRocket's developer community?
Join LogRocket’s Content Advisory Board. You’ll help inform the type of content we create and get access to exclusive meetups, social accreditation, and swag.
Sign up now