There are many libraries available for creating and managing forms. In React, forms have always been a bit complex. Form libraries aim to simplify form management without compromising performance.

In this article, we’ll look at React Final Form, a popular library for form management. We’ll cover how React Final Form works, compare it to some competitors, and, finally, test it out with a relevant example. Let’s get started!
React Final Form is a lightweight form library written in core JavaScript that acts as a wrapper around Final Form, a form state management library.
React Final Form uses the observer design pattern in which the components subscribe to specific events. Instead of the whole form re-rendering, only the fields that have been subscribed re-render.
Let’s look at some main features of React Final Form.
React Final Form is simple a wrapper around the Final Form library. It has zero dependencies and is written in pure JavaScript, making it framework agnostic. The bundle size of React Final Form is only 3.2kB minified and gzipped.
Due to its simple form state management, React Final Form emphasizes writing code for required functionality over unnecessarily writing code for simple forms. React Final Form’s design is highly modular, making it a perfect choice for many use cases.
Although re-rendering is not a big deal in small forms, as form size increases, we see a significant lag in performance with each re-render. Due to its subscription-based pattern, React Final Form only re-renders required fields, preventing delays.
Now that we know the basics of React Final Form, let’s take a look at Formik, a similar library, to see how the two compare.
Formik is a library that assists developers in three areas of writing React code: getting values in and out of form state, validation and error messages, and form submission.
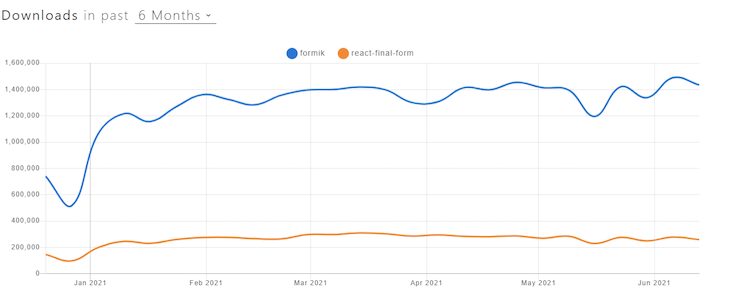
Let’s look at both libraries on npm trends to gage popularity and community size. We see that over the last six months, Formik has obtained a higher number of weekly downloads than React Final Form.

On GitHub, React Final Form has 6.6K stars, while Formik has 27.7K stars. Formik clearly has a larger online community, however, there are plenty of threads and forums for both libraries, meaning you should be able to receive community support.
As seen in the screenshot below, both libraries are updated frequently:

React Final Form currently has fewer open issues on GitHub than Formik, but this may change in the future if the library grows in popularity.
Formik’s bundle size is 13kB, which is larger than React Final Form’s bundle size of 3.2 kB.
Below, we can see the bundle composition for both libraries. React Final Form has fewer dependencies, reducing the chance of the library breaking up when updated.


Let’s test React Final Form’s functionality by starting our own project. Set up a React project and install the React Final Form library by running the following command:
npm install --save final-form react-final-form
Once the library is installed, import the main components from the library as follows:
import { Form, Field } from 'react-final-form'
Note that in the code snippet above, we import two components, Form and Field. Form is the parent component that takes all the props for the management of our form, and Field wraps the HTML elements to create a standalone Final Form component. The component created by Field has its own state that is managed by the Form tag.
Let’s write the code for a simple input form in React Final Form. Our code contains input fields for firstName and lastName. We also add a submit button:
/* eslint-disable jsx-a11y/accessible-emoji */
import React from 'react'
import { render } from 'react-dom'
import Styles from './Styles'
import { Form, Field } from 'react-final-form'

const sleep = ms => new Promise(resolve => setTimeout(resolve, ms))

const onSubmit = async values => {
  await sleep(300)
  window.alert(JSON.stringify(values, 0, 2))
}

const App = () => (
  <Styles>
    <h1>React Final Form - Simple Example</h1>

    <Form
      onSubmit={onSubmit}
      initialValues={{ firstname: '', lastname :''}}
      render={({ handleSubmit, form, submitting, pristine, values }) => (
        <form onSubmit={handleSubmit}>
          <div>
            <label>First Name</label>
            <Field
              name="firstName"
              component="input"
              type="text"
              placeholder="First Name"
            />
          </div>
          <div>
            <label>Last Name</label>
            <Field
              name="lastName"
              component="input"
              type="text"
              placeholder="Last Name"
            />
          </div>

          <div className="buttons">
            <button type="submit" disabled={submitting || pristine}>
              Submit
            </button>
            <button
              type="button"
              onClick={form.reset}
              disabled={submitting || pristine}
            >
              Reset
            </button>
          </div>
        </form>
      )}
    />
  </Styles>
)

render(<App />, document.getElementById('root'))
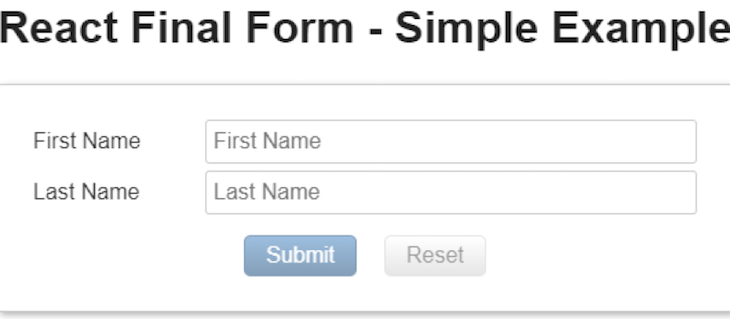
Starting the server gives us the following output.

We are calling two logs, one from the Form and one from the Field. Let’s try entering sam in FirstName to see what happens!

![]()
Note that Form only rendered once. The Field component shows independent behavior because it renders the same number of times as the number of characters entered. In React, we should always aim for a smaller number of re-renders to avoid delays as our form size grows.
We used a render prop, which gives us access to different props from the Form component. See the final output of our example below:

Now that we’ve seen how React Final Form works, let’s run the same example using Formik.
As before, we’ll set up a simple form with a field for firstName a field for lastName, and a submit button. Let’s call our form Client Profile:
import React from "react";
import ReactDOM from "react-dom";
import { Formik, Form, Field } from "formik";


// Messages
export default function App() {
  return (
    <Formik
      initialValues={{
        firstname: "",
        lastname: "",
      }}
      onSubmit={(values, { setSubmitting }) => {
        setTimeout(() => {
          console.log(JSON.stringify(values, null, 2));
          setSubmitting(false);
        }, 400);
      }}
    >
      {({ errors, touched, isValidating }) => (
        <div className="container">
          <div>
            <h3>Client Profile</h3>
          </div>
          <div>
            <Form>
              {console.log(“Render”)}
              <div>
                <Field
                  type="text"
                  placeholder="First Name"
                  name="firstname"
                />
              </div>
              <div>
                <Field

                  type="text"
                  placeholder="lastname"
                  name="name"
                />
              </div>
            <button type="submit">Submit</button>
            </Form>
          </div>
        </div>
      )}
    </Formik>
  );
}

const rootElement = document.getElementById("root");
ReactDOM.render(<App />, rootElement);
On the first render, our form looks like the image below:

We’ve placed a log inside the Form tag that will keep track of the renders. Let’s enter Sam in the input field. We get the following output:

Note that the form re-rendered a total of nine times when we entered an input value, as opposed to React Final Form’s single render. Let’s consider these examples in depth.
subscription propIn React Final Form, the Form component takes the subscription prop, which implements the observer design pattern and causes fewer renders. The subscription prop is similar to the useEffect Hook because it watches the values that have been passed to it and re-renders whenever they are changed.
In the Formik code block above, we do not have passed values inside the prop. Instead, Form is watching {submitting || pristine} for changes.
React Final Form offers two types of validations: form-level validation and field-level validation. With field-level validation, you can run validation while Field is being changed. In form-level validation, the validation tests are run when the Form is submitted.
Formik has a similar mechanism for validation using a validationSchema. Therefore, both libraries are equal in this regard.
React Final Form’s paradigm for handling forms is different than other libraries. It handles the re-rendering problem of different libraries efficiently by using the observer design pattern.
Not only is React Final Form is smaller in size than Formik, it is also faster. Therefore, if you are aiming to create large and complex forms for your React application without compromising the performance, React Final Form is the best choice.
Install LogRocket via npm or script tag. LogRocket.init() must be called client-side, not
server-side
$ npm i --save logrocket

// Code:

import LogRocket from 'logrocket';
LogRocket.init('app/id');
// Add to your HTML:

<script src="https://cdn.lr-ingest.com/LogRocket.min.js"></script>
<script>window.LogRocket && window.LogRocket.init('app/id');</script>
Would you be interested in joining LogRocket's developer community?
Join LogRocket’s Content Advisory Board. You’ll help inform the type of content we create and get access to exclusive meetups, social accreditation, and swag.
Sign up now
A breakdown of the wrapper and container CSS classes, how they’re used in real-world code, and when it makes sense to use one over the other.

This guide walks you through creating a web UI for an AI agent that browses, clicks, and extracts info from websites powered by Stagehand and Gemini.

This guide explores how to use Anthropic’s Claude 4 models, including Opus 4 and Sonnet 4, to build AI-powered applications.

Which AI frontend dev tool reigns supreme in July 2025? Check out our power rankings and use our interactive comparison tool to find out.