Serverless computing has revolutionized the way we build and deploy modern web applications. With its ability to scale dynamically, offer high availability, and drastically reduce infrastructure costs, serverless computing has become the go-to solution for many developers looking to build highly scalable and reliable applications.

However, serverless applications can be challenging to build, especially when managing infrastructure and integrating different services. This is where serverless stack (SST) comes into play. SST is an open source framework that makes it easy to build modern, full-stack applications on AWS using serverless architecture.
In this article, we’ll walk through the process of building a full-stack serverless application with SST by creating a simple contact list application using React, Lambda functions, and DynamoDB.
Jump ahead:
SST is an open source framework for building and deploying serverless applications on Amazon Web Services. It is designed to be easy-to-use and flexible, supporting multiple programming languages and frameworks, including Node.js, Python, Java, and React.
SST provides tools and libraries that simplify the development process and enable us to build scalable and cost-effective serverless applications using AWS services like AWS Lambda, Amazon API Gateway, and Amazon S3. It includes a set of pre-built templates and examples, that can be used as a starting point for projects, and a robust set of testing and debugging tools for ensuring the quality and reliability of code.
One of the key benefits of using SST is its focus on serverless architecture, which enables developers to concentrate on writing code without worrying about infrastructure management. SST automatically provisions and configures the necessary AWS resources based on the application’s requirements; this saves time and reduces the chance of errors.
SST uses AWS credentials to run and deploy apps. So, to proceed with this guide, you’ll need to configure the AWS CLI.
To create and set up the SST app, run the following commands:
> npx create-sst@latest contacts
> cd contacts
> npm install
Now, let’s understand the breakdown of an SST app’s project layout. Here’s infomration on the SST app’s main directories:
stacks/: Contains the code that defines the infrastructure of the serverless app using the AWS CDK; we can create multiple stacks within this directory, each with its resources and dependenciespackages/functions/: Contains the Lambda functions’ code which is executed when the API is called; we can create multiple functions within this directory, each with its own dependencies and configurationpackages/core/: Contains the serverless app’s business logic and application code; this includes any modules, libraries, or utilities our functions rely on to perform their tasksSST makes managing and scaling serverless apps easy by separating the infrastructure and application code into separate directories. We can update the infrastructure and code independently, making it easier to deploy changes and fix issues in our app. Separating the code into multiple packages makes it easier to manage dependencies and improve code organization.
To start the SST dev environment, run the following command:
> npx sst dev
The SST CLI will ask us for the name of the stage. A stage or an environment is a string used to namespace our deployments. We can use stages to deploy multiple app versions to different environments, such as development, staging, and production.
For simplicity, add your name as the stage name for local development. It will take around two to five minutes to deploy the app for the first time.
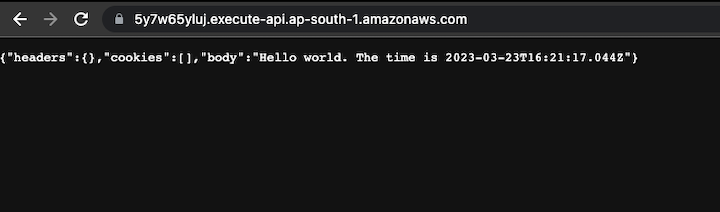
Once the deployment is complete, copy the API endpoint printed on the terminal console and open it in the browser to verify that the deployment was successful:
SST offers many benefits over traditional server-centric development:
Now that the deployment is verified and the app is up and running, let’s delete the starter files so we can start from scratch. Next, run the following commands to remove the template files:
> npx sst remove API
> rm stacks/MyStack.ts packages/core/src/time.ts packages/functions/src/lambda.ts
Create a StorageStack inside the stacks folder to create and manage the DynamoDB resource:
import { StackContext, Table } from "sst/constructs";

export function StorageStack({ stack, app }: StackContext) {
  const table = new Table(stack, "Contacts", {
    fields: {
      id: "string",
      name: "string",
      email: "string",
    },
    primaryIndex: { partitionKey: "id", sortKey: "email" },
  });

  return {
    table,
  };
}
In SST we can use the Table construct to create a DynamoDB table, and define the table’s primary key and any secondary indexes. In tha bove code, we create the Contacts table with three fields: id, name, and email. The table is then exported from the file to be referenced in other resources.
Next, add the StorageStack in the sst.config file:
import { SSTConfig } from "sst";
import { StorageStack } from "./stacks/StorageStack";

export default {
  config(_input) {
    return {
      name: "contacts",
      region: "ap-south-1",
    };
  },
  stacks(app) {
    app.stack(StorageStack)
  }
} satisfies SSTConfig;
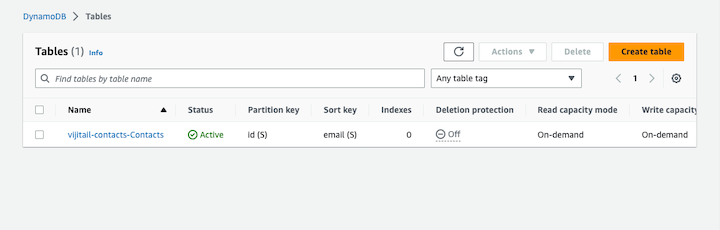
Now, run the npx sst dev command again to deploy the changes. Once the deployment is complete, check the DynamoDB dashboard in the AWS console to verify the changes:
Let’s start with serverless functions by building an API to create a contact object in DynamoDB.
Create and configure the ApiStack in the stacks folder with the following content:
import { Api, use, StackContext } from "sst/constructs";
import { StorageStack } from "./StorageStack";

export function ApiStack({ stack, app }: StackContext) {
  const { table } = use(StorageStack);

  // Create the API
  const api = new Api(stack, "Api", {
    defaults: {
      function: {
        bind: [table],
      },
    },
    routes: {
      "POST /contacts": "packages/functions/src/create.main",
    },
  });

  // Show the API endpoint in the output
  stack.addOutputs({
    ApiEndpoint: api.url,
  });

  // Return the API resource
  return {
    api,
  };
}
Here, the Api construct is used to create an API. The ApiStack function uses the table object referencing the DynamoDB table created in the StorageStack.
We can use the bind property to bind the table with the API, enabling the API to access the table. The routes object maps the route path and the corresponding function that will be called when API is invoked.
Now, let’s build the Lambda function to create an entry in DynamoDB. First, run the following command to install the dependencies required by the serverless function:
npm i aws-lambda uuid
Here’s the content of the functions file:
// packages/functions/src/create.ts
import * as uuid from 'uuid';
import AWS from "aws-sdk";
import { Table } from "sst/node/table";
import { APIGatewayProxyHandlerV2 } from "aws-lambda";

const dynamoDb = new AWS.DynamoDB.DocumentClient();

export const main: APIGatewayProxyHandlerV2 = async (event) => {

  const data = JSON.parse(event?.body || '');

  const params = {
    TableName: Table.Contacts.tableName,
    Item: {
        id: uuid.v4(),
        email: data.email,
        name: data.name ,
        createdAt: Date.now(),
    },
  };

  await dynamoDb.put(params).promise();

  return {
      statusCode: 200,
      body: JSON.stringify(params.Item),
  };

}
In the above code, the request body is accessed using the event.body object. We can access the name of the table using the SST Table construct, Table.Contacts.tableName.
Now, add the routes to get the contacts list as well as the delete API that will enable the removal of contact entries from the DynamoDB table:
routes: {
  "POST /contacts": "packages/functions/src/create.main",
  "GET /contacts": "packages/functions/src/list.main",
  "DELETE /contacts/{id}": "packages/functions/src/delete.main"
},
Here’s the code for the list and delete handlers:
// packages/functions/src/list.ts

import AWS from "aws-sdk";
import { Table } from "sst/node/table";
import { APIGatewayProxyHandlerV2 } from "aws-lambda";

const dynamoDb = new AWS.DynamoDB.DocumentClient();

export const main: APIGatewayProxyHandlerV2 = async (event) => {
  const params = {
    TableName: Table.Contacts.tableName,
  };
  const results = await dynamoDb.scan(params).promise();

  return {
    statusCode: 200,
    body: JSON.stringify(results.Items),
  };
}


// packages/functions/src/delete.ts

import AWS from "aws-sdk";
import { Table } from "sst/node/table";
import { APIGatewayProxyHandlerV2 } from "aws-lambda";

const dynamoDb = new AWS.DynamoDB.DocumentClient();

export const main: APIGatewayProxyHandlerV2 = async (event) => {

  const data = JSON.parse(event?.body || '');

  const params = {
    TableName: Table.Contacts.tableName,
    Key: {
        id: event?.pathParameters?.id,
        email: data?.email
    }
  };
  await dynamoDb.delete(params).promise();

  return {
    statusCode: 200,
    body: JSON.stringify({status: true}),
  };
}
With our backend API and infrastructure deployed, we’re ready to focus on our application’s frontend. We’ll build a web app that communicates with our backend to provide a complete end-to-end solution.
From the packages folder, run the following command to create a React app and install the required dependencies:
> npx create-react-app web-app
> cd web-app
> npm install sst --save-dev
We want to load the environment variables from our backend server. To do this, we’ll use the sst package within the React app. It will detect and retrieve the environment variables from our SST app and integrate them into the React development environment during initialization.
In the package.json file, replace the start script with the following to bind the env variables:
"start": "sst env react-scripts start"
We’ll use the StaticSite construct to deploy the React app. In the stacks folder, create a new stack, WebAppStack, and add the following content:
// stacks/WebAppStack.ts

import { StaticSite, use, StackContext } from "sst/constructs";
import { ApiStack } from "./ApiStack";

export function WebAppStack({ stack, app }: StackContext) {
  const { api } = use(ApiStack);

  // Define our React app
  const site = new StaticSite(stack, "ReactSite", {
    path: "packages/web-app",
    buildOutput: "build",
    buildCommand: "npm run build",
    environment: {
      REACT_APP_API_URL: api.url
    },
  });

  // Show the url in the output
  stack.addOutputs({
    SiteUrl: site.url || "http://localhost:3000",
  });
}
Here, we configure the StaticSite construct to reference the packages/web-app/ directory that houses our React application. Then, we transmit the outputs from the ApiStack as environment variables in React.
This approach ensures we cannot hardcode these variables into our React app. Instead of manually specifying the values of these variables within the React code, we pass them as environment variables during the build or deployment process. These environment variables are then made accessible within the React app at runtime.
In the deployment process, the api.url could be replaced with the actual API endpoint URL corresponding to the deployed environment. This way, the React app can be seamlessly connected to the appropriate API without the need to modify the source code.
Next, add the WebAppStack in the sst.config file:
// sst.config.ts

...
stacks(app) {
  app.stack(StorageStack).stack(ApiStack).stack(WebAppStack);
}
...
Now, start the React app by running the following command from the web-app directory:
> npm run start
Once the frontend server is up and running, open your browser and check out the results:


Whether you’re building a simple web application or a complex enterprise solution, SST can help streamline the development and deployment process, while taking full advantage of the power and scalability of the AWS cloud. By leveraging SST’s inbuilt constructs and development tools, you can focus on building great applications that solve real-world problems, rather than worrying about the underlying infrastructure.
The complete code from this article is available on GitHub.
Install LogRocket via npm or script tag. LogRocket.init() must be called client-side, not
server-side
$ npm i --save logrocket

// Code:

import LogRocket from 'logrocket';
LogRocket.init('app/id');
// Add to your HTML:

<script src="https://cdn.lr-ingest.com/LogRocket.min.js"></script>
<script>window.LogRocket && window.LogRocket.init('app/id');</script>
Hey there, want to help make our blog better?
Join LogRocket’s Content Advisory Board. You’ll help inform the type of content we create and get access to exclusive meetups, social accreditation, and swag.
Sign up now
A breakdown of the wrapper and container CSS classes, how they’re used in real-world code, and when it makes sense to use one over the other.

This guide walks you through creating a web UI for an AI agent that browses, clicks, and extracts info from websites powered by Stagehand and Gemini.

This guide explores how to use Anthropic’s Claude 4 models, including Opus 4 and Sonnet 4, to build AI-powered applications.

Which AI frontend dev tool reigns supreme in July 2025? Check out our power rankings and use our interactive comparison tool to find out.


