Building custom admin panels for each Node.js project can be a time-consuming task for a developer, especially given the number of projects they handle. As a result, there is a growing demand for alternative tools designed to reduce the developer’s workload.
This article highlights the features of an open source Node.js admin panel that promises to do just that: AdminJS. The tutorial portion of this post will demonstrate how to use AdminJS to build a full-stack application.
Jump ahead:
The Replay is a weekly newsletter for dev and engineering leaders.
Delivered once a week, it's your curated guide to the most important conversations around frontend dev, emerging AI tools, and the state of modern software.
AdminJS, previously called AdminBro, is an open source administrative panel interface tailored to meet the needs of Node.js applications. This interface eliminates the time and effort required to develop a custom admin page. Instead, users can easily view and manage content with the AdminJS UI.
AdminJS is built with React and offers a range of customizability, it also provides a REST API that can be integrated into other applications.
With AdminJS, users can quickly build and set up administrative dashboards and applications. To help you evaluate whether you should consider AdminJS for your application needs, here’s a summary of its features:
To start with AdminJS, we’ll need to install the AdminJS core package and set it up with a plugin and adapter of our choosing. For this tutorial, we’ll use the Express.js plugin and MongoDB adapter.
To install the AdminJS core package on your local machine, navigate to the directory of your choice and open up a CLI. In the command line, use one of the following commands to install AdminJS with npm or Yarn:
npm init
//select default options and fill out fields as desired
npm i adminjs
yarn init
//select default options and fill out fields as desired
yarn add adminjs
To add the Express plugin, we’ll use one of the following commands in the CLI:
npm i @adminjs/express # for Express server
yarn add @adminjs/express # for Express server
Next, we’ll add the MongoDB adapter to our application with one of the following commands:
npm i @adminjs/mongoose mongoose # for Mongoose
yarn add @adminjs/mongoose mongoose # for Mongoose
With our installation completed, we can finish our setup by connecting the installed plugin and adapter to our AdminJS package. First, we’ll install Express.js:
//npm
npm i express tslib express-formidable express-session

//yarn
yarn add express tslib express-formidable express-session
Next, we’ll set up a simple application with Express. In the file directory, we’ll create a new file, App.js, and add the following:
const AdminJS = require('adminjs')
const AdminJSExpress = require('@adminjs/express')
const express = require('express')

const PORT = 3000

const startAdminJS = async () => {
  const app = express()

  const admin = new AdminJS({})

  const adminRouter = AdminJSExpress.buildRouter(admin)
  app.use(admin.options.rootPath, adminRouter)

  app.listen(PORT, () => {
    console.log(`Listening on port ${PORT}, AdminJS server started on URL: http://localhost:${PORT}${admin.options.rootPath}`)
  })
}

startAdminJS()
Here we created a simple AdminJS interface. In this tutorial, we’ll add a MongoDB data source, add authentication to our AdminJS UI, and use the database to create a simple application.
We’ll be using MongoDB as the data source for our AdminJS panel. As a prerequisite, we’ll need to create a database on MongoDB and connect our application to it with the Mongoose adapter.
To get started, log into MongoDB and select Create Organization:
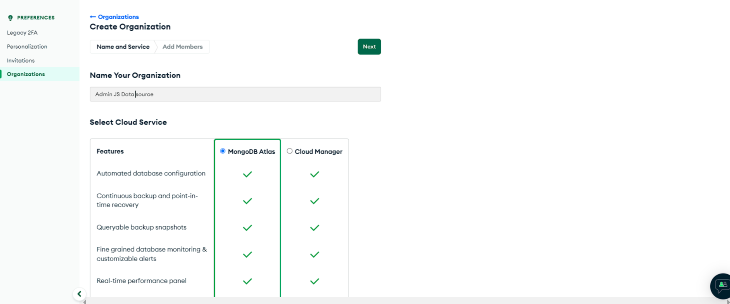
Here we created an organization named “AdminJS data source”. Next, we’ll add a new project to our organization; we’ll name the project “Books Model”:
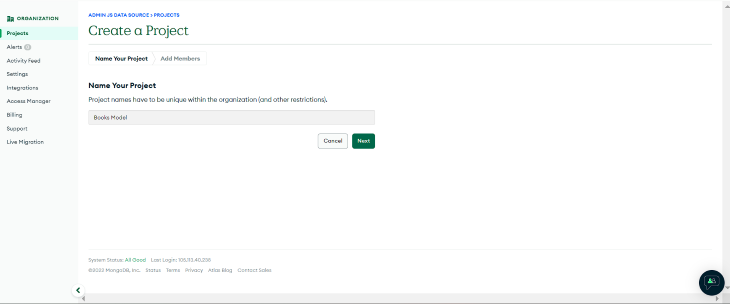
Next, we’ll be prompted to create a new database. For this tutorial, we’ll build a shared cluster called “Books”.
Now, we’ll create admin credentials for the cluster, and add the localhost URL to the IP address field. To get connection credentials, click on Connect and select connect with MongoDB native adapters. In the full-stack application, we can find the unique URI to connect our app to the database.
In the application’s working directory, we’ll create a bookModel folder and a book.model.js file. In book.model.js file, we’ll define the schema for our database:
const mongoose = require('mongoose');
const BookSchema = new mongoose.Schema({
    title: { type: String },
    author: { type: String },
});
const Book = mongoose.model('Book', BookSchema);

module.exports = {
    BookSchema,
    Book,
}
The BookModel defined schema will have the following fields: title and author.
Next, we’ll add the model created in the previous section to our app.js file, connect our application to MongoDB, and create an AdminJS instance.
To do this, make the following modifications to the app.js file:
//previous libraries import
const mongoose = require("mongoose");
const AdminJSMongoose = require("@adminjs/mongoose");
const { Book } = require("./bookModel/book.model.js");

AdminJS.registerAdapter({
  Resource: AdminJSMongoose.Resource,
  Database: AdminJSMongoose.Database,
})

//port

const startAdminJS = async () => {
  const app = express();
  const mongooseDB = await mongoose
    .connect(
      "mongodb+srv://ZionDev:[email protected]/?retryWrites=true&w=majority",
      {
        useNewUrlParser: true,
        useUnifiedTopology: true,
      }
    )
    .then(() => console.log("database connected"))
    .catch((err) => console.log(err));

  const BookResourceOptions = {
    databases: [mongooseDB],
    resource: Book,
  };

  const adminOptions = {
    rootPath: "/admin",
    resources: [BookResourceOptions],
  };

  const admin = new AdminJS(adminOptions);
    //other code
Here we added the Book model as a resource to AdminJS. We also added the MongoDB database so that it will automatically update as we perform CRUD operations in AdminJS.
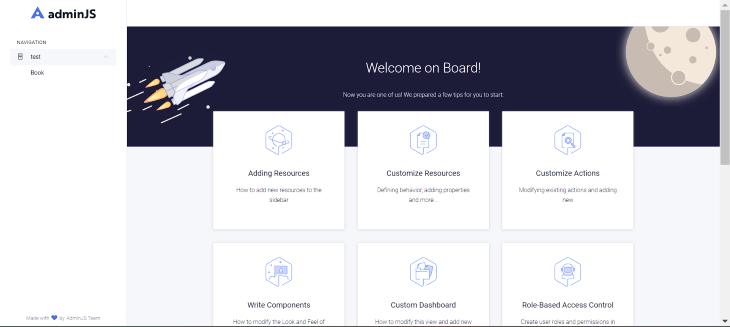
If we run the application with the node App.js command, we’ll get the AdminJS default screen and the Book model will appear in the navigation section:
AdminJS provides the following actions: list, search, new, show, edit, delete, and bulk delete. It also allows the user to define custom actions when required. Actions to be created can be placed in two categories:
Both actions are similar in that they are created in the same pattern. The significant difference between both patterns is the addition of a component props. Let’s look at how we can make both types of actions.
To create these actions, we’ll use the following syntax:
const BookResourceOptions = {
    resource: Book,
    options: {
      actions: {
        GetJsonData: {
          actionType: "record",
          component: false,
          handler: (request, response, context) => {
            const { record, currentAdmin } = context;
            console.log("record", record);
            return {
              record: record.toJSON(currentAdmin),
              msg: "Hello world",
            };
          },
        },
      },
    },
  };
Here, we added a custom action to the BookResourceOption. The above command has the component property set to false. Hence, no component will be rendered and the action will run on the backend. The resulting output will be the selected record’s data.
Next, we’ll need to create a component that the action will render. Then, we’ll add the designed component to the component property field.
For example, suppose we have the following custom React component:
import React from 'react'
import { ActionProps } from 'adminjs'

const ShowRecord = (props) => {
  const { record } = props

  return (
    <Div>
      <h1>This is a simple component</h1>
    <p>Below are our records</p>
    <span>
      {JSON.stringify(record)}
    </span>
    </Div>
  )
}

export default ShowRecord
Once it’s created, we can add it to the component property, like so:
component: AdminJS.bundle('./ShowRecord'),
AdminJS can add user authentication for viewing and managing content; this can help better secure data and restrict unwanted access. We can add authentication to our AdminJS application with the express plugin. To do so, we’ll make the following modification to the App.js file:
//other code

//login details
const DEFAULT_ADMIN = {
  email: '[email protected]',
  password: 'administrator',
}

// handle authentication
const authenticate = async (email, password) => {
  //condition to check for correct login details
  if (email === DEFAULT_ADMIN.email && password === DEFAULT_ADMIN.password) {
    //if the condition is true
    return Promise.resolve(DEFAULT_ADMIN)
  }
  //if the condition is false
  return null
}
Finally, we’ll replace AdminJS buildRouter with the buildAuthenticatedRouter and pass the authentication credentials to it:
const adminRouter = AdminJSExpress.buildAuthenticatedRouter(
    admin,
    {
      authenticate,
      cookieName: "AdminJS",
      cookiePassword: "Secret",
    },
    null,
    {
      store: mongooseDB,
      resave: true,
      saveUninitialized: true,
      secret: 'Secret',
      name: 'adminjs',
    }
  );
With this, we get a login page to access the AdminJS instance:

Next, we’ll build a book list application with Next.js and Axios, connect the AdminJS interface to the application, and display stored content. To access the AdminJS content, we’ll create an API request to the URL instance running on the backend.
In the api directory, we’ll create a file: getBooks.js. Next, we’ll make an API request to the Books resource in this file. The API endpoint for resources takes the following syntax:
.../api/resources/{resourceId}/actions/{action}
In this case, our resource id is Book, and the action to be performed is list. This action will return all data stored in the resource. Add the following code to the getBooks.js file:
import axios from "axios";

export default async function handler(req, res) {
  await axios
    .get("http://localhost:3000/admin/api/resources/Book/actions/list")

    .then((response) => {
      return res.status(200).json(response.data.records);
    })
    .catch((error) => {
      console.log(error);
    });
}
The above code returns a response containing our resource data. We can access this data as static props on the frontend in our index.js file:
export default function Home(props) {
  console.log(props);
  return (
    <div style={{display:"flex", alignItems:"center", height:"100vvh", paddingTop:"55px", flexDirection:"column"}}>
      <h1>Book List Application</h1>
      <div style={{marginTop:"34px"}} >
        {/* book List container */}
        {props.books.map((book) => {
          return (
            <div style={{display:"flex", flexDirection:"column", border:"1px solid black", width:"500px", padding:"10px", margin:"10px"}}>
              <h2>{book.params.title}</h2>
              <p>{book.params.author}</p>
            </div>
          );
        }
        )}
      </div>
    </div>
  )
}

export const getStaticProps = async () => {
  const res = await fetch('http://localhost:3001/api/getBooks');
  const data = await res.json();
  return {
    props: { books: data }
  }
}
We use getStaticProps to fetch data from the API route and pass it as a props. Then, we can access this prop on the frontend and return the title and author for each array element in the response.
To test our application, we’ll create entries using the AdminJS instance:
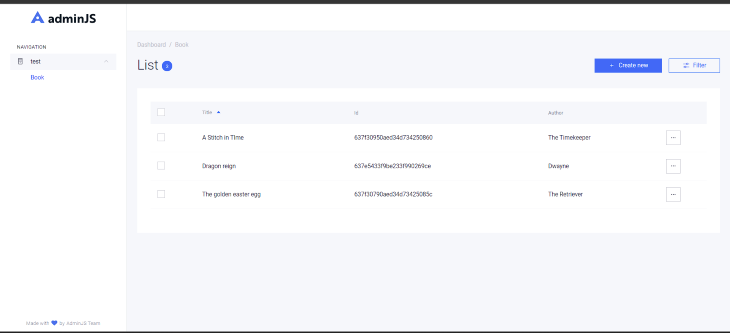
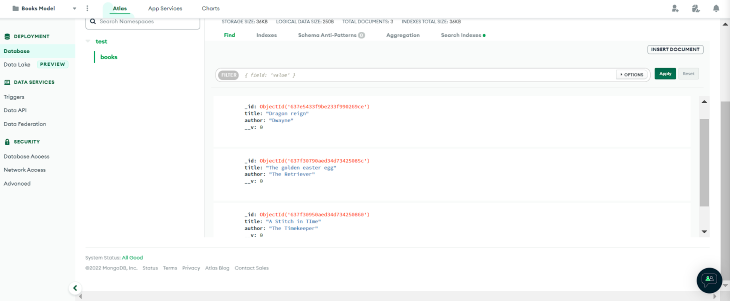
There are three entries in the above dashboard list, each containing a book title and author. If we navigate to the MongoDB Books collection on MongoDB Atlas, we can see the data produced by the Create operation performed in the AdminJS instance:
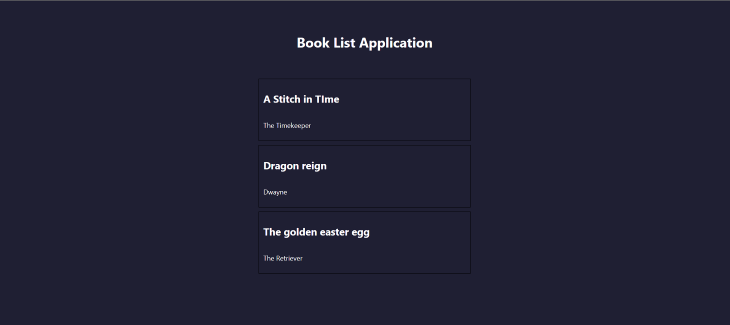
Now, when we run our Next.js application, we get the following result:
In this tutorial, we introduced AdminJS, reviewed its many features, and then used it to build a full-stack Node.js application with Express.js and MongoDB. How will you use AdminJS in your next project?
 Monitor failed and slow network requests in production
Deploying a Node-based web app or website is the easy part. Making sure your Node instance continues to serve resources to your app is where things get tougher. If you’re interested in ensuring requests to the backend or third-party services are successful, try LogRocket.

LogRocket lets you replay user sessions, eliminating guesswork around why bugs happen by showing exactly what users experienced. It captures console logs, errors, network requests, and pixel-perfect DOM recordings — compatible with all frameworks.
LogRocket's Galileo AI watches sessions for you, instantly identifying and explaining user struggles with automated monitoring of your entire product experience.
LogRocket instruments your app to record baseline performance timings such as page load time, time to first byte, slow network requests, and also logs Redux, NgRx, and Vuex actions/state. Start monitoring for free.

Learn how Vite+ unifies Vite, Vitest, Oxlint, Oxfmt, Rolldown, and Node.js management in one CLI.

AI companies are buying developer tools as coding agents turn runtimes, package managers, and linters into strategic infrastructure.

Learn how AI-assisted development governance uses rules, agents, hooks, and protocols to help AI coding tools produce safer, more consistent code.

A step-by-step guide to building your first MCP server using Node.js, covering core concepts, tool design, and upgrading from file storage to MySQL.
Hey there, want to help make our blog better?
Join LogRocket’s Content Advisory Board. You’ll help inform the type of content we create and get access to exclusive meetups, social accreditation, and swag.
Sign up now

