
Snorlax is an open source file management system that you can deploy and connect to a web application. Built with Go and Rust, Snorlax offers a simple API that you can leverage to handle the basic Create, Read, Update, and Delete (CRUD) functions, which are typically required. We can create a frontend that looks similar to the Finder on MacOS or Window’s File Explorer using Snorlax’s API.

In this article, we’ll discuss what Snorlax is and walk through building a React application that connects to a Snorlax server. You can follow along by accessing the source code for Snorlax on GitHub, which includes the server code as well as a desktop application built with React and Tauri. Let’s get started!
Jump ahead:
The Replay is a weekly newsletter for dev and engineering leaders.
Delivered once a week, it's your curated guide to the most important conversations around frontend dev, emerging AI tools, and the state of modern software.
You can find the Snorlax server in the server folder in the GitHub repo. To get it up and running, you’ll need to install Go. Follow the instructions for your OS of choice from the docs.
Open your terminal and navigate to the /server folder. Run the go get command followed by the go run main.go command. Once that’s done, you should see a message asking for a default storage location, which creates a folder inside the server to store your files:
SNORLAX SERVER v1.0.0 🚀
=======================
Enter storage location [default ./storage/]:
Once you’ve determined a storage location, select the port to run it on; the default is PORT 8000. You’ll see the following:
SNORLAX SERVER v1.0.0 🚀
=======================
Enter storage location [default ./storage/]:
[i] CONNECTED TO STORAGE FOLDER storage/
=======================
Enter port where server should run [default 8000]:
=======================
[+] SERVER STARTED AT PORT 8000
[i] http://127.0.0.1:8000
Now that the server is started, go into the desktop folder and start the client application. The client application is built with React and Tauri, so you’ll need to install the necessary Tauri prerequisites. If you’re not familiar with it, Tauri is an application development toolkit that leverages Rust to build performant applications. There is a lot you can do with Tauri, and I highly recommend checking out the guides.
When I initially got set up, I also had to upgrade my version of Rust. Once you have all of the prerequisites installed, you should be able to open a terminal and go to the desktop directory of the Snorlax repo. Here, you’ll install packages with npm install and start the application with npm run tauri dev. You could also use pnpm to run the desktop application. Once the application starts up, you should see the following:
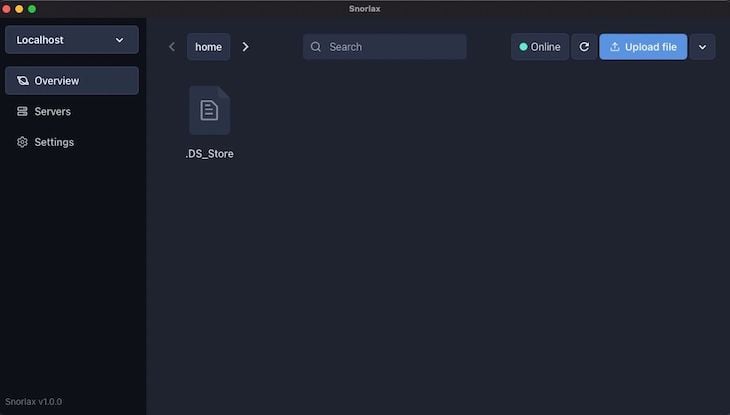
The application is built with a fairly self-explanatory interface. To perform the basic file operations, you’ll need to select a server and simply enter the values that were output when you started the server earlier:
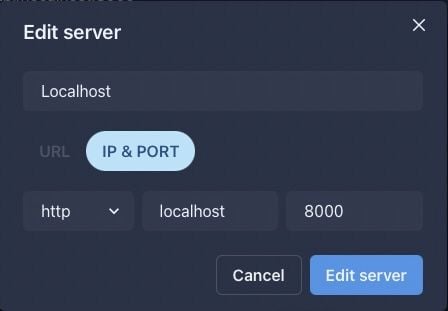
Now that you have the application running, let’s dive into some of the details of how it works.
The server exposes API endpoints that you can use to interact with files, like your typical endpoints that either GET or POST a file, as well as methods to get information about the files stored.
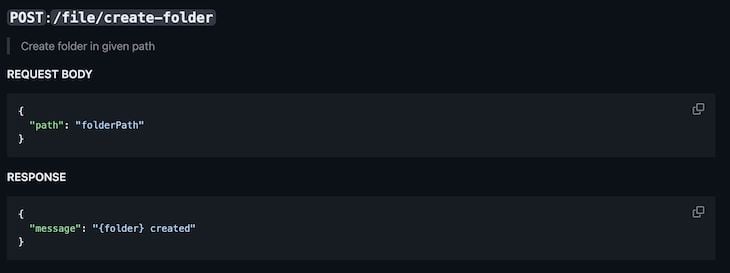
The project’s README has the endpoints listed, but I’ll include screenshots for easy reference. Below are the Read endpoints:
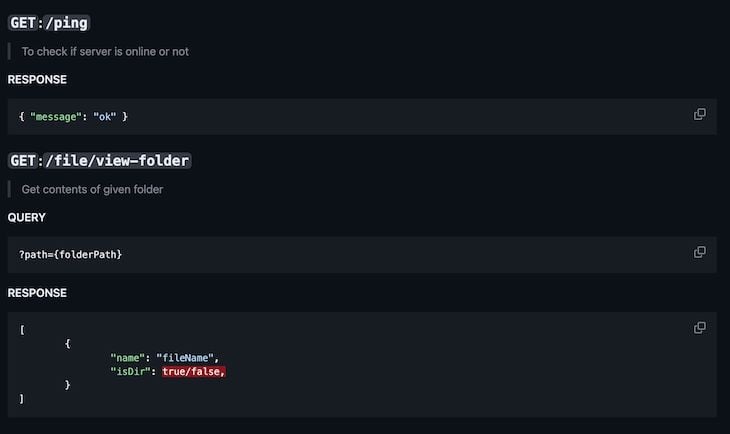
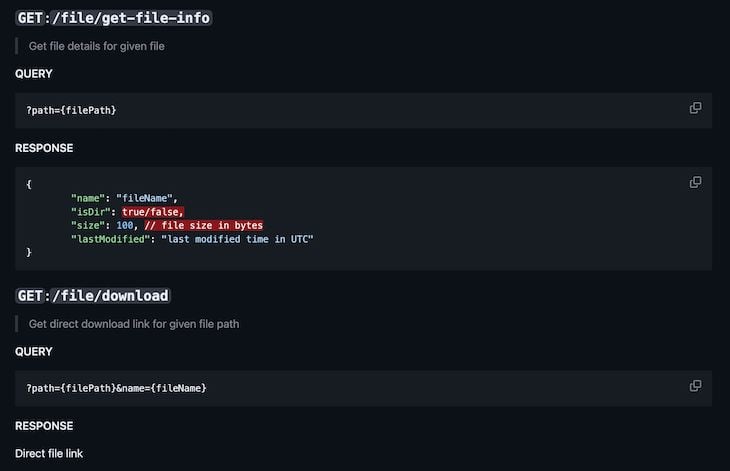
Below are the Create endpoints:
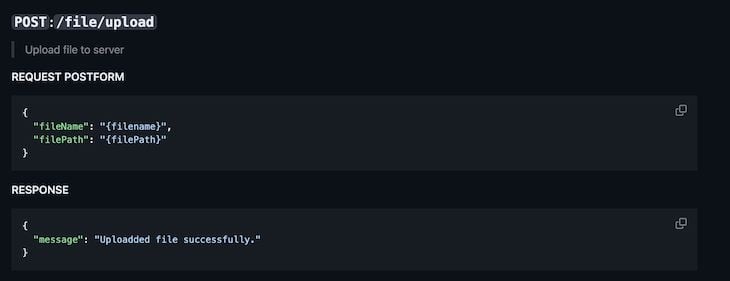
The screenshot below shows the Update endpoint:
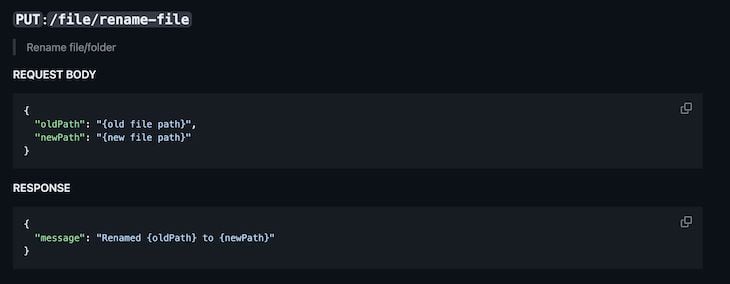
Finally, we have the Delete endpoint:

As I stated earlier, the example client application we’re reviewing is built with React and Tauri. The application follows most of the standard things you’d see in any React application, and it also has custom hooks that create a central store that can interact with the server.
Below is the hook for creating the connection to the server at the server.store.ts file:
import { create } from 'zustand';
import { ServerType } from '@/types/server.type';
import { invoke } from '@tauri-apps/api';
interface ServerStore {
  loading: boolean;
  servers: ServerType[];
  selectedServer: ServerType | null;
  setSelectedServer: (selectedServer: ServerType | null) => void;
  loadServers: (selectServerWithId?: number) => void;
  deleteServer: (serverId: number) => void;
  editServer: (serverId: number, connection: string, name: string) => void;
}
export const useServerStore = create<ServerStore>((set) => ({
  loading: false,
  servers: [],
  selectedServer: null,
  setSelectedServer: (selectedServer) => {
    // set selected database id to localstorage
    if (selectedServer) {
      localStorage.setItem(
        'selectedServerId',
        JSON.stringify(selectedServer.id)
      );
    }
    set({ selectedServer });
  },
  loadServers(selectServerWithId) {
    set({ servers: [], loading: true });
    invoke('read_servers')
      .then((servers: any) => {
        set({ servers, loading: false });
        // get serverId from localstorage is `selectedServerId` is not given
        if (!selectServerWithId) {
          selectServerWithId = JSON.parse(
            localStorage.getItem('selectedServerId') || ''
          );
        }
        // select server if id is given
        if (selectServerWithId) {
          // check if database exist in loaded data
          let filteredServer = servers.filter(
            (server: ServerType) => server.id === selectServerWithId
          );
          if (filteredServer.length == 1) {
            set({ selectedServer: filteredServer[0] });
          }
        }
      })
      .catch(console.log);
  },
  editServer(serverId, connection, name) {
    set((state) => ({
      servers: state.servers.map((server) => {
        if (serverId === server.id) {
          server.name = name;
          server.connection = connection;
        }
        return server;
      }),
    }));
  },
  deleteServer(serverId) {
    set((state) => ({
      servers: state.servers.filter((server) => server.id !== serverId),
      selectedServer:
        state.selectedServer?.id == serverId
          ? state.servers.length > 1
            ? state.servers[0]
            : null
          : state.selectedServer,
    }));
  },
}));
If you notice the imports, the store actually leverages Zustand to manage the application’s state. Then, the various functions like setSelectedServers or loadServers take an inventory of the sever values and set the parameters, like the connection string. This is then used in the API calls to actually interact with the file system.
Similar to the servers hook, there is also a hook for interacting with the files, as seen in the file.store.ts file:
import { getDirectory } from '@/api/file.api';
import { create } from 'zustand';
import { FileType } from '@/types/file.type';
import { showToast } from '@/utils/showToast';
interface FilesStore {
  files: FileType[];
  selectedFile: FileType | null;
  loading: boolean;
  setSelectedFile: (selectedFile: FileType | null) => void;
  addFile: (file: FileType) => void;
  deleteFile: (deletedFile: FileType) => void;
  renameFile: (oldName: string, newName: string) => void;
  loadFiles: (connection: string, path: string) => void;
}
export const useFilesStore = create<FilesStore>((set) => ({
  files: [],
  selectedFile: null,
  loading: false,
  setSelectedFile: (selectedFile) => set({ selectedFile }),
  addFile(file) {
    set((state) => ({
      files: [...state.files, file],
    }));
    set({ selectedFile: file.isDir ? null : file });
  },
  deleteFile(deletedFile) {
    set((state) => ({
      files: state.files.filter((file) => file.name !== deletedFile.name),
      selectedFile: null,
    }));
  },
  renameFile(oldName, newName) {
    set((state) => ({
      selectedFile: state?.selectedFile
        ? {
            name: newName,
            isDir: state.selectedFile?.isDir,
          }
        : null,
      files: state.files.map((file) => {
        if (file.name == oldName) {
          file.name = newName;
        }
        return file;
      }),
    }));
  },
  loadFiles(connection, path) {
    set({ loading: true, files: [] });
    getDirectory(connection, path)
      .then(({ data }) => set({ files: data || [] }))
      .catch((err) => {
        set({ files: [] });
        console.log(err);
        showToast({
          title: 'Failed to load files',
          description: err?.response?.data?.message || err?.message,
          status: 'error',
          duration: 5000,
        });
      })
      .finally(() => set({ loading: false }));
  },
}));
The functions for interacting with the files leverage an API definition that is laid out in the src/api/file.api.ts file:
import axios, { AxiosProgressEvent } from 'axios';
export const getDirectory = (connection: string, path: string) => {
  return axios.get(`${connection}/file/view-folder?path=${path}`);
};
export const getFileInfo = (
  connection: string,
  path: string,
  fileName: string
) => {
  return axios.get(`${connection}/file/get-file-info?path=${path}/${fileName}`);
};
export const deleteFile = (
  connection: string,
  path: string,
  fileName: string
) => {
  return axios.delete(
    `${connection}/file/delete-file?path=${path}/${fileName}`
  );
};
export const renameFile = (connection: string, data: any) => {
  return axios({
    url: `${connection}/file/rename-file`,
    method: 'PUT',
    data,
  });
};
export const createFolder = (
  connection: string,
  path: string,
  folderName: string
) => {
  return axios({
    url: `${connection}/file/create-folder`,
    method: 'POST',
    data: {
      path: `${path}/${folderName}`,
    },
  });
};
export const uploadFile = (
  connection: string,
  path: string,
  file: File,
  fileName: string,
  onUploadProgress: (progressEvent: AxiosProgressEvent) => void
) => {
  const formData = new FormData();
  formData.append('file', file);
  formData.append('fileName', fileName);
  formData.append('filePath', path);
  return axios.post(`${connection}/file/upload`, formData, {
    headers: {
      'Content-Type': 'multipart/form-data',
    },
    onUploadProgress,
  });
};
export const downloadFile = (
  connection: string,
  path: string,
  fileName: string,
  onDownloadProgress: (progressEvent: AxiosProgressEvent) => void
) => {
  return axios.get(
    `${connection}/file/download?path=${
      path + '/' + fileName
    }&name=${fileName}`,
    {
      responseType: 'blob',
      onDownloadProgress,
    }
  );
};
The combination of these hooks and the API definition create the interactions for the frontend to connect to the server. The React components can then call these hooks and do something like the following:
  const { path, searchQuery } = useFilePageStore();
  const { files, loadFiles, loading } = useFilesStore();
  const { selectedServer } = useServerStore();
  useEffect(() => {
    if (!selectedServer) return;
    loadFiles(selectedServer.connection, path);
  }, [path, selectedServer]);
The Snorlax server exposes an API that an application can consume. The sample React application connects to the server and acts as a file management solution.
This is a great start, but we can take it even further by hosting the server in a Docker container. You could create a Dockerfile that copies the application and then exposes it on the port of your choice:
# syntax=docker/dockerfile:1
FROM golang:1.19-alpine
WORKDIR /server
COPY server ./
RUN go build -o /docker-snorlax
EXPOSE 8000
CMD [ "/docker-snorlax" ]
If you copy the code above and put it in a file named Dockerfile inside of the cloned Snorlax repo, you can build it with docker build --tag docker-snorlax. You can run the built image with docker run docker-snorlax, and you’ll see the following:
➜  snorlax git:(main) ✗ docker run docker-snorlax
SNORLAX SERVER v1.0.0 🚀
=======================
Enter storage location [default ./storage/]: [i] CONNECTED TO STORAGE FOLDER storage/
=======================
Enter port where server should run [default 8000]: =======================
[+] SERVER STARTED AT PORT 8000
[i] http://127.0.0.1:8000
[i] http://172.17.0.2:8000
=======================
Now, you’ve containerized the server! You could do the same for the React application and then push this to a cloud provider for hosting. Obviously, you should also consider things like security and proxying requests, but these are the basics to get you started.
In this article, we discussed how to get started using Snorlax as a file server. Following the sample application provided in the Snorlax repo, we were able to see the server running and learn how to leverage React to connect to it. We also discussed how to use Docker to containerize the server and potentially host it for a cloud application.
Snorlax is a really nice software solution that is well built and thoroughly documented. I highly recommend checking out the sample repo and trying out some of the things discussed in this post. Thanks for reading! Follow my writing on rhythmandbinary.com and Twitter at @AndrewEvans0102.
Install LogRocket via npm or script tag. LogRocket.init() must be called client-side, not
server-side
$ npm i --save logrocket

// Code:

import LogRocket from 'logrocket';
LogRocket.init('app/id');
// Add to your HTML:

<script src="https://cdn.lr-ingest.com/LogRocket.min.js"></script>
<script>window.LogRocket && window.LogRocket.init('app/id');</script>

@container scroll-state: Replace JS scroll listeners nowCSS @container scroll-state lets you build sticky headers, snapping carousels, and scroll indicators without JavaScript. Here’s how to replace scroll listeners with clean, declarative state queries.

Russ Miles, a software development expert and educator, joins the show to unpack why “developer productivity” platforms so often disappoint.

Discover what’s new in The Replay, LogRocket’s newsletter for dev and engineering leaders, in the February 18th issue.

Learn how to recreate Claude Skills–style workflows in GitHub Copilot using custom instruction files and smarter context management.
Would you be interested in joining LogRocket's developer community?
Join LogRocket’s Content Advisory Board. You’ll help inform the type of content we create and get access to exclusive meetups, social accreditation, and swag.
Sign up now