Mobile application developers work with various sorts of projects, including ecommerce mobile apps that customers can use to buy products online. The number of smartphone users in the world is increasing drastically every day, and so, every product-selling company is likely hoping to provide a convenient purchasing service through an ecommerce mobile app.

These apps consist of several generic screens, such as a products list, product details page, shopping cart, checkout area, and signup/login pages. Some mobile apps may also have space for customer reviews, personal settings, and many other features. Like any other enterprise apps, mobile apps also need to be released into both the Google Play and Apple App stores to reach a wide customer audience.
The Replay is a weekly newsletter for dev and engineering leaders.
Delivered once a week, it's your curated guide to the most important conversations around frontend dev, emerging AI tools, and the state of modern software.
Mobile application developers often tend to build their apps with cross-platform frameworks for rapid project delivery. This is partly why React Native is a popular framework for building cross-platform mobile apps — it lets developers easily build native apps within a React-based development environment.
Most freelance developers first look for open source React Native ecommerce app templates and customize them according to their users’ requirements. But the majority of existing app templates for ecommerce apps in React Native on GitHub use a bit of complex Redux for centralized state management purposes, and many of those projects include stuff that you don’t need.
With this in mind, it can be a wiser decision to create your own React Native ecommerce app template from scratch. In this tutorial, I will explain how to do just this.
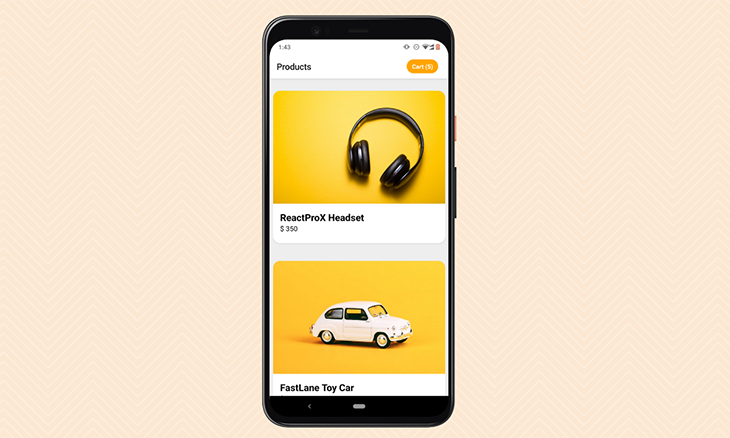
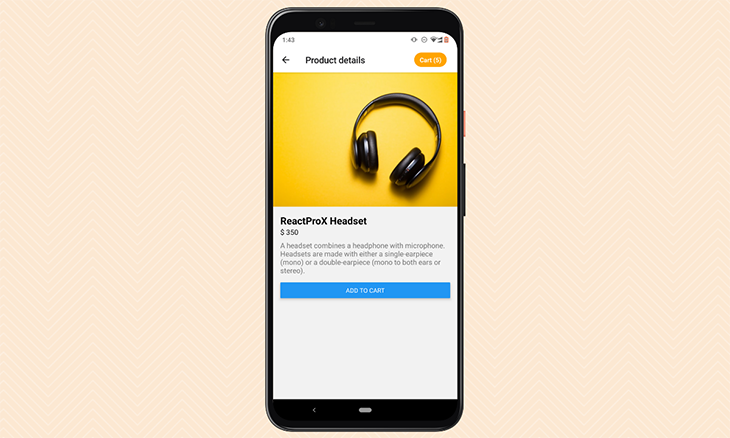
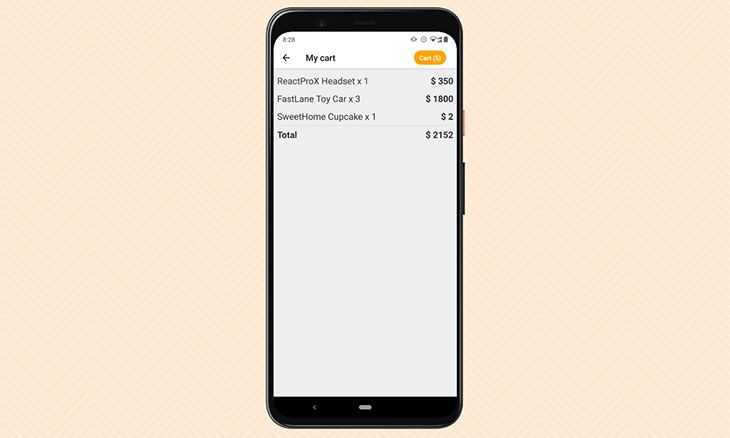
We are going to build an ecommerce mobile app with several generic (and therefore customizable) features. The app has the following three screens.


Let’s create a new React Native project. In this tutorial, I will use the Expo CLI to build the ecommerce application.
You can use either the React Native CLI or the Expo CLI to build React Native apps, but if you use the React Native CLI, you’ll need to set up the developer environment by yourself. For example, if you need to test your app on an Android device, you need to set up the required Android SDKs.
On the other hand, the Expo CLI lets you develop React Native apps without installing any mobile development SDKs to your computer.
Run the following command to install the Expo CLI. Make sure that you have a newer LTS version of both Node.js and npm.
Note: If you are building on the Ubuntu OS, nvm is a good tool to install to keep track and update to the latest Node LTS version.
npm install -g expo-cli
The following command will create a new React Native project.
expo init e-commerce-app
If it asks for a template, select the blank template option. After that, run the following command to start developing the application.
npm start
# or
yarn start
Now you can see your code changes live with the Expo Go mobile app. (This is available on both the Play Store and the App Store.) I will demonstrate the application using an Android device.
Scan the QR code given by the above command with your mobile phone to open your application.
We are creating a multi-screen mobile app, and the products list is one of the app screens. We can use a React Native navigation extension to build multi-screen apps.
Install the popular React Navigation package with the following commands.
npm install @react-navigation/native
expo install react-native-screens react-native-safe-area-context
npm install @react-navigation/native-stack
The product information is typically retrieved via a web API. But, for now, let’s create a mock API service to obtain several products and get our mobile app running. Add the following code to the ./services/ProductsService.js file.
const PRODUCTS = [
    {
        id: 100,
        name: 'ReactProX Headset',
        price: 350,
        image: require('../assets/products/headset-100.jpg'),
        description: 'A headset combines a headphone with microphone. Headsets are made with either a single-earpiece (mono) or a double-earpiece (mono to both ears or stereo).'
    },
    {
        id: 101,
        name: 'FastLane Toy Car',
        price: 600,
        image: require('../assets/products/car-101.jpg'),
        description: 'A model car, or toy car, is a miniature representation of an automobile. Other miniature motor vehicles, such as trucks, buses, or even ATVs, etc. are often included in this general category.'
    },
    {
        id: 102,
        name: 'SweetHome Cupcake',
        price: 2,
        image: require('../assets/products/cake-102.jpg'),
        description: 'A cupcake (also British English: fairy cake; Hiberno-English: bun; Australian English: fairy cake or patty cake[1]) is a small cake designed to serve one person.'
    }
];
export function getProducts() {
    return PRODUCTS;
}
export function getProduct(id) {
    return PRODUCTS.find((product) => (product.id == id));
}
As you can see, the above service will act as a mock API server to retrieve product information. The getProducts function lists all the existing products, and the getProduct function returns product details for a given product identifier. Make sure to store your sample product images in the assets/products directory.
Now that we have the product data, we need to create a reusable component for a single product item because the products list has multiple products. Add the following code into ./components/Product.js.
import React from 'react';
import {Text, Image, View, StyleSheet, TouchableOpacity} from 'react-native';
export function Product({name, price, image, onPress}) {
  return (
    <TouchableOpacity style={styles.card} onPress={onPress}>
      <Image
        style={styles.thumb}
        source={image}
      />
      <View style={styles.infoContainer}>
        <Text style={styles.name}>{name}</Text>
        <Text style={styles.price}>$ {price}</Text>
      </View>
    </TouchableOpacity>
  );
}
const styles = StyleSheet.create({
  card: {
    backgroundColor: 'white',
    borderRadius: 16,
    shadowOpacity: 0.2,
    shadowRadius: 4,
    shadowColor: 'black',
    shadowOffset: {
      height: 0,
      width: 0,
    },
    elevation: 1,
    marginVertical: 20,
  },
  thumb: {
    height: 260,
    borderTopLeftRadius: 16,
    borderTopRightRadius: 16,
    width: '100%',
  },
  infoContainer: {
    padding: 16,
  },
  name: {
    fontSize: 22,
    fontWeight: 'bold',
  },
  price: {
    fontSize: 16,
    fontWeight: '600',
    marginBottom: 8,
  },
});
The product component is responsible for rendering a product when the name, price, and image properties are provided. This component accepts a touch event callback that opens the product details screen. As you may have already noticed, there are also some styling rules applied to make the product entry display a slightly rounded rectangle.
Since we have the product component completed, we can now start building our product list screen by reusing the product component. Add the following code into ./screens/ProductsList.js.
import React, {useEffect, useState} from 'react';
import { View, Text, FlatList, StyleSheet } from 'react-native';
import { Product } from '../components/Product.js';
import { getProducts } from '../services/ProductsService.js';
export function ProductsList ({navigation}) {
function renderProduct({item: product}) {
    return (
      <Product {...product}
      onPress={() => {
        navigation.navigate('ProductDetails', {
          productId: product.id,
        });
      }}
      />
    );
  }

  const [products, setProducts] = useState([]);

  useEffect(() => {
    setProducts(getProducts());
  });

  return (
    <FlatList
      style={styles.productsList}
      contentContainerStyle={styles.productsListContainer}
      keyExtractor={(item) => item.id.toString()}
      data={products}
      renderItem={renderProduct}
    />
  );
}
const styles = StyleSheet.create({
  productsList: {
    backgroundColor: '#eeeeee',
  },
  productsListContainer: {
    backgroundColor: '#eeeeee',
    paddingVertical: 8,
    marginHorizontal: 8,
  },
});
The products list component fetches the products list data from the mock API service that we created earlier. After that, it will display product items by rendering multiple product component instances.
Before each product is rendered, we pass a navigation callback via the onPress prop. The navigation callback displays the product details screen once a particular product item is selected.
Now, our products list screen is ready.
The user should be able to add the currently opened product to the shopping cart from the product details screen. Now, we need to implement the shopping cart’s logic before the product details screen.
In this scenario, we need to update the shopping cart summary icon (in the top right corner of the screen) when the user updates the cart. Besides, the cart summary screen also lists down the items in the shopping cart.
We have to store the shopping cart data in a global location, and we need to update/retrieve them from different places. React’s Context API is a good solution for this scenario because it provides a simple way to have a global state, unlike other state management solutions.
Create a context for the shopping cart in CartContext.js with the following code.
import React, {createContext, useState} from 'react';
import { getProduct } from './services/ProductsService.js';
export const CartContext = createContext();
export function CartProvider(props) {
  const [items, setItems] = useState([]);

  function addItemToCart(id) {
    const product = getProduct(id);
    setItems((prevItems) => {
      const item = prevItems.find((item) => (item.id == id));
      if(!item) {
          return [...prevItems, {
              id,
              qty: 1,
              product,
              totalPrice: product.price
          }];
      }
      else {
          return prevItems.map((item) => {
            if(item.id == id) {
              item.qty++;
              item.totalPrice += product.price;
            }
            return item;
          });
      }
    });
}
function getItemsCount() {
      return items.reduce((sum, item) => (sum + item.qty), 0);
  }

  function getTotalPrice() {
      return items.reduce((sum, item) => (sum + item.totalPrice), 0);
  }

  return (
    <CartContext.Provider
      value={{items, setItems, getItemsCount, addItemToCart, getTotalPrice}}>
      {props.children}
    </CartContext.Provider>
  );
}
The above CarProvider class defines a React Context for the shopping cart by exposing the shopping cart’s actions. Now, we can use this context instance to add new cart items, get a list of items, and get the total items.
The product details section displays the full information about the currently selected product. Also, it has the Add to Cart button, which updates the shopping cart.
Add the following code to the ./screens/ProductDetails.js file.
import React, {useEffect, useState, useContext} from 'react';
import {
  Text,
  Image,
  View,
  ScrollView,
  SafeAreaView,
  Button,
  StyleSheet
  } from 'react-native';
import { getProduct } from '../services/ProductsService.js';
import { CartContext } from '../CartContext';
export function ProductDetails({route}) {
  const { productId } = route.params;
  const [product, setProduct] = useState({});

  const { addItemToCart } = useContext(CartContext);

  useEffect(() => {
    setProduct(getProduct(productId));
  });

  function onAddToCart() {
    addItemToCart(product.id);
  }

  return (
    <SafeAreaView>
      <ScrollView>
        <Image
          style={styles.image}
          source={product.image}
        />
        <View style={styles.infoContainer}>
          <Text style={styles.name}>{product.name}</Text>
          <Text style={styles.price}>$ {product.price}</Text>
          <Text style={styles.description}>{product.description}</Text>
            <Button
            onPress={onAddToCart}
            title="Add to cart"
            / >
        </View>
      </ScrollView>
    </SafeAreaView>
  );
}
const styles = StyleSheet.create({
  card: {
    backgroundColor: 'white',
    borderRadius: 16,
    shadowOpacity: 0.2,
    shadowRadius: 4,
    shadowColor: 'black',
    shadowOffset: {
      height: 0,
      width: 0,
    },
    elevation: 1,
    marginVertical: 20,
  },
  image: {
    height: 300,
    width: '100%'
  },
  infoContainer: {
    padding: 16,
  },
  name: {
    fontSize: 22,
    fontWeight: 'bold',
  },
  price: {
    fontSize: 16,
    fontWeight: '600',
    marginBottom: 8,
  },
  description: {
    fontSize: 16,
    fontWeight: '400',
    color: '#787878',
    marginBottom: 16,
  },
});
The above screen loads product details from the mock API service based on the product identifier received from the navigation parameters. The Add to Cart button’s onPress action then updates the shopping cart context by calling the addItemToCart context function. Finally, the screen’s content is wrapped with the SafeAreaView and ScrollView to enable a vertical scrollbar to show the content that doesn’t quite fit within the device’s viewport.
Every customer wishes to see a summary of their order before checkout. This ecommerce app has a cart summary screen that will list down all the shopping cart items with product name, quantity, subtotal, and final total. Implement the cart screen in ./screens/Cart.js with the following code.
import React, { useEffect, useState, useContext } from 'react';
import { View, Text, Button, FlatList, StyleSheet } from 'react-native';
import { CartContext } from '../CartContext';
export function Cart ({navigation}) {
const {items, getItemsCount, getTotalPrice} = useContext(CartContext);

  function Totals() {
    let [total, setTotal] = useState(0);
    useEffect(() => {
      setTotal(getTotalPrice());
    });
    return (
       <View style={styles.cartLineTotal}>
          <Text style={[styles.lineLeft, styles.lineTotal]}>Total</Text>
          <Text style={styles.lineRight}>$ {total}</Text>
       </View>
    );
  }
function renderItem({item}) {
    return (
       <View style={styles.cartLine}>
          <Text style={styles.lineLeft}>{item.product.name} x {item.qty}</Text>
          <Text style={styles.lineRight}>$ {item.totalPrice}</Text>
       </View>
    );
  }

  return (
    <FlatList
      style={styles.itemsList}
      contentContainerStyle={styles.itemsListContainer}
      data={items}
      renderItem={renderItem}
      keyExtractor={(item) => item.product.id.toString()}
      ListFooterComponent={Totals}
    />
  );
}
const styles = StyleSheet.create({
  cartLine: {
    flexDirection: 'row',
  },
  cartLineTotal: {
    flexDirection: 'row',
    borderTopColor: '#dddddd',
    borderTopWidth: 1
  },
  lineTotal: {
    fontWeight: 'bold',
  },
  lineLeft: {
    fontSize: 20,
    lineHeight: 40,
    color:'#333333'
  },
  lineRight: {
    flex: 1,
    fontSize: 20,
    fontWeight: 'bold',
    lineHeight: 40,
    color:'#333333',
    textAlign:'right',
  },
  itemsList: {
    backgroundColor: '#eeeeee',
  },
  itemsListContainer: {
    backgroundColor: '#eeeeee',
    paddingVertical: 8,
    marginHorizontal: 8,
  },
});
The above code fetches shopping cart items from the cart context and displays them inside a list.
Every ecommerce application typically shows the current cart item count with the help of a small icon on the top right corner of the screen. Let’s create a small component to display the current cart’s total item count with the following code in ./components/CartIcon.js.
import React, { useContext } from 'react';
import { View, Text, StyleSheet } from 'react-native';
import { CartContext } from '../CartContext';
export function CartIcon({navigation}) {
  const {getItemsCount} = useContext(CartContext);
  return (
    <View style={styles.container}>
      <Text style={styles.text}
        onPress={() => {
          navigation.navigate('Cart');
        }}
      >Cart ({getItemsCount()})</Text>
    </View>
  );
}
const styles = StyleSheet.create({
  container: {
    marginHorizontal: 8,
    backgroundColor: 'orange',
    height: 32,
    padding: 12,
    borderRadius: 32 / 2,
    alignItems: 'center',
    justifyContent: 'center',
  },
  text: {
    color: 'white',
    fontWeight: 'bold',
  },
});
Now, all app components are ready to be assembled as an ecommerce mobile app. The main application component needs to include a navigation controller because we have multiple screens. Moreover, we indeed need to wrap all components with the cart context provider because we have used the React Context API.
Replace your ./App.js file’s code with the following code as the final step.
import React from 'react';
import { StyleSheet } from 'react-native';
import { NavigationContainer } from '@react-navigation/native';
import { createNativeStackNavigator } from '@react-navigation/native-stack';
import { ProductsList } from './screens/ProductsList.js';
import { ProductDetails } from './screens/ProductDetails.js';
import { Cart } from './screens/Cart.js';
import { CartIcon } from './components/CartIcon.js';
import { CartProvider } from './CartContext.js';
const Stack = createNativeStackNavigator();
function App() {
  return (
    <CartProvider>
      <NavigationContainer>
        <Stack.Navigator>
          <Stack.Screen name='Products' component={ProductsList}
          options={({ navigation }) => ({
            title: 'Products',
            headerTitleStyle: styles.headerTitle,
            headerRight: () => <CartIcon navigation={navigation}/>
          })}/>
          <Stack.Screen name='ProductDetails' component={ProductDetails}
          options={({ navigation }) => ({
            title: 'Product details',
            headerTitleStyle: styles.headerTitle,
            headerRight: () => <CartIcon navigation={navigation}/>,
          })} />
          <Stack.Screen name='Cart' component={Cart}
          options={({ navigation }) => ({
            title: 'My cart',
            headerTitleStyle: styles.headerTitle,
            headerRight: () => <CartIcon navigation={navigation}/>,
          })} />
        </Stack.Navigator>
      </NavigationContainer>
    </CartProvider>
  );
}
const styles = StyleSheet.create({
  headerTitle: {
    fontSize: 20
  }
});
export default App;
This tutorial guided you to build a cross-platform ecommerce app with React Native from scratch. We built a minimal ecommerce app template without using any state management libraries. Therefore, it’s easy to build a personal app template with this tutorial’s demo app source and forgo looking through all of the prepared ecommerce React Native templates on GitHub that may not suit your specific needs. (Plus, if you need, you can integrate your favorite state management library to this.)
The full source code is available on my GitHub.
As for next steps, you can implement requirements such as authentication, customer reviews, product comments, stock availability checks, etc. You’ll also need to plan your mobile app’s backend because we used a mock API service in this tutorial.
If you plan to use an existing ecommerce API, you can write a service to make API calls. If you are going to build a new ecommerce API, a Node-based NoSQL backend is easy to get started.

LogRocket's Galileo AI watches sessions for you and and surfaces the technical and usability issues holding back your React Native apps.
LogRocket also helps you increase conversion rates and product usage by showing you exactly how users are interacting with your app. LogRocket's product analytics features surface the reasons why users don't complete a particular flow or don't adopt a new feature.
Start proactively monitoring your React Native apps — try LogRocket for free.

LogRocket lets you replay user sessions, eliminating guesswork around why users don't convert by showing exactly what users experienced. It captures console logs, errors, network requests, and pixel-perfect DOM recordings — compatible with all frameworks.
LogRocket's Galileo AI watches sessions for you, instantly identifying and explaining user struggles with automated monitoring of your entire product experience.
Start proactively monitoring your ecommerce apps — try LogRocket for free.

@container scroll-state: Replace JS scroll listeners nowCSS @container scroll-state lets you build sticky headers, snapping carousels, and scroll indicators without JavaScript. Here’s how to replace scroll listeners with clean, declarative state queries.

Explore 10 Web APIs that replace common JavaScript libraries and reduce npm dependencies, bundle size, and performance overhead.

Russ Miles, a software development expert and educator, joins the show to unpack why “developer productivity” platforms so often disappoint.

Discover what’s new in The Replay, LogRocket’s newsletter for dev and engineering leaders, in the February 18th issue.
Would you be interested in joining LogRocket's developer community?
Join LogRocket’s Content Advisory Board. You’ll help inform the type of content we create and get access to exclusive meetups, social accreditation, and swag.
Sign up now