Using Django to develop servers for HTTP connections and application requests is common. However, when developing an application that requires the connection to be open all the time for a two-way connection, like conferencing and chatting programs, using an HTTP connection is inefficient. In this situation, using WebSockets is essential.

By using WebSockets, all the users connected to that open network can receive relevant data in real-time, which offers a way of establishing a two-way connection between the client and the server. This is a stateful protocol, meaning that after the initial connection authentication, the client credential is saved and further authentication is not required until the connection is destroyed.
In this tutorial, we’ll learn how to build a chat application using Django and React. After this tutorial, you should be more familiar with how WebSockets work in Django and React. To follow along with this article, you’ll need:
You can find the completed application on GitHub. Let’s get started!
The Replay is a weekly newsletter for dev and engineering leaders.
Delivered once a week, it's your curated guide to the most important conversations around frontend dev, emerging AI tools, and the state of modern software.
WebSocket is a bidirectional protocol, meaning data can be exchanged instantly between the client and server without interruption. For the same reason, WebSockets is also regarded as full-duplex communication.
WebSockets doesn’t require any specific browser to work; all browsers are compatible. WebSocket is a protocol with state. Since the client credential is saved after the primary connection validation, additional authentication is not needed again until the connection is lost.
When you want to do anything with WebSockets, Django Channels is essential, so go ahead and install it with the following command:
pip install channels
In this section, we’ll set up Django to work with WebSockets, comparing it to building a normal Django application.
Thanks to Django Channels, using WebSockets in Django is straightforward. You can build an ASGI (Asynchronous Server Gateway Interface) server using Django Channels, after which you can build a group where members can instantly text each other. Communication is not with a specific user but rather with a group, and any number of users may join.
Create a folder that will contain all the code for your project. Navigate to the folder you just created on the terminal and run the startproject command to create a new Django project:
$ django-admin startproject chat .
Now, run $ python3 manage.py startapp app to create a new app.
You need to make your Django project aware that a new app has been added and that you installed the Channels plugin. You can do so by updating the chat/settings.py file and adding 'app' to the INSTALLED_APPS list. It’ll look something like the code below:
# project/settings.py
INSTALLED_APPS = [
   ...
   'channels',
   'app',
]
In the settings.py file, you should set up configuration to allow Django and the Django channel to connect with one another via a message broker. To do so, we can utilize a tool like Redis, but in this example, we’ll stick with the local backend. Add the following line of code to your settings.py file:
ASGI_APPLICATION = "chat.routing.application" #routing.py will handle the ASGI
CHANNEL_LAYERS = {
    'default': {
        'BACKEND': "channels.layers.InMemoryChannelLayer"
        }
    }
In the code above, ASGI_APPLICATION is needed to run the ASGI server and tell Django what to do when an event happens. We’ll place this configuration in a file called routing.py. Routing Django Channels is similar to the Django URL configuration; it chooses what code to run when a WebSocket request is sent to the server.
Before you create the routing, we’ll first develop the consumers. In Django Channels, the consumer enables you to create sets of functions in your code that will be called whenever an event occurs. They are similar to views in Django.
To develop the consumers, open the app/ folder, create a new file called consumers.py, and paste the following code:
# app/consumers.py
import json
from asgiref.sync import async_to_sync
from channels.generic.websocket import WebsocketConsumer

class TextRoomConsumer(WebsocketConsumer):
    def connect(self):

        self.room_name = self.scope\['url_route'\]['kwargs']['room_name']
        self.room_group_name = 'chat_%s' % self.room_name
        # Join room group
        async_to_sync(self.channel_layer.group_add)(
            self.room_group_name,
            self.channel_name
        )
        self.accept()
    def disconnect(self, close_code):
        # Leave room group
        async_to_sync(self.channel_layer.group_discard)(
            self.room_group_name,
            self.channel_name
        )

    def receive(self, text_data):
        # Receive message from WebSocket
        text_data_json = json.loads(text_data)
        text = text_data_json['text']
        sender = text_data_json['sender']
        # Send message to room group
        async_to_sync(self.channel_layer.group_send)(
            self.room_group_name,
            {
                'type': 'chat_message',
                'message': text,
                'sender': sender
            }
        )

    def chat_message(self, event):
        # Receive message from room group
        text = event['message']
        sender = event['sender']
        # Send message to WebSocket
        self.send(text_data=json.dumps({
            'text': text,
            'sender': sender
        }))
Now, we can create the routing that will handle the consumer you just created. Create a new file called routing.py and paste the code below, which will orchestrate the consumers:
from channels.routing import ProtocolTypeRouter, URLRouter
# import app.routing
from django.urls import re_path
from app.consumers import TextRoomConsumer
websocket_urlpatterns = [
    re_path(r'^ws/(?P<room_name>[^/]+)/$', TextRoomConsumer.as_asgi()),
]
# the websocket will open at 127.0.0.1:8000/ws/<room_name>
application = ProtocolTypeRouter({
    'websocket':
        URLRouter(
            websocket_urlpatterns
        )
    ,
})
Now, let’s build the frontend of a chat application that connects to a Django backend using WebSockets. We’ll build this portion with React, and we’ll add styling with MUI.
In your terminal, navigate to the root of your project and run the following command to get the Create React App boilerplate code for React:
npx create-react-app frontend
Next, cd into the frontend/ directory and run the following commands to install the MUI and WebSocket dependencies, which allow us to connect the React application to the WebSocket server:
npm install --save --legacy-peer-deps @material-ui/core
npm install websocket
Delete all the code in the frontend/src/App.js. We’ll replace it with the code in the rest of the tutorial, starting with the initial state:
import React, { Component } from 'react';
import { w3cwebsocket as W3CWebSocket } from "websocket";

class App extends Component {
  state = {
    filledForm: false,
    messages: [],
    value: '',
    name: '',
    room: 'test',
  }
  client = new W3CWebSocket('ws://127.0.0.1:8000/ws/' + this.state.room + '/'); //gets room_name from the state and connects to the backend server
  render(){
    }

}
Now, we need to handle what happens when the component is mounted on the browser. We want the application to connect to the backend server and get messages when the component mounts, so we’ll use componentDidMount(). You can implement this by pasting the following code before the render() function:
...
componentDidMount() {
    this.client.onopen = () => {
      console.log("WebSocket Client Connected");
    };
    this.client.onmessage = (message) => {
      const dataFromServer = JSON.parse(message.data);
      if (dataFromServer) {
        this.setState((state) => ({
          messages: [
            ...state.messages,
            {
              msg: dataFromServer.text,
              name: dataFromServer.sender,
            },
          ],
        }));
      }
    };
  }
render() {
...
Next, we’ll create the forms that we’ll use to update the state. We’ll create a form that will update the name of the sender and the room name. Then, we’ll create another form that will handle the form submission. Paste the code below in the render() function:
render() {
    const { classes } = this.props;
    return (
      <Container component="main" maxWidth="xs">
        {this.state.filledForm ? (
          <div style={{ marginTop: 50 }}>
            Room Name: {this.state.room}
            <Paper
              style={{height: 500, maxHeight: 500, overflow: "auto", boxShadow: "none", }}
            >
              {this.state.messages.map((message) => (
                <>
                  <Card className={classes.root}>
                    <CardHeader title={message.name} subheader={message.msg} />
                  </Card>
                </>
              ))}
            </Paper>
            <form
              className={classes.form}
              noValidate
              onSubmit={this.onButtonClicked}
            >
              <TextField id="outlined-helperText" label="Write text" defaultValue="Default Value"
                variant="outlined"
                value={this.state.value}
                fullWidth
                onChange={(e) => {
                  this.setState({ value: e.target.value });
                  this.value = this.state.value;
                }}
              />
              <Button type="submit" fullWidth variant="contained" color="primary"
                className={classes.submit}
              >
                Send Message
              </Button>
            </form>
          </div>
        ) : (
          <div>
            <CssBaseline />
            <div className={classes.paper}>
              <form
                className={classes.form}
                noValidate
                onSubmit={(value) => this.setState({ filledForm: true })}
              >
                <TextField variant="outlined" margin="normal" required fullWidth label="Room name"
                  name="Room name"
                  autoFocus
                  value={this.state.room}
                  onChange={(e) => {
                    this.setState({ room: e.target.value });
                    this.value = this.state.room;
                  }}
                />
                <TextField variant="outlined" margin="normal" required fullWidth name="sender" label="sender"
                  type="sender"
                  id="sender"
                  value={this.state.name}
                  onChange={(e) => {
                    this.setState({ name: e.target.value });
                    this.value = this.state.name;
                  }}
                />
                <Button type="submit" fullWidth variant="contained" color="primary"
                  className={classes.submit}
                >
                  Submit
                </Button>
              </form>
            </div>
          </div>
        )}
      </Container>
    );
  }

export default withStyles(useStyles)(App);
When you fill in the room name and the sender’s name, filledForm will be changed to true in the state, then the form for inputting messages will be rendered. In our code, we used some MUI classes that we’ll need to import. You can do so by pasting the code below at the top of your App.js file:
import Button from "@material-ui/core/Button";
import CssBaseline from "@material-ui/core/CssBaseline";
import TextField from "@material-ui/core/TextField";
import Container from "@material-ui/core/Container";
import Card from "@material-ui/core/Card";
import CardHeader from "@material-ui/core/CardHeader";
import Paper from "@material-ui/core/Paper";
import { withStyles } from "@material-ui/core/styles";
const useStyles = (theme) => ({
  submit: {
    margin: theme.spacing(3, 0, 2),
  },
});
Once the message form is submitted, we’ll send the text to the backend server when the submit button is clicked. Paste the code below directly above the componentDidMount() function:
  onButtonClicked = (e) => {
    this.client.send(
      JSON.stringify({
        type: "message",
        text: this.state.value,
        sender: this.state.name,
      })
    );
    this.state.value = "";
    e.preventDefault();
  };
  componentDidMount() {
...
Now that we’ve finished coding our application, we can test it out. First, start up the backend server by running the following command. Make sure you’re in the directory where the manage.py file is:
python manage.py runserver
On another terminal window, navigate to the frontend/ directory and run the frontend server by running the command below. The React application will open automatically:
npm start
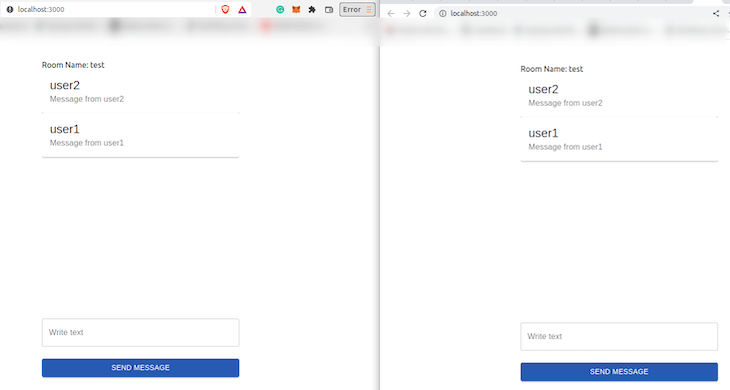
Fill in a name and a room name. Then, open the application in another browser with a different name but the same room name. Now, you can start chatting with yourself, and you’ll notice that the messages are received in real-time:

In this article, we’ve learned about WebSockets, its applications, and how to use it in Django by utilizing Django Channels. Finally, we covered how to establish WebSocket connections to the Django server using React.
Although we built an efficient, real-time chat application, there are still improvements that you can make. For example, to store messages, you might include a database connection. As an alternative to the local backend, you might consider using Redis as the message broker.
I hope you enjoyed this article and be sure to leave a comment if you have any questions. Happy coding!
Install LogRocket via npm or script tag. LogRocket.init() must be called client-side, not
server-side
$ npm i --save logrocket

// Code:

import LogRocket from 'logrocket';
LogRocket.init('app/id');
// Add to your HTML:

<script src="https://cdn.lr-ingest.com/LogRocket.min.js"></script>
<script>window.LogRocket && window.LogRocket.init('app/id');</script>

Russ Miles, a software development expert and educator, joins the show to unpack why “developer productivity” platforms so often disappoint.

Discover what’s new in The Replay, LogRocket’s newsletter for dev and engineering leaders, in the February 18th issue.

Learn how to recreate Claude Skills–style workflows in GitHub Copilot using custom instruction files and smarter context management.

Claude Code is deceptively capable. Point it at a codebase, describe what you need, and it’ll autonomously navigate files, write […]
Would you be interested in joining LogRocket's developer community?
Join LogRocket’s Content Advisory Board. You’ll help inform the type of content we create and get access to exclusive meetups, social accreditation, and swag.
Sign up now
3 Replies to "Building a chat application with React and Django Channels"
Connection is getting failed
please use channels==3.0.5 and try again. Also the code on this tutorial was built on python 3.7
Very very good tutorial thanks