Having worked with several ORMs in the past, MikroORM sparked my interested because it promises certain changes and additions that aren’t already available in the JavaScript/TypeScript ecosystem.

While trying it out, I discovered that it wasn’t so easy to set up, especially if you aren’t too familiar with TypeScript. If you’re just getting your feet wet with building RESTful API, this tutorial will show you how to make the most out of the ORM in an easy-to-follow, step-by-step manner.
To show MikroORM in action, we’ll walk you through the steps of building an API for a blog application. Our example app’s functionality will include the ability to create posts, write comments, and perform updating, deleting, and reading operations on the posts and comments. Fully grasping these concepts will serve as foundation toward building more complex CRUD applications.
Here is the GitHub repository of the finished project in case you get stuck and need a reference.
The Replay is a weekly newsletter for dev and engineering leaders.
Delivered once a week, it's your curated guide to the most important conversations around frontend dev, emerging AI tools, and the state of modern software.
Before we begin, below is an overview of the technologies we’ll be using.
This tutorial assumes some prior knowledge of JavaScript. We’ll use the latest ES6 features.
We’ll set up the structure for our application using the following commands.
Run each command one after the other:
mkdir -p  mikroORM-express-tutorial/{server}
cd mikroORM-express-tutorial
npm init -y
touch mikro-orm.config.js
After running the above commands, you should have a project structure that looks like this:
mikroORM-express-tutorial
 |--- server
 |--- mikro-orm.config.js
 |--- package-lock.json
 |--- package.json
Our configuration file will go into mikro-orm.config.js file while the rest of our application code will be in the server directory.
npm i express

cd server
touch app.js
In this file, we’ll bootstrap our Express.js application:
const express = require("express");

let port = process.env.PORT || 3000;

(async () => {
  //bootstrap express application.
  const app = express();

  //parse incoming requests data;
  app.use(express.json());
  app.use(express.urlencoded({ extended: false }));

  //default catch-all route that sends a JSON response.
  app.get("*", (req, res) =>
    res
      .status(200)
      .send({ success: true, message: "This is where it all starts!!!" })
  );

  app.listen(port, () => {
    console.log(
      `Express Mikro-ORM tutorial listening at http://localhost:${port}`
    );
  });
})();
We’ll also install nodemon so we don’t have to restart our server each time we make changes in our workspace.
// -D options indicates that we want this package as a dev dependency rather than main package that will be bundled with the rest of our application.

npm i -D nodemon
Next, let’s open up package.json file and create a command to start our server under the scripts sections:
>....
"scripts": {
    "test": "echo \"Error: no test specified\" && exit 1",
    "start:dev": "nodemon ./server/app"
  },
....
Now let’s try starting our application by running the following command:
npm run start:dev
Open up you browser and visit the url http://localhost:3000. You should receive the following response:
{
 "success":true,
 "message":"This is where it all starts!!!"
}
This step requires a PostgreSQL installation, either on our local machine or a hosted instance online. Setting up a local instance is beyond the scope of this article, we’ll use a managed instance on ElephantSQL.
Visit the website and sign up for a free-tier PostgreSQL instance; this shouldn’t take more than two minutes.
npm i -s @mikro-orm/core @mikro-orm/postgresql

//next cd into server
touch bootstrap.js

inside bootstrap.js paste the following lines of code

const { mikroORMConfig } = require("../mikro-orm.config");
const allEntities = require("./entities");
module.exports.initializeORM = async (MikroORM) => {
  const DI = {};
  DI.orm = await MikroORM.init(mikroORMConfig);
  DI.em = DI.orm.em;
  for (const entityInstance of allEntities) {
    if (entityInstance.label === "BaseEntity") {
      continue;
    }
    DI[entityInstance.label] = await DI.orm.em.getRepository(
      entityInstance.entity
    );
  }
  return DI;
};
Next, lets set up our database connection in the file mikro-orm.config.js:
const allEntities = require("./server/entities");

module.exports = {
  entities: allEntities,
  type: "postgresql",
  clientUrl:
    "some string from https://www.elephantsql.com/",
};
In both of the above snippets, there is a reference to the variable allEntities. We’ll look at defining entities.
MikroORM has the concept of baseEntitiy. This is optional, but I find it useful because it helps in making some properties and fields reusable across all entities.
In the server directory, we will be making a few files:
mkdir entities
cd entities
touch BaseEntity.js index.js Post.js

//inside BaseEntity.js
const { EntitySchema } = require("@mikro-orm/core");
class BaseEntity {
  constructor() {
    this.createdAt = new Date();
    this.updatedAt = new Date();
  }
}
const schema = new EntitySchema({
  name: "BaseEntity",
  abstract: true,
  properties: {
    id: { primary: true, type: "number" },
    createdAt: { type: "Date" },
    updatedAt: { type: "Date", onUpdate: () => new Date() },
  },
});
module.exports = {
  BaseEntity,
  entity: BaseEntity,
  schema,
  label: "BaseEntity",
};
Inside Post.js, we will require the author, title, and content as input form the user when creating a POST.
"use strict";
const { EntitySchema } = require("@mikro-orm/core");
const { BaseEntity } = require("./BaseEntity");
const { Comment } = require("./Comment");
class Post extends BaseEntity {
  constructor(title, author, content) {
    super();
    this.title = title;
    this.author = author;
    this.content = content;
  }
}
const schema = new EntitySchema({
  class: Post,
  extends: "BaseEntity",
  properties: {
    title: { type: "string" },
    author: { type: "string" },
    content: { type: "string" },
  },
});
module.exports = {
  Post,
  entity: Post,
  schema,
  label: "postRepository",
};
We’ll make these files available via index.js.
const Post = require("./Post");
const BaseEntity = require("./BaseEntity");

module.exports = [Post, BaseEntity];
Now that we have the layout of our schema, the next step is to run migrations to enable it to sync with our PostgreSQL database.
// At the root of the project run the following command
 npx mikro-orm schema:update --run --fk-checks
Now that we’ve successfully set up our entities and run the database migration, it’s time to make our controllers. We’ll make a postController that will use the above entities’ definitions and will be responsible for carrying out CRUD operations on the Post entity.
//cd into server
mkdir controllers
touch post.controller.js
//inside the file post.controller.js
const { Router } = require("express");
const { Post } = require("../entities/Post");
const router = Router();
const PostController = (DI) => {
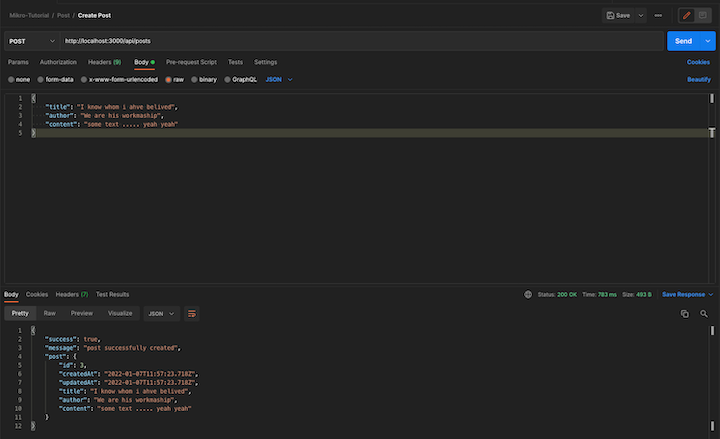
router.post("/", async (req, res) => {
const { title, author, content } = req.body;
if (!title || !author || !content) {
return res.status(400).send({
success: false,
message: "One of `title, author` or `content` is missing",
});
}
try {
const post = new Post(title, author, content);
await DI.postRepository.persistAndFlush(post);
res
.status(200)
.send({ success: true, message: "post successfully created", post });
} catch (e) {
return res.status(400).send({ success: false, message: e.message });
}
});
return router;
}
Tha above code snippet creates a new blog post. If successfully created, it returns the blog post. Otherwise, it returns an error.
Note: We could do a better job of managing validations, but for the purpose of keeping this tutorial simple, I chose this approach.
Next, we’ll import our controller into our main application and pass it the dependency variable it needs.
Here is what our updated app.js file looks like now:
const express = require("express");
const { MikroORM, RequestContext } = require("@mikro-orm/core");
const { initializeORM } = require("./bootstrap");
const { PostController } = require("./controllers/post.controller");

let port = process.env.PORT || 3000;

(async () => {
  const app = express();
  const DI = await initializeORM(MikroORM);
  app.use(express.json());
  app.use(express.urlencoded({ extended: false }));

  app.use((req, res, next) => {
    RequestContext.create(DI.orm.em, next);
    req.di = DI;
  });

  app.use("/api/posts", PostController(DI));

  app.get("*", (req, res) =>
    res
      .status(200)
      .send({ success: true, message: "This is where it all starts!!!" })
  );

  app.listen(port, () => {
    console.log(
      `Express Mikro-ORM tutorial listening at http://localhost:${port}`
    );
  });
})();
In line 10, we initialize the database connection via our ORM to the managed PostgreSQL instance and a return dependency that we will make available across the entire application.
In lines 14–17, we will need to fork the entity manager for each request so their identity maps will not collide. To do so, we use the RequestContext helper.
Finally, in line 19, we inject into our controller the dependency it needs.
Cheers if you made it this far! Feel free to create more posts if you’re so inclined.
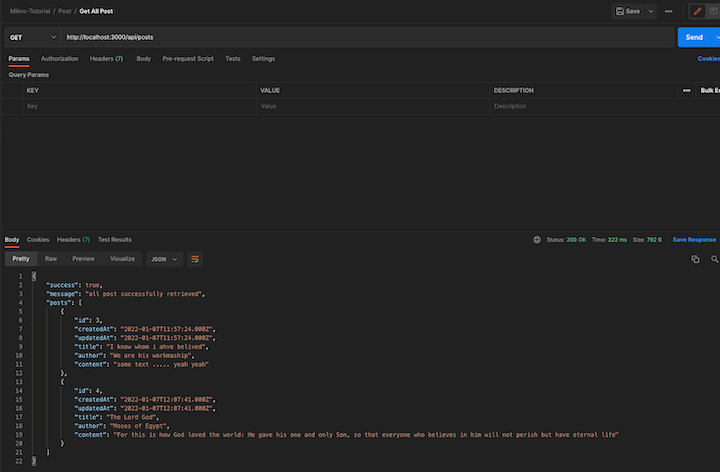
Next, we’ll add the functionality to list all todos.
Add the following snippet into the postController file post.controller.js:
....
 router.get("/", async (req, res) => {
    try {
      const posts = await DI.postRepository.find({});
      res.status(200).send({
          success: true,
          message: "all post successfully retrieved",
          posts
});
    } catch (e) {
      return res.status(400).send({
        success: false,
        message: e.message,
      });
    }
  });
....
In the above code snippet, we’re fetching all the posts from our database and sending them back to the user (or an error message should something go wrong along the way).
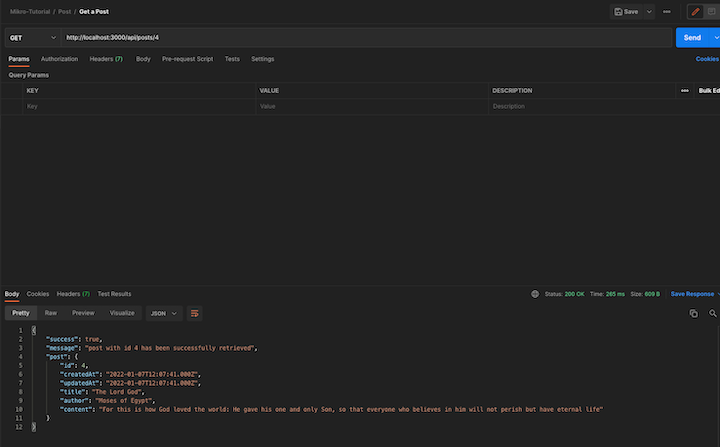
We’ll also add the functionality to retrieve a single post rather than all available posts. To achieve this, we’ll add the following to our postController:
....
  router.get("/:id", async (req, res) => {
    const { id } = req.params;
    try {
      const post = await DI.postRepository.findOneOrFail({ id });
      res.status(200).send({
        success: true,
        message: `post with id ${id} has been successfully retrieved`,
        post,
      });
    } catch (e) {
      return res.status(400).send({ success: false, message: e.message });
    }
  });

....
With this new route in place, we can go ahead and test it in Postman.
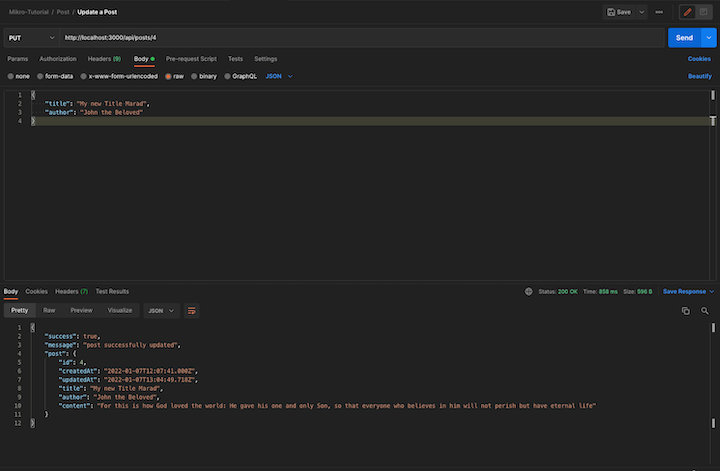
Let’s add the functionality to update a single post.
At the top of our file, we’ll add the following import statement:
const { wrap } = require("@mikro-orm/core");

....

 router.put("/:id", async (req, res) => {
    const { id } = req.params;
    const { title, author, content } = req.body;

    if (!title && !author && !content) {
      return res.status(400).send({
        success: false,
        message: "One of `title, author` or `content` must be present",
      });
    }
    try {
      const post = await DI.postRepository.findOneOrFail({ id });
      wrap(post).assign({
        title: title || post.title,
        author: author || post.author,
        content: content || post.content,
      });
      await DI.postRepository.flush();
      res.status(200).send({
        success: true,
        message: "post successfully updated",
        post,
      });
    } catch (e) {
      return res.status(400).send({ success: false, message: e.message });
    }
  });

....
In the above code snippet, we import wrap from the library and then use it to update our post. We then fall back to existing values if the user provides partial fields when updating the particular post.
Let’s test this in Postman:
Finally, let’s add the functionality to delete a post.
....
router.delete("/:id", async (req, res) => {
    const { id } = req.params;
    try {
      const post = await DI.postRepository.findOneOrFail({ id });
      await DI.postRepository.removeAndFlush(post);
      res.status(200).send({
        success: true,
        message: `successfully deleted post with ${id} id`,
        post,
      });
    } catch (e) {
      return res.status(400).send({ success: false, message: e.message });
    }
  });
....
Head to this GitHub repository to see a working code sample for reference.
If you’re building a real-world application with Node.js, Express, and MikroORM, you may want to consider adding things like authentication and authorization, better error handling, etc. If you’re interested in taking a deeper dive, you can learn more about relationship between entities, unit of work, transactions, etc.
 Monitor failed and slow network requests in production
Deploying a Node-based web app or website is the easy part. Making sure your Node instance continues to serve resources to your app is where things get tougher. If you’re interested in ensuring requests to the backend or third-party services are successful, try LogRocket.

LogRocket lets you replay user sessions, eliminating guesswork around why bugs happen by showing exactly what users experienced. It captures console logs, errors, network requests, and pixel-perfect DOM recordings — compatible with all frameworks.
LogRocket's Galileo AI watches sessions for you, instantly identifying and explaining user struggles with automated monitoring of your entire product experience.
LogRocket instruments your app to record baseline performance timings such as page load time, time to first byte, slow network requests, and also logs Redux, NgRx, and Vuex actions/state. Start monitoring for free.

Local AI proxy tutorial for detecting, masking, and rehydrating PII before prompts reach cloud LLMs.

Learn how Graph RAG uses connected knowledge structures to improve retrieval beyond simple text similarity.

Learn how sibling-index() enables clean, JavaScript-free stagger animations using native CSS.

useEffect breaks AI streaming responses in ReactSee why useEffect breaks AI streaming in React, and how moving stream state outside React fixes flicker and stale updates.
Would you be interested in joining LogRocket's developer community?
Join LogRocket’s Content Advisory Board. You’ll help inform the type of content we create and get access to exclusive meetups, social accreditation, and swag.
Sign up now

