Whether writing comments, composing blog posts, or writing advanced articles, a well-configured and performant text editor has always been one of the cornerstones for productive work and a great user experience.

The Replay is a weekly newsletter for dev and engineering leaders.
Delivered once a week, it's your curated guide to the most important conversations around frontend dev, emerging AI tools, and the state of modern software.
One of the most popular choices among web developers is Quill, which is a rich text editor based on the WYSIWYG (What You See Is What You Get) principle, meaning that users can edit the content while getting a preview of its final appearance.
Some of the main reasons users choose Quill are its ease of use, customization options, awesome documentation, and the fact that it is open-source.
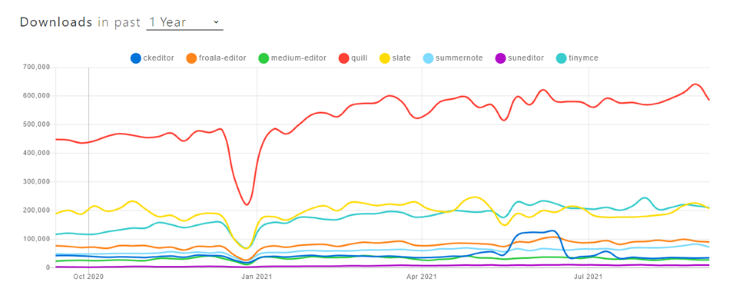
The npm trends popularity graph below shows the download stats for Quill and other WYSIWYG text-editor alternatives in the past year:

Today, we’ll build a WYSIWYG text editor in React using Quill.

By the end of this tutorial, you will have a fully functional text editor with text formatting options and full access to the editor’s content.
First, let’s set up a React application using Create React App, which requires no setup and creates a fully working React boilerplate within a minute.
Open your terminal and run the following command:
npx create-react-app react-quill-editor
After, change your working directory to the newly created project folder by running the following command:
cd react-quill-editor
Then start your React application by running:
npm start
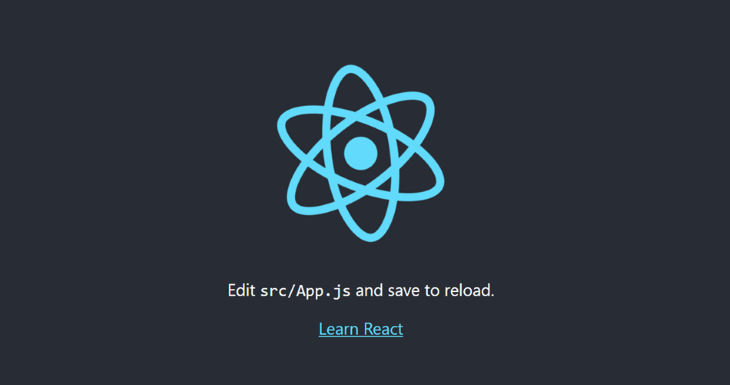
Your browser window should open automatically, and you should see the default template that looks like this:

Back in the project files folder, we have some files that we don’t need.
Find the src folder and remove everything except App.js, which will include the main logic of the editor, and index.js, which will render the editor to the DOM.
First, install the react-quill package, which is a React wrapper around Quill. To do that, run the following command in your terminal:
`npm i react-quill`
Once the installation is complete, open the App.js file, import the ReactQuill component, and include it into the App, as shown below:
javascript
import ReactQuill from 'react-quill';
import 'react-quill/dist/quill.snow.css';

const App = () => {
    return (
        <ReactQuill theme="snow"/>
    )
}

export default App;
To render the app to the DOM, make sure your index.js looks like this:
javascript
import  React  from  "react";
import  ReactDOM  from  "react-dom";

import  App  from  "./App";

ReactDOM.render(
    <React.StrictMode>
        <App  />
    </React.StrictMode>,
    document.getElementById("root")
);
Now open the browser window. If your React app is still running, you will see that the basic editor has been rendered:

Note that for presentation purposes, I’ve added some dummy text from Lorem Ipsum.
Quill comes with a couple of built-in themes. The first one is a clean and flat toolbar theme called “Snow”, which we already used and is widely recognized as the Quill’s standard appearance.
The “Snow” theme includes toolbar options, such as h1, h2, h3, bold, italic, and underline. There is also an option to add links and create ordered and unordered item lists.
The second one is called “Bubble.” It is a tooltip-based theme that reminds of Medium’s standard text editor.
The setup is the same used in the previous theme, except you are importing a different stylesheet and setting a different value for the theme prop, like so:
javascript
import ReactQuill from 'react-quill';
import 'react-quill/dist/quill.bubble.css';

const App = () => {
    return (
        <ReactQuill theme="bubble"/>
    )
}

export default App;
Here is what the tooltip theme looks like:

The theme includes options such as bold, italic, h1, and h2, and there is an option to add links and create quotes.
In this tutorial, we will stick with the standard theme, “Snow”.
Quill allows users to control which toolbar features to use. The supported options can be divided by the way they are being displayed in the editor — as an inline, block, or embed element.
See the table for a full list of available options:
| Type | Option |
| Inline | font, size, background, color, bold, italic, script, strike, underline, link, code |
| Block | header, list, blockquote, direction, indent, align, codeblock |
| Embed | image, video |
The toolbar is configured via the toolbar module.
javascript
import ReactQuill from 'react-quill';
import 'react-quill/dist/quill.snow.css';

const modules = {
    toolbar: [
        // options here
    ]
}

const App = () => {
    return (
        <ReactQuill modules={modules} theme="snow"/>
    )
}

export default App;
The available features can be grouped by nesting arrays. This will add a space between the groups in the UI.
javascript
const modules = {
    toolbar: [
        ["font", "header"], ["bold", "underline"],
    ]
}
Furthermore, you can customize buttons by providing the type for the object key.
You can provide the types for script (“sub” and “super”), list (“ordered” and “bullet”) and indent (“+1” and “-1”).
Similarly, you can do the same for dropdowns, only all the values must be provided as an array. You can use this for heading, where you can provide values 1 to 6.
javascript
const modules = {
    toolbar: [
        { script:  "sub"  }, // custom button
        { header:  [1, 2, 3]  }, // custom dropdown
    ]
}
To use the default values for options like font, color, and background, set the key value as an empty array, like so:
javascript
const modules = {
    toolbar: [
        { color: [] },
    ]
}
Let’s combine all we have learned above and create a rich text editor with all the features users might need for content creation:
javascript
import  ReactQuill  from  "react-quill";
import  "react-quill/dist/quill.snow.css";

const  modules  = {
    toolbar: [
        [{ font: [] }],
        [{ header: [1, 2, 3, 4, 5, 6, false] }],
        ["bold", "italic", "underline", "strike"],
        [{ color: [] }, { background: [] }],
        [{ script:  "sub" }, { script:  "super" }],
        ["blockquote", "code-block"],
        [{ list:  "ordered" }, { list:  "bullet" }],
        [{ indent:  "-1" }, { indent:  "+1" }, { align: [] }],
        ["link", "image", "video"],
        ["clean"],
    ],
};

const  App  = () => {
    return  <ReactQuill  modules={modules} theme="snow" placeholder="Content goes here..."  />;
};

export  default  App;
Notice we also set a placeholder prop for the ReactQuill component, which improves the overall UI by highlighting where the content should be.
If we check the browser again, now we have a feature-rich text editor that looks like this:

To make practical use of the content (such as posting it in the database), we first need to access it. For that, we will use React built-in useState hook.
First, import it at the very top of the App.js file:
javascript
import {useState} from 'react'
Then, inside the App component, create a value variable that will hold the content of the editor and set the value to an empty string.
javascript
const [value, setValue] =  useState("");
Finally, set the setValue function as the onChange event handler in the ReactQuill component, so value gets updated every time there is a change in the editor.
javascript
<ReactQuill  modules={modules} theme="snow" onChange={setValue} placeholder="Content goes here..."  />;
We will also add console.log(value) inside the App component, so it is easier to test that the value gets updated as expected.
If you followed along, your App.js file should now look like this:
javascript
import { useState } from  "react";
import  ReactQuill  from  "react-quill";
import  "react-quill/dist/quill.snow.css";

const  modules  = {
    toolbar: [
        [{ font: [] }],
        [{ header: [1, 2, 3, 4, 5, 6, false] }],
        ["bold", "italic", "underline", "strike"],
        [{ color: [] }, { background: [] }],
        [{ script:  "sub" }, { script:  "super" }],
        ["blockquote", "code-block"],
        [{ list:  "ordered" }, { list:  "bullet" }],
        [{ indent:  "-1" }, { indent:  "+1" }, { align: [] }],
        ["link", "image", "video"],
        ["clean"],
    ],
};

const  App  = () => {
    const [value, setValue] =  useState("");
    console.log(value);

    return  <ReactQuill  modules={modules} theme="snow" onChange={setValue} placeholder="Content goes here..." />;
};

export  default  App;
Now check your browser and open Developer tools. You can do that via browser settings or by pressing the F12 key on the keyboard. Once the Developer tools are opened, switch to the Console tab.
Now try to type something in your editor and use some styling options. As you can see, the value is being printed on the console each time there is an update, meaning you can access it whenever you need it.

The value printed out is a string consisting of the editor content expressed in HTML syntax.
You can test it by adding console.log(typeof value) in the App component. The string format allows you to process and store the content afterward.
Congratulations, you have created a fully working and feature-rich Quill text editor in React! This should cover most of the needs of a content creator.
Next time you are in search of a solid solution for the WYSIWYG editor, look no further than Quill. It’s easy to set up, incredibly flexible, and the developer has full access to the features of the editor.
Install LogRocket via npm or script tag. LogRocket.init() must be called client-side, not
server-side
$ npm i --save logrocket

// Code:

import LogRocket from 'logrocket';
LogRocket.init('app/id');
// Add to your HTML:

<script src="https://cdn.lr-ingest.com/LogRocket.min.js"></script>
<script>window.LogRocket && window.LogRocket.init('app/id');</script>

@container scroll-state: Replace JS scroll listeners nowCSS @container scroll-state lets you build sticky headers, snapping carousels, and scroll indicators without JavaScript. Here’s how to replace scroll listeners with clean, declarative state queries.

Explore 10 Web APIs that replace common JavaScript libraries and reduce npm dependencies, bundle size, and performance overhead.

Russ Miles, a software development expert and educator, joins the show to unpack why “developer productivity” platforms so often disappoint.

Discover what’s new in The Replay, LogRocket’s newsletter for dev and engineering leaders, in the February 18th issue.
Hey there, want to help make our blog better?
Join LogRocket’s Content Advisory Board. You’ll help inform the type of content we create and get access to exclusive meetups, social accreditation, and swag.
Sign up now
2 Replies to "Build a WYSIWYG text editor using Quill"
Thank you for this article.
I am building rich text editor where i need to support markdown, Mentions and hashtags, so how can we achieve this.
Ok, so we have an editor. But what I can’t figure out is how to save the content to a database and then edit it again later using the quill editor. Any help?