If you want to learn about automating image optimization, then you’ve come to the right place, as you can do just that with the TinyPNG API! This post will demonstrate clearly how to do that so you can optimize your images with ease in your projects.

Jump ahead:
The Replay is a weekly newsletter for dev and engineering leaders.
Delivered once a week, it's your curated guide to the most important conversations around frontend dev, emerging AI tools, and the state of modern software.
Images are a big part of the web — they’re also a big part of the web’s payload. If we’re not careful, we can end up with a site that’s slow to load and expensive to host; a really bad combo!
I run Lighthouse on my blog and I’m always looking for ways to improve the performance of the site; one of the things that Lighthouse flags is image optimization. It’s a good idea to optimize our images to make sure they’re not unhelpfully large and hindering the performance of our projects.
We can do this manually using tools like TinyPNG or Squoosh, but it’s also possible to automate this process completely. In this post, I’ll show you how to optimize images automatically using the TinyPNG API.
The TinyPNG API is a paid service. We can get a free API key which allows us to optimize 500 images per month. If we need to optimize more than that, we’ll need to pay for a subscription. I personally rarely find I optimize more than 500 images per month, so I’m happy with the free plan.
It’s worth noting that the name “TinyPNG” is a bit of a misnomer. The API supports a number of image formats including PNG, JPEG, and WebP, so it’s not just for PNGs — in fact, we’ll be using the WebP format in this post.
You can just use the API directly if you like, but I prefer to use a client library — we’ll be using the Node.js library.
We’re going to initialize a simple Node.js console application called tinify using TypeScript and ts-node:
mkdir tinify
cd tinify
npm init -y
npm install @types/node tinify ts-node typescript
npx tsc --init
You’ll note that we’re using the tinify npm package that is developed here. Handily, this package ships with TypeScript definitions, so we don’t need to install a separate types package.
In our package.json file, we’ll add a start script to run our application:
  "scripts": {
    "start": "ts-node index.ts"
  },
In our tsconfig.json file, we’ll also up the target to a new ECMAScript emit version to allow us to use some newer language features. We don’t need this for TinyPNG, but it’s nice to use the newer features:
{
  "compilerOptions": {
    "target": "es2021"
  }
}
Now, we can create our index.ts file:
import fs from 'fs';
import path from 'path';
import tinify from 'tinify';

function setUpTinify() {
  if (!process.env.TINIFY_KEY) {
    console.log(
      'Run with: TINIFY_KEY=$YOUR_API_KEY IMAGE_DIR=$YOUR_IMAGE_DIRECTORY yarn start'
    );
    process.exit(1);
  }

  tinify.key = process.env.TINIFY_KEY;
}

function getImageFilesFromDirectory(dir: string) {
  return fs
    .readdirSync(dir)
    .filter(
      (file) =>
        file.endsWith('.jpg') ||
        file.endsWith('.jpeg') ||
        file.endsWith('.webp') ||
        file.endsWith('.png')
    )
    .map((file) => path.resolve(dir, file))
    .filter((file) => fs.statSync(file).size > 0);
}

async function processImageFiles(imageFiles: string[]) {
  let processed = 0;
  let totalOriginalSizeKb = 0n;
  let totalNewSizeKb = 0n;
  let failed: string[] = [];

  for (const imageFilePath of imageFiles) {
    try {
      console.log(`
🖼️  Processing ${imageFilePath}
`);
      const originalImageFilePrefix = imageFilePath.substring(
        0,
        imageFilePath.lastIndexOf('.')
      );

      const originalStats = await fs.promises.stat(imageFilePath, {
        bigint: true,
      });
      const originalSizeKb = originalStats.size / 1024n;

      const source = tinify.fromFile(imageFilePath);
      const converted = source.convert({ type: ['image/webp', 'image/png'] });
      const convertedExtension = await converted.result().extension();
      const newImageFilePath = `${originalImageFilePrefix}.${convertedExtension}`;
      await converted.toFile(newImageFilePath);

      const newStats = await fs.promises.stat(newImageFilePath, {
        bigint: true,
      });
      const newSizeKb = newStats.size / 1024n;

      const imageFileName = path.basename(imageFilePath);
      const newImageFileName = path.basename(newImageFilePath);

      totalOriginalSizeKb += originalSizeKb;
      totalNewSizeKb += newSizeKb;

      console.log(`- 🔴 ${originalSizeKb}kb - ${imageFileName}
- 🟢 ${newSizeKb}kb - ${newImageFileName}
- 🔽 ${calculatePercentageReduction({ originalSizeKb, newSizeKb }).toFixed(
        2
      )}% reduction

✅ Processed! (${++processed} of ${imageFiles.length})

----------------------`);
    } catch (e) {
      console.log(`\n❌ Failed to process ${imageFilePath}`);
      failed.push(imageFilePath);
    }
  }

  console.log(`
************************************************
* Total savings for ${imageFiles.length} images
- 🔴 ${totalOriginalSizeKb}kb
- 🟢 ${totalNewSizeKb}kb
- 🔽 ${calculatePercentageReduction({
    originalSizeKb: totalOriginalSizeKb,
    newSizeKb: totalNewSizeKb,
  }).toFixed(2)}% reduction
************************************************
`);

  if (failed.length > 0) console.log('Failed to process', failed);
}

function calculatePercentageReduction({
  originalSizeKb,
  newSizeKb,
}: {
  originalSizeKb: bigint;
  newSizeKb: bigint;
}) {
  return (
    ((Number(originalSizeKb) - Number(newSizeKb)) / Number(originalSizeKb)) *
    100
  );
}

async function run() {
  setUpTinify();

  let directory = process.env.IMAGE_DIR;

  if (!directory) {
    console.log('No directory specified!');
    process.exit(1);
  }

  const imageFiles = getImageFilesFromDirectory(directory);
  console.log(`Found ${imageFiles.length} image files in ${directory}`);
  await processImageFiles(imageFiles);
}

// do it!
run();
There are a number of things happening here, so let me walk through it in a little more detail.
Each time we run it, we’re checking that we have a TinyPNG API key and an image directory specified. If not, we’ll exit with an error message.
Then, we’re getting a list of image files from the specified directory. We search for files with the extensions .jpg, .jpeg, .webp, and .png (those formats supported by TinyPNG) and we also filter out any files that are empty.
Next, we’re looping through the image files and processing them one by one. We’re using the tinify package to shrink the image and we say we’ll accept either webp or png as our target format. Tinify will decide which is the most optimal format upon each request and render accordingly.
Finally, we’re saving the new files to the same directory as the original file and we’re calculating the percentage reduction in file size.
To get an idea of what’s happening here, we can look at the code that does the conversion:
const source = tinify.fromFile(imageFilePath);
const converted = source.convert({ type: ['image/webp', 'image/png'] });
const convertedExtension = await converted.result().extension();
const newImageFilePath = `${originalImageFilePrefix}.${convertedExtension}`;
await converted.toFile(newImageFilePath);
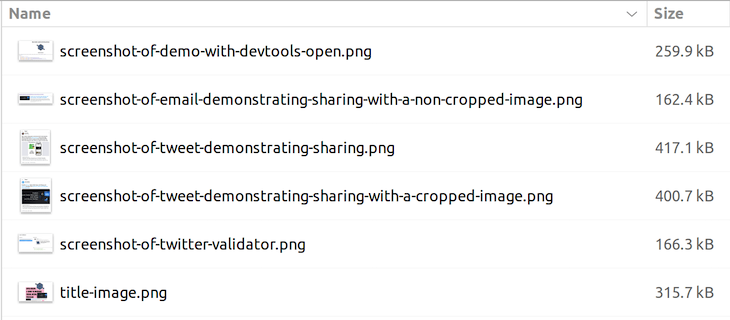
With our tool written, we now need to test it out. I have a directory of images that I want to compress:
~/code/github/open-graph-sharing-previews/images-to-shrink
Now, let’s run our tool against that directory and see what happens.
TINIFY_KEY=YOUR_API_KEY_GOES_HERE IMAGE_DIR=~/code/github/open-graph-sharing-previews/images-to-shrink yarn start

yarn run v1.22.18
$ ts-node index.ts
Found 6 image files in /home/john/code/github/open-graph-sharing-previews/images-to-shrink

🖼️  Processing /home/john/code/github/open-graph-sharing-previews/images-to-shrink/screenshot-of-demo-with-devtools-open.png

- 🔴 253kb - screenshot-of-demo-with-devtools-open.png
- 🟢 83kb - screenshot-of-demo-with-devtools-open.png
- 🔽 67.19% reduction

✅ Processed! (1 of 6)

----------------------

🖼️  Processing /home/john/code/github/open-graph-sharing-previews/images-to-shrink/screenshot-of-email-demonstrating-sharing-with-a-non-cropped-image.png

- 🔴 158kb - screenshot-of-email-demonstrating-sharing-with-a-non-cropped-image.png
- 🟢 50kb - screenshot-of-email-demonstrating-sharing-with-a-non-cropped-image.png
- 🔽 68.35% reduction

✅ Processed! (2 of 6)

----------------------

🖼️  Processing /home/john/code/github/open-graph-sharing-previews/images-to-shrink/screenshot-of-tweet-demonstrating-sharing-with-a-cropped-image.png

- 🔴 391kb - screenshot-of-tweet-demonstrating-sharing-with-a-cropped-image.png
- 🟢 64kb - screenshot-of-tweet-demonstrating-sharing-with-a-cropped-image.webp
- 🔽 83.63% reduction

✅ Processed! (3 of 6)

----------------------

🖼️  Processing /home/john/code/github/open-graph-sharing-previews/images-to-shrink/screenshot-of-tweet-demonstrating-sharing.png

- 🔴 407kb - screenshot-of-tweet-demonstrating-sharing.png
- 🟢 78kb - screenshot-of-tweet-demonstrating-sharing.webp
- 🔽 80.84% reduction

✅ Processed! (4 of 6)

----------------------

🖼️  Processing /home/john/code/github/open-graph-sharing-previews/images-to-shrink/screenshot-of-twitter-validator.png

- 🔴 162kb - screenshot-of-twitter-validator.png
- 🟢 49kb - screenshot-of-twitter-validator.webp
- 🔽 69.75% reduction

✅ Processed! (5 of 6)

----------------------

🖼️  Processing /home/john/code/github/open-graph-sharing-previews/images-to-shrink/title-image.png

- 🔴 308kb - title-image.png
- 🟢 49kb - title-image.webp
- 🔽 84.09% reduction

✅ Processed! (6 of 6)

----------------------

************************************************
* Total savings for 6 images
- 🔴 1679kb
- 🟢 373kb
- 🔽 77.78% reduction
************************************************

Done in 25.23s.
Isn’t that impressive? We’ve reduced the file size of all of these images by an average amount of 77.78%! That’s a huge saving!
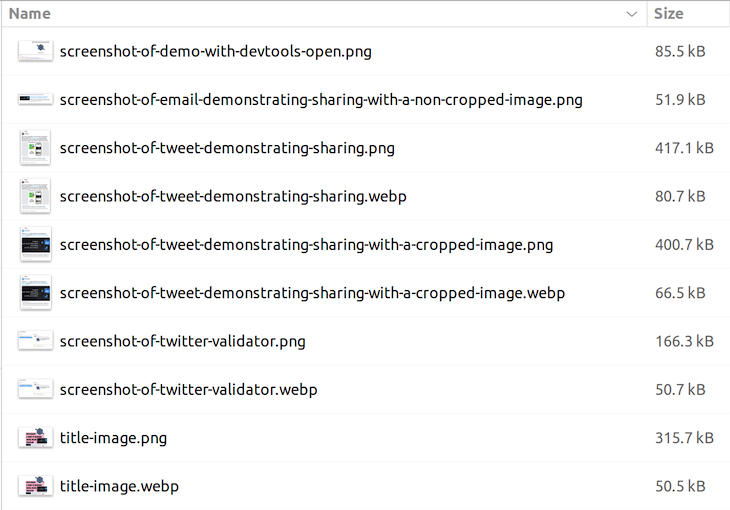
If we look a little closer, we’ll see that on two occasions the format remained a PNG file and the size shrunk. In four cases, the format has changed to a WebP file. When we look at our directory again, we can see that the files have been updated, and some new WebP files have been created:
In this article, we’ve seen how we can use the TinyPNG API to optimize our images. In addition to this, we also demonstrated how you can build a tool that uses the TinyPNG API to automatically optimize the images in a given directory.
It’s all automated, so we can now run this script whenever we want to optimize images in anywhere we want!
If you’re interested in learning other methods of image optimisation, you might find this post on using Cloudinary as your image CDN interesting.

LogRocket lets you replay user sessions, eliminating guesswork by showing exactly what users experienced. It captures console logs, errors, network requests, and pixel-perfect DOM recordings — compatible with all frameworks, and with plugins to log additional context from Redux, Vuex, and @ngrx/store.
With Galileo AI, you can instantly identify and explain user struggles with automated monitoring of your entire product experience.
Modernize how you understand your web and mobile apps — start monitoring for free.

A step-by-step guide to building your first MCP server using Node.js, covering core concepts, tool design, and upgrading from file storage to MySQL.

Using security headers in your Next.js apps is a highly effective way to secure websites from common security threats.

A deep dive into April 2026’s AI model and tool rankings. We break down performance, usability, pricing, and real-world capabilities across 50+ features to help you pick the right tools for your development workflow.

A practical guide to Agent Browser CLI. Learn how AI agents navigate, snapshot, and interact with web pages using stable references, enabling efficient automation and exploratory testing.
Would you be interested in joining LogRocket's developer community?
Join LogRocket’s Content Advisory Board. You’ll help inform the type of content we create and get access to exclusive meetups, social accreditation, and swag.
Sign up now

