
Editor’s note: This article was updated on 9 June 2022 to reflect the most recent versions of AWS Cognito and Amplify.

Authorization is one of the first things you should create when starting a new project, regardless of whether you’re building for ecommerce, gaming, logistics, or any other project field.
In any given organization, there might be existing solutions you can reuse. But if you’re not so lucky, then you can choose to either build your own implementation or build on existing solutions, which is highly recommended and saves you a lot of time.
In this tutorial we will be covering how to add authentication to your future (and even current) React apps using AWS Cognito user pools and the Amplify Framework.
The Replay is a weekly newsletter for dev and engineering leaders.
Delivered once a week, it's your curated guide to the most important conversations around frontend dev, emerging AI tools, and the state of modern software.
As defined in the docs, Amazon Cognito user pools are full-featured user directory services to handle user registration, authentication, and account recovery.
A user pool is a user directory in Amazon Cognito. With a user pool, your users can sign in to your web or mobile app through Amazon Cognito. Your users can also sign in through social identity providers like Facebook or Amazon, and through SAML identity providers.
Whether your users sign in directly or through a third party, all members of the user pool have a directory profile that you can access through an SDK.
The Amplify Framework is a comprehensive library for building sophisticated, cloud-powered apps on a flexible, scalable, and reliable serverless backend on AWS. Amplify allows you to access an array of cloud services offered by AWS.
In order to access Amplify, you need to have an AWS account. If you have one already, then you’re good to go; if you don’t, you can sign up here for the AWS free tier.
To install the Amplify CLI, run the following command:
$ npm install -g @aws-amplify/cli
After successful installation, we can now configure the CLI by running:
$ amplify configure
This will then take you through a series of well-explained and straightforward steps where you log in to your AWS account, choose a username, set up a new admin user, and generate a secret access key and access key id, which are saved in the AWS profile config located at ~/.aws/credentials.
After successful setup, you’ll get a confirmation that a new user has been successfully set up:
I prefer working with TypeScript for all my projects, so to kick off a new TypeScript/React project, we will use Create React App to bootstrap our app by running the following command:
$ yarn create react-app my-app --template typescript
Bootstrapping the app takes a few minutes to complete, so you can grab yourself a cup of coffee in case you get impatient.
In order to get our Amplify project started, we run the following command to initialize and configure the project:
$ amplify init
This will then run you through a step of options in which you choose the settings that suit your project best. In our case, we will go with the following options.
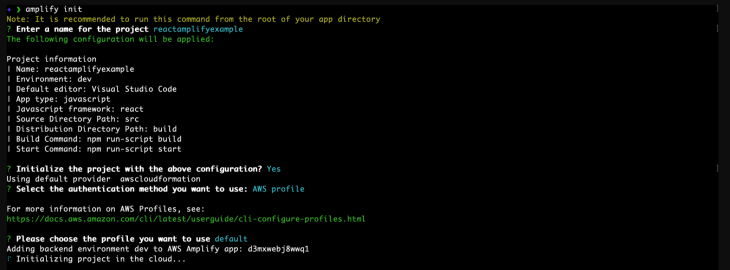
Deployment should kick off immediately, after which you should get a success message that matches the following.
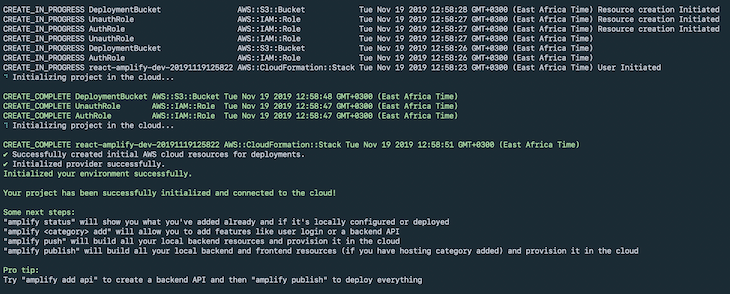
After the deployment is done, a generated file named aws-exports.js will appear in your src folder. You should never modify this file, because it changes whenever you deploy your changes.
Next, we need to add the authentication resource to our app. Run the following command in order to choose config options for our Cognito pools:
$ amplify add auth
To have the best configuration options for your app, choose manual configuration and choose the following options from the menu.
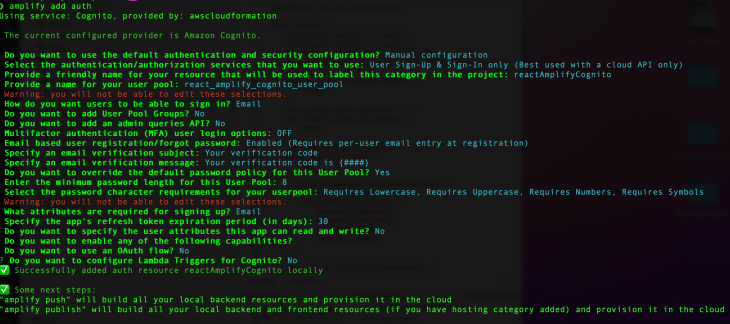
In order to deploy the new resource changes to the cloud, run:
$ amplify push
Now our Amplify and Cognito setup is fully done, and we can carry on to install dependencies.
To do so, run the following command:
$ yarn add aws-amplify react-router-dom styled-components antd password-validator jwt-decode
Next, let’s move on to the source code for the sample app. We will address the files one by one while breaking down the logic in each.
SignUpContainer.tsxThis component contains the logic needed to sign up new users. We will be using Ant Design for UI components, and in order to validate the user password, we will use password validator.
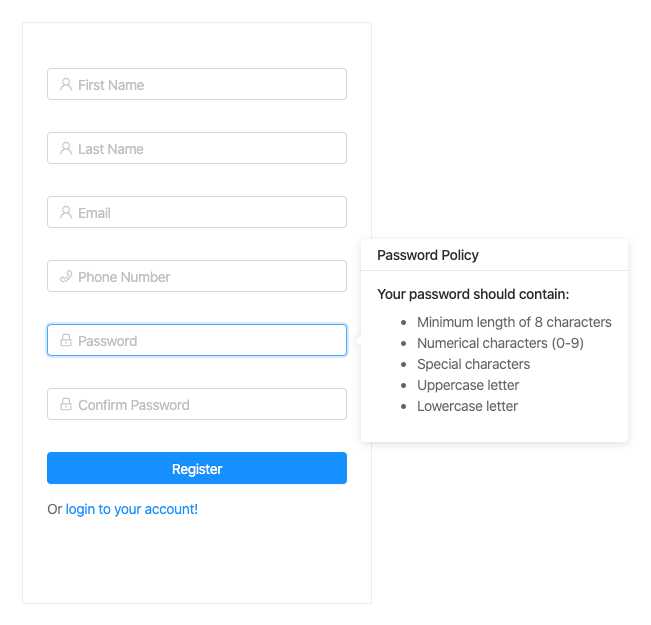
We added password requirements while setting up our user pool, which should be as follows:
After successful validation of all the required user details, we send the payload to the Cognito API, which sends out a verification code to the user’s email and creates a new user in the UserPool.
The code is as follows:
import * as React from "react";
import { Link, Redirect } from 'react-router-dom';
import { Auth } from 'aws-amplify';
import { Form, Input, Icon, Button, notification, Popover, Spin, Col, Row } from 'antd';

// Presentational
import FormWrapper from '../../Components/Styled/FormWrapper';

// App theme
import { colors } from '../../Themes/Colors';

type Props = {
  form: any;
};

type State = {
  confirmDirty: boolean;
  redirect: boolean;
  loading: boolean;
  email: string;
};

type UserFormData = {
  fname: string;
  lname: string;
  password: string;
  email: string;
  phoneNumber: number;
};

const passwordValidator = require('password-validator');

// create a password schema
const schema = new passwordValidator();

schema
  .is()
  .min(8)
  .has()
  .uppercase()
  .has()
  .lowercase()
  .has()
  .digits()
  .has()
  .symbols();

class SignUpContainer extends React.Component<Props, State> {
  state = {
    confirmDirty: false,
    redirect: false,
    loading: false,
    email: ''
  };

  handleSubmit = (event: React.FormEvent) => {
    event.preventDefault();

    this.props.form.validateFieldsAndScroll((err: Error, values: UserFormData) => {
      if (!err) {
        let { fname, lname, password, email, phoneNumber } = values;

        // show loader
        this.setState({ loading: true });

        Auth.signUp({
          username: email,
          password,
          attributes: {
            email,
            name: ${fname} ${lname},
            phone_number: phoneNumber
          }
        })
          .then(() => {
            notification.success({
              message: 'Succesfully signed up user!',
              description: 'Account created successfully, Redirecting you in a few!',
              placement: 'topRight',
              duration: 1.5,
              onClose: () => {
                this.setState({ redirect: true });
              }
            });

            this.setState({ email });
          })
          .catch(err => {
            notification.error({
              message: 'Error',
              description: 'Error signing up user',
              placement: 'topRight',
              duration: 1.5
            });

            this.setState({
              loading: false
            });
          });
      }
    });
  };

  handleConfirmBlur = (event: React.FormEvent) => {
    const { value } = event.currentTarget;

    this.setState({ confirmDirty: this.state.confirmDirty || !!value });
  };

  compareToFirstPassword = (rule: object, value: string, callback: (message?: string) => void) => {
    const { form } = this.props;

    if (value && value !== form.getFieldValue('password')) {
      callback('Two passwords that you enter is inconsistent!');
    } else {
      callback();
    }
  };

  validateToNextPassword = (rule: object, value: string, callback: (message?: string) => void) => {
    const form = this.props.form;
    const validationRulesErrors = schema.validate(value, { list: true });

    if (value && this.state.confirmDirty) {
      form.validateFields(['confirm'], { force: true });
    }
    if (validationRulesErrors.length > 0) {
      callback(this.formatPasswordValidateError(validationRulesErrors));
    }
    callback();
  };

  formatPasswordValidateError = (errors: Array) => {
    for (let i = 0; i < errors.length; i++) {
      if (errors[i] === 'min') {
        return 'password length should be a at least 8 characters';
      } else if (errors[i] === 'lowercase') {
        return 'password should contain lowercase letters';
      } else if (errors[i] === 'uppercase') {
        return 'password should contain uppercase letters';
      } else if (errors[i] === 'digits') {
        return 'password should contain digits';
      } else if (errors[i] === 'symbols') {
        return 'password should contain symbols';
      }
    }
  };

  render() {
    const { getFieldDecorator } = this.props.form;
    const { redirect, loading } = this.state;

    const title = 'Password Policy';
    const passwordPolicyContent = (
      <React.Fragment>
        <h4>Your password should contain: </h4>
        <ul>
          <li>Minimum length of 8 characters</li>
          <li>Numerical characters (0-9)</li>
          <li>Special characters</li>
          <li>Uppercase letter</li>
          <li>Lowercase letter</li>
        </ul>
      </React.Fragment>
    );
     return (
      <React.Fragment>
        <FormWrapper onSubmit={this.handleSubmit}>
          <Form.Item>
            {getFieldDecorator('fname', {
              rules: [
                {
                  required: true,
                  message: 'Please input your first name!'
                }
              ]
            })(
              <Input
                prefix={<Icon type="user" style={{ color: colors.transparentBlack }} />}
                placeholder="First Name"
              />
            )}
          </Form.Item>
          <Form.Item>
            {getFieldDecorator('lname', {
              rules: [
                {
                  required: true,
                  message: 'Please input your last name!'
                }
              ]
            })(
              <Input prefix={<Icon type="user" style={{ color: colors.transparentBlack }} />} placeholder="Last Name" />
            )}
          </Form.Item>
          <Form.Item>
            {getFieldDecorator('email', {
              rules: [{ required: true, message: 'Please input your email!' }]
            })(<Input prefix={<Icon type="user" style={{ color: colors.transparentBlack }} />} placeholder="Email" />)}
          </Form.Item>
          <Form.Item>
            {getFieldDecorator('phoneNumber', {
              rules: [
                {
                  required: true,
                  message: 'Please input your phone number!'
                }
              ]
            })(
              <Input
                prefix={<Icon type="phone" style={{ color: colors.transparentBlack }} />}
                placeholder="Phone Number"
              />
            )}
          </Form.Item>
          <Form.Item>
            <Popover placement="right" title={title} content={passwordPolicyContent} trigger="focus">
              {getFieldDecorator('password', {
                rules: [
                  { required: true, message: 'Please input your Password!' },
                  {
                    validator: this.validateToNextPassword
                  }
                ]
              })(
                <Input
                  prefix={<Icon type="lock" style={{ color: colors.transparentBlack }} />}
                  type="password"
                  placeholder="Password"
                />
              )}
            </Popover>
          </Form.Item>
          <Form.Item>
            {getFieldDecorator('confirm', {
              rules: [
                {
                  required: true,
                  message: 'Please confirm your password!'
                },
                {
                  validator: this.compareToFirstPassword
                }
              ]
            })(
              <Input
                prefix={<Icon type="lock" style={{ color: colors.transparentBlack }} />}
                type="password"
                placeholder="Confirm Password"
                onBlur={this.handleConfirmBlur}
              />
            )}
          </Form.Item>

          <Form.Item className="text-center">
            <Row>
              <Col lg={24}>
                <Button style={{ width: '100%' }} type="primary" disabled={loading} htmlType="submit">
                  {loading ? <Spin indicator={<Icon type="loading" style={{ fontSize: 24 }} spin />} /> : 'Register'}
                </Button>
              </Col>
              <Col lg={24}>
                Or <Link to="/login">login to your account!</Link>
              </Col>
            </Row>
          </Form.Item>
        </FormWrapper>
        {redirect && (
          <Redirect
            to={{
              pathname: '/verify-code',
              search: `?email=${this.state.email}`
            }}
          />
        )}
      </React.Fragment>
    );
  }
}

export default Form.create()(SignUpContainer);
You should now have something similar to this.
After registration, your user pool you should now have a list of new users.

ConfirmEmailContainer.tsxAfter successful registration, a confirmation code is sent to the user’s email. To verify it, add the following code, whereby we have a basic input with a submit button.
When the confirmation code is submitted, we make a call to the Cognito API to check its validity, after which we redirect to the login page on successful verification:
import * as React from 'react';
import { Redirect, RouteComponentProps } from 'react-router-dom';
import { Spin, Icon, Button, Form, notification, Input, Col } from 'antd';
// amplify
import { Auth } from 'aws-amplify';
/** Presentational */
import FullWidthWrapper from '../../Components/Styled/FullWidthWrapper';
import EmailConfirmFormWrapper from '../../Components/Styled/EmailConfirmFormWrapper';
type State = {
username: string;
loading: boolean;
redirect: boolean;
confirmationCode: string;
error: string;
};
class ConfirmEmailContainer extends React.Component<RouteComponentProps, State> {
state = {
username: '',
loading: false,
redirect: false,
confirmationCode: '',
error: ''
};
componentDidMount() {
if (this.props.location.search) {
// get username from url params
let username = this.props.location.search.split('=')[1];
this.setState({ username });
}
}
handleSubmit = (event: React.FormEvent) => {
event.preventDefault();
const { confirmationCode } = this.state;
// show progress spinner
this.setState({ loading: true });
Auth.confirmSignUp(this.state.username, confirmationCode)
.then(() => {
this.handleOpenNotification('success', 'Succesfully confirmed!', 'You will be redirected to login in a few!');
})
.catch(err => {
this.handleOpenNotification('error', 'Invalid code', err.message);
this.setState({
loading: false
});
});
};
/**
* @param {string} - type
* @param {string} - title
* @param {string} - message
*
* @returns {void} - no value returned
*/
handleOpenNotification = (type: string, title: string, message: string): void => {
switch (type) {
case 'success':
notification['success']({
message: title,
description: message,
placement: 'topRight',
duration: 1.5,
onClose: () => {
this.setState({ redirect: true });
}
});
break;
case 'error':
notification['error']({
message: title,
description: message,
placement: 'topRight',
duration: 1.5
});
break;
}
};
handleOnPaste = (event: React.ClipboardEvent) => {
event.preventDefault();
let code = event.clipboardData.getData('Text').trim();
/** Update input */
this.setState({ confirmationCode: code });
// regex to check if string is numbers only
const reg = new RegExp('^[0-9]+$');
if (reg.test(code) && code.length === 6) {
// code is a valid number
this.setState({ loading: true });
Auth.confirmSignUp(this.state.username, code)
.then(() => {
this.handleOpenNotification('success', 'Succesfully confirmed!', 'You will be redirected to login in a few!');
})
.catch(err => {
this.handleOpenNotification('error', 'Invalid code', err.message);
this.setState({
loading: false
});
});
}
};
handleChange = (event: React.ChangeEvent<HTMLInputElement>) => {
this.setState({ confirmationCode: event.currentTarget.value });
};
render() {
const { loading, error, confirmationCode, redirect } = this.state;
return (
<FullWidthWrapper align="center">
<EmailConfirmFormWrapper onSubmit={this.handleSubmit}>
<Col md={24} lg={18}>
<div className="full-width">
<h2>Check your email</h2>
<p>We've sent a six digit confirmation code</p>
</div>
<Form.Item validateStatus={error && 'error'} help={error} label="Confirmation Code">
<Input
size="large"
type="number"
placeholder="Enter confirmation code"
onChange={this.handleChange}
onPaste={this.handleOnPaste}
value={confirmationCode}
/>
</Form.Item>
</Col>
<Col md={24} lg={12}>
<Button type="primary" disabled={loading} htmlType="submit" size="large">
{loading ? <Spin indicator={<Icon type="loading" style={{ fontSize: 24 }} spin />} /> : 'Confirm Email'}
</Button>
</Col>
</EmailConfirmFormWrapper>
{redirect && <Redirect to={{ pathname: '/login' }} />}
</FullWidthWrapper>
);
}
}
export default ConfirmEmailContainer;
The code above should result in this.

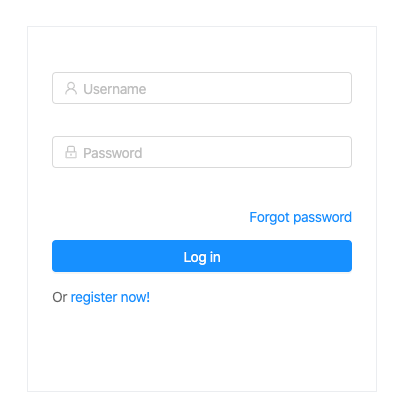
LoginContainer.tsxAfter successfully confirming the user’s code, we redirect to the login page. Below, we’ll create a form that has some great validation offered by Ant Design.
After the validation passes, we then submit the username and password payload using the Auth module included in the AWS SDK, which then makes a call to the Cognito API and returns a success or error payload. If the user credentials pass, we save the token to localStorage and redirect to the dashboard landing page.
The code is as follows:
import * as React from 'react';
import { Link, RouteComponentProps } from 'react-router-dom';
import { Auth } from 'aws-amplify';
import { Form, Icon, Spin, Input, Button, notification, Col, Row } from 'antd';

/** Presentational */
import FormWrapper from '../../Components/Styled/FormWrapper';

/** App theme */
import { colors } from '../../Themes/Colors';

/** App constants */
import { AUTH_USER_TOKEN_KEY } from '../../Utils/constants';

type Props = RouteComponentProps & {
  form: any;
};

type State = {
  loading: boolean;
};

class LoginContainer extends React.Component<Props, State> {
  state = {
    loading: false
  };

  handleSubmit = (event: React.FormEvent) => {
    event.preventDefault();

    this.props.form.validateFields((err: Error, values: { username: string; password: string }) => {
      if (!err) {
        let { username, password } = values;

        this.setState({ loading: true });

        Auth.signIn(username, password)
          .then(user => {
            const { history, location } = this.props;
            const { from } = location.state || {
              from: {
                pathname: '/dashboard'
              }
            };

            localStorage.setItem(AUTH_USER_TOKEN_KEY, user.signInUserSession.accessToken.jwtToken);

            notification.success({
              message: 'Succesfully logged in!',
              description: 'Logged in successfully, Redirecting you in a few!',
              placement: 'topRight',
              duration: 1.5
            });

            history.push(from);
          })
          .catch(err => {
            notification.error({
              message: 'Error',
              description: err.message,
              placement: 'topRight'
            });

            console.log(err);

            this.setState({ loading: false });
          });
      }
    });
  };

  render() {
    const { getFieldDecorator } = this.props.form;
    const { loading } = this.state;

    return (
      <React.Fragment>
        <FormWrapper onSubmit={this.handleSubmit} className="login-form">
          <Form.Item>
            {getFieldDecorator('username', {
              rules: [
                {
                  required: true,
                  message: 'Please input your username!'
                }
              ]
            })(
              <Input prefix={<Icon type="user" style={{ color: colors.transparentBlack }} />} placeholder="Username" />
            )}
          </Form.Item>
          <Form.Item>
            {getFieldDecorator('password', {
              rules: [
                {
                  required: true,
                  message: 'Please input your password!'
                }
              ]
            })(
              <Input
                prefix={<Icon type="lock" style={{ color: colors.transparentBlack }} />}
                type="password"
                placeholder="Password"
              />
            )}
          </Form.Item>
          <Form.Item className="text-center">
            <Row type="flex" gutter={16}>
              <Col lg={24}>
                <Link style={{ float: 'right' }} className="login-form-forgot" to="/forgot-password">
                  Forgot password
                </Link>
              </Col>
              <Col lg={24}>
                <Button
                  style={{ width: '100%' }}
                  type="primary"
                  disabled={loading}
                  htmlType="submit"
                  className="login-form-button"
                >
                  {loading ? <Spin indicator={<Icon type="loading" style={{ fontSize: 24 }} spin />} /> : 'Log in'}
                </Button>
              </Col>
              <Col lg={24}>
                Or <Link to="/signup">register now!</Link>
              </Col>
            </Row>
          </Form.Item>
        </FormWrapper>
      </React.Fragment>
    );
  }
}

export default Form.create()(LoginContainer);
You should end up with the following view.
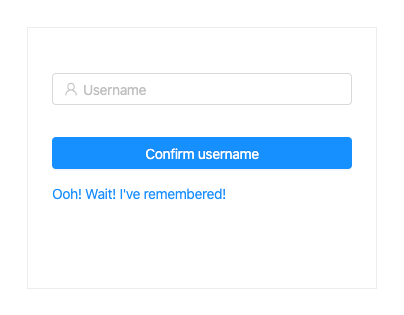
ForgotPasswordContainer.tsxIn case a user has forgotten their password, we need a way for them to recover it. This is quite easy when using Amplify.
We will achieve this by adding the following logic, which takes a username payload and sends out a verification code to the user’s email, which we will then use to reset their password:
import * as React from 'react';
import { Link, Redirect } from 'react-router-dom';
import { Auth } from 'aws-amplify';
import { Form, Icon, Spin, Input, Button, notification, Row, Col } from 'antd';

/** Presentational */
import FormWrapper from '../../Components/Styled/FormWrapper';

/** App theme */
import { colors } from '../../Themes/Colors';

type Props = {
  form: any;
};

type State = {
  username: string;
  redirect: boolean;
  loading: boolean;
};

class ForgotPasswordContainer extends React.Component<Props, State> {
  state = {
    username: '',
    redirect: false,
    loading: false
  };

  handleSubmit = (event: React.FormEvent) => {
    event.preventDefault();

    this.props.form.validateFields((err: { message: string }, values: { username: string }) => {
      if (!err) {
        let { username } = values;

        this.setState({
          loading: true,
          username
        });

        Auth.forgotPassword(username)
          .then(data => {
            notification.success({
              message: 'Redirecting you in a few!',
              description: 'Account confirmed successfully!',
              placement: 'topRight',
              duration: 1.5,
              onClose: () => {
                this.setState({ redirect: true });
              }
            });
          })
          .catch(err => {
            notification.error({
              message: 'User confirmation failed',
              description: err.message,
              placement: 'topRight',
              duration: 1.5
            });
            this.setState({ loading: false });
          });
      }
    });
  };

  render() {
    const { getFieldDecorator } = this.props.form;
    const { loading, redirect, username } = this.state;

    return (
      <React.Fragment>
        <FormWrapper onSubmit={this.handleSubmit} className="login-form">
          <Form.Item>
            {getFieldDecorator('username', {
              rules: [
                {
                  required: true,
                  message: 'Please input your username!'
                }
              ]
            })(
              <Input prefix={<Icon type="user" style={{ color: colors.transparentBlack }} />} placeholder="Username" />
            )}
          </Form.Item>
          <Form.Item className="text-center">
            <Row>
              <Col lg={24}>
                <Button style={{ width: '100%' }} type="primary" htmlType="submit" className="login-form-button">
                  {loading ? (
                    <Spin indicator={<Icon type="loading" style={{ fontSize: 24 }} spin />} />
                  ) : (
                    'Confirm username'
                  )}
                </Button>
              </Col>
              <Col lg={24}>
                <Link to="/login">Ooh! Wait! I've remembered!</Link>
              </Col>
            </Row>
          </Form.Item>
        </FormWrapper>
        {redirect && (
          <Redirect
            to={{
              pathname: '/reset-password',
              search: `?username=${username}`
            }}
          />
        )}
      </React.Fragment>
    );
  }
}

export default Form.create()(ForgotPasswordContainer);
The form will appear as follows:
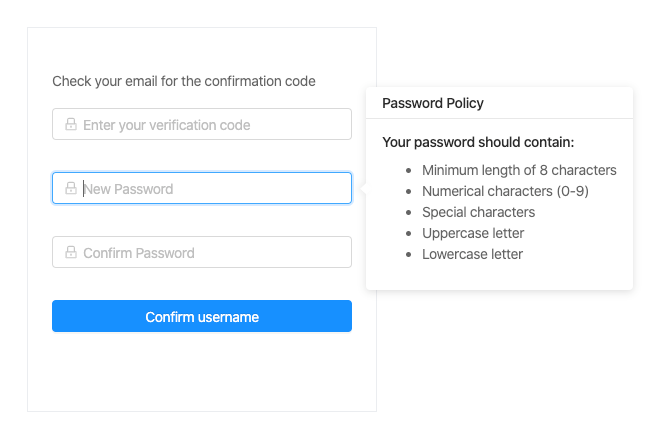
PasswordResetContainer.tsxAfter the verification code is sent, we then redirect to the password reset component. There, the user enters the verification code and a new password, which is sent to the Cognito API. If the verification code matches, the new password is set as the current, which the user can now use to log in.
The code is as follows:
import * as React from 'react';
import { Redirect, RouteComponentProps } from 'react-router-dom';
import { Auth } from 'aws-amplify';
import { Form, Input, Icon, Button, notification, Popover, Spin, Row, Col } from 'antd';

/** App theme */
import { colors } from '../../Themes/Colors';
import FormWrapper from '../../Components/Styled/FormWrapper';

type Props = RouteComponentProps & {
  form: any;
};

type State = {
  confirmDirty: boolean;
  redirect: boolean;
  loading: boolean;
};

class PasswordResetContainer extends React.Component<Props, State> {
  state = {
    confirmDirty: false,
    redirect: false,
    loading: false
  };

  handleBlur = (event: React.FormEvent<HTMLInputElement>) => {
    const value = event.currentTarget.value;

    this.setState({ confirmDirty: this.state.confirmDirty || !!value });
  };

  compareToFirstPassword = (rule: object, value: string, callback: (message?: string) => void) => {
    const form = this.props.form;

    if (value && value !== form.getFieldValue('password')) {
      callback('Two passwords that you enter is inconsistent!');
    } else {
      callback();
    }
  };

  validateToNextPassword = (rule: object, value: string, callback: (message?: string) => void) => {
    const form = this.props.form;
    if (value && this.state.confirmDirty) {
      form.validateFields(['confirm'], { force: true });
    }
    callback();
  };

  handleSubmit = (event: React.FormEvent) => {
    event.preventDefault();

    this.props.form.validateFieldsAndScroll((err: Error, values: { password: string; code: string }) => {
      if (!err) {
        let { password, code } = values;
        let username = this.props.location.search.split('=')[1];

        Auth.forgotPasswordSubmit(username.trim(), code.trim(), password.trim())
          .then(() => {
            notification.success({
              message: 'Success!',
              description: 'Password reset successful, Redirecting you in a few!',
              placement: 'topRight',
              duration: 1.5,
              onClose: () => {
                this.setState({ redirect: true });
              }
            });
          })
          .catch(err => {
            notification['error']({
              message: 'Error reseting password',
              description: err.message,
              placement: 'topRight',
              duration: 1.5
            });

            this.setState({ loading: false });
          });

        // show loader
        this.setState({ loading: true });
      }
    });
  };

  render() {
    const { getFieldDecorator } = this.props.form;
    const { redirect, loading } = this.state;

    const title = 'Password Policy';
    const passwordPolicyContent = (
      <React.Fragment>
        <h4>Your password should contain: </h4>
        <ul>
          <li>Minimum length of 8 characters</li>
          <li>Numerical characters (0-9)</li>
          <li>Special characters</li>
          <li>Uppercase letter</li>
          <li>Lowercase letter</li>
        </ul>
      </React.Fragment>
    );

    return (
      <React.Fragment>
        <FormWrapper onSubmit={this.handleSubmit}>
          <div className="text-center">
            <p>Check your email for the confirmation code</p>
          </div>
          <Form.Item>
            <Row>
              <Col lg={24}>
                {getFieldDecorator('code', {
                  rules: [
                    {
                      required: true,
                      message: 'Please input your confirmation code!'
                    }
                  ]
                })(
                  <Input
                    prefix={<Icon type="lock" style={{ color: colors.transparentBlack }} />}
                    placeholder="Enter your verification code"
                  />
                )}
              </Col>
            </Row>
          </Form.Item>

          <Form.Item>
            <Popover placement="right" title={title} content={passwordPolicyContent} trigger="focus">
              {getFieldDecorator('password', {
                rules: [
                  { required: true, message: 'Please input your Password!' },
                  {
                    validator: this.validateToNextPassword
                  }
                ]
              })(
                <Input
                  prefix={<Icon type="lock" style={{ color: colors.transparentBlack }} />}
                  type="password"
                  placeholder="New Password"
                />
              )}
            </Popover>
          </Form.Item>

          <Form.Item>
            <Row>
              <Col lg={24}>
                {getFieldDecorator('confirm', {
                  rules: [
                    {
                      required: true,
                      message: 'Please confirm your password!'
                    },
                    {
                      validator: this.compareToFirstPassword
                    }
                  ]
                })(
                  <Input
                    prefix={<Icon type="lock" style={{ color: colors.transparentBlack }} />}
                    type="password"
                    placeholder="Confirm Password"
                    onBlur={this.handleBlur}
                  />
                )}
              </Col>
            </Row>
          </Form.Item>

          <Form.Item className="text-center">
            <Row>
              <Col lg={24}>
                <Button style={{ width: '100%' }} type="primary" htmlType="submit" className="login-form-button">
                  {loading ? (
                    <Spin indicator={<Icon type="loading" style={{ fontSize: 24 }} spin />} />
                  ) : (
                    'Confirm username'
                  )}
                </Button>
              </Col>
            </Row>
          </Form.Item>
        </FormWrapper>
        {redirect && <Redirect to={{ pathname: '/login' }} />}
      </React.Fragment>
    );
  }
}

export default Form.create()(PasswordResetContainer);
The component will display a view that looks like this.
We’ve covered signup, login, and password reset using AWS Cognito and Amplify, a highly reliable combo that makes life easier for you as a developer. You get to focus on implementing your business logic without worrying about authentication for your app.
AWS Cognito and Amplify can also be integrated into whichever architecture pattern you have, be it monolith or microservices. You can access the code here, and you can also try out the demo app here.

Russ Miles, a software development expert and educator, joins the show to unpack why “developer productivity” platforms so often disappoint.

Discover what’s new in The Replay, LogRocket’s newsletter for dev and engineering leaders, in the February 18th issue.

Learn how to recreate Claude Skills–style workflows in GitHub Copilot using custom instruction files and smarter context management.

Claude Code is deceptively capable. Point it at a codebase, describe what you need, and it’ll autonomously navigate files, write […]
Hey there, want to help make our blog better?
Join LogRocket’s Content Advisory Board. You’ll help inform the type of content we create and get access to exclusive meetups, social accreditation, and swag.
Sign up now
16 Replies to "Authentication in React with AWS Cognito and Amplify"
Dude you rock
Thanks dude! Hope you found the tutorial helpful!
Will we need to change this much to use antd version 4 or react-bootstrap? I can get it working on it’s own but I am also trying to incorporate it into an existing app for an assignment and can’t get it working
I am able to perform signup/signin in the application using amplify Auth api by following your tutorial.
The next step is to make api call and I need authorization for this, by making use of access_token to call aws api gateway. But here,
I am not able to get the scopes(that are configured in Cognito App Client settings) in Access Token
I must be in the minority. I cannot get past entering the keys for the new user during ‘amplify configure’. I tried to copy and paste and twice I was told I entered the wrong key values. Is it expected to enter the keys manually rather than copy/paste?
After login, not able to access private routes. Automatically redirect back to login.
The TS error I’ve yet to overcome? “This expression is not callable.
Type ‘void’ has no call signatures.” in the SignUpContainer’s call to Form.create(), after I managed to replace the Icon components with @ant-design/icon components.The focus of this post is Cognito, so why complicate implementation with Typescript and (and!) a UI component library. Don’t get me wrong, I’m interested in all three, but my priority is to add auth to my React app, and the bloat doesn’t exactly do wonders for compatability. Going forward, I’ll take the cue to design and validate my own UI, and store tokens locally. All is not lost.
For feedback: Kindly update this article to reflect the cleaned up code on github that is more up to date.
Great tutorial, thank you so much!
I just wanted to ask you about storing the session jwtToken in local storage – https://github.com/brayoh/react-amplify/blob/master/src/Containers/LoginContainer/index.tsx#L46
What do you think of using Auth.currentAuthenticatedUser() from the amplify API instead? I am really new to frontend authentication so I don’t know if it is a big deal to store the token in local storage or it would be better to use this call.
Again, thanks Brayoh, looking forward to your reply 😀
Is it a security problem to create static web app using React and exposing Amplify parameters?
What is the correct way to create a client side Amplify configuration if I want to deploy my React App in AWS S3?
Great tutorial! But the problem that I have now is how to implement the user session timeout because the refresh token automatically updates the access token every hour. I want to force a log out after 20 minutes of inactivity.
Great! But how would you go about securing your own backend endpoints? Like how to verify against the pool the token sent from client ?
We never used jwt-decode. Would have been interesting to see how that is utilised.
The demo app fails. Says “Error signing up user”.
how i can access my application
where i can put my upper code