
Authentication, or confirming the identity of a user in an application, is critical to implement in web applications. Authentication creates a system for verifying user credentials through usernames, passwords, tokens, fingerprints, facial recognition, or security questions.

Developers are often torn between building their own authentication system or using a third-party service. In this article, we’ll look at how to implement authentication in Next.js applications using Auth0.
The Replay is a weekly newsletter for dev and engineering leaders.
Delivered once a week, it's your curated guide to the most important conversations around frontend dev, emerging AI tools, and the state of modern software.
According to its docs, “Auth0 is a flexible, drop-in solution to add authentication and authorization services to your applications”. Basically, Auth0 allows you to add security to your applications using any language or stack. Some of its features include:
Auth0 also comes with frameworks and SDKs for various frontend libraries out of the box. One of them is the Auth0 Next.js SDK, which allows you to add authentication to Next.js applications using Auth0.
First, let’s install the Auth0 Next.js SDK package from npm. We’ll configure Auth0 based on our unique project needs, then we’ll be ready to implement it!
With the Auth0 Next.js SDK, we can add authentication to our applications using both client-side and server-side methods. On the backend, we’ll use API routes. On the frontend, we’ll use React Context API.
First, create an Auth0 account. Navigate to your Auth0 Dashboard and click on applications. Create a new application; we’ll use a regular web application.
You’ll get a pop-up asking which framework or stack you’re using. Choose Next.js.
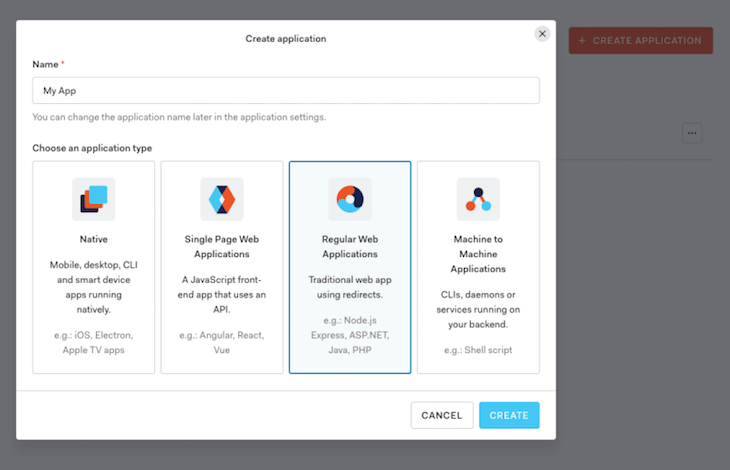
Click on the Applications tab and select your recently created application. On your Settings tab, scroll to the Application URIs subsection and update the following details:
http://localhost:3000/api/auth/callbackhttp://localhost:3000/In the code snippets above, we added a callback URL to redirect users after they log in to our application and a logout URL to redirect users after they log out.
On our Auth0 Dashboard, we can configure the type of authentication we want for our users, add login and sign up pages, add user registrations, and even add a database for users. Now, we’re ready to create our Next.js application!
To initialize a Next.js application, I recommend using Create Next App. This CLI tool automatically sets up everything you need for your app. Run the command below to create a new project:
npx create-next-app {project name}
Alternately, you can use Yarn:
yarn create-next-app {project name}
Next, cd into the project directory and start the development server using the command below:
cd {project name} && yarn run dev
Now, we’ll install the @auth0/next.js-auth0 dependency in our application:
npm install @auth0/nextjs-auth0
Using Yarn:
yarn add @auth/nextjs-auth0
Next, let’s install the dotenv package, which we’ll use for storing our environment variables. We also add styled-components, which we’ll use for styling our application:
npm install dotenv styled-components
Using Yarn:
yarn add dotenv styled-components
Create a new file called .env in the root directory of your project and add the following credentials, provided by Auth0:
AUTH0_SECRET="your auth secret goes here"
AUTH0_BASE_URL="http://localhost:3000"
AUTH0_ISSUER_BASE_URL="your base URL from auth0"
AUTH0_CLIENT_ID="your unique ID goes here"
AUTH0_CLIENT_SECRET="your auth0 secret goes here"
The AUTH0_SECRET is a 32-character secret used to encrypt cookies, and the AUTH0_CLIENT_SECRET can be found on your Auth0 dashboard under the Settings tab.
You can read more about Auth0’s configurations in the docs.
Create a new folder called components inside the src directory in our Next.js application. Inside the components folder, create a new folder called Navbar. Inside Navbar, create a file called Navbar.jsx.
Let’s create a functional component called Navbar with two dynamic links, one for signing a user in and another for signing a user out:
// components/Navbar/Navbar.jsx

import { useUser } from "@auth0/nextjs-auth0";
import styled from "styled-components";

const Navbar = () => {
    const { user } = useUser();
    return (
        <Nav>
            <h1>My Nextjs Note App</h1>
            {!user ? (
                <a href="/api/auth/login">Sign In</a>
            ) : (
                <a href="/api/auth/logout">Sign Out</a>
            )}
        </Nav>
    );
};
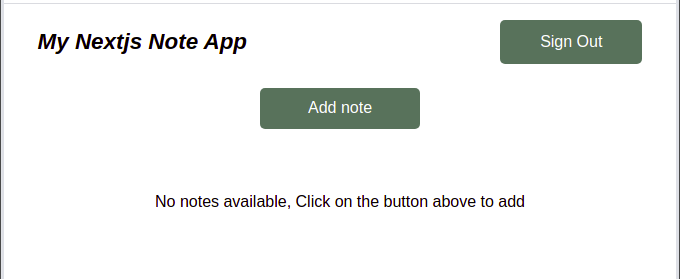
In the code above, we created a functional component called Navbar. Inside it, we initialized a nav tag and added an h1 with the title of our application. Then, we checked whether the user is logged in. If they are, we display the Sign out button. If they’re not logged in, we render a Sign in button.
Next, we’ll add styles to our Navbar file:
const Nav = styled.nav`
    display: flex;
    align-items: center;
    justify-content: space-between;
    width: 90%;
    margin: 0 auto;
    h1 {
        font-size: 1.4rem;
        font-style: oblique;
    }
    & > div {
        display: flex;
        a {
            margin-left: 1rem;
        }
    }
    a {
        display: block !important;
        border: none;
        outline: none;
        background: #5b6d5b;
        color: #fff;
        font-size: 1rem;
        padding: 0.8rem 2.5rem;
        border-radius: 5px;
        transition: opacity 0.7s;
        text-decoration: none;
        &:hover {
            opacity: 0.8;
        }
    }
`;
export default Navbar;
Our Navbar component should look like the image below:
In this section, we’ll build a form for users to add notes to their application. We’ll build an input field, a submit button, and a function to submit our note in the form component.
We’ll use localStorage as a database for storing our notes:
import { useState } from "react";
import styled from "styled-components";
import { addNote } from "../../utils/utils";

const Form = ({ hideForm, setRefresh }) => {
    const [title, setTitle] = useState("");
    const [content, setContent] = useState("");
    const SubmitHandler = (e) => {
        e.preventDefault();
        title && content && addNote(title, content);
        setTitle("");
        setContent("");
        hideForm(false);
        setRefresh();
    };
In the code block above, we imported the useState Hook from React and an addNote object from the utilities directory. Then, we created a form component that takes in a hideForm and a setRefresh prop.
Next, we added the SubmitHandler function to handle submitting our notes. For a note to be submitted, it must contain a title and content.
Now, let’s build a component and buttons for submitting our notes using the function above:
return (
        <FormWrapper onSubmit={SubmitHandler}>
            <div>
                <label htmlFor="title">Note Title</label>
                <input
                    onChange={(e) => setTitle(e.target.value)}
                    value={title}
                    type="text"
                    name="note-title"
                    id="title"
                    placeholder="e.g About Today"
                />
            </div>
            <div>
                <label htmlFor="content">Note Content</label>
                <textarea
                    onChange={(e) => setContent(e.target.value)}
                    value={content}
                    name="note-content"
                    id="content"
                    placeholder="e.g I woke up 6am..."
                />
            </div>
            <button type="submit">Save Note</button>
        </FormWrapper>
    );
};
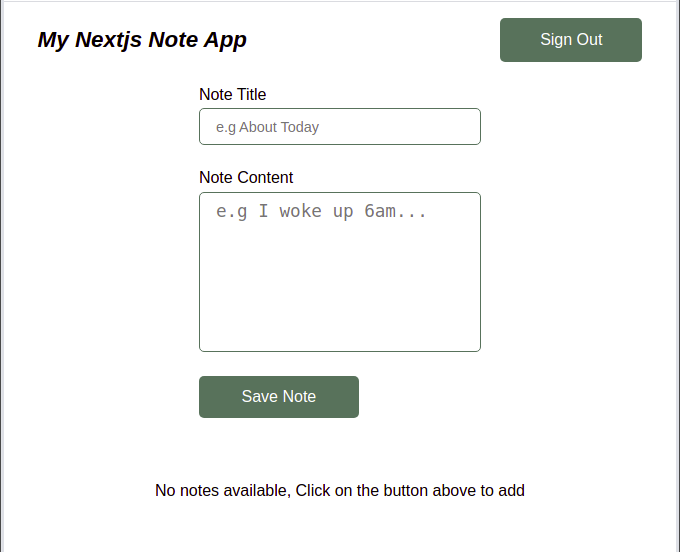
In the code block above, we created two input fields, one for adding a note title and one for users to input their content. Finally, we added a submit button.
To complete our components directory, we need to build a component for a note.
Now, we’ll write a function that will act as a backbone for adding notes to our application. We’ll initialize functions for editing and deleting a note after it has been added by a user. The component will take in an ID for our notes and set it as the state of our application:
import { useState } from "react";
import styled from "styled-components";
import { editNote, deleteNote } from "../../utils/utils";

const Note = ({ title, id, content, setRefresh }) => {
    const [edit, setEdit] = useState(false);
    const [newTitle, setNewTitle] = useState(title);
    const [newContent, setNewContent] = useState(content);

    const submitHandler = (e) => {
        e.preventDefault();
        newTitle && newContent && editNote(id, newTitle, newContent);
        setEdit(false);
        setRefresh();
    };

    const deleteHandler = () => {
        const ok = window.confirm("Are you sure you want to delete?");
        if (ok) {
            deleteNote(id);
            setRefresh();
        }
    };
In the code above, we initialized a function Note, which takes in title, id, content, and setRefresh as props. Using the useState Hooks, we added state to title, edit, and newContent. Like we did with our form component, we created a submitHandler function for users.
To handle a user deleting a note, we created another function called deleteHandler that asks for a confirmation alert before attempting to delete a note based on the note ID.
Next, we’ll build an Edit button for editing our notes, and we’ll add a Delete button for deleting posts using a conditional statement.
return (
        <Wrapper>
            {!edit ? (
                <button
                    className="edit-btn"
                    onClick={() => setEdit(true)}
                    type="button"
                >
                    Edit
                </button>
            ) : null}
            {!edit ? (
                <button className="delete-btn" onClick={deleteHandler} type="button">
                    Delete
                </button>
            ) : null}
            {edit ? (
                <form onSubmit={submitHandler}>
                    <h4>Edit Note</h4>
                    <div>
                        <input
                            onChange={(e) => setNewTitle(e.target.value)}
                            value={newTitle}
                            type="text"
                            name="note-title"
                            id="title"
                            placeholder="e.g About Today"
                        />
                    </div>
                    <div>
                        <textarea
                            onChange={(e) => setNewContent(e.target.value)}
                            value={newContent}
                            name="note-content"
                            id="content"
                            placeholder="e.g I woke up 6am..."
                        />
                    </div>
                    <button type="submit">Save</button>
                </form>
            ) : (
                <>
                    <h3>{title}</h3>
                    <p>{content}</p>
                </>
            )}
        </Wrapper>
    );
};
In the code block above, we added input fields for users to add notes. We also added Edit and Delete buttons. To edit an input, we updated the user’s notes using the ID of the input.
Notice the errors on the screen that indicate utils is not declared. We’ll create a new folder inside of our src called utils that will contain the logic for storing our user’s notes in the local storage of their devices.
Let’s write the logic for this task in the utils directory.
/**
 * Adds Note to list of Note in localStorage
 * @param {*} title note title
 * @param {*} content body of note
 */
export const addNote = (title, content) => {
    let notesArr = JSON.parse(localStorage.getItem("next:note-app"));
    if (notesArr?.length) {
        const newNote = {
            id: new Date().getTime(),
            title,
            content,
        };
        const newNotesArr = [...notesArr, newNote];
        localStorage.setItem("next:note-app", JSON.stringify(newNotesArr));
    } else {
        const newNote = {
            id: new Date().getTime(),
            title,
            content,
        };
        const newNotesArr = [newNote];
        localStorage.setItem("next:note-app", JSON.stringify(newNotesArr));
     }
};
In the code above, we exported the addNote object that takes in a title and content. Next, we initialized the object and passed it as JSON to local storage. To ensure that users don’t add empty notes, we added a method that monitors the length of the array of the user’s note and then stores it as JSON strings in local storage.
Our component should look like the image below:
In this section, we’ll create a function to edit a note after it has been added to the user’s local storage:
**
 * Edit Note Func
 * @param {*} id note id
 * @param {*} title new title
 * @param {*} content new content
 */
export const editNote = (id, title, content) => {
    let notesArr = JSON.parse(localStorage.getItem("next:note-app"));
    let noteIndex = notesArr.findIndex((note) => note.id === id);
    const selectedNote = notesArr[noteIndex];
    const updatedNote = {
        id: selectedNote.id,
        title,
        content,
    };
    notesArr.splice(noteIndex, 1, updatedNote);
    localStorage.setItem("next:note-app", JSON.stringify(notesArr));
};
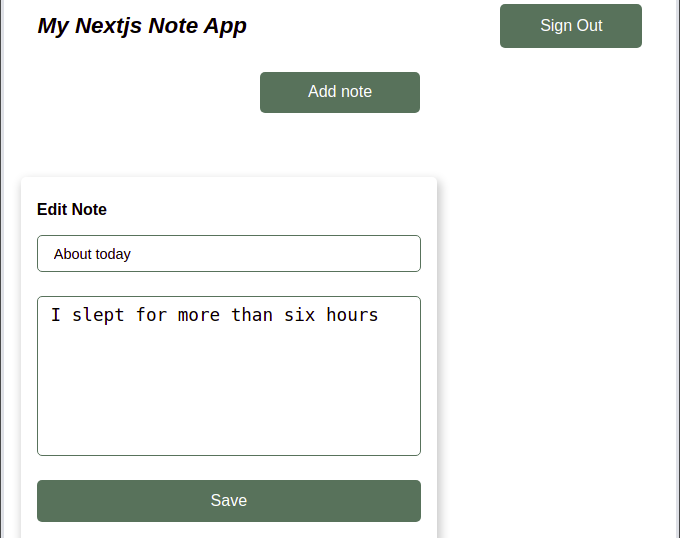
In the code block above, we parse a note to our local storage as a JSON file. Then, we retrieve the note we want to edit by passing the ID of the note. Using the native JavaScript Splice method, we update the contents of the note, replacing or adding new contents to a note.
Our edit page should look like the image below:
Let’s navigate to our api directory inside of our src folder. Inside it, let’s update the index.js to render our entire application:
import Head from "next/head";
import { useState, useEffect } from "react";
import { useUser } from "@auth0/nextjs-auth0";
import styled from "styled-components";
import Form from "../components/Form/Form";
import Navbar from "../components/Navbar/Navbar";
import Note from "../components/Note/Note";

const App = () => {
    const [showForm, setShowForm] = useState(false);
    const [notes, setNotes] = useState([]);
    const [refresh, setRefresh] = useState(false);
    const { user, isLoading, error } = useUser();

    useEffect(() => {
        // Our notes from LocalStorage (our DB)
        const store = JSON.parse(localStorage.getItem("next:note-app"));
        setNotes(store);
    }, [refresh]);
    return (
        <>
            <Head>
                <title>Next.js note app with auth0</title>
                <meta
                    name="description"
                    content="A basic crud project to illustrate how to use autho in a next.js app"
                />
                <link rel="icon" href="/favicon.ico" />
            </Head>
            <Wrapper>
                <Navbar />
                {isLoading ? (
                    <p className="nodata-indicator">Loading...</p>
                ) : error ? (
                    <p>{error?.message}</p>
                ) : user ? (
                    <>
                        {showForm ? (
                            <article className="form-wrapper">
                                <Form
                                    setRefresh={() => setRefresh(!refresh)}
                                    hideForm={setShowForm}
                                />
                            </article>
                        ) : (
                            <article className="form-wrapper">
                                <button onClick={() => setShowForm(!showForm)} type="button">
                                    Add note
                                </button>
                            </article>
                        )}
                        {!notes?.length ? (
                            <div>
                                <p className="nodata-indicator">
                                    No notes available, Click on the button above to add
                                </p>
                            </div>
                        ) : (
                            <article className="notes-wrapper">
                                {notes.map((note) => {
                                    return (
                                        <Note
                                            key={note.id}
                                            id={note.id}
                                            title={note.title}
                                            content={note.content}
                                            setRefresh={() => setRefresh(!refresh)}
                                        />
                                    );
                                })}
                            </article>
                        )}
                    </>
                ) : (
                    <div>
                        <p className="non-auth-text">
                            Welcome to my next.js note app, sign in to get started
                        </p>
                    </div>
                )}
            </Wrapper>
        </>
    );
};
In the code block above, we are using the useEffect Hook to get notes from our local storage, which acts as our database, and rendering them as our default notes.
We also added a title for our application. Using Auth0, we added sign in features for users to sign in to their personalized notes application. We also created a button for adding a note. To render all our notes, we used the native JavaScript map object.
To complete our application, let’s add some styling:
const Wrapper = styled.section`
    margin: 1rem 0;
    max-width: 100%;
    overflow-x: hidden;
    height: 100%;
    .form-wrapper {
        max-width: 60%;
        margin: 1.5rem auto 0;
        display: flex;
        flex-direction: column;
        align-items: center;
        justify-content: center;
        button {
            border: none;
            outline: none;
            background: #5b6d5b;
            color: #fff;
            font-size: 1rem;
            height: 2.6rem;
            width: 10rem;
            border-radius: 5px;
            transition: opacity 0.7s;
            &:hover {
                opacity: 0.8;
            }
        }
    }
    .notes-wrapper {
        max-width: 95%;
        margin: 4rem auto;
        display: grid;
        grid-template-columns: repeat(3, 1fr);
        grid-gap: 2rem;
    }
    .nodata-indicator {
        margin-top: 4rem;
        text-align: center;
    }
    .non-auth-text {
        margin-top: 4rem;
        text-align: center;
        font-size: 1.5rem;
    }
`;
export default App;
Our application should look like the image below:
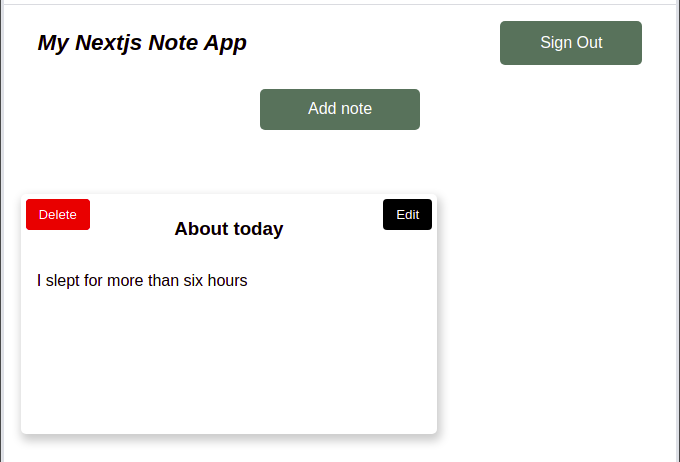
In this article, we learned how to set up Auth0 for authentication in Next.js applications.
We built a Notes application using Next.js and the Auth0 Next.js SDK. Then, we added authentication with features like sign in, sign out, and email verification, which come out of the box with Auth0.
Auth0 is a great tool if you’re looking for an easy way to add authentication to your project. In this article, we only scratched the surface of the different methods for verification. Ultimately, the best solution for you will depend on your project’s needs.
A working version of the code in this article can be found on CodeSandbox.
Debugging Next applications can be difficult, especially when users experience issues that are difficult to reproduce. If you’re interested in monitoring and tracking state, automatically surfacing JavaScript errors, and tracking slow network requests and component load time, try LogRocket.
LogRocket captures console logs, errors, network requests, and pixel-perfect DOM recordings from user sessions and lets you replay them as users saw it, eliminating guesswork around why bugs happen — compatible with all frameworks.
LogRocket's Galileo AI watches sessions for you, instantly identifying and explaining user struggles with automated monitoring of your entire product experience.
The LogRocket Redux middleware package adds an extra layer of visibility into your user sessions. LogRocket logs all actions and state from your Redux stores.


Modernize how you debug your Next.js apps — start monitoring for free.

Russ Miles, a software development expert and educator, joins the show to unpack why “developer productivity” platforms so often disappoint.

Discover what’s new in The Replay, LogRocket’s newsletter for dev and engineering leaders, in the February 18th issue.

Learn how to recreate Claude Skills–style workflows in GitHub Copilot using custom instruction files and smarter context management.

Claude Code is deceptively capable. Point it at a codebase, describe what you need, and it’ll autonomously navigate files, write […]
Hey there, want to help make our blog better?
Join LogRocket’s Content Advisory Board. You’ll help inform the type of content we create and get access to exclusive meetups, social accreditation, and swag.
Sign up now