When adding a feature to record audio in your app, it’s usually a good idea to show some sort of visual representation to the user that audio is being recorded. For example, you could add a timer to the UI that informs the user how long the audio has been recording. But, if you really want to give your users a clean visual experience, waveforms could be a game changer.
In this article, we’ll learn how to create simple waveforms when you’re either recording audio or playing an audio file in Flutter. Let’s get started!
Jump ahead:
The Replay is a weekly newsletter for dev and engineering leaders.
Delivered once a week, it's your curated guide to the most important conversations around frontend dev, emerging AI tools, and the state of modern software.
Put simply, audio waveforms are graphs that represent how loud different parts of the audio are. The x-axis represents time, and the y-axis represents amplitude. So, the higher the waves, the louder the sound is. Similarly, lower waves or flatter waves represent softer areas in the audio.
Waveforms let the user know if they’re speaking softly or loudly so that they can adjust their volume accordingly. For example, a user could be trying to speak softly, but it could be too soft for the microphone to pick up. By looking at the graph, they could easily decide to raise their volume for the microphone.
Waveforms also come in handy when you want to play or stream an audio file. For example, when doctors listen to the sound relayed by a stethoscope, it would only make the experience better to see a graph on the screen showing the sound patterns.
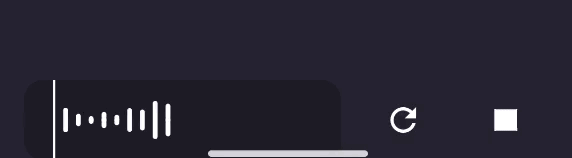
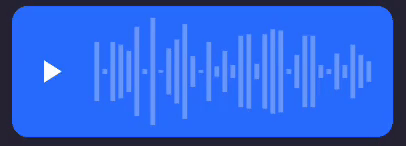
In this tutorial, we’ll build a feature like in the images below for a Flutter app:
We’ll start by adding the required dependencies and permissions, including the Audio Waveforms package:
flutter pub add audio_waveforms
Import the package in our main.dart file:
import 'package:audio_waveforms/audio_waveforms.dart';
Now, add the permission to record to the Android manifest:
<uses-permission android:name="android.permission.RECORD_AUDIO" />
The AudioWaveforms widget will create our waveforms. But, before we can continue, we need to create a recorderController that will be passed to our AudioWaveforms widget. Let’s declare a RecordController in our state with the following code:
late final RecorderController recorderController;
Then, to initialize the controller, enter the code below:
void _initialiseController() {
 recorderController = RecorderController()
      ..androidEncoder = AndroidEncoder.aac
      ..androidOutputFormat = AndroidOutputFormat.mpeg4
      ..iosEncoder = IosEncoder.kAudioFormatMPEG4AAC
      ..sampleRate = 16000;
}
We can change the sample rate and encoders according to our needs. We’ll call this method in our initState:
void initState() {
  super.initState();
  _initialiseController();
}
Now, using the controller to record audio and display a waveform is as simple as adding the AudioWaveform widget to our widget tree as follows:
AudioWaveforms(
  size: Size(MediaQuery.of(context).size.width, 200.0),
  recorderController: recorderController,
),


void _startRecording() async {
  await recorderController.record(path);
  // update state here to, for eample, change the button's state
}
To start the recording, we’ll call the method above on the click of a button:
IconButton(
          icon: Icon(Icons.mic),
          tooltip: 'Start recording',
          onPressed: _startRecording
)
We’ll stop the recording with the following code:
final path = await recorderController.stop();
Stopping the recorder will return the path of the file where the recording is saved.
We already saw that we have control over the sample rate and the encoding in RecordController.
AudioWaveforms also allows us to change the style of the waves, including aspects like size, waveStyle, color, padding, and margin:
AudioWaveforms(
              enableGesture: true,
              size: Size(MediaQuery.of(context).size.width / 2, 50),
              recorderCAudioWaveforms(
              enableGesture: true,
              size: Size(MediaQuery.of(context).size.width / 2, 50),
              recorderController: recorderController,
              waveStyle: const WaveStyle(
                waveColor: Colors.white,
                extendWaveform: true,
                showMiddleLine: false,
              ),
              decoration: BoxDecoration(
                borderRadius: BorderRadius.circular(12.0),
                color: const Color(0xFF1E1B26),
              ),
              padding: const EdgeInsets.only(left: 18),
              margin: const EdgeInsets.symmetric(horizontal: 15),
            )
We can also apply color gradients to the waves:
waveStyle: WaveStyle(
   gradient: ui.Gradient.linear(
    const Offset(70, 50),
    Offset(MediaQuery.of(context).size.width / 2, 0),
    [Colors.red, Colors.green],
   ),
  )
Now, we’ll learn how to play audio files and generate waveforms for them. The main differences here from the previous example for recording the audio are:
PlayerController instead of a RecordControllerAudioFileWaveforms instead of AudioWaveformsFirst, we’ll run the same code as before, replacing RecordController with PlayerController:
late final PlayerController playerController;
However, this time, we’re making the following alteration:
void _initialiseController() {
 playerController = PlayerController();
}
Pass this playerController to the AudioFileWaveforms widget in your widget tree:
AudioFileWaveforms(
 size: Size(MediaQuery.of(context).size.width, 100.0),
 playerController: playerController,
)
We need to provide the path of the audio file to the controller. You can grab the path of the file any way you like. We’ll use path_provider for this task. Add path_provider to your pubspec.yaml, then at the top of your main.dart, add the code below:
import 'package:path_provider/path_provider.dart';
You could store the path in a variable called path:
String? path;
late Directory directory;

void initState() {
  super.initState();
  _initialiseController();
  directory = await getApplicationDocumentsDirectory();
  path = "${directory.path}/test_audio.aac";
  playerController.preparePlayer(path);
}
Notice that we also call the preparePlayer method on our controller by providing the path to our audio file. We can start and stop the player the same way we did with recordController:
await playerController.startPlayer();
await playerController.stopPlayer();


void _playandPause() async {
  playerController.playerState == PlayerState.playing
  ? await playerController.pausePlayer()
  : await playerController.startPlayer(finishMode: FinishMode.loop);
}
Now, we can call the _playandPause method on a button click. We also provide a finishMode to the startPlayer method to loop the audio and the waveform when it ends. You could also add other options to pause the waveform or stop it with FinishMode.pause and FinishMode.stop, respectively.
We can also add the ability to seek the audio using gestures on the waveform:
AudioFileWaveforms(
 enableSeekGesture: true,
)
We’ll style our waveforms as follows:
AudioFileWaveforms(
 size: Size(MediaQuery.of(context).size.width / 2, 70),
              playerController: playerController,
              density: 1.5,
              playerWaveStyle: const PlayerWaveStyle(
                scaleFactor: 0.8,
                fixedWaveColor: Colors.white30,
                liveWaveColor: Colors.white,
                waveCap: StrokeCap.butt,
              ),
)
Notice that we’re using PlayerWaveStyle to provide the styles instead of WaveStyle, which is better suited for recorders.
Before finishing up, it’s important to dispose of the controllers that we used to record and play audio. In the dispose method, we’ll add the following code:
 @override
void dispose() {
  super.dispose();
  recorderController.dispose();
  playerController.dispose();
}
We just saw how easy it is to create an audio player and display waveforms in Flutter using the Audio Waveforms package. Waveforms are a dynamic visual representation of the volume of sound; they provide feedback to the user of how well the microphone is capturing their spoken words so that they can increase or decrease their volume accordingly.
We learned how to add customizations to our waveforms so they suit our visual preferences, start and stop the recording, and finally, dispose of the controllers for recording and playing audio. I hope you enjoyed this tutorial; be sure to leave a comment if you have any questions.
Install LogRocket via npm or script tag. LogRocket.init() must be called client-side, not
server-side
$ npm i --save logrocket

// Code:

import LogRocket from 'logrocket';
LogRocket.init('app/id');
// Add to your HTML:

<script src="https://cdn.lr-ingest.com/LogRocket.min.js"></script>
<script>window.LogRocket && window.LogRocket.init('app/id');</script>

When should you move API logic out of Next.js? Learn when Route Handlers stop scaling and how ElysiaJS helps.

Explore how Dokploy streamlines app deployment with Docker, automated builds, and simpler infrastructure compared to traditional CI/CD workflows.

A side-by-side look at Astro and Next.js for content-heavy sites, breaking down performance, JavaScript payload, and when each framework actually makes sense.

AI-generated tests can speed up React testing, but they also create hidden risks. Here’s what broke in a real app.re
Would you be interested in joining LogRocket's developer community?
Join LogRocket’s Content Advisory Board. You’ll help inform the type of content we create and get access to exclusive meetups, social accreditation, and swag.
Sign up now
