
In the crowded frontend landscape, Astro brings a breath of fresh air with its focus on simplicity, stellar DX, and its unique proposition of zero JavaScript by default. It’s essentially impossible to build a slow Astro site, making this a compelling framework for your next project.

In this guide, we’ll go over what makes Astro so great, discuss how to use its features to your advantage, and compare it to other frontend frameworks. Let’s get into it.
The Replay is a weekly newsletter for dev and engineering leaders.
Delivered once a week, it's your curated guide to the most important conversations around frontend dev, emerging AI tools, and the state of modern software.
Astro was created by Fred Schott and Nate Moore. It started off as a framework for building fast static content sites such as blogs, landing pages, and more.
When Astro began, its unique proposition — which remains mostly the same today, with just a few changes — was ease of use. You could pull content from anywhere, including an API, CMS, MDX file, or Markdown file, and serve it on your Astro site.
Astro was also initially designed not to compete against existing component libraries like React or Vue, but rather, to support interoperability. In a nutshell, you can use your favorite tools with Astro! It continues to offer first-class support for frontend tools like React, Vue, Svelte, and Tailwind CSS.
However, the real star of the Astro show was a new paradigm shift for frontend architecture called islands.
Astro’s islands were the secret to its speed. They let Astro extract your UI into smaller, isolated components on the page and partially hydrate interactive components in an otherwise static page. This was a game-changer. In practice, it meant every Astro site was fast!
Fast forward to the present: most of Astro’s core offerings remain the same, including its islands architecture and associated benefits. However, Astro’s ambitions have only grown. It now touts itself as a full-on web framework.
Today, Astro is a modern web framework for building fast multi-page websites, dynamic server endpoints, and performant content-focused websites.
While it still retains its simplicity and core offerings — including features such as server endpoints, Content Collections, View Transitions, and its impressive developer experience — Astro is metamorphosing into a capable modern web framework for powerful web applications.
Before we take a closer look at how Astro works and some of the key features you should know, let’s pause for a moment to establish why you should consider using Astro in the first place.
Astro‘s small bundle size and low learning curve make it easy to quickly learn to build performant applications with it. We’ve already mentioned its speed and ease of use, but let’s dive a little deeper into what makes these possible and then discuss its vibrant community and ecosystem.
JavaScript is the language of the web. To build an interactive web application, you almost always need JavaScript. For the most part, there’s no way around that. So, why does Astro ship zero-JavaScript applications by default?
When it comes to performance issues, particularly on mobile and underpowered devices, JavaScript is often the culprit. Parsing large amounts of JavaScript can delay interactivity in severe ways.
While Astro’s “no JavaScript by default” take may sound extreme, in reality, it means not sending JavaScript down the wire for the initial render of your application’s page. Instead, Astro generates static HTML by default, removing JavaScript from your build.
However, as the developer, you can decide when to hydrate certain components of your page or include important interactive scripts from the get-go.
In the context of content-focused applications, this tradeoff makes sense. The initial goal is to get the content to the user as fast as possible, and Astro excels at this. Most other frameworks don’t come close.
If you’re building a content-focused website, you should highly consider doing so with Astro. With most content-focused sites, you don’t need the runtime overhead from robust single-page application (SPA) frameworks such as React.
The developer experience refers to all the emotions and perceptions developers have while interacting with a technical product. It encompasses factors like the ease of using the framework, the intuitiveness of the CLI tooling, the helpfulness of error warnings, the quality of the framework’s API, and more.
Astro is an excellent example of a product with outstanding DX. Firstly, it offers a helpful setup wizard to guide users through the process of starting a new project.
Additionally, the framework is easy to use without a steep learning curve. For instance, the component template syntax is a superset of HTML. This means if you know HTML, you already know Astro!
A good developer experience is like a good movie — it’s hard to fully appreciate it until you’ve tried it. Astro’s DX is excellent, so I highly recommend giving it a try.
Astro has managed to foster a vibrant community and rapidly growing ecosystem. At its heart is a group of diverse engineers, designers, and all-round enthusiasts with a common passion.
The community is very inclusive and inviting, and the weekly events that run on Discord are a particular highlight for me. The community calls, showcase Fridays, and Twitch streams provide the opportunity for anyone to come in and begin to get integrated into the community.
Visit the Astro lounge on Discord to experience it for yourself.
Now that we’ve covered why you should use Astro, let’s talk about how it works, some features you should know, and ideas for ways you can use it.
The subject of how Astro works in its entirety merits a standalone book. Let’s focus on the core concepts.
As mentioned earlier, at the heart of Astro is its islands architecture. So how do islands work in Astro? Let’s start with the basics.
We know that the client and the application server are the two main actors in serving an application to a user:

We can take measures to improve performance within both the browser and the server, but for the purposes of this guide, let’s focus on the browser.
Again, this is a huge subject — we could spend hours discussing the several makeups of client applications. For simplicity, let’s consider the example of a server-side application rehydrated on the client.
This is a common rendering pattern in applications built with UI libraries such as React and Vue. The simplified process looks like this:
In many such applications, a big performance culprit here is hydration. Hydration is a bit like a double-edged sword: it brings many benefits, but there’s a lot of room for improvement. This is why there’s interest in something called partial hydration, a concept underlying Astro‘s islands.
Here’s a simple way to describe partial hydration. Instead of hydrating the entire application, we hone in on smaller interactive parts of the application and hydrate those independently:
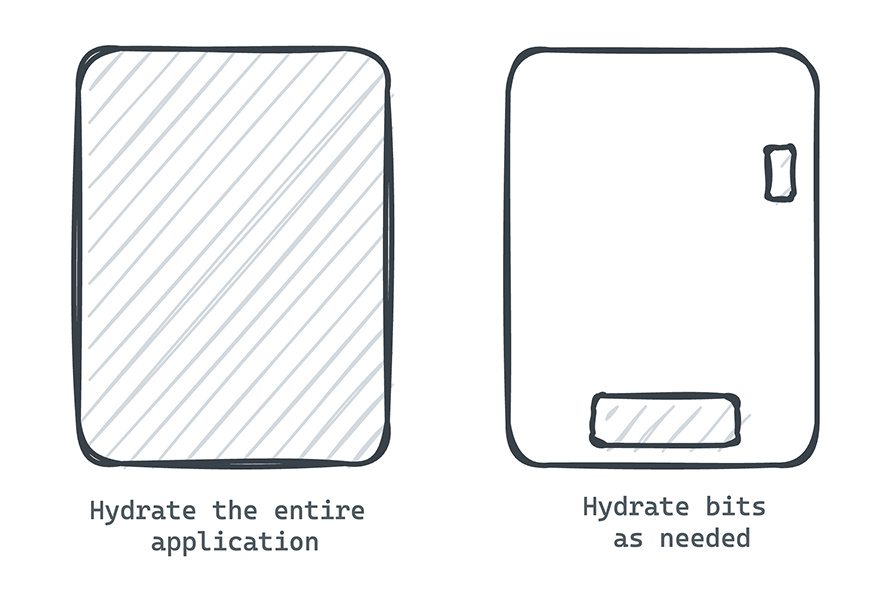
Now, let’s apply this concept to better understand Astro islands.
An Astro island is an interactive UI component embedded within a static HTML page. Multiple islands can exist on a page. An island is always rendered in isolation by being hydrated independently — in other words, through partial hydration.
What’s the advantage of doing this?
By leveraging islands, an Astro application can have a remarkable initial application load time that isn’t bogged down by JavaScript. Most of the site stays static, and the interactive bits or islands are only hydrated as needed after the initial page load.
An overview of Astro isn’t complete without exploring some of its standout features. We discussed some Astro features already, such as islands and partial hydration. In the coming sections, we’ll go over some other key features you should understand to work effectively with Astro.
The smallest unit of an Astro application is a component. Components form the foundation of every Astro application:

Any filename that ends with .astro is an Astro component file.
Similar to most other frontend frameworks, the degree of abstraction within a component is left up to you. For example, a component could be a small reusable piece of the UI such as headers or footers, or a component could be large enough to be an entire page or layout.
Consider the following Hello World Astro component below:
// HelloWorld.astro
---
const name = "LogRocket"
---

<h1>Hello world, {name} </h1>
From the example above, you’ll notice that an Astro component contains two distinct sections: the component script and the component template.
The component script is the section encased in between the --- dotted lines, identical to a Markdown front matter block. Within the script section, you can write any valid JavaScript — and TypeScript, by default! In the basic example above, we defined a name variable like so:
---
const name = "LogRocket"
---
Meanwhile, the component template is where you define the markup of the component. If the component needs to render some eventual UI element or HTML to the browser, this is where you define it. In our example, we defined the following:
<h1>Hello world, {name} </h1>
Notice how the syntax feels familiar? This is because the Astro component template determines the HTML output of your component and supports plain HTML! If you know HTML, you already know the component syntax here.
However, the Astro component template syntax is a superset of HTML. It adds powerful interpolations so we can leverage the full power of JavaScript and TypeScript.
For example, in our Hello World example, we’re printing the name variable within the markup. As such, the eventual HTML output will be <h1>Hello world, LogRocket</h1> .
Beyond simple string interpolations, the component template syntax supports more features, such as adding <style> and <script> tags, leveraging dynamic attributes, conditional rendering, dynamic HTML, and more. See some of these in action below:
---
const isActive = false
---

<h1>LogRocket</h1>

{/** Conditional render **/}
{isActive && <p>Hello World from LogRocket</p>}

{/**Style markup: the style is scoped by default **/}
<style>
 h1 {
   color: red,

}

{/** Add script **/}
<script>
<!-- You can also write TypeScript here. Supported out of the box -->
const header = document.querySelector("h1")
header.textContent = "Updated LogRocket Header"
</script>
The entry point into an Astro application is a page. Astro leverages a file-based routing approach for its pages.
Let’s assume you’re building a web application with two distinct routes: index.html and about.html. In Astro-land, these correspond to two distinct pages.
So, how would we represent this?
Every file in the src/pages/ subdirectory of an Astro project corresponds to a page. In our case, we’d need two pages — src/pages/index.astro and src/pages/about.astro:
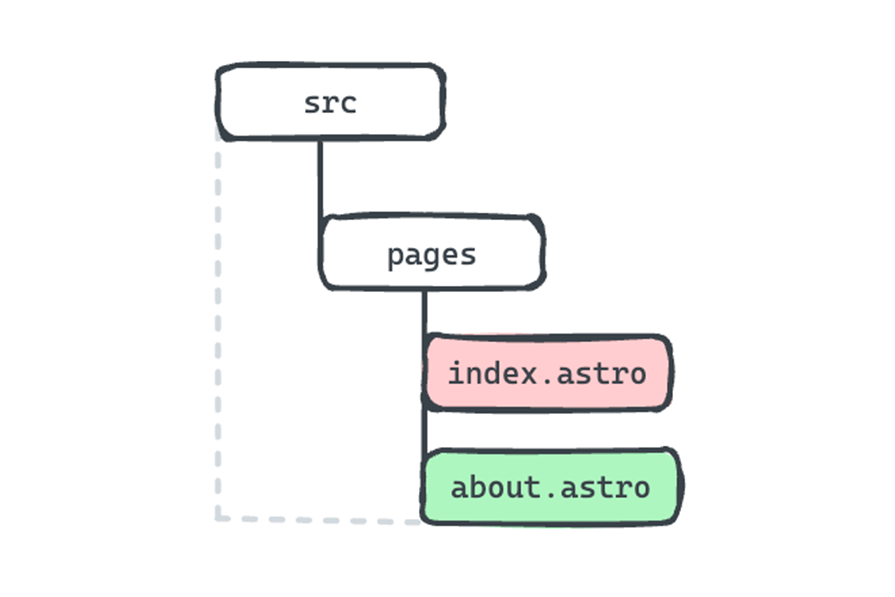
Note that these pages both have the .astro file ending. If you recall what we discussed previously, this means a page is an Astro component.
Upon building the application — which you can do via a simple command like npm build — the index.astro and about.astro will be built into the corresponding index.html and about.html files of your web application.
Remember that Astro is a multi-page web framework. In other words, by default, every route corresponds to a separate HTML document.
You can try this out by following the steps below:
npm create astro@latestastro devsrc/pages directory and create two new pages: index.astro and about.astroastro buildWhile we’ve discussed using .astro components as pages, Astro also supports building pages with:
Earlier, we discussed the one-to-one mapping between pages and the HTML output. While it’s easy to reason about why Astro uses direct mapping, there are legitimate cases to break out of this approach. A good example could be if you wanted to handle multiple routes via one page.
Luckily, an Astro page can also specify dynamic route parameters in the filename. This will generate multiple matching pages. For example, if we were building a blog application where each blog entry had a route of its own, we could represent the page as follows:
src/pages/blogs/[blog].astro
Here’s a visual to help you see how this would work:
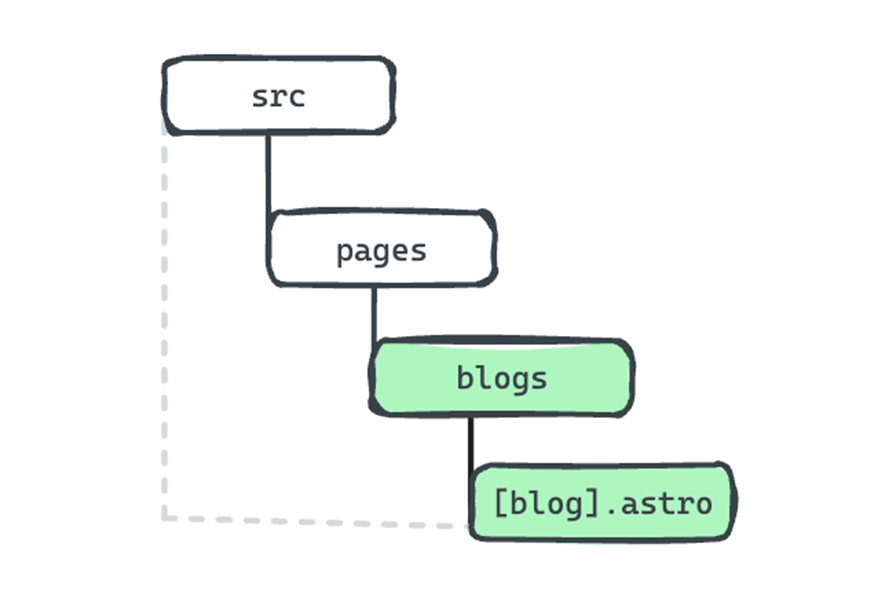
Note the square braces in the component file name — [blog].astro. In static mode, all routes must be determined at built time. So, the dynamic route must export a getStaticPaths() method that returns an array of objects with a params property. This tells Astro what pages to generate at build time.
See the example below:
// src/pages/blogs/[blog.astro]
---
export function getStaticPaths() {
   return [
     {params: {blog: "how-to-learn-astro"}},
     {params: {blog: "how-to-learn-ai"}},
     {params: {blog: "how-to-learn-astro-ai"}},
  ]
}

// We can deconstruct the param from the Astro global
const { blog } = Astro.params
---

{/** This is the component markup section **/}

<h1> Hello Blog, {blog} </h1>
When we build this app for production, src/pages/blogs/[blog.astro] will generate three blog entry pages:
/blogs/how-to-learn-astro.html/blogs/how-to-learn-ai.html/blogs/how-to-learn-astro-ai.htmlAstro also supports server-side rendering, in which case the routes are generated at runtime instead of at build time. This means there’s no need to specify a getStaticPaths() method, and the page could be much simplified as shown below:
// src/pages/blogs/[blog.astro]
---
// We can deconstruct the param from the Astro global
const { blog } = Astro.params
---

{/** This is the component markup section **/}

<h1> Hello Blog, {blog} </h1>
In practice, with SSR, the blog parameter here is likely to be the blog’s unique identifier, such as an ID. When a user attempts to view /blogs/some-id, we can grab some-id via Astro.params and fetch the required blog content server-side.
We’ve established that an Astro application is largely made up of components, and we’ve seen a special type of component called pages. There’s another type of component we should know: layouts.
Most web applications contain some reusable structures that give the pages a shell — for example, header, footer, and side navigation elements. These can be abstracted into a reusable Astro component called a layout.
To create a layout component, add an Astro component in the src/layouts directory:
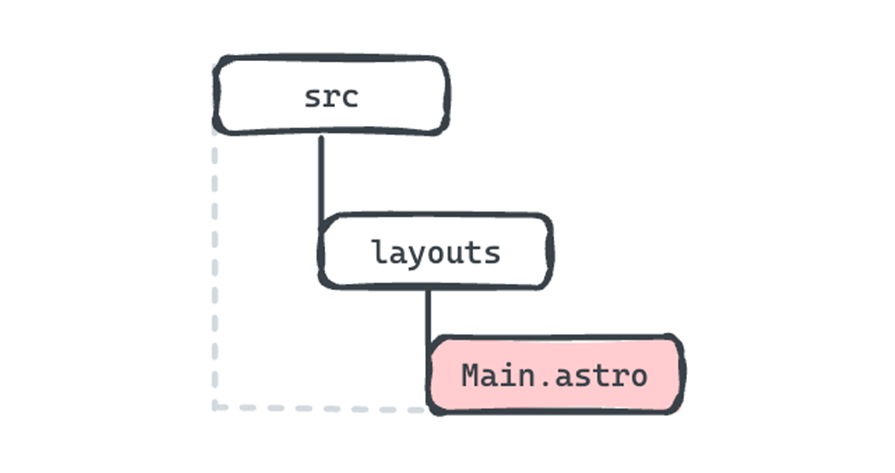
In this layout component, you can abstract shared user interface elements and reuse them across your application pages.
Consider the following layout component:
// src/layouts/Main.astro
---
const { title } = Astro.props;
---
<!doctype html>
<html lang="en">
  <head>
    <meta charset="UTF-8" />
    <meta name="description" content="Astro description" />
    <meta name="viewport" content="width=device-width" />
    <link rel="icon" type="image/svg+xml" href="/favicon.svg" />
    <meta name="generator" content={Astro.generator} />
    <title>{title}</title>
  </head>
  <body>
    {/** Note the use of <slot /> below **/}
    <slot />
  </body>
</html>
We may leverage this component in any of our pages by importing and rendering the layout component as shown below:
---
import Main from '../layouts/Main.astro';
---

{/** Render the Main component as you would an HTML element <Main></Main> **/}
<Main title="Home page.">
  {/** Note the children elements passed within the <Layout> braces **/}
  <main>
    <h1> Hello world, again </h1>
   <main>
</Main>
It’s important to note how the layout component has been used here. Within the page’s component markup section, the layout is rendered and the page’s interface elements are passed as children to the <Main> component.
We can render this content by adding a <slot/> within the <Main> component. In a nutshell, every child element passed to the <Main> layout component will be rendered within the <slot/> in <Main>:

We can also increase the reusability of Astro components by providing what’s commonly referred to as props. Consider the following example:
<Main title="Hello world" />
<Main title="Another title" />
<Main title="Hello again" />
The rendered output will be different for each of these component instances. Think of props as attributes you can pass to a rendered component.
In our case, we’re leveraging props to pass a different title to the layout component whenever it is rendered:
// src/layouts/Main.astro
---
// Get the title from the Astro global
const { title } = Astro.props;
---

// Use the title props in the rendered markup e.g., { title }
When I think of Astro, I think of ease. A lot of the growth Astro’s seen in the past few years is a result of the focus on ease of adoption and development.
Think about it this way: how do you get people started on a project quickly? Enable them to write less code by handing them themes and templates that can help them get started faster. Well, Astro’s done a brilliant job of that by providing engineers with varying templates:
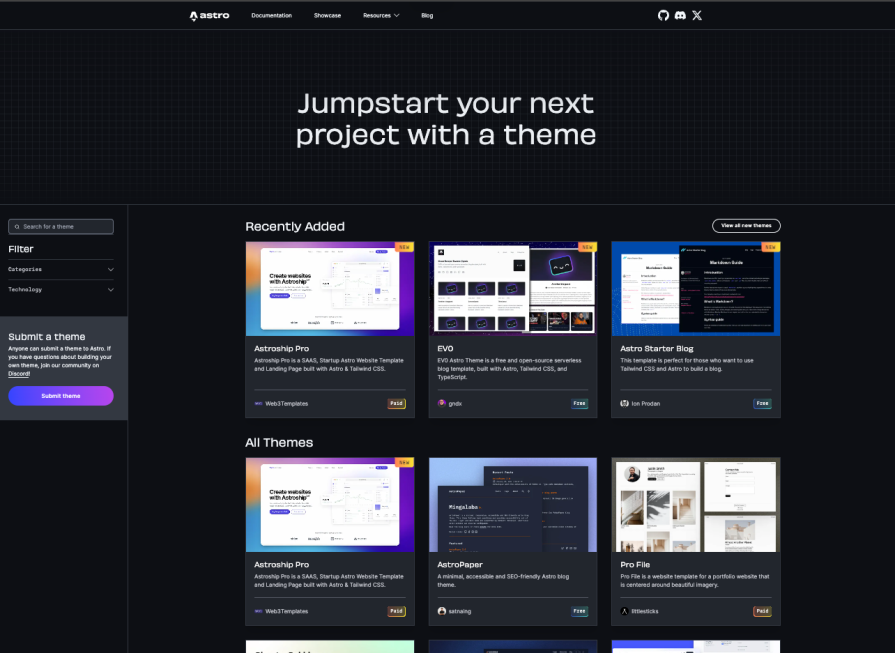
Astro provides tons of free and paid themes to help you jumpstart your next project. Talk about ease!
Remember when I said that Astro’s metamorphosing into a full-fledged web framework? Middleware plays a big part in helping Astro reach that goal. Let’s see how.
Most full-stack web frameworks have some sort of middleware implementation, like NestJS. Middleware sits between the client request and the rest of your server application logic, serving as a hub for centralizing logic such as authentication, logging, feature flags, and more:

Here’s the structure of a basic middleware in Astro:
// src/middleware.js|ts
import { defineMiddleware } from "astro/middleware";
const middleware = defineMiddleware((context, next) => {
// Do something here with the request
return next() // Do nothing, forward the request as is.
});
export const onRequest = middleware;
For type safety, import the MiddlewareResponseHandler type from the Astro package, along with the defineMiddleware utility. Then, define the middleware variable via the defineMiddleware utility:
const middleware = definedMiddleware(...)
Finally, export an onRequest function that points to middleware.
Note that we could also have done the following:
export const onRequest = defineMiddleware(...)
As mentioned earlier in this article, Astro islands are the secret to Astro’s speed. I also previously explained how Astro’s islands architecture and partial hydration work, enabling us to enjoy the benefits of hydration while still delivering content to users as quickly as possible.
For more advanced readers, you might be interested in my demo of building your own component island implementation. You can find the full code in my build-your-own-component-island GitHub repo.
Imagine you were building a large, content-driven application. You can expect such a project to use a lot of Markdown, MDX, JSON, or YAML files.
One best practice for organizing the project’s content is saving the content data in a database, where we can validate the document schema and make sure the required content fits the data model we desire.
When using this solution, we can represent these as collections of data stored in a database with a predefined schema:
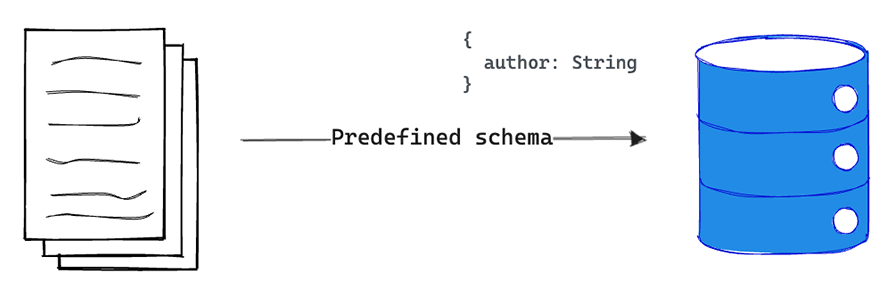
With most static site generators, it’s difficult to validate your local schema. Astro changed the game by providing strong type safety with its Content Collections API.
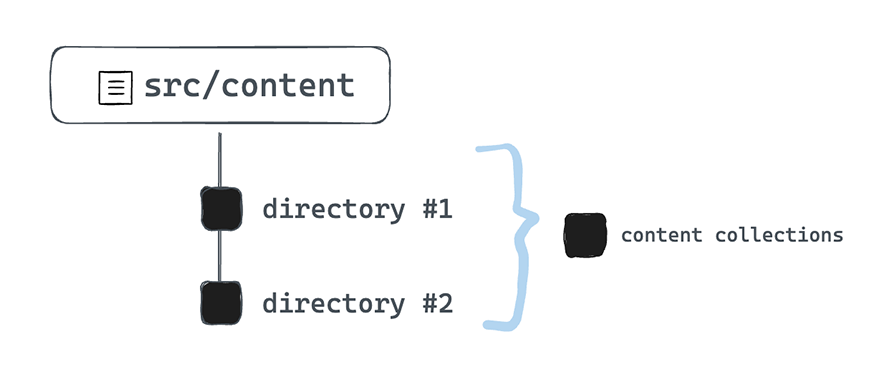
A content collection is any top-level directory in the src/content folder of an Astro project:
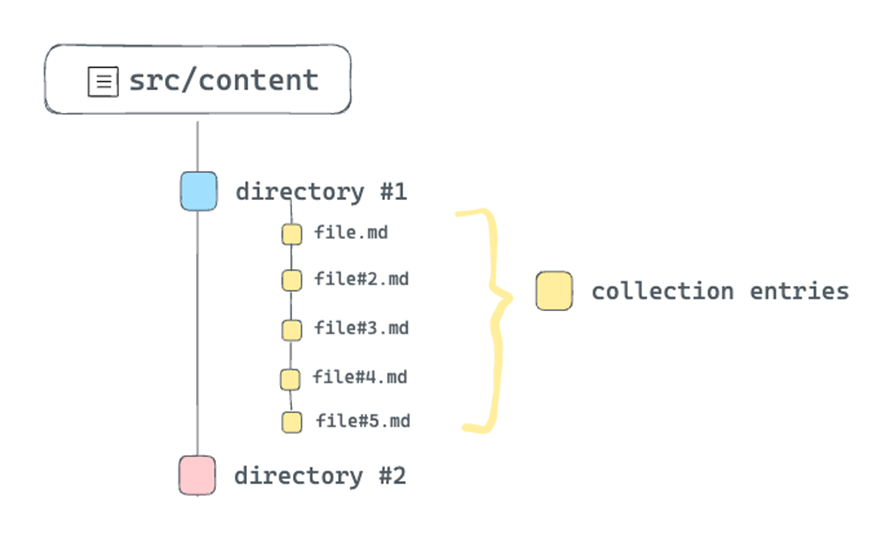
A collection isn’t particularly helpful without any items in it. In Astro’s case, the individual documents or entries within a collection are referred to as collection entries:
Now, the beauty of organizing large, content-driven sites this way is that we can take advantage of Astro’s type safety while querying and working with content collections. For example, we can introduce a schema for our content collection as shown below:
// 📂 src/content/config.ts
// Import utilities from astro:content
import { z, defineCollection } from "astro:content";

// Define the type and schema for one or more collections
const blogCollection = defineCollection({
  type: 'content',
  // an object of strings - title, year, month, and day.
  schema: z.object({
    title: z.string(),
    year: z.string(),
    month: z.string(),
    day: z.string(),
  }),
});

// Export a single collections object to register the collections
// The key should match the collection directory name in "src/content"
export const collections = {
  blog: blogCollection, // add the blog collection
};
Now, every entry in the src/content/blog collection must adhere to this schema. How do we ensure this? Firstly, by validating the front matter of every Markdown entry.
For example, if we had the following content entry, we’d get a TypeScript error, as the entry does not satisfy the defined schema:
<!-- src/content/blog/initial-blog.md -->

---
title="Hello World"
<!-- missing schema year, month, and day -->
---

# Initial Blog
This is a markdown document that represents a blog entry
You’d also get some type safety as you query and interact with query collections.
Regardless of the size of the Astro project, content collections are the best way to organize your content document, validate the structure of the document, and enjoy out-of-the-box TypeScript support when querying or manipulating the content collection.
Clear and visually appealing page transitions not only enhance the user experience but also establish the direction of flow and highlight the relationship between elements across different pages. Here’s where the View Transitions API comes in.
Astro’s View Transitions is a set of new APIs designed to manipulate page transitions natively using the View Transitions browser API. Astro is the first major web framework to mainstream View Transitions. Here’s a preview of the View Transitions API in action:
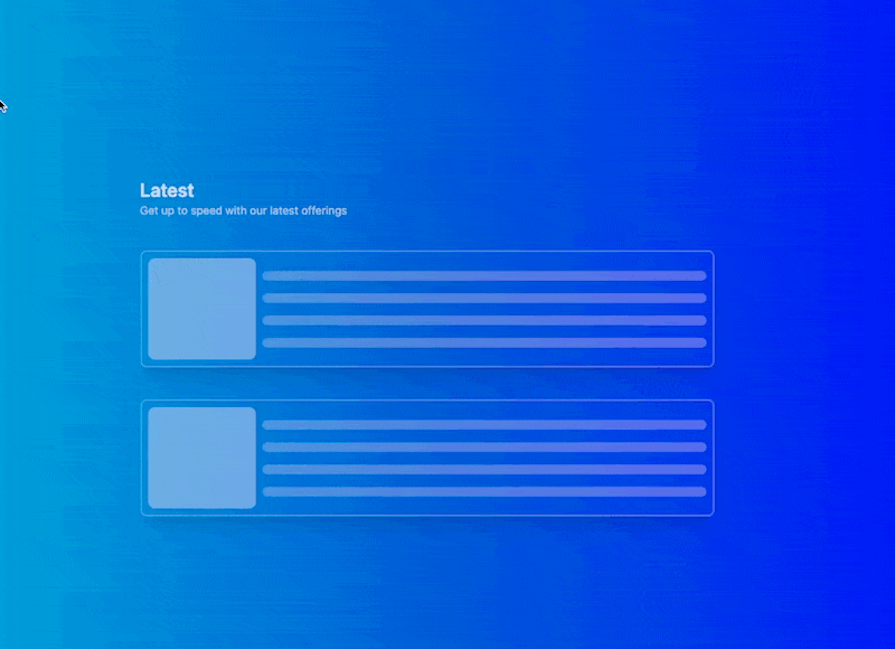
To get started with the View Transitions API in an Astro project, simply import ViewTransitions. Then, render the component in the head of the origin and destination pages for which you wish to provide a page transition:
// some-page.astro
---
import { ViewTransitions } from "astro:transitions";
---

<head>
  <ViewTransitions />
</head>

// ...
ViewTransitions is responsible for adding a client script to your origin page that intercepts clicks to other pages.
Astro applications can come in a wide variety of shapes and forms, largely because it’s such a versatile framework.
In other words, when you need to reach out to other framework components for rich interactivity, Astro doesn’t stop you. You can bring components from React, Vue, Preact, Svelte, SolidJS, Lit, or Alpine into an Astro project with no fuss.
When it comes to your data source, Astro is also not opinionated. You can work with any backend or CMS of your choice and render data as you see fit.
Finally, when the time comes to deploy your application, Astro can be deployed on various deployment services from Netlify to Cloudflare to Microsoft Azure and more.
This is the versatility Astro offers.
I’ve sung many praises for Astro so far, and hopefully, you’ve seen that I have good reasons for doing so. We’ve discussed what makes Astro great, how easy it is to use, and some of its standout features.
Now, we’ll consider some common use cases for Astro. If your business primarily operates through content-driven websites where low latency is crucial, Astro makes a strong case.
It’s widely accepted that there’s a correlation between latency and revenue. In other words, improving latency could potentially lead to increased revenue, although the degree of effectiveness depends on your specific use case.
Let’s see a few practical examples where Astro could be an effective choice.
If your personal blog or portfolio is a static site, using Astro is a no-brainer. Besides improving the performance of your site, Astro’s component-based architecture allows you to easily add dynamic features where appropriate.
You can also integrate Markdown for a better authoring experience and take advantage of Astro’s server-side rendering to remain SEO-friendly. In short, if you’re building a static site in 2024, Astro is your best bet.
Ecommerce websites come in all shapes and forms, some being more static than others. In my opinion, ecommerce sites sit somewhere in between static sites and fully interactive single-page applications. At first glance, you might not think Astro shines here, but it does.
Performance is crucial in an ecommerce website. Even in 2006, Amazon found every 100ms of latency cost them one percent in sales, and these tiny delays continue to impact UX and conversion today. For huge companies now, that’s likely to the tune of billions.
The Astro static build can generate pages for large sites, even sites with ten thousand pages or more. Now, what if you need server-side rendering? No problem — Astro supports that, too. When you need interactivity, you can use a native script or bring in your favorite component library.
With Astro, you get a performant site with optimized load times that gives your users a seamless shopping experience.
Documentation sites are typically content-heavy, and Astro shines here. I’ve mostly built my document sites from the ground up — for example, this React documentation site clone in Astro.
Astro also has a dedicated documentation framework called Starlight to get you up and running quickly. If you need a clean, intuitive documentation site that loads quickly to deliver the information you need, Astro is a great choice.
Astro is not limited to static websites. In theory, it can also power dynamic web applications.
However, I do think you need to be careful here. While you can easily use React, Vue, Svelte, and other options for full-on web applications, you should only use Astro for this use case when it really makes sense.
Here’s how I make my decision regarding whether or not to use Astro for a full-stack app: can I leverage islands for performance gains in this application? In other words, do I want to build a multi-page application that’s mostly static with islands hydrated as I see fit?
If the answer is yes, then I might explore Astro.
Astro and Next.js are both modern JavaScript frameworks designed for creating performant user interfaces. However, Astro was initially developed as a static site generator, while Next began as a framework for building rich applications with state management capabilities:

Although these frameworks have grown and changed over the years, understanding their origins will help us better understand how and why they’ve evolved to where they are today. This, in turn, will help us make a fair comparison between them and decide which option is best for our needs.
For instance, while Astro is still an excellent choice for static websites, it also tries to bridge the gap to create more stateful applications. At the same time, it’s important to note that just because you can render a full React client-side application in Astro, this doesn’t necessarily mean you should.
If your website is mostly static and performance is a priority, you should consider using Astro. Meanwhile, if you are building a very rich, stateful application, Next might be a better option.
It is worth noting that the distinction between static and stateful may not always be clear. You could have an application with a mix of both — some static pages and some rich stateful bits. For example, you could make a decent argument for building a Google form or Medium clone using Astro.
Ultimately, the choice of framework depends on your specific use case and business constraints.
Astro may seem like the new kid on the block, but it is quickly becoming a mature web framework for ambitious content-focused websites and more. With even giants like Microsoft choosing Astro for certain content-focused sites, the stage is set for wider Astro adoption.
Install LogRocket via npm or script tag. LogRocket.init() must be called client-side, not
server-side
$ npm i --save logrocket

// Code:

import LogRocket from 'logrocket';
LogRocket.init('app/id');
// Add to your HTML:

<script src="https://cdn.lr-ingest.com/LogRocket.min.js"></script>
<script>window.LogRocket && window.LogRocket.init('app/id');</script>

Russ Miles, a software development expert and educator, joins the show to unpack why “developer productivity” platforms so often disappoint.

Discover what’s new in The Replay, LogRocket’s newsletter for dev and engineering leaders, in the February 18th issue.

Learn how to recreate Claude Skills–style workflows in GitHub Copilot using custom instruction files and smarter context management.

Claude Code is deceptively capable. Point it at a codebase, describe what you need, and it’ll autonomously navigate files, write […]
Hey there, want to help make our blog better?
Join LogRocket’s Content Advisory Board. You’ll help inform the type of content we create and get access to exclusive meetups, social accreditation, and swag.
Sign up now