Once upon a time, frontend development was simple because most of the heavy lifting was handled on the backend. Today, much of an application’s logic resides on the frontend, requiring clever architecture that supports reusability, extendibility, and maintainability.

In this tutorial, we’ll show you how to structure your application into a series of smaller blocks, or modules, of functionality. We’ll walk through the process of building a well-structured Angular application that enforces separation of concerns and reusability using modules. We’ll also review some best practices for using Angular modules.
Here’s what we’ll cover:
To follow along, you should have Node.js V10.x installed on your machine and prior working knowledge of Angular.
In Angular applications, modules are small pieces of code with independent program functionalities.
For a simple example of how Angular modules work, let’s say you’re building an ecommerce website or application. You might have a module for your cart section, another for your products section, another for customers, and so on. Each module represents an independent piece of your ecommerce application.
If you don’t pay rapt attention to proper software architecture, parts of your app can become deeply entangled and disorganized, making it more difficult to reuse code or test any piece of code in isolation.
Modules enable you to:
The types of modules available in Angular include root, core, shared, and feature modules. Let’s go over each Angular module type in more detail.
The root module is the main module in an Angular application. It is generated by the Angular CLI as AppModule and bootstrapped when the application starts.
Every other Angular module depends either directly or indirectly on the root module. Only one root module can exist in an Angular application.
The core module usually contains components that are used once in an Angular application, such as a navigation bar, loader, footer, etc. This module should be loaded globally in AppModule.
A shared module is made up of directives, pipes, and components that can be reused in feature modules.
For example, let’s say you’ve written a custom grid or filter that is reused in multiple modules of your Angular application. You could identify these as shared modules.
Feature modules house the main features of your Angular application.
If you’re building an ecommerce application, for example, you might have specific sets of functionalities, such as orders, products, cart, customers, etc. Breaking these functionalities into feature modules helps you split the application into dedicated areas. This enables multiple developers or teams of developers to work on independent features without breaking other parts of the application.
To show how Angular modules work in practice, we’ll walk you through the process of building an ecommerce application in Angular. We’ll use the Angular CLI tool to scaffold our new project.
To check whether you have the Angular CLI tool installed, run the following command in your terminal:
ng --version
//or
ng v
Install the Angular CLI tool with the following command:
npm install -g @angular/[email protected]
Now we can create a new Angular project with the following command:
ng new angular-modules
This usually takes some time, depending on your internet connection. When successful, it will create a folder called angular-modules. Navigate to the newly created folder and start your application with the following command:
ng serve
When setting up a new Angular application, the first step is to define all the features that your application needs, then separate these features into the module types we discussed earlier. Each module can then be filled with the components, directives, pipes, and services that give shape to the feature the module represents.
To create a module, run the following Angular CLI command:
ng generate module products
In the root directory of your Angular project, run the above command to create a products module. This creates a products directory inside the app directory. The products directory contains a TypeScript file that is responsible for defining the module.
To create a component and register it in a module at the same time, use the following Angular CLI command:
ng generate component products/productItem --module=products
The --module flag indicates the module that the component is registered with — in our case, the products module. It can also be used when generating directives and pipes.
When creating the component, Angular CLI converts camel case into kebab case when creating folders and files. Hence, the folder of productItem component, along with its corresponding files, is converted from productItem to product-item.
Update products/product-item/product-item.component.html with the following:
<h2>Hello, Product-item component is working!</h2>
In the previous section, we created our productItem component in a separate module. Now, let’s render this component in the browser.
By default, the App component is rendered in the browser. For the productItem component to be rendered in the browser, it must be accessed by the App component.
First, the products module must export the productItem component so that it can be available in any Angular module that needs it. We can achieve this via the exports properties of ProductsModule.
Update products.module.ts file with the following:
//src/apps/products/products.module.ts
import { NgModule } from '@angular/core';
import { CommonModule } from '@angular/common';
import { ProductItemComponent } from './product-item/product-item.component';

@NgModule({
  declarations: [ProductItemComponent],
  imports: [
    CommonModule
  ],
  exports: [ProductItemComponent]
})
export class ProductsModule { }
With this, any Angular module can now import the ProductsModule to access all its exported modules, components, directives, and pipes.
Update the app.component.html file as follows:
<app-product-item></app-product-item>
Next, use the imports properties of AppModule to register ProductModule globally in AppModule.
Update app.module.ts file as follows:
import { NgModule } from '@angular/core';
import { BrowserModule } from '@angular/platform-browser';
import { AppComponent } from './app.component';
import {ProductsModule} from "./products/products.module"
@NgModule({
  declarations: [
    AppComponent,
  ],
  imports: [
    BrowserModule,
    ProductsModule
  ],
  providers: [],
  bootstrap: [AppComponent]
})
export class AppModule { }
Now you can access the ProductItemComponent anywhere in your app.
If you try to run our Angular application using ng serve, you’ll get the following:
Hello, Product-item component is working!
That is it! As a next step, you can practice more by creating modules and their corresponding components for the customers, orders, and cart features.
In this tutorial, we explored Angular modules, reviewed the types of modules in Angular, and demonstrated some of the benefits of using modules to structure your Angular apps.
Angular modules enable you to improve the organization and structure of your application. Doing so improves code reusability and testability and makes for an excellent developer experience as you scale your Angular apps.
Debugging Angular applications can be difficult, especially when users experience issues that are difficult to reproduce. If you’re interested in monitoring and tracking Angular state and actions for all of your users in production, try LogRocket.
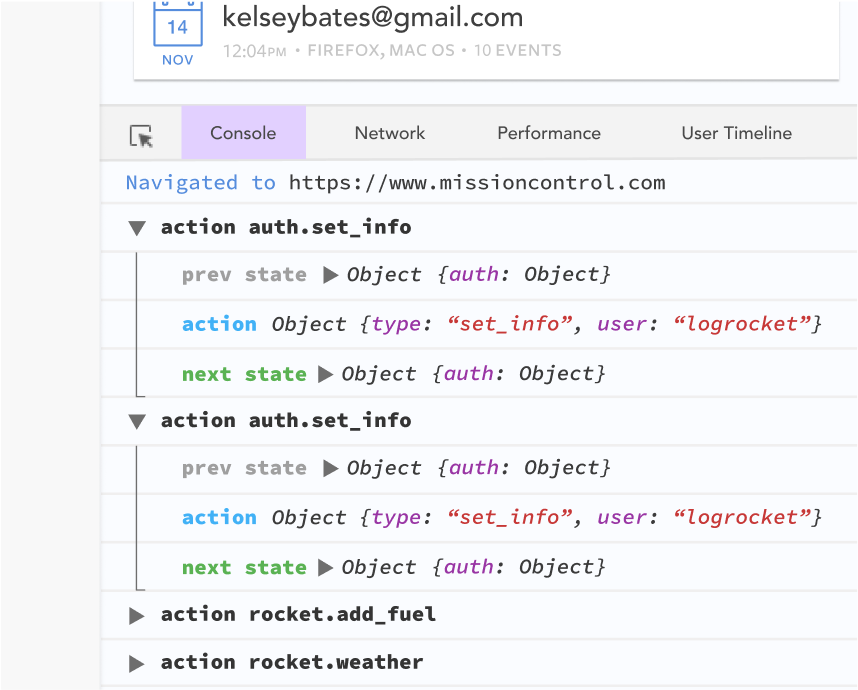
LogRocket lets you replay user sessions, eliminating guesswork by showing exactly what users experienced. It captures console logs, errors, network requests, and pixel-perfect DOM recordings—compatible with all frameworks.
With Galileo AI, you can instantly identify and explain user struggles with automated monitoring of your entire product experience.
The LogRocket NgRx plugin logs Angular state and actions to the LogRocket console, giving you context around what led to an error, and what state the application was in when an issue occurred.
Modernize how you debug your Angular apps — start monitoring for free.

Learn how to protect full-stack projects from NPM supply chain attacks with a practical security checklist.

Explore 15 essential MCP servers for web developers to enhance AI workflows with tools, data, and automation.

Learn how contrast-color() automatically picks accessible text colors using native CSS, without JavaScript.

Learn how to build a harness-style AI workflow using Claude Code with specialized Dev, QE, and Ops subagents, gated handoffs, MCP telemetry, and LEARNING.md.
Hey there, want to help make our blog better?
Join LogRocket’s Content Advisory Board. You’ll help inform the type of content we create and get access to exclusive meetups, social accreditation, and swag.
Sign up now

