The Replay is a weekly newsletter for dev and engineering leaders.
Delivered once a week, it's your curated guide to the most important conversations around frontend dev, emerging AI tools, and the state of modern software.
Vime.js is a modern framework-agnostic media player. It ships with support for video hosting services like Youtube, Vimeo, Dailymotion, HTML5, and more. It allows loading, playing, and controlling media files using the HTMLMediaElement. So it supports adding local video files.

There are many downsides to self-hosted videos, including performance issues, storage challenges, etc. There is also no single file format standard for web videos, consequently, different major web browsers support different formats.
Firefox supports Ogg or WebM videos but does not support H.264. Safari supports H.264 (MP4) videos but does not support WebM or Ogg. Thankfully, Chrome supports all the major video formats. These can be reconciled by using a video sharing platform like YouTube or Vimeo. However, this method also has its limitations.
In a scenario where we want videos from multiple platforms, we may have to write different logics for each platform. Consequently, our code is not DRY. Vime.js resolves these issues.
It takes away the hassles of interacting with various video hosting platforms and gives us an easy-to-use API. This means that no matter the number of video hosting platform we want to use, we only need to learn Vime.js.
Also, Vime.js handles the cross-browser compatibility issues. And it is a lot more extensible, customizable, and accessible.
We have seen the importance of Vime.js and why we should adopt it promptly. Interestingly, we have barely scratched the surface of what it can do. Here are some of its features:
First things first, Vime.js is a framework-agnostic library. You can plug it into your React, Angular, Vue, and Svelte projects. What this also means is that the installation is different for each framework.
This is not an issue because the installation is handled by npm. It is, however, imperative to notice the nuances in each npm script.
In this post, I will focus on two use cases — React and HTML 5. However, I will leave the necessary links to docs on other frameworks.
If you don’t want to deal with the niceties of the different npm installation scripts, this is the simplest way to use Vime.js. When using a CDN jsDelivr is recommended for best performance.
Simply insert this code inside the <head> tag in your HTML 5 document:
<!-- Default theme. ~960B -->
<link
  rel="stylesheet"
  href="https://cdn.jsdelivr.net/npm/@vime/core@^4/themes/default.css"
/>

<!-- Optional light theme (extends default). ~400B -->
<link
  rel="stylesheet"
  href="https://cdn.jsdelivr.net/npm/@vime/core@^4/themes/light.css"
/>

<!-- Library and all of its components are lazy loaded, so nothing to sweat about here. ~3kB -->
<script
  type="module"
  src="https://cdn.jsdelivr.net/npm/@vime/core@^4/dist/vime/vime.esm.js"
></script>
First load the CSS by adding these to the root component:
// Default theme. ~960B
import '@vime/core/themes/default.css';

// Optional light theme (extends default). ~400B
import '@vime/core/themes/light.css';
then run:
npm i @vime/react
Here are the links for other frameworks:
There are two core components of Vime.js, and they are the player, the provider, and the UI components.
Let’s deal with them individually.
This component holds the state of the player such as whether to autoplay or show control. It also holds the state of the media playback such as the current time or duration.
It sits as the root component and wraps the UI and the provider components. Also, it is the primary component you will be interfacing with to set properties on the player, listen for events, and call methods.
Get more of its properties, events, and methods here.
Below is a simple, player component implementation:
<vime-player>
    <!-- Provider component is placed here. -->
    <!-- UI components are placed here. -->
</vime-player>
This is the only component the player component interacts with directly. It does this by using the MediaProviderAdapter interface. Providers are responsible for loading and controlling the player/media.
For example, the Youtube Provider would set up the YouTube player embed and load a video through it. This video can then be controlled via the player component.
Kindly consider the code sample for the Youtube provider below:
<vime-player controls>
  <vime-youtube video-id="DyTCOwB0DVw"></vime-youtube>
  <!-- ... -->
</vime-player>
From our example above, we can see that the vime-youtube provider takes a property called the video-id. This property holds the resource ID of the video to load.
Learn more about vime-youtube.
These are visible components on a media player that may be interactable. A good example is a spinner.
Consider the code below:
<vime-player>
  <!-- ... -->
  <vime-ui>
    <!-- ... -->
    <vime-spinner></vime-spinner>
  </vime-ui>
</vime-player>
The code sample above throws a spinner in the UI. This is a handy utility used to enhance user experience.
The image below features a spinner used as a loading indicator when the video is buffering.

In this section, we will load and play a video using Vime.js and will customize the styles.css.
It is quite challenging to set up an entire interface for a video player, so we will start with a simple React.js setup.
As mentioned earlier, Vime is framework agnostic, so in this section, we will work with React.js. Since the Vime.js API is consistent across frameworks we can learn once and use it everywhere. In addition, the niceties between each framework’s implementation are very small so one can easily switch to a different framework without any hassle.
Consider the code below:
import "./styles.css";
import React from "react";
import { VimePlayer, VimeYoutube } from "@vime/react";
export default function APP() {
  return (
    <VimePlayer controls>
      <VimeYoutube videoId="1GFbKYQhDMU" />
      {/* ... */}
    </VimePlayer>
  );
}
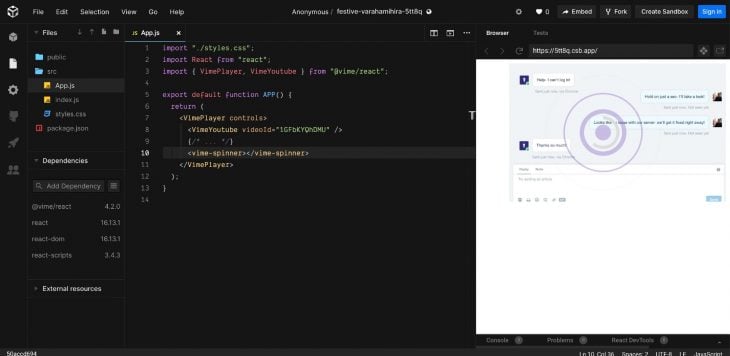
The contrived example above loads a video from LogRocket’s YouTube channel using the VimeYoutube provider. You can view the demo here.
Let’s do something more interesting:
import React from 'react';
import { VimePlayer, VimeVideo } from '@vime/react';

function Player() {
  return (
    <VimePlayer controls>
      <VimeVideo crossOrigin="" poster="https://media.vimejs.com/poster.png">
        <source
          data-src="https://media.vimejs.com/720p.mp4"
          type="video/mp4"
        />
        <track
          default
          kind="subtitles"
          src="https://media.vimejs.com/subs/english.vtt"
          srcLang="en"
          label="English"
        />
      </VimeVideo>

      {/* ... */}
    </VimePlayer>
  );
}
In our example above, we are loading the image using the VimeVideo component. This component allows loading, playing, and controlling videos using the HTML 5 video element. It takes several properties like crossorigin and poster in our example. These properties are passed to the underlying HTML 5 elements.
In our example above the VimeVideo component has two child HTML 5 media elements these are the source element and the track element. In the HTML 5 source element we passed data-src as an attribute this is to allow lazy-loading; the normal src can also be used.
The track element is used to handle subtitles for our videos.
Also, notice we passed a controls property to this component. This property turns on the Player controls such as play, volume, full-screen, and more. You can check out the code here.
Out of the box, Vime.js comes with a light and dark theme. We can switch between these by passing the theme property to the player component:
<!-- Default is 'dark'. -->
<vime-player theme="light">
  <!-- ... -->
</vime-player>
For styling, Vime.js uses custom CSS properties for its components. Below is a list of the available selectors:
vime-player.mobile {
  /* Add styles here for when the player is loaded on a mobile device. */
}

vime-player.live {
  /* Add styles here for when the media is a live stream. */
}

vime-player.audio {
  /* Add styles here for when the media is of type `audio`. */
}

vime-player.video {
  /* Add styles here for when the media is of type `video`. */
}

/* You can replace 'light' with 'dark' or any custom theme name you'd like. */
vime-player[theme="light"] {
  /* Add styles here for when the theme is set to `light`.  */
}
You can find more component-specific properties for styling here.
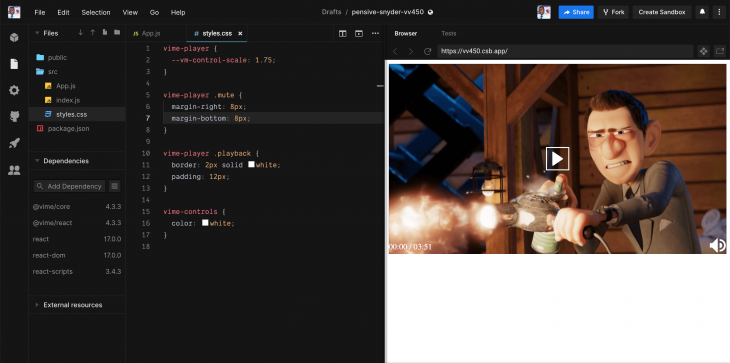
You can also add custom class names or IDs to properly target the item to style as seen in the image below:

Play with code here.
Without a doubt, Vime.js is an amazing library. And can do a lot more than we have discussed. However, with this post, you should be able to get started using Vime.js without any hassles. For more advanced stuff, I would recommend checking out their official documentation.
There’s no doubt that frontends are getting more complex. As you add new JavaScript libraries and other dependencies to your app, you’ll need more visibility to ensure your users don’t run into unknown issues.
LogRocket is a frontend application monitoring solution that lets you replay JavaScript errors as if they happened in your own browser so you can react to bugs more effectively.

LogRocket works perfectly with any app, regardless of framework, and has plugins to log additional context from Redux, Vuex, and @ngrx/store. Instead of guessing why problems happen, you can aggregate and report on what state your application was in when an issue occurred. LogRocket also monitors your app’s performance, reporting metrics like client CPU load, client memory usage, and more.
Build confidently — start monitoring for free.

@container scroll-state: Replace JS scroll listeners nowCSS @container scroll-state lets you build sticky headers, snapping carousels, and scroll indicators without JavaScript. Here’s how to replace scroll listeners with clean, declarative state queries.

Russ Miles, a software development expert and educator, joins the show to unpack why “developer productivity” platforms so often disappoint.

Discover what’s new in The Replay, LogRocket’s newsletter for dev and engineering leaders, in the February 18th issue.

Learn how to recreate Claude Skills–style workflows in GitHub Copilot using custom instruction files and smarter context management.
Hey there, want to help make our blog better?
Join LogRocket’s Content Advisory Board. You’ll help inform the type of content we create and get access to exclusive meetups, social accreditation, and swag.
Sign up now