
It wasn’t so long ago that the highest level of integration that you could expect between your phone and your car was playing music from your phone to your car speakers.

As time has gone on, this has changed drastically, with the introduction of technologies like Android Auto and Apple CarPlay. Now your chosen audio, fast-food, or navigation app can beam itself directly to your cars entertainment system for easy interactions.
While the intent between Apple CarPlay and Android Audio are similar, in this article we’ll look at how we can complement our Flutter app with some CarPlay functionality. We will cover:
RootTemplateThe Replay is a weekly newsletter for dev and engineering leaders.
Delivered once a week, it's your curated guide to the most important conversations around frontend dev, emerging AI tools, and the state of modern software.
Now, as the writer of this article, I would just love to jump into the exciting technical details of how to do this (as I am sure you would like to read about them!). However, before I do that, we need to briefly mention some of the things that could possibly obstruct you from ever getting your Flutter CarPlay app off the ground.
As developers, we’re always keen to find a way forward to deliver a certain product or feature. When we’re told that we can’t do something, or that something isn’t supported, we’re tempted to do it anyway just to see if we can be the first to do something, or because we really want to deliver for our customers.
However, in the case of developing an app that makes use of Apple CarPlay, we need to define some realistic expectations. This article relates to Flutter apps, but would apply to any app that leverages CarPlay. Let’s dive in.
Creating a Flutter app that has a CarPlay component is not as easy as just pulling a package in, setting up some values, and deploying it out to your users. Any app that uses CarPlay must specifically be approved by Apple.
This approval process can be long, sometimes to the order of months. There are also reports of Apple simply not getting back to developers who request this functionality. There’s nothing you can do or say to speed up this process — you are entirely on Apple’s timeline.
Even still, it’s not as simple as checking a box declaring that your app uses CarPlay. Your app must fall into a set of categories that Apple has pre-defined, which brings us to our next point.
To make use of CarPlay within your app, it has to fit into a certain set of categories that Apple prescribes. These categories are, essentially:
And that’s it.
Perhaps you feel that it’s draconian of Apple to enforce such restrictions on what you can and cannot develop for CarPlay. However, consider the premise of CarPlay: it’s something that people use in their car to complete basic tasks that should not distract them from driving.
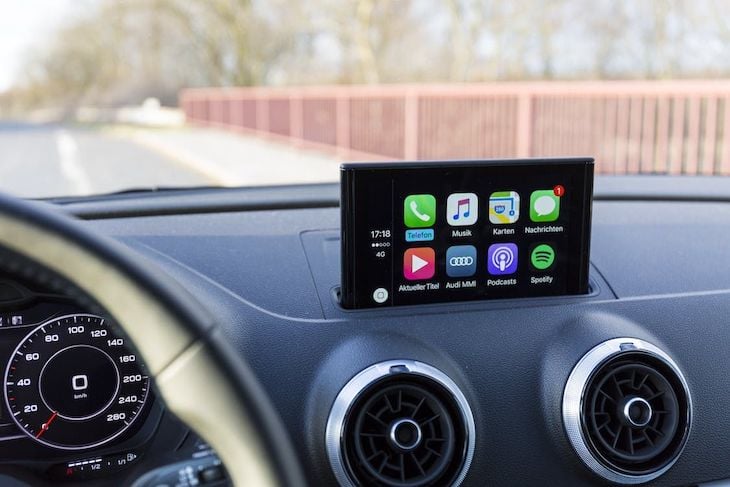
If you developed an app that let people play Flappy Bird on their infotainment systems as they were driving, and they crashed their car, it’s true that the driver would be at fault for being so careless. But wouldn’t Apple bear some responsibility for allowing the app in the first place? In that light, the restrictions seem warranted.
So, considering the above, we’d only consider adding CarPlay to our Flutter app if:
If we ignore the above and just send apps out for Apple’s endorsement, they will likely not take the time to help your app become compliant. They will reject your application, or worse, just never get back to you, leaving your app stranded without an official approval (which you can use) or a rejection (which you can possibly escalate).
In case Apple does not approve our app, it’s important for us not to pin the success or failure of our app on having the CarPlay feature, especially considering that Apple may not tell us why the app was rejected.
With all of that out of the way, let’s dig in to how to actually add CarPlay to our Flutter app.
For today’s example, we’ll be bringing CarPlay functionality to our fast-food ordering app, which is called EatUp. On our phone, this is what the app looks like:
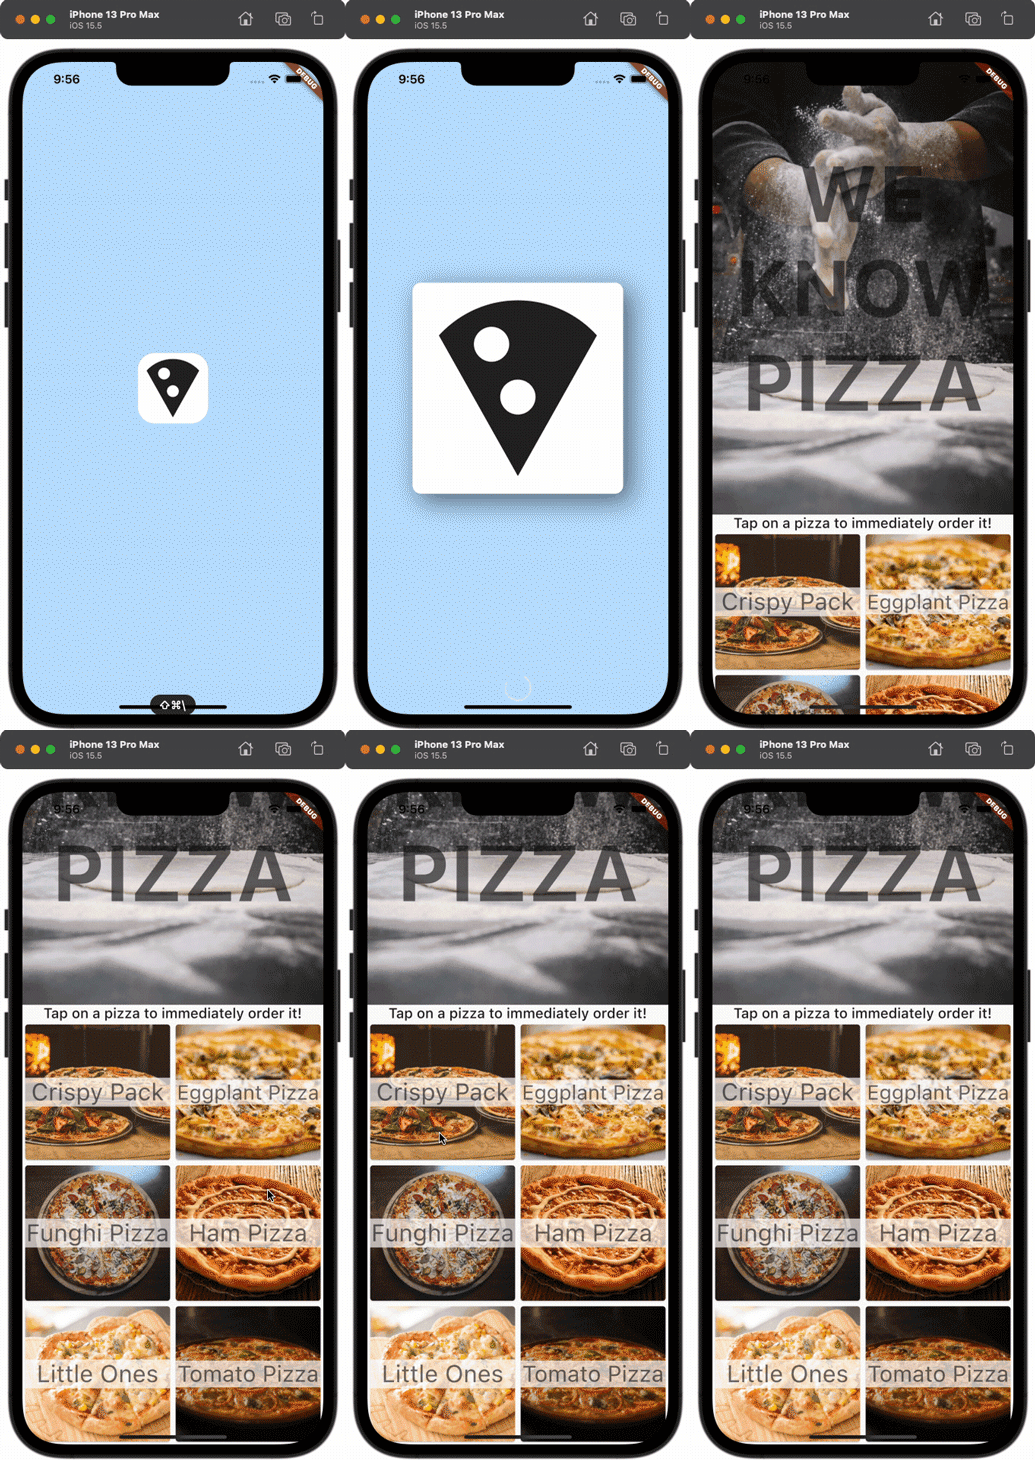
The focus of this article isn’t on Flutter app development itself, but rather on how to add CarPlay to the app. You are welcome to peruse the source code to understand how we achieved the layout shown above, but we won’t go into further detail here.
The configuration steps for flutter_carplay are available on pub.dev, so let’s go through them now.
Note that in doing this, you will be making changes to your Flutter project. If you are adding CarPlay to an existing app, now would be an ideal time to commit your changes to source control. This way, you can easily revert your changes if they cause problems.
First of all, we want to add a reference to our pubspec.yaml in our dependencies:
dependencies:
  flutter:
    sdk: flutter
  ...other dependencies...
  flutter_carplay: ^1.0.3
Then, we should run the flutter pub get command within our project. This will create a Podfile that helps integrate the native parts of flutter_carplay with our project.
Let’s open the ios/Podfile file and uncomment the top line, and set the global platform to iOS 14.0:
# Uncomment this line to define a global platform for your project
platform :ios, '14.0'
Change directories into the ios folder and run pod install --repo-update.
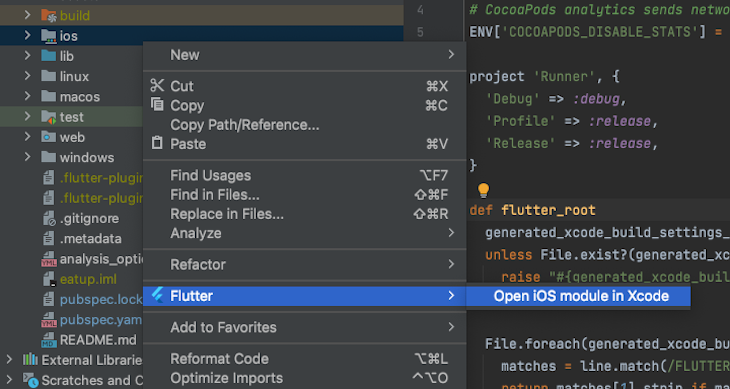
Because CarPlay is a native iOS feature, we will need to make changes to our XCode project. Right-click on the ios folder, and then choose Flutter > Open iOS module in Xcode:
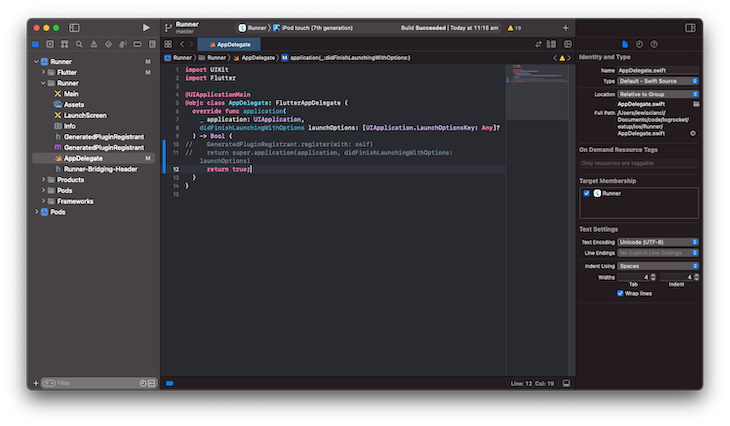
Within our project, navigate to Runner > Runner > AppDelegate and replace the contents of our application function with a simple return true. In my case, I commented out the old code and added the new code directly beneath it, so it should look the same for you:
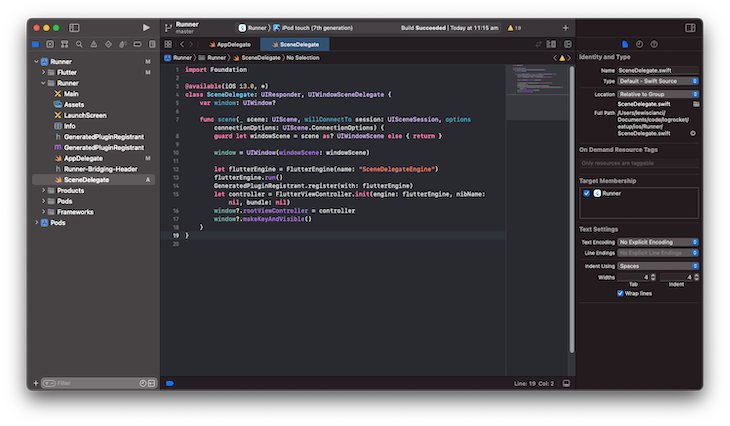
Within our Runner folder (not the topmost one, but the one that exists one level down), create a SceneDelegate.swift file, and set the contents to the below:
@available(iOS 13.0, *)
class SceneDelegate: UIResponder, UIWindowSceneDelegate {
    var window: UIWindow?

    func scene(_ scene: UIScene, willConnectTo session: UISceneSession, options connectionOptions: UIScene.ConnectionOptions) {
        guard let windowScene = scene as? UIWindowScene else { return }

        window = UIWindow(windowScene: windowScene)

        let flutterEngine = FlutterEngine(name: "SceneDelegateEngine")
        flutterEngine.run()
        GeneratedPluginRegistrant.register(with: flutterEngine)
        let controller = FlutterViewController.init(engine: flutterEngine, nibName: nil, bundle: nil)
        window?.rootViewController = controller
        window?.makeKeyAndVisible()
    }
}
After you have done this, the SceneDelegate should look like this:
Now, right-click on the Info.plist file and click on Open As > Source Code. This will open the Info.plist in plain text so that you can easily paste the next configuration into the file.
We should be extra careful during this step because it’s very easy to accidentally break this file if we type the wrong thing into it:
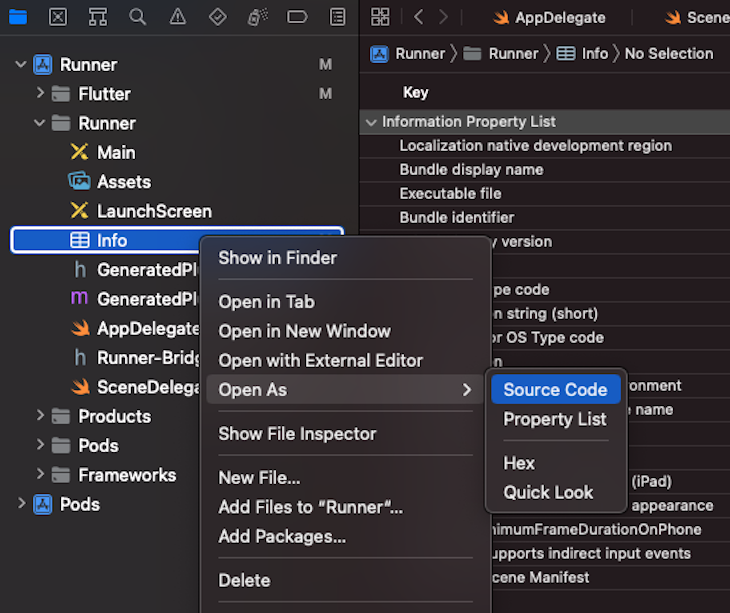
Before the closing </dict>, add the following text. This is the default configuration, and we will come back to this later to customize it:
<key>UIApplicationSceneManifest</key>
<dict>
  <key>UIApplicationSupportsMultipleScenes</key>
  <true />
  <key>UISceneConfigurations</key>
  <dict>
    <key>CPTemplateApplicationSceneSessionRoleApplication</key>
    <array>
      <dict>
        <key>UISceneConfigurationName</key>
        <string>CarPlay Configuration</string>
        <key>UISceneDelegateClassName</key>
        <string>flutter_carplay.FlutterCarPlaySceneDelegate</string>
      </dict>
    </array>
    <key>UIWindowSceneSessionRoleApplication</key>
    <array>
      <dict>
        <key>UISceneConfigurationName</key>
        <string>Default Configuration</string>
        <key>UISceneDelegateClassName</key>
        <string>$(PRODUCT_MODULE_NAME).SceneDelegate</string>
        <key>UISceneStoryboardFile</key>
        <string>Main</string>
      </dict>
    </array>
  </dict>
</dict>
Even in development, we need to permit our app to interact with the CarPlay simulator on our computer. Let’s configure these entitlements now.
Within XCode, click on Runner, then click on Signing & Certificates, and then click on the + button to the left of All:
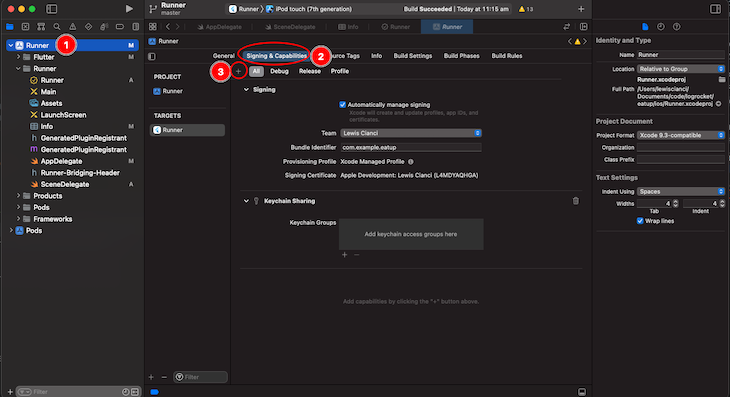
In the list that comes up, select Keychain Sharing. Your app doesn’t actually use keychain sharing, but doing this sets you up with a Runner.entitlements file in your project:
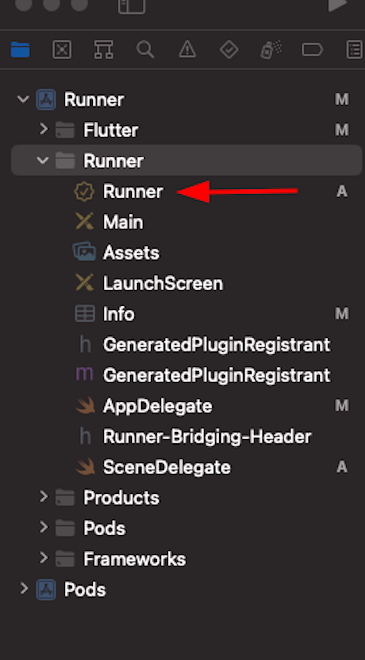
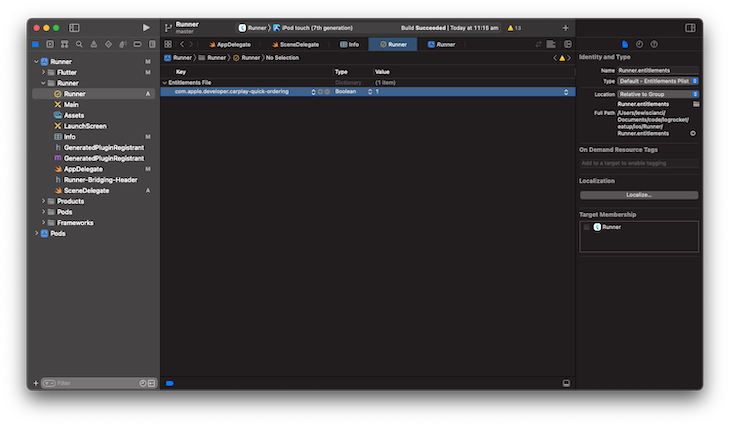
Within this file, remove the Keychain Access Groups and add a new entitlement, depending on what type of app you are developing. You can check Apple’s list of available entitlements to see which one to use for your project.
When you are done, your Runner.entitlements file should look like the following:
Now we’re finally ready to add some functionality to our Flutter app! 🎉
Now, we’ll add the following UI into the CarPlay component of our app.
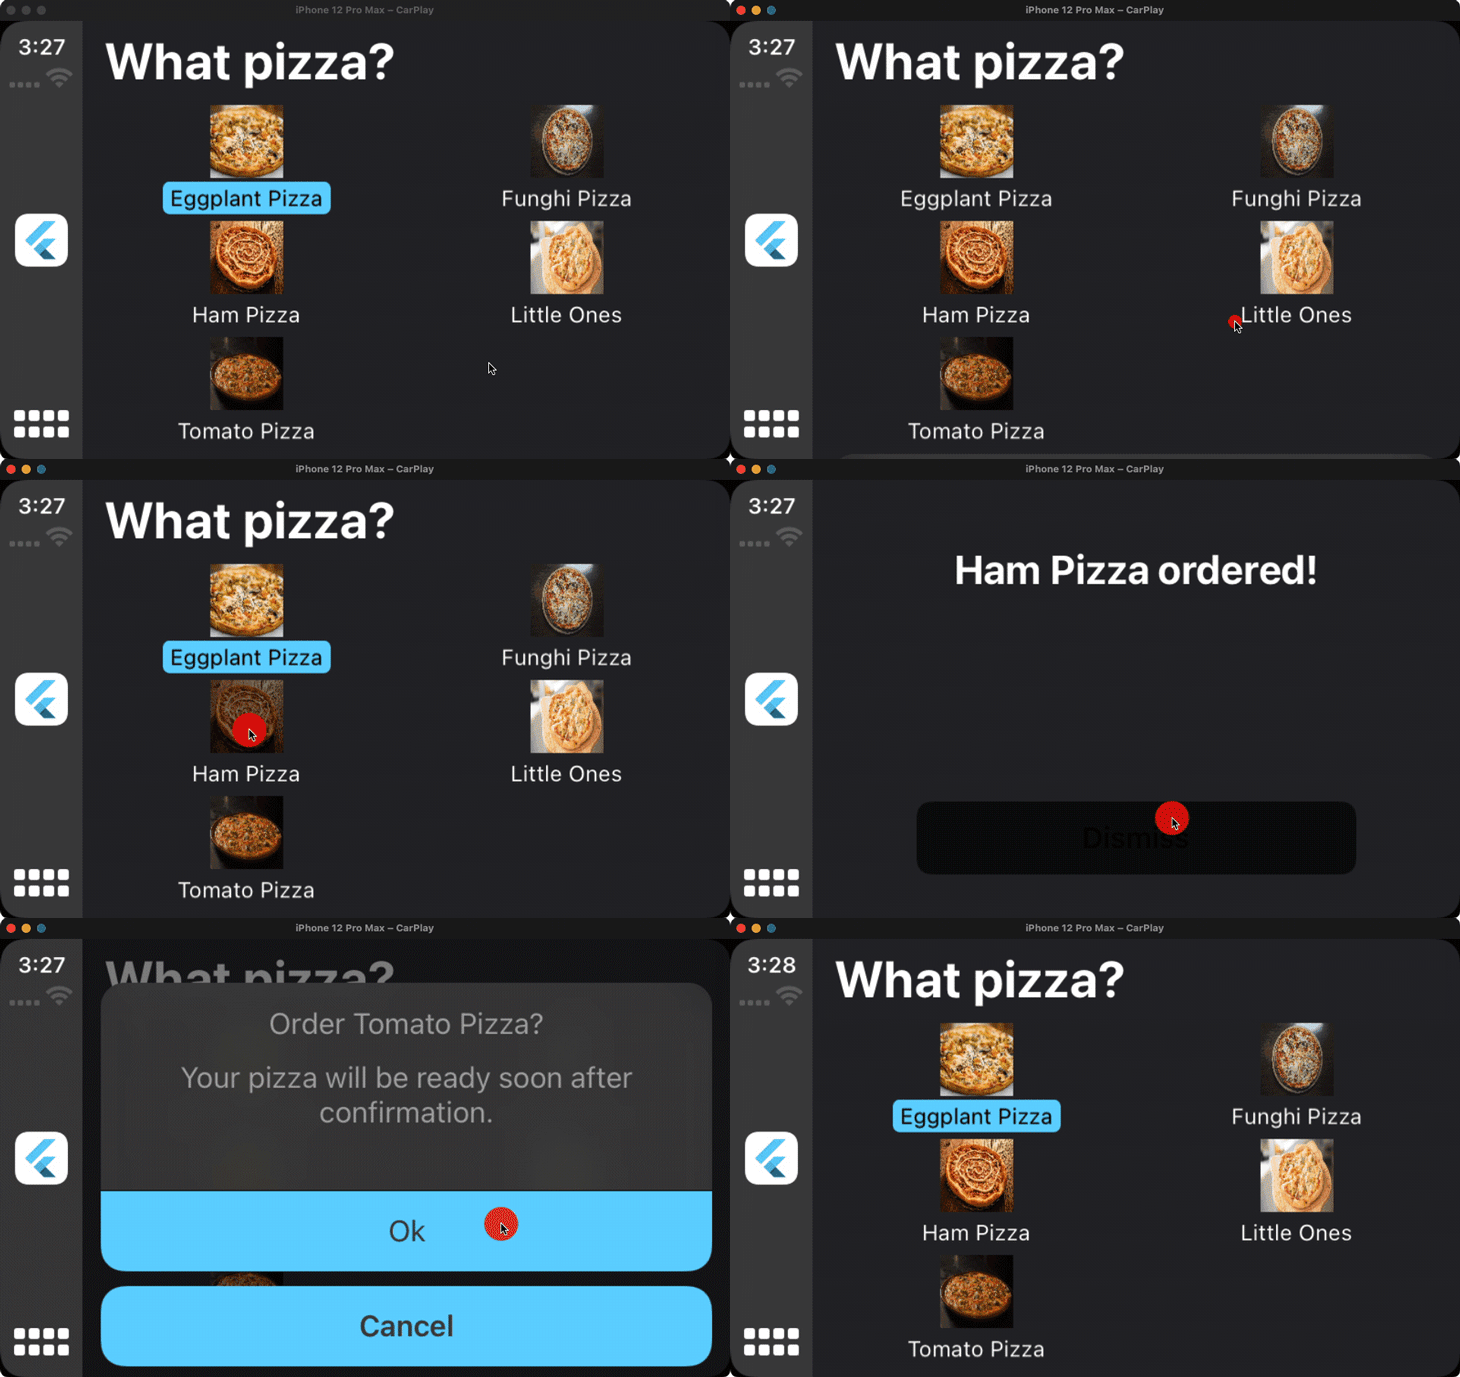
Here’s we will need to do in order to achieve this:
RootTemplate that will form the basis of our CarPlay experienceLet’s go ahead and take care of these steps now.
RootTemplateWithin our main.dart file, we’ll create a new FlutterCarplay object. This object will be responsible for handling our connection to CarPlay, and will let us control what is happening within our CarPlay experience:
final FlutterCarplay _flutterCarplay = FlutterCarplay();
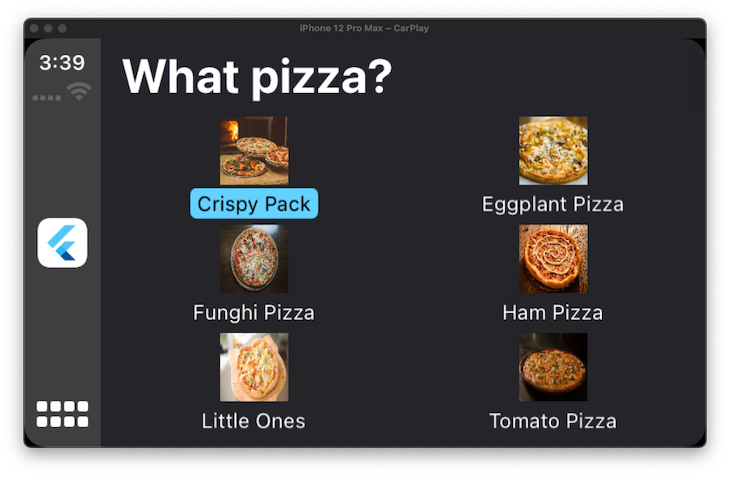
Next, within our initState for our widget, we want to set up the RootTemplate with some options to tap on. It’s fairly easy to create a grid template, set a title, and then describe some buttons that we would like to be able to be pressed:
@override
void initState() {
  FlutterCarplay.setRootTemplate(
    rootTemplate: CPGridTemplate(
      title: "What pizza?",
      buttons: [
        ...Data.FoodItems.map(
          (e) => CPGridButton(
            titleVariants: [e.name],
            image: 'assets/images/${e.asset}',
            onPress: () {
              showOrderingConfirmationSheet(e);
              // showActionSheet();
            },
          ),
        )
      ],
    ),
    animated: true,
  );

  _flutterCarplay.forceUpdateRootTemplate(); // This makes the CarPlay experience reload on hot reload, useful during development.

  // TODO: implement initState
  super.initState();
}
As expected, this is the result:
Now, let’s implement showOrderingConfirmationSheet:
void showOrderingConfirmationSheet(FoodItem food) {
  FlutterCarplay.showActionSheet(
    template: CPActionSheetTemplate(
      title: "Order ${food.name}?",
      message: "Your pizza will be ready soon after confirmation.",
      actions: [
        CPAlertAction(
          title: "Cancel",
          style: CPAlertActionStyles.cancel,
          onPress: () {
            // print("Cancel pressed in action sheet");
            FlutterCarplay.popModal(animated: true);
          },
        ),
        CPAlertAction(
          title: "Ok",
          style: CPAlertActionStyles.normal,
          onPress: () {
            print("Ok pressed in action sheet");
            FlutterCarplay.popModal(animated: true);
            FlutterCarplay.showAlert(
                template: CPAlertTemplate(titleVariants: [
              '${food.name} ordered!'
            ], actions: [
              CPAlertAction(
                title: "Dismiss",
                style: CPAlertActionStyles.destructive,
                onPress: () {
                  print("Dismiss pressed in action sheet");
                  FlutterCarplay.popModal(animated: true);
                },
              ),
            ]));
          },
        ),
      ],
    ),
  );
}
This results in the particular food item being opened and a confirmation message being displayed. You can also call native functionality within your Flutter app at this stage, such as adding or removing items from an internal database, depending on your needs.
As always, you can retrieve a full copy of the source code on Github. There is a commit before I implemented CarPlay, and a commit after I had implemented it, so you can use this to compare what changed. This comparison can be useful in case you experience difficulties in implementing CarPlay.
So, that’s how you add CarPlay to your Flutter app. The most time-consuming component of adding CarPlay is getting Apple to approve your use of CarPlay within your app. If you want to start using CarPlay within your Flutter app, that’s something you should start working on as soon as you can.
Adding CarPlay to your Flutter app can be quite a process, but if CarPlay is a good fit for your app, it can add a lot of value to your app’s experience.
Install LogRocket via npm or script tag. LogRocket.init() must be called client-side, not
server-side
$ npm i --save logrocket

// Code:

import LogRocket from 'logrocket';
LogRocket.init('app/id');
// Add to your HTML:

<script src="https://cdn.lr-ingest.com/LogRocket.min.js"></script>
<script>window.LogRocket && window.LogRocket.init('app/id');</script>

React Server Components and the Next.js App Router enable streaming and smaller client bundles, but only when used correctly. This article explores six common mistakes that block streaming, bloat hydration, and create stale UI in production.

Gil Fink (SparXis CEO) joins PodRocket to break down today’s most common web rendering patterns: SSR, CSR, static rednering, and islands/resumability.

@container scroll-state: Replace JS scroll listeners nowCSS @container scroll-state lets you build sticky headers, snapping carousels, and scroll indicators without JavaScript. Here’s how to replace scroll listeners with clean, declarative state queries.

Explore 10 Web APIs that replace common JavaScript libraries and reduce npm dependencies, bundle size, and performance overhead.
Would you be interested in joining LogRocket's developer community?
Join LogRocket’s Content Advisory Board. You’ll help inform the type of content we create and get access to exclusive meetups, social accreditation, and swag.
Sign up now
One Reply to "Adding CarPlay to your Flutter app"
And yet I do not understand what is CarPlay and Android Auto, what they give me if you activate them? I have them in the car from the factory, but how to activate them? I do not get, asked a friend to help too, they could not, so it is a thing that all want to put it, but the activation is so complicated?