Many times we may want to pass data from one component to another — not in the traditional parent to child component method, but in a method that makes the component reusable.

Components are used to make web templates that you can dump in different places to re-render the same kind of code. How cool would it be if you could reuse a component, but render the component differently in different places based on imputed properties? Pretty cool.
With Vue slots, you can turn a part or all of your components into reusable templates that will render differently based on different use cases. All you need to do is embed them in slots.
In this article, I’ll help you understand the concept of Vue slots and show you how to use them.
The Replay is a weekly newsletter for dev and engineering leaders.
Delivered once a week, it's your curated guide to the most important conversations around frontend dev, emerging AI tools, and the state of modern software.
So, we understand the whole concept from the definition of slots — it’s about making components reusable. Now, we’re going to dive in with some examples showcasing Vue slots and talk about how to make use of them.
We’re going to create some buttons in App.vue and allow the buttons to be reused by Buttons.vue:
/**App.vue**/
<template>
  <div id="app">
  <button-helper>
    <button type="button" class="Red">Red</button>
    <button type="button" class="Green">Green</button>
    <button type="button" class="Blue">Blue</button>
  </button-helper>
  </div>
</template>
<script>
import buttonHelper from './components/Buttons.vue'
export default {
  name: 'App',
  components: {
    'button-helper':buttonHelper
  }
    }
</script>

<style>
.Red{
  width:120px;
  height: 50px;
  margin: 50px;
  padding: 10px;
  background-color:red;
  text-align: center;
  cursor:pointer;
}
.Green{
  width:120px;
  height: 50px;
  margin: 50px;
  padding: 10px;
  background-color:Green;
  text-align: center;
  cursor:pointer;
}
.Blue{
  width:120px;
  height: 50px;
  margin: 50px;
  padding: 10px;
  background-color:blue;
  text-align: center;
  cursor:pointer;
}
</style>
//Buttons.vue

<template>
<div>
  <slot></slot>
  </div>
</template>
<script>
export default {
  name: 'Buttons',
    }
</script>

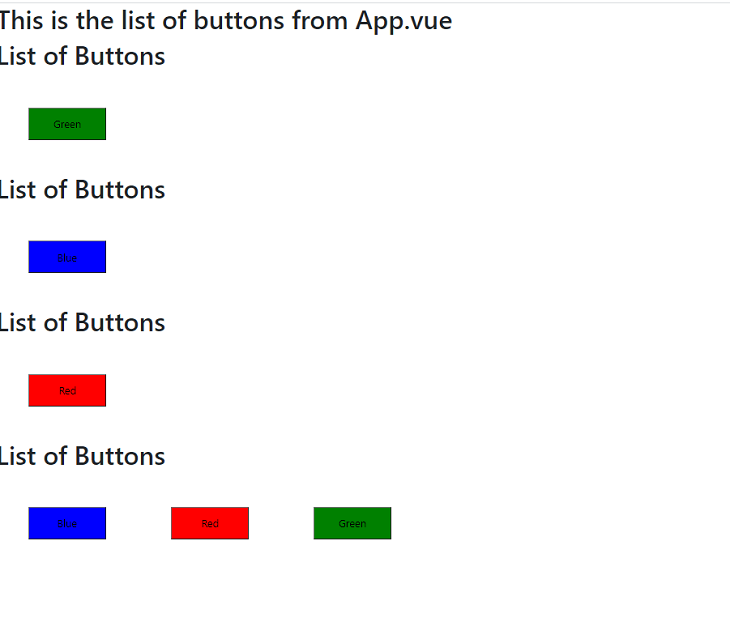
In the above example, we have created some buttons in our <App></App> template. We’ve also called them into our Buttons.vue. When we remove <slot></slot> from App.vue, we’ll see that only <h1>List of Buttons</h1> is shown.
This is because you cannot pass properties of a component from one component (App.vue) to another component (Buttons.vue) simply by embedding the property in the child component tag.
What if we want to control how the buttons are rendered in Buttons.vue? We’ll probably want a green button to be rendered first, and a red button last.
Below is an example that illustrates how we can reuse components by rendering them differently:
//App.vue

<template>
  <div id="app">
  <button-helper>
    <h1 slot="title">List of Buttons</h1>
    <button slot="red" type="button" class="Red">Red</button>
    <button slot="green" type="button" class="Green">Green</button>
    <button slot="blue" type="button" class="Blue">Blue</button>
  </button-helper>
  </div>
</template>
<script>
import buttonHelper from './components/Buttons.vue'
export default {
  name: 'App',
  components: {
    'button-helper':buttonHelper
  }
    }
</script>

<style>
.Red{
  width:120px;
  height: 50px;
  margin: 50px;
  padding: 10px;
  background-color:red;
  text-align: center;
  cursor:pointer;
}
.Green{
  width:120px;
  height: 50px;
  margin: 50px;
  padding: 10px;
  background-color:Green;
  text-align: center;
  cursor:pointer;
}
.Blue{
  width:120px;
  height: 50px;
  margin: 50px;
  padding: 10px;
  background-color:blue;
  text-align: center;
  cursor:pointer;
}
</style>
//Buttons.vue
<template>
<div>
  <h1>This is the list of buttons from App.vue</h1>
<div>
  <slot name="title"></slot>
  <slot name="green"></slot>
</div>
<div>
  <slot name="title"></slot>
  <slot name="blue"></slot>
</div>
<div>
  <slot name="title"></slot>
  <slot name="red"></slot>
  </div>
<div>
  <slot name="title"></slot>
  <slot name="blue"></slot>
  <slot name="red"></slot>
  <slot name="green"></slot>
</div>
</div>
</template>
<script>
export default {
  name: 'Buttons',
    }
</script>

Above, we’ve named our slots. This is very essential when we have more than one property to pass as slots — we’ll need to assign names to slots. For instance, we may not want all of the slots to appear together when we call them.
This way, we can call the slots we want from the child component by calling their names.
We name slots by adding slot="name" to the property in the parent component we want to pass to the child component. We call the named slot in our child component by adding <slot name="name"></slot> to the position where we want our slot to be called. This method is called naming slots with a name attribute.
We can also name our templates using the v-slot directive on a <template>. This way, the name of the slot will be passed as v-slot‘s argument:
//Buttons.vue
<template>
  <div>
    <h1>List of Buttons</h1>
    <slot name="green"></slot>
    <slot name="red"></slot>
    <slot name="blue"></slot>
  </div>
</template>
<script>
export default {
  name: 'Buttons',
    }
</script>
//App.vue
<template>
  <div id="app">
    <Buttons>
      <template v-slot:green>
        <button class="Green">I am Green</button>
      </template>
    </Buttons>
      <Buttons>
      <template v-slot:blue>
        <button class="Blue">I am Blue</button>
      </template>
    </Buttons>
      <Buttons>
      <template v-slot:red>
        <button class="Red">I am Red</button>
      </template>
    </Buttons>
    </div>
</template>
<script>
import Buttons from './components/Buttons'
export default {
  name: 'App',
  components: {
    Buttons,
  }
    }
</script>
<style>
.Red{
  width:120px;
  height: 50px;
  margin: 50px;
  padding: 10px;
  background-color:red;
  text-align: center;
  cursor:pointer;
}
.Green{
  width:120px;
  height: 50px;
  margin: 50px;
  padding: 10px;
  background-color:Green;
  text-align: center;
  cursor:pointer;
}
.Blue{
  width:120px;
  height: 50px;
  margin: 50px;
  padding: 10px;
  background-color:blue;
  text-align: center;
  cursor:pointer;
}
</style>
Now, let’s dig into some more advanced methods of passing slots by binding expressions. This way, we can render slots based on the use case — especially from the input of the user, like when we manipulate the DOM.
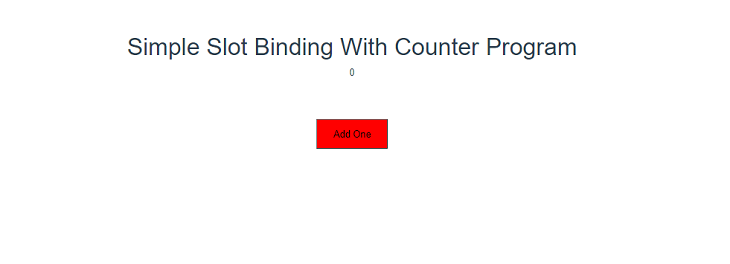
We are going to create a simple program that binds data from the child component (Buttons.vue) to the parent component (App.vue) according to the input of the user:
// Button.vue

<template>
  <div class="hello">
    <h1>{{ msg }}</h1>
    <slot name="propsTest" :count="count" :addOne="addOne" />
  </div>
</template>
<script>
export default {
  name: "Buttons",
  props: {
    msg: String
  },
  data() {
    return {
      count: 0
    };
  },
  methods: {
    addOne() {
      this.count++;
    }
  }
};
</script>
<!-- Add "scoped" attribute to limit CSS to this component only -->
<style scoped>
h3 {
  margin: 40px 0 0;
}
ul {
  list-style-type: none;
  padding: 0;
}
li {
  display: inline-block;
  margin: 0 10px;
}
a {
  color: #42b983;
}
</style>
<template>
  <div id="app">
    <Buttons msg="Simple Slot Binding With Counter Program">
      <template v-slot:propsTest="{ count, addOne }">
        <p>{{ count }}</p>
        <button @click="addOne" class="Red">Add One</button>
      </template>
    </Buttons>
  </div>
</template>
<script>
import Buttons from "./components/Buttons";
export default {
  name: "app",
  components: {
    Buttons
  }
};
</script>
<style>
#app {
  font-family: "Avenir", Helvetica, Arial, sans-serif;
  -webkit-font-smoothing: antialiased;
  -moz-osx-font-smoothing: grayscale;
  text-align: center;
  color: #2c3e50;
  margin-top: 60px;
}
.Red{
  width:120px;
  height: 50px;
  margin: 50px;
  padding: 10px;
  background-color:red;
  text-align: center;
  cursor:pointer;
}
</style>

In the above example, we’ve passed the counter property from Button.vue to App.vue and added a button by using vue-slots.
So, we may want to assign fallback content to our property from Button.vue.That way, if no property is assigned in App.vue or other components accessing data from Button.vue, the component can fall back to the fall back content:
//Buttons.vue
<template>
<button type="submit" class="Red">
  <slot>Submit</slot>
</button>
</template>
<script>
export default {
  name: 'Buttons',
    }
</script>
<style>
.Red{
  width:120px;
  height: 50px;
  margin: 50px;
  padding: 10px;
  background-color:red;
  text-align: center;
  cursor:pointer;
}
</style>
//App.vue
<template>
  <div id="app">
    <Buttons>
      send
    </Buttons>
  </div>
</template>

<script>
import Buttons from './components/Buttons'
export default {
  name: 'App',
  components: {
    Buttons,
  }
    }
</script>

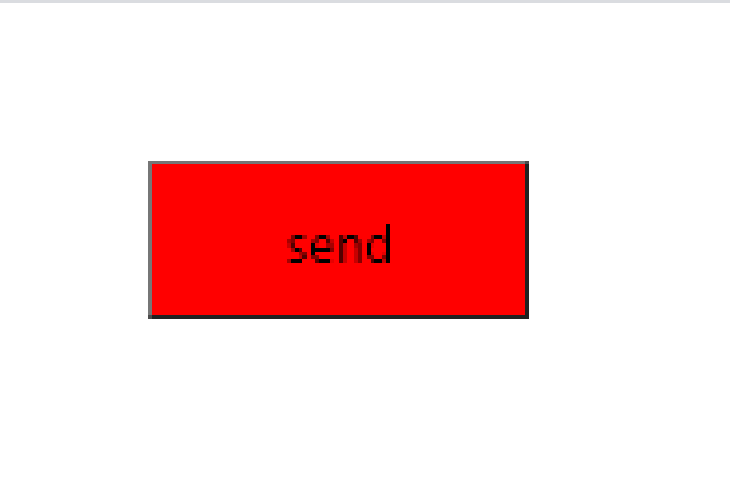
If we remove the send button in the 5th line of App.vue, we would see that the text in the button changes from Submit to Send.
To pass a property in Vue, you would define the data in the parent component and assign a value to the data. Then, you’d pass the value of the property to the child component so the data becomes a property in the child component.
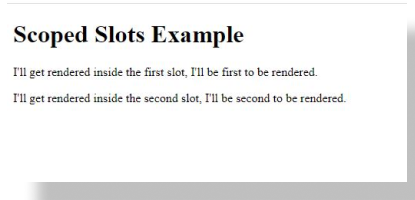
But with scoped slots, you’d pass properties from your child components into a scoped slot, then access them from the parent component. This is the reverse of the traditional property passing in Vue. This concept is to allow the parent component to have access to some data on the child component.
To understand this concept properly, we would create a simple expression and pass properties from our child component into our parent component using slot-scope.
//App.vue
<template>
  <div>
    <Buttons>
      <template slot-scope="firstSlotScope">
        <p>{{firstSlotScope.text}}</p>
        <!-- Renders <p>I'll get rendered inside the first slot.</p> -->
      </template>
      <template slot="not-first" slot-scope="secondSlotScope">
        <p>{{secondSlotScope.text}}</p>
        <!-- Renders <p>I'll get rendered inside the second slot.</p> -->
      </template>
    </Buttons>
  </div>
</template>
<script>
import Buttons from './components/Buttons';
export default {
  name: 'App',
  components: {
    Buttons,
  }
}
</script>
//Buttons.vue
<template>
  <div>
    <h1>Scoped Slots Example</h1>
    <slot :text="firstSlotText"></slot>
    <slot name="not-first" :text="secondSlotText"></slot>
  </div>
</template>
<script>
export default {
  name: 'Buttons',
  data() {
    return {
      firstSlotText: "I'll get rendered inside the first slot, I'll be first to be rendered.",
      secondSlotText: "I'll get rendered inside the second slot, I'll be second to be rendered."
    }
  }
}
</script>

Instead of binding data and assigning values to them with Vue slots, you can access data on the child component from the parent component as props.
We have seen the different ways to reuse properties of a component by using the slot property. This article also explains how we can name slots dynamically or by using the slot attributes. We have also seen how we can pass specific data from the child component to the parent component with slots and how to use scoped slots.
You can practice more with slots with this Github repo. All the instructions to set up the repository are attached in the ReadMe.md file. The complete code for this project can be found here.
You can read more about Vue slots in Vue’s official site. Feel free to contact me if you have suggestions or questions about this article.
Debugging Vue.js applications can be difficult, especially when users experience issues that are difficult to reproduce. If you’re interested in monitoring and tracking Vue mutations and actions for all of your users in production, try LogRocket.

LogRocket lets you replay user sessions, eliminating guesswork by showing exactly what users experienced. It captures console logs, errors, network requests, and pixel-perfect DOM recordings — compatible with all frameworks.
With Galileo AI, you can instantly identify and explain user struggles with automated monitoring of your entire product experience.
Modernize how you debug your Vue apps — start monitoring for free.

@container scroll-state: Replace JS scroll listeners nowCSS @container scroll-state lets you build sticky headers, snapping carousels, and scroll indicators without JavaScript. Here’s how to replace scroll listeners with clean, declarative state queries.

Russ Miles, a software development expert and educator, joins the show to unpack why “developer productivity” platforms so often disappoint.

Discover what’s new in The Replay, LogRocket’s newsletter for dev and engineering leaders, in the February 18th issue.

Learn how to recreate Claude Skills–style workflows in GitHub Copilot using custom instruction files and smarter context management.
Would you be interested in joining LogRocket's developer community?
Join LogRocket’s Content Advisory Board. You’ll help inform the type of content we create and get access to exclusive meetups, social accreditation, and swag.
Sign up now
2 Replies to "A deep dive into Vue slots"
How can we access the slot data in script of child component.
This is Awesome Fantastic Example Thanks for Sharing