Editor’s note: This article was updated by Timonwa Akintokun on 23 April 2024 to include information about using CMS plugins and efficiently managing third-party scripts and resources, as well as to provide some practical steps to execute the strategies explored in this article.

Render-blocking resources are static files, such as fonts, HTML, CSS, and JavaScript files, that are vital to the process of rendering a web page. When the browser encounters a render-blocking resource, it stops downloading the rest of the resources until these critical files are processed. In the meantime, the entire rendering process is put on hold.
On the other hand, non-render-blocking resources don’t postpone the rendering of the page. The browser can safely download them in the background after the initial page render.
However, not all resources that the browser deems render-blocking are essential for the first paint. It all depends on the individual characteristics of the page.
There are best practices you can use to turn these noncritical render-blocking resources into non-render-blocking ones. Besides, you can also decrease the number or size of render-blocking resources that are still critical and can’t be eliminated.
In this article, I will review the top tips and tricks for eliminating render-blocking resources.
If you reduce the number of render-blocking resources, you can shorten the critical rendering path and reduce page load times, thus improving the user experience and search engine optimization.
There are three ways to reduce the number and impact of render-blocking resources:
Even though the elimination of render-blocking resources has always been an important performance optimization technique, Google’s Core Web Vitals performance metrics make it even more important.
Since Core Web Vitals are included in Google’s search algorithm, you simply can’t ignore them if you want your site to rank highly in Google. Render-blocking resources can negatively impact the Largest Contentful Paint (LCP), one of Google’s three Core Web Vitals. The other two are Cumulative Layout Shift (CLS) and Interaction to Next Paint (INP).
LCP measures the rendering time of the largest image or text block that’s visible in the user’s viewport. If your critical rendering path is too long — in other words, if you have too many render-blocking resources, or the files are too large — the largest content element will take longer to load.
So, for a better LCP score, it’s recommended to keep the number and weight of your render-blocking resources in check.
As a rule of thumb, the browser treats everything it finds in the <head> section of an HTML page as render-blocking. This includes:
<head> sectionImages, media files, and <script> tags placed at the bottom of the <body> section are treated as non-render-blocking resources.
Now, let’s dive into some strategies for eliminating or reducing the number and impact of render-blocking resources.
This tip may seem obvious, but it’s important to start here. Whether you have an existing website or it’s still in the development phase, the first thing you should do do is find your render-blocking resources so that you can decide how to handle them.
Luckily, these days, there are many free performance metrics tools you can use for this purpose. The most notable ones are:
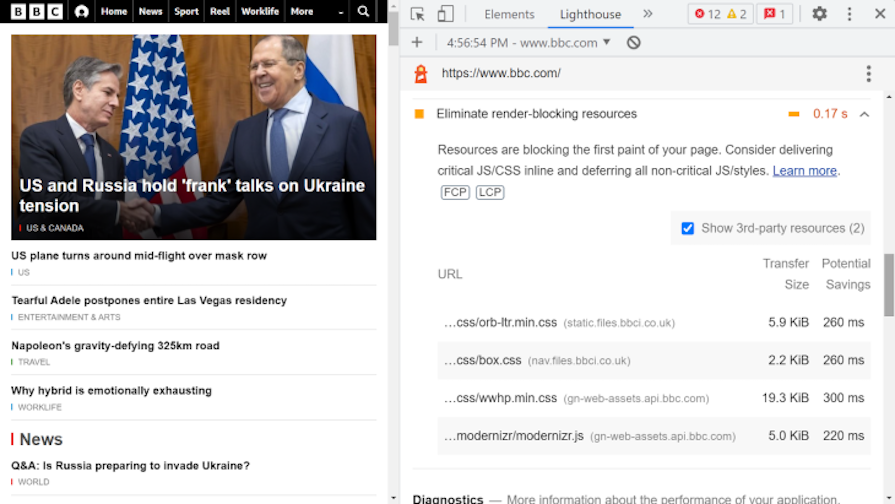
However, in Lighthouse, you’ll only see the Eliminate render-blocking resources flag in the Opportunities section of your performance report if your render-blocking resources cause performance issues on your site.
For instance, here’s Lighthouse’s warning for BBC’s homepage:
If you want to get feedback about your render-blocking resources anyway, use one of the aforementioned web apps. In addition to identifying your render-blocking resources, they also provide you with useful tips on how to eliminate them.
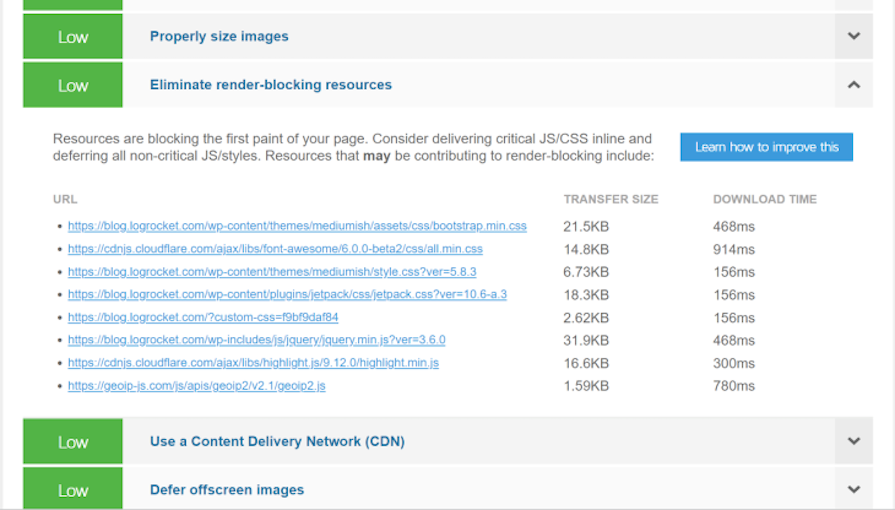
For example, here’s the relevant part of GTmetrix’s report for LogRocket’s blog page. You can see that the Eliminate render-blocking resources recommendation has low priority, but the files that “may be contributing to render-blocking” are still listed:
To identify render-blocking resources using these tools, you should do the following:
After following these steps, you still might not have totally eliminated the render-blocking resources on your site. If that’s the case, you can proceed apply some of the following techniques to further improve your page load times and Core Web Vitals scores.
@import ruleThere are two ways to use CSS styles on your pages:
<link rel= "stylesheet"> tag that you need to add to your HTML file@import rule that you need to add to your CSS fileHowever, to optimize CSS loading, it’s a best practice to avoid using the @import rule and instead utilize <link> tags in your HTML file. The @import rule, while convenient for organizing CSS dependencies within a CSS file, can slow down the rendering process as it requires the browser to download imported files before rendering.
To transition from using the @import rule to <link> tags, follow these steps:
@import rule within your CSS file<link> tags in the <head> sectionFor example, the following CSS @import:
@import url('style.css');
Becomes this instead:
<head>
 <link href="style.css" rel="stylesheet">
</head>
media attribute for conditional CSSBy default, the browser treats all CSS files as render-blocking resources. However, if you add the media attribute to the <link> tag, you can indicate the presence of a conditional CSS file to the browser.
Conditional CSS only applies under certain conditions, such as below or above a given viewport size or on a print page. With the media attribute, you can define a specific media condition for a CSS file. You can use any value that you would use for a media query in a CSS file. For example:
<link href="print.css" rel="stylesheet" media="print">
<link href="large.css" rel="stylesheet" media="screen and (min-width: 1500px)">
<link href="mobile.css" rel="stylesheet" media="screen and (max-width: 600px)">
Even though these files are still downloaded on all devices, they become non-render-blocking resources if the condition evaluates as false. However, they will still be render-blocking if the condition evaluates as true.
For instance, the mobile.css stylesheet in the above example will be render-blocking on mobile devices with a maximum viewport width of 600px and non-render-blocking on viewports larger than 600px.
If you have an existing CSS file with one or more media queries, you can extract all @media rules and save them as separate files using this PostCSS plugin.
All the CSS files that you place into the <head> section of your HTML page are automatically treated as render-blocking resources. However, you don’t need all of this code to render the critical part of your page: above-the-fold content.
Splitting CSS into critical and non-critical parts is a performance optimization technique that has gained a lot of popularity since the introduction of Core Web Vitals, as it also improves LCP scores — i.e., the rendering time of the largest content element above the fold.
Luckily, you don’t have to find your critical-path CSS manually — even though it’s possible to do so. You can use online tools, such as the Critical Path CSS Generator or Addy Osmani’s Critical library, to extract the CSS rules that are related to your above-the-fold content.
Critical Path CSS Generator, for example, allows you to enter the URL of your website on their website and returns as outputs two generated downloadable CSS files: a “critical” and a “combined” one.
You can either add the critical CSS file as an external resource to the <head> section or inline it using the <style> tag to also reduce the number of HTTP requests:

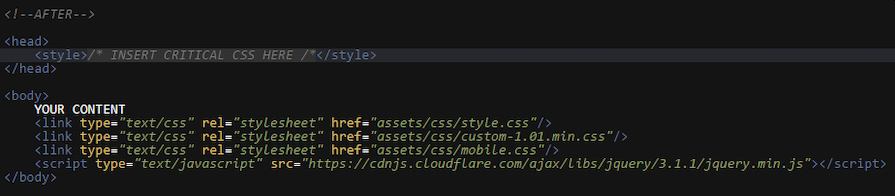
The combined CSS file includes all your CSS rules, and you need to move it down before the closing <body> tag so that it will become a non-render-blocking resource. You can read the instructions in detail below the generator, but here’s how your optimized code should look:
Optionally, you can also use JavaScript to dynamically load below-the-fold CSS after the browser finishes downloading the page.
This technique is also detailed under the Critical Path CSS Generator (method number two) and will further improve your site’s performance. However, it won’t contribute to the elimination of render-blocking resources as non-critical CSS has already been moved out of the <head> section.
For web pages built with WordPress or other content management systems (CMS), deferring non-critical CSS can be achieved through plugins specifically designed for optimization. Plugins like Autoptimize for WordPress offer features to aggregate, minify, and defer CSS files, improving page load times and overall performance.
Using these tools can help eliminate render-blocking resources without manual coding, making them accessible to a broader range of users, including those without extensive technical knowledge.
defer and async attributes to eliminate render-blocking JavaScriptSimilar to CSS, JavaScript files added to the <head> section of the document are also treated as render-blocking resources by default.
You can remove them from the critical rendering path by placing the <script> tags right before the closing </body> tag instead of the <head> section. In this case, they only begin to download after the entire HTML has been downloaded.
However, because the download of these scripts starts later, the elements they load — such as ads, animations, or dynamic functionalities — might load later than the rest of the frontend, especially if it’s a longer script. This can result in noticeable delays and lagging UIs on slower connections, which is bad for the UX.
The defer and async attributes of the <script> tag offer a solution to this problem. Both are Boolean attributes which means that if you add them, they will fire without any further configuration.
They also make scripts added to the <head> section of an HTML document non-render-blocking, but in a different way. Deferred scripts respect the document order while asynchronous scripts are independent of the DOM.
The defer attribute instructs the browser to download the script in the background so it won’t block the rendering of the page. The deferred script executes once the DOM is ready but before the DOMContentLoaded event fires:
<script src="script01.js" defer></script>
<script src="script02.js" defer></script>
Deferred scripts follow the document order, just like non-deferred, default scripts. For example, in the above example, script01.js will be executed first, no matter which script loads first.
Note that you can’t add defer to inline scripts. It only works with external scripts that specify the script’s location using the src attribute.
On the other hand, the async attribute informs the browser that a script is completely independent of the page. It will download in the background as a non-render-blocking resource, just like deferred scripts.
However, unlike deferred scripts, async scripts don’t follow the document order, so they will execute whenever they finish downloading — which can happen at any time.
For instance, in the below example, we can’t be sure which script will run first. It solely depends on which one downloads faster — usually, this ends up being the smaller one. Remember, async scripts are independent of both the document and each other, so the document order won’t impact them in any way:
<script src="script03.js" async></script>
<script src="script04.js" async></script>
The defer attribute is recommended for scripts that need the DOM, but you want to begin to download them before the document loads, without making them a render-blocking resource. You should also use defer rather than async if the document order is important — for instance, when consecutive scripts depend on each other.
The async attribute is recommended for independent third-party scripts, such as ads, trackers, and analytics scripts. For example, Google Analytics recommends adding the async attribute to support asynchronous loading in modern browsers.
While implementing the defer and async attributes for third-party scripts can be more complex due to limited control over them, some optimization plugins may offer features to manage third-party scripts more effectively. For instance, in WordPress, you can use the Async JavaScript plugin to add these attributes to JavaScript files.
However, it’s essential to exercise caution when modifying third-party scripts, as they may be required for the functionality of external services or integrations on your website. Test your website thoroughly to ensure that you don’t negatively impact its functionality or performance after implementing defer and async attributes for third-party files.
Besides deferring non-critical CSS and JavaScript, check if you have any unused CSS or JavaScript on your site. You can do so with the help of code analysis tools such as PurgeCSS that check your CSS code and remove any unused selectors from it, including the ones added by third-party libraries or frameworks such as Bootstrap.
For JavaScript, you can use bundle analysis tools like webpack-bundle-analyzer and linting tools like ESLint to identify and remove unused code, resulting in smaller bundle sizes and improved website performance.
A bundle analysis tool will generate an analysis report for you, which you can use to detect unused packages or modules included in your webpack bundles. On the other hand, linting tools identify unused variables, functions, or imports within your JavaScript files, allowing you to maintain a lean and efficient codebase.
Popular content management systems also have cleanup plugins that let you remove your unused CSS and JavaScript automatically.
You can use module bundlers such as webpack, Rollup, and Parcel to split your code into smaller bundles and load each bundle on demand and even in parallel.
Many of these smaller bundles are non-essential resources that can be safely lazy-loaded after the web page has been rendered. You might also have code that you only need to load if the user wants to use a specific part or feature of your page.
Even though it’s possible to perform code splitting and create smaller bundles manually, automation makes the process straightforward, safe, and fast. These days, most bundling tools come with zero-configuration code splitting functionality that works out of the box, but they also let you tweak the configuration manually if you want to.
In addition to code splitting, you can also minify both render-blocking and non-render-blocking resources. Since minified files are lighter, initial page rendering will finish sooner. Plus, it will also take less time to download non-render-blocking resources in the background.
There are numerous tools available to help you perform minification according to best practices, including Minify, CSS Minifier, Minify Code, and PostCSS. Build tools, such as webpack, Parcel, and Rollup, also come with built-in minification functionalities that enable you to quickly reduce the weight of render-blocking resources.
For third-party libraries, most of them minify their code before distribution to improve performance and reduce file sizes. Library developers commonly practice this optimization to ensure efficient loading and usage across various websites and applications.
Some CMS platforms also provide code minification plugins, allowing website owners to easily minify CSS and JavaScript files within their CMS dashboard. This simplifies the optimization process and improves overall site performance.
Because custom fonts are called from the <head> section of the document, they are also render-blocking resources. For instance:
<link href="https://fonts.googleapis.com/css2?family=Lato&display=swap" rel="stylesheet">
You can reduce the impact of custom fonts on initial page rendering by adding them locally rather than pulling them from a content delivery network such as Google CDN. Font providers tend to add multiple @font-face rules, many of which you won’t need.
For example, Google Fonts adds @font-face rules for all the character sets a typeface comes with, such as Latin, Cyrillic, Chinese, Vietnamese, and others.
Let’s say, for instance, that the online CSS file you add with the <link> tag includes @font-face rules for seven different character sets, but you only want to use one. However, Google Fonts doesn’t download the font files for all the character sets; they just add many redundant @font-face rules to the CSS file.
If you add fonts locally, you can also minify your font-related CSS and bundle it together with the rest of your CSS. You can use the google-webfonts-helper to generate local @font-face rules for Google Fonts quickly. For instance, this is what you need to add to include the Lato Regular font face:
/* lato-regular - latin */
@font-face {
  font-family: 'Lato';
  font-style: normal;
  font-weight: 400;
  font-display: swap;
  src: local('Lato Regular'), local('Lato-Regular'),
       url('../fonts/lato-v16-latin-regular.woff2') format('woff2'),
       url('../fonts/lato-v16-latin-regular.woff') format('woff');
}
Note that google-webfonts-helper doesn’t add the font-display: swap rule — I added it myself to the above declaration. This is a descriptor of the @font-face rule that lets you specify how the browser should display the font face on the page.
By using font-display with the swap value, you instruct the browser to immediately begin to use a system font and swap it with the custom font once it downloads. This rule is also added when you pull the font from Google’s CDN. This enables you to avoid invisible text on the page while the custom font is still loading.
When you load fonts locally, make sure you serve compressed font formats for modern browsers, such as WOFF and WOFF2. Remember that lighter files reduce the impact of render-blocking resources too. In addition to generating the @font-face rules, google-webfonts-helper also lets you download a zipped file that contains all the font formats you need.
Some articles about render-blocking resources recommend using TypeKit’s Web Font Loader to load custom fonts asynchronously. It was a decent tool once upon a time, but it hasn’t been updated since 2017 and it has many unresolved issues. I wouldn’t recommend using it.
Although loading fonts asynchronously shortens the critical rendering path, you should always do it carefully. If fonts load later than the page content, the page can produce a common UX problem called flash of invisible text (FOIT).
There are various ways to handle FOIT, such as using third-party libraries or the aforementioned font-display: swap rule. Make sure to check the browser support for font-display, and note that using it with the swap value just turns FOIT into a flash of unstyled text (FOUT) but doesn’t completely eliminate the issue
Still, you’ll want to spend time considering whether it’s really worth going the async route performance-wise. Think of factors such as the weight of extra scripts, potential issues, users with disabled JavaScript. In the last case, you still need to add the static <link> element within <noscript> tags to support them.
For websites built with CMS, plugins offer a convenient way to optimize and manage render-blocking resources without extensive manual coding. Here are some examples of plugins available for different CMS platforms:
These plugins can optimize various aspects of your website, including aggregating, minifying, and deferring resources, as well as improving caching mechanisms and enhancing overall performance.
To use these plugins effectively:
Third-party scripts and resources, such as analytics, ads, or social media widgets, can contribute to render-blocking issues. While these scripts are often necessary for website functionality, they can also impact performance if not managed properly.
Here are some tips for handling third-party scripts and resources efficiently so that they don’t become render-blocking resources:
async or defer attributes for third-party scripts to prevent them from blocking page rendering.By carefully managing plugins and third-party resources, you can effectively reduce render-blocking issues and improve your website’s performance.
While these strategies can help you eliminate render-blocking resources, thus improving web performance, it’s important to remember that some challenges may arise while implementing them. Here are some considerations to keep in mind:
In this article, we discussed various strategies for eliminating render-blocking resources. To summarize:
media attributesdefer and async attributes to eliminate render-blocking JavaScriptTo improve overall page load times, you can also use resource hints and the preload directive. They don’t eliminate render-blocking resources per se, but you can use them to improve page load times.
Render-blocking resources won’t stop the fetching process of preloaded resources, and you can also pre-connect to Google CDN to make web fonts load faster if you don’t want to load them locally.
For an in-depth guide to browser rendering, check out “How browser rendering works — behind the scenes.”
Debugging code is always a tedious task. But the more you understand your errors, the easier it is to fix them.
LogRocket allows you to understand these errors in new and unique ways. Our frontend monitoring solution tracks user engagement with your JavaScript frontends to give you the ability to see exactly what the user did that led to an error.

LogRocket records console logs, page load times, stack traces, slow network requests/responses with headers + bodies, browser metadata, and custom logs. Understanding the impact of your JavaScript code will never be easier!
Would you be interested in joining LogRocket's developer community?
Join LogRocket’s Content Advisory Board. You’ll help inform the type of content we create and get access to exclusive meetups, social accreditation, and swag.
Sign up now
Get to know RxJS features, benefits, and more to help you understand what it is, how it works, and why you should use it.

Explore how to effectively break down a monolithic application into microservices using feature flags and Flagsmith.

Native dialog and popover elements have their own well-defined roles in modern-day frontend web development. Dialog elements are known to […]

LlamaIndex provides tools for ingesting, processing, and implementing complex query workflows that combine data access with LLM prompting.


17 Replies to "11 best practices to eliminate render-blocking resources"
I had recently created a website on wordpress eBetterBooks and was having this issue and I referred to your blog and was able to fix it. Thanks a lot!
Great content! It refreshed & clarified some of my doubts. Thanks!
I used @ import for my website, djtconcept.ng, I compressed with gzip and minified it, and it reads 98% score on speed test, does it mean render blocking resources didn’t count. I will appreciate an answer
What if I want to use a wordpress optimization plugin?
Seriously. Very useful
Thank you very much, Anna Monus! This trick is very useful to my website and got faster than before. Btw do you have another tricks to eliminate render blocking resources for fontawesome css? Thanks again
Thank you very much, Anna Monus! This trick is very useful to my website and got faster than before. Btw do you have another tricks to eliminate render blocking resources for fontawesome css? Thanks again
Sage 50 Backup
When you create a backup, an error occurs and the backup process stops. You may see one of the following messages on the screen of your computer: “Sage Backup Error” or “Backup failed.” A user may not be able to restore a backup created in Winzip if they are seeing the error that their backup failed. The mistake is that in C:\Documents and Setting instead of a folder for backup, create a folder called “Sage 50 Backup” and save your files inside it when you create your backup.
Simple and easy way to avoid rendering issues – add ‘prerender’ in your html, like this (but not to your main css page):
Also don’t forget to put your scripts at the bottom of the html body and add ‘defer’:
http://js/jquery.min.js
So, after step 1, I now know what my render blocking resources are… it just tells me to eliminate them…. but how? That was supposed to be the whole point of this article. I still don’t know how to eliminate them. The article assumes you have this knowledge…
İ have a website named oyun delisi and my css lowering my speed page. itried to defer but it can not suitable.
Thank you, it really helped me.
Thank you so much for the awesome post, Anna. Very useful to my website and got faster than before.
Very useful for my website. Thank you
Superb! I did these tricks and got awesome SPI results for my website. Thanks
To be clear, well over half of these fall directly into ‘wouldn’t it be nice if we could’, not ‘we can’:
Identify your render blocking resources – wouldn’t be here if we hadn’t?
Don’t add CSS with the @import rule – sure
Use the media attribute for conditional CSS – uhhhh, so rewrite the entire bootstrap CSS core file?
Defer non-critical CSS – how? not using wordpress or anything other framework that allows third party plugins?
Use the defer and async attributes to eliminate render-blocking JavaScript – how? how would anyone defer or asynchronously load third party JS? 🤷♂️
Find and remove unused CSS and JavaScript – LOL, that is a realistic and completely achievable task
Split code into smaller bundles – again, LOL?
Minify CSS and JavaScript files – you can’t do this to third party scripts. you can’t do this to third party CSS resources.
Load custom fonts locally – i guess three out of your nine is better than none, right?
The solution you shared is good but the use of CMS like wordprees is also a better option. Now we can easily get the softwares and applications for making our work easy. Like I use a tool named Quickbooks for making my finance management easy and if I got stucked at any point I used Quickbooks File doctor. for fixing the issues.