Picture this: You spend hours trying to perfect your website’s layout and ensure every element is pixel-perfect. It looks flawless in Chrome. But when you open it in Safari, the spacing is off. Then, in Firefox, a key animation doesn’t work at all. Frustrating right?
Different browsers don’t always interpret CSS the same way. Chrome, Edge, Safari, and Firefox each use their own rendering engines, which can lead to unexpected differences in layout, spacing, and animations. Some browsers support the latest CSS features, while others take longer to catch up. On top of that, vendor-specific properties often force developers to write extra code just to keep styles consistent. Even reliable techniques like Flexbox and CSS Grid don’t always behave the same across browsers.
That’s why cross-browser testing matters. Catching issues early saves hours of debugging and ensures users get a good experience and impression, no matter which browser they use. There are powerful tools that can do the heavy lifting so you don’t have to test manually on every browser and device:
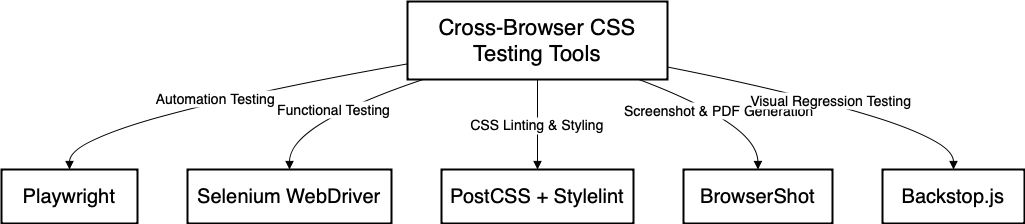
In this article, we’ll explore five free and open source tools that simplify CSS compatibility testing. These tools help identify rendering inconsistencies, debug layout issues, and ensure your styles work smoothly across different browsers.
Each section will cover:
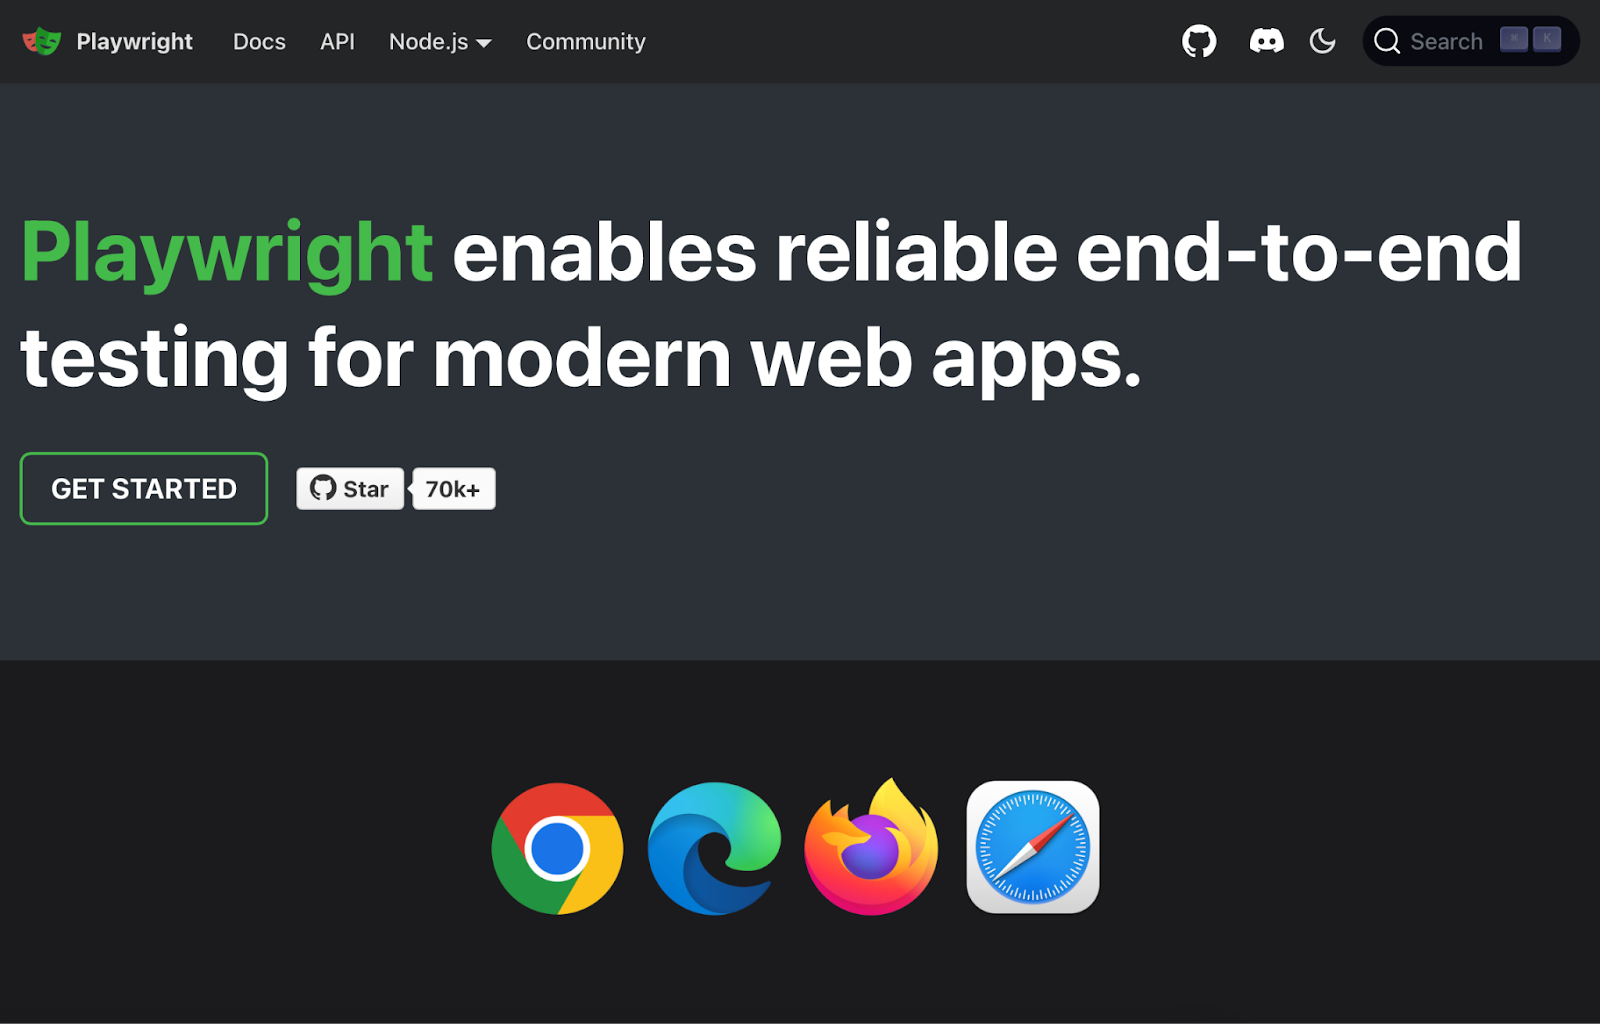
Playwright is an open source testing framework that automates browser interactions across Chromium (Chrome and Edge), WebKit (Safari), and Firefox.
Playwright was specifically built for end-to-end testing, and it allows developers to test their applications across multiple browsers, operating systems, and devices. Playwright ensures that CSS renders consistently across different environments, whether running in a local environment or in a CI/CD pipeline.
Playwright provides several powerful features that make it an excellent tool for testing CSS across different browsers:
Installing Playwright is straightforward. You can install it using npm with the following command:
npm install @playwright/test
To set up Playwright in a new project, run:
npm init playwright@latest
This command initializes Playwright, creates necessary configuration files, and installs browsers needed for testing.
Once you install Playwright, you can start writing tests to check for CSS consistency across different browsers. Here’s an example test that captures screenshots in Chromium, WebKit, and Firefox to compare rendering differences:
const { test, expect } = require('@playwright/test');
test('Check CSS rendering across browsers', async ({ page }) => {
  await page.goto('https://example.com');
  // Capture screenshots for comparison
  await page.screenshot({ path: `chromium.png`, fullPage: true });
  await page.screenshot({ path: `webkit.png`, fullPage: true });
  await page.screenshot({ path: `firefox.png`, fullPage: true });
  // Example: Verify if a specific element is visible
  const button = await page.locator('.my-button');
  await expect(button).toBeVisible();
});
The above script is written in JavaScript and is designed to automate cross-browser CSS testing.
It starts by importing the test and expected functions from Playwright. Then, it defines a test named “Check CSS rendering across browsers.”
Inside this test, it opens a browser page and navigates to https://example.com. After loading the page, it captures full-page screenshots for three different browsers: Chromium, WebKit, and Firefox. Next, it locates a button with the class .my-button on the page. Finally, it checks if the button is visible using Playwright’s expect function:
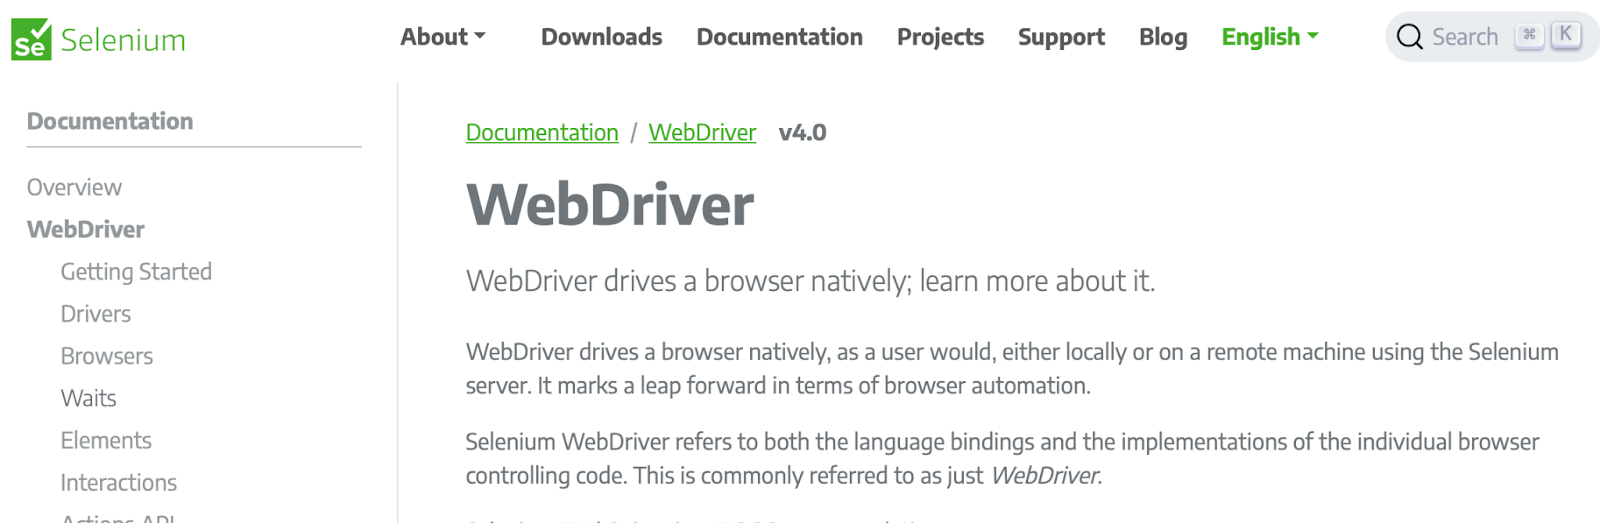
Selenium WebDriver is an open source automation framework that allows developers to programmatically control web browsers for testing purposes. It enables cross-browser testing by automating interactions with major browsers like Chrome, Firefox, Edge, and Safari. Selenium WebDriver is widely used for functional UI testing, browser compatibility testing, and automating repetitive web tasks.
Selenium WebDriver makes it easy to test how your web application behaves across different browsers. It automates real user interactions like clicking buttons, filling out forms, and navigating between pages so you can catch layout issues, broken functionality, or unexpected behavior before users do.
1. Install Selenium WebDriver
Install Selenium in your preferred programming language. For example, in Python:
pip install selenium
For Java, add the Selenium dependency in pom.xml (Maven):
<dependency>
    <groupId>org.seleniumhq.selenium</groupId>
    <artifactId>selenium-java</artifactId>
    <version>4.29.0</version>
</dependency>
For JavaScript (Node.js):
npm install selenium-webdriver
2. Download the browser driver
Each browser requires a specific WebDriver. Download and set up the appropriate Selenium web driver:
Once installed, you can start writing Selenium tests to check UI consistency across different browsers. Here’s an example test using Python that validates a button’s visibility across browsers:
from selenium import webdriver
from selenium.webdriver.common.by import By
from selenium.webdriver.chrome.service import Service
from webdriver_manager.chrome import ChromeDriverManager
# Launch browsers
browsers = ['chrome', 'firefox', 'edge']
for browser in browsers:
    if browser == 'chrome':
        driver = webdriver.Chrome(service=Service(ChromeDriverManager().install()))
    elif browser == 'firefox':
        driver = webdriver.Firefox()
    elif browser == 'edge':
        driver = webdriver.Edge()
    driver.get("https://example.com")
    # Capture screenshots for comparison
    driver.save_screenshot(f"{browser}.png")
    # Verify if a button is visible
    button = driver.find_element(By.CLASS_NAME, "my-button")
    assert button.is_displayed(), f"{browser}: Button is not visible"
    driver.quit()
The script above launches Chrome, Firefox, and Edge browsers. Then it navigates to https://example.com. It then takes a screenshot for visual comparison. After that, it checks if a button with the class .my-button is visible. After which, it closes the browser after execution.
PostCSS and Stylelint work together to keep your CSS clean, error-free, and compatible across browsers.
PostCSS processes your styles using JavaScript plugins. One of its most important plugins, Autoprefixer, automatically adds missing vendor prefixes so your CSS works consistently in different browsers without you having to write extra code.
Stylelint is a modern CSS linter that catches errors, enforces best practices, and ensures your styles follow a consistent structure. It helps prevent common mistakes and keeps your code easy to maintain.
By using both tools, you can automate CSS fixes, catch invalid properties early, and make sure your styles work seamlessly across all browsers.
We have established that it can be tedious to handle CSS prefixes and ensure compatibility across different browsers.
Here’s how PostCSS and Stylelint simplify this process:
webkit-, -moz-) based on browser support. Developers no longer need to remember which prefixes are required for different propertiesGetting started with PostCSS and Stylelint is straightforward. You can install them using npm with the following command:
npm install postcss autoprefixer stylelint
To configure Autoprefixer, create a postcss.config.js file in your project and add:
module.exports = {
  plugins: [
    require('autoprefixer')
  ]
};
For Stylelint, add a .stylelintrc.json configuration file:
{
  "extends": "stylelint-config-standard",
  "rules": {
    "indentation": 2,
    "max-nesting-depth": 3
  }
}
Unlike traditional CSS preprocessors like Sass or Less, PostCSS operates at the post-processing level, modifying raw CSS based on plugin rules rather than requiring an entirely different syntax. When paired with Stylelint, it creates a powerful workflow that not only ensures cross-browser compatibility but also enforces styling consistency across a team.
BrowserStack is a testing platform that allows developers to test websites and mobile applications on real browsers and devices. It provides a cloud-based infrastructure that supports manual and automated testing across multiple environments. BrowserStack helps teams release high-quality applications faster with an emphasis on cross-browser testing, real device testing, and AI-powered insights.
BrowserStack offers a wide range of features that streamline testing workflows and improve test coverage. It enables teams to:
Getting started with BrowserStack is simple. You can sign up for a free trial and integrate it into your test suite using tools like Selenium, Cypress, Playwright, and Appium. For automated testing, install the BrowserStack SDK with:
npm install -g browserstack-cli
To run Selenium tests, set up your credentials and execute tests using the following command:
browserstack --username <your-username> --key <your-access-key> run tests
BackstopJS is another open source solution used to detect unintended CSS changes across different browsers:
BackstopJS captures screenshots of a web application before and after a change, then compares them to detect visual differences. This automated approach eliminates the need for manual inspection (which can be time-consuming and prone to human error). Instead of sifting through multiple browser versions and devices to catch inconsistencies, BackstopJS provides a clear visual report highlighting areas that have changed.
You can use BackstopJS to:
Setting up BackstopJS is straightforward. You can install it via npm with the following command:
npm install -g backstopjs
Then, initialize a new BackstopJS project:
backstop init
When choosing a cross-browser testing tool, it’s essential to consider the type of testing you need to perform, the level of automation required, and the specific browsers, devices, or platforms you need to support. Below is a comparison of the testing tools we have highlighted so you can understand which one will be right for your use case.
| Feature | Playwright | Selenium WebDriver | PostCSS + Stylelint | BrowserStack | BackstopJS |
|---|---|---|---|---|---|
| Use case | End-to-end automation testing | Functional testing across multiple browsers | CSS linting and styling checks | Capturing webpages as images/PDFs | Visual regression testing |
| Automation level | Fully automated | Fully automated | Static code analysis (CSS) | Manual or automated | Automated (visual) |
| Supported browsers | Chrome, Firefox, Safari, Edge | Chrome, Firefox, Safari, Edge, IE | CSS-focused (not browser-specific) | Chromium-based (Chrome, Edge) | Chrome, Firefox |
| Best for | UI automation and performance testing | Functional testing in various browsers | CSS code quality enforcement | Generating screenshots/PDFs | Detecting UI layout changes |
| CI/CD integration | Yes (Jenkins, GitHub Actions, CircleCI) | Yes (Selenium Grid, Jenkins) | Yes (Prettier, ESLint) | Yes (Node.js-based) | Yes (Jenkins, GitHub Actions) |
| Ease of setup | Moderate | Moderate to difficult | Easy | Easy | Moderate |
| Parallel execution | Yes | Yes (via Selenium Grid) | No | No | Yes |
| Headless mode | Yes | Yes | No | Yes | Yes |
| Best for teams using | JavaScript, TypeScript, Python | Java, Python, C#, JavaScript | Frontend developers | PHP, Node.js | JavaScript, frontend teams |
| Learning curve | Moderate | Steep | Easy | Easy | Moderate |
Go with Playwright or Selenium WebDriver if you’re testing web app functionality:
If you’re not testing interactions but want to enforce consistent styles, go for PostCSS + Stylelint:
Use BrowserStack if you want to capture web pages as images or PDFs:
Go for BackstopJS if you want visual regression testing that can catch unwanted layout shifts and style changes:
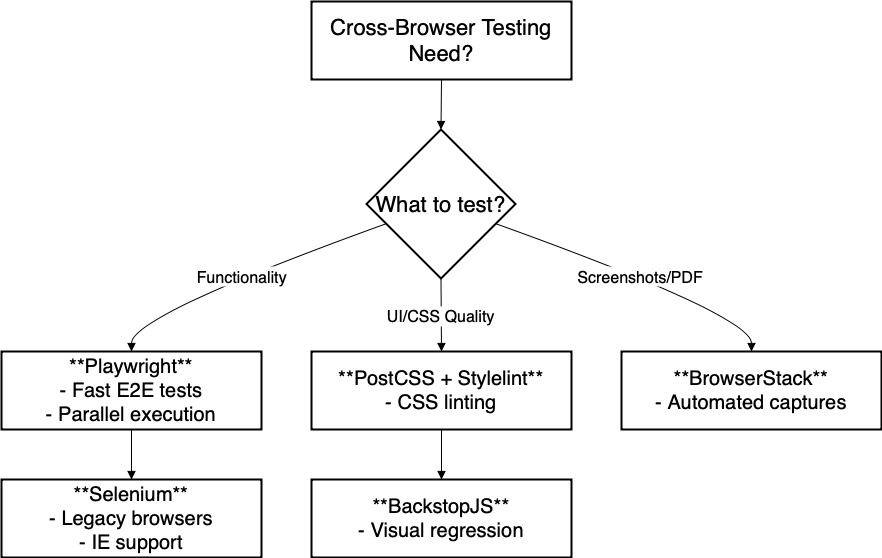
Choosing the right tool depends on what you’re testing. Are you checking for functional correctness, UI consistency, or styling errors?
In this article, we explored five of the best open source tools for cross-browser CSS testing. We broke down how Playwright and Selenium WebDriver help automate functional testing across multiple browsers, why PostCSS + Stylelint is essential for enforcing consistent styles, and how BrowserStack makes it easy to generate high-quality screenshots and PDFs. We also looked at BackstopJS, which catches UI inconsistencies before they reach production.
These tools are free, powerful, and built to streamline your workflow. Why not try them out and see which one fits your development process best?
As web frontends get increasingly complex, resource-greedy features demand more and more from the browser. If you’re interested in monitoring and tracking client-side CPU usage, memory usage, and more for all of your users in production, try LogRocket.

LogRocket lets you replay user sessions, eliminating guesswork around why bugs happen by showing exactly what users experienced. It captures console logs, errors, network requests, and pixel-perfect DOM recordings — compatible with all frameworks.
LogRocket's Galileo AI watches sessions for you, instantly identifying and explaining user struggles with automated monitoring of your entire product experience.
Modernize how you debug web and mobile apps — start monitoring for free.

We built the same app in TanStack Start RSC and Next.js RSC. TanStack shipped 40% less JS and built 4x faster — but Next.js is still the safer production bet.

From RSC vulnerabilities and the Vercel breach to TypeScript 7.0 Beta and AI agents — the nine frontend storylines that defined H1 2026, ranked.

AI tools generate working React code fast, but miss race conditions, empty states, debouncing, and accessibility. Here’s how to catch bugs before production.

Learn how to use Gemini CLI subagents to delegate frontend, backend, testing, and docs tasks to specialized agents with guardrails and clear ownership.
Would you be interested in joining LogRocket's developer community?
Join LogRocket’s Content Advisory Board. You’ll help inform the type of content we create and get access to exclusive meetups, social accreditation, and swag.
Sign up now

