We explore middleware in this post. Middleware is invoked every time a page or endpoint is about to be rendered, and shines as the first touchpoint to your application, making it a suitable place for centralized logic such as authentication, A/B testing, server-side validations, and request logging.

In this post, we’ll discuss how Astro’s middleware works in their islands approach, and demonstrate how to implement authentication and feature flags using multiple middleware. You can find all of our examples in this GitHub repo.
Jump ahead:
What does basic Astro middleware look like? Let’s start a new Astro project with the following command:
npm create astro@latest -- --yes --template=minimal --skip-houston hello-world
This will use hello-world as the project directory and the minimal Astro starter template. Run the project:
cd hello-world && npm run dev
To use middleware, create a new file in src/middleware.js|ts. Alternatively, you may use a middleware directory, e.g.: src/middleware/index.js|ts.
For our purposes, let’s stick to the simpler src/middleware.ts file. Make sure to export an onRequest function that points to the middleware:
import type { MiddlewareHandler } from "astro";

const middleware = () => {};

// Export onRequest. This should NOT be a default export
export const onRequest = middleware;
The middleware is still incomplete: technically speaking, a middleware will be invoked with two arguments and must return a Response object.
Here’s a typed implementation:
import type { MiddlewareResponseHandler } from "astro";
import { defineMiddleware } from "astro/middleware";

const middleware: MiddlewareResponseHandler = (context, next) => {
};

export const onRequest = middleware;
The context object is identical to the endpoint context, which mirrors many of the global Astro properties. The next function returns a standard Response when invoked.
Now, let’s complete the basic middleware as shown below:
const middleware: MiddlewareResponseHandler = (context, next) => {
    console.log("HELLO WORLD!");
    return next();
};
In this example, the middleware receives a request, logs HELLO WORLD!, and returns an unmodified response that continues its standard lifecycle.
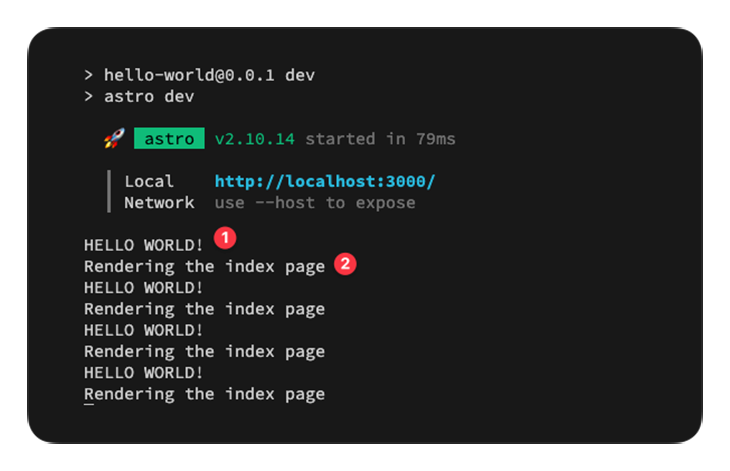
Now, go to the project’s index page and add a simple log, as shown below:
---
console.log("Rendering the index page");
---
If you inspect the local server logs, the middleware log is first to fire every time the index page is rendered. Hit refresh to see multiple logs:
A terser version of the same middleware could also be written as shown below:
{/* 📂 src/middleware.ts */}
import { defineMiddleware } from "astro/middleware";

/**
* Inline the middleware function by leveraging "defineMiddleware"
*/
export const onRequest = defineMiddleware((context, next) => {
  console.log("HELLO WORLD!");

  return next();
});
View the complete solution on GitHub.
Our current “Hello, World!” middleware simply intercepts the user’s request, logs a message on the server, and forwards the response by calling next(). In this example, we’re not modifying the user response. next() returns a standard response that continues its lifecycle as usual and eventually renders the requested page or endpoint.
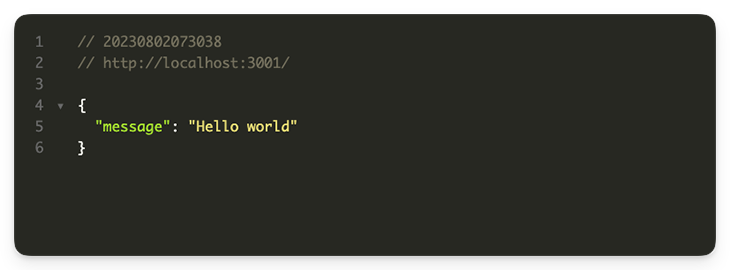
Consider the following example that intercepts the user request and immediately returns a response to the user:
{/* 📂 src/middleware.ts */}

import { defineMiddleware } from "astro/middleware";

export const onRequest = defineMiddleware((context, next) => {
  console.log("MIDDLEWARE");

  return new Response(
    JSON.stringify({
      message: "Hello world",
    }),
    {
      status: 200,
    }
  );
});
Now, if you visit the index page (or any valid route), you will no longer receive the requested resource, but the JSON response specified in the middleware:
Beyond “Hello, World!,” let’s take a plunge into practical middleware use cases. We’ll start simple and increase in complexity.
Use Response.redirect or context.redirect to respond with a redirect within a middleware.
The API is shown below:
// Response.redirect
return Response.redirect(url: URL | string, status?: number)

// For SSR:
return context.redirect(path: string, status?: number)
The main difference between these APIs is that context.redirect accepts relative string paths, e.g., /redirected, while Response.redirect accepts either a URL object or the full redirect URL path, e.g., https://www.example.com/redirected not /redirected.
Let’s consider a practical example. Start a new Astro project with the command below:
npm create astro@latest -- --yes --skip-houston --template=basics redirect
Create a new src/pages/redirected.astro page, then copy the entire content of src/pages/index.astro into this new page and change the <h1> element to the following:
<h1>You've been <span class="text-gradient">Redirected</span></h1>
Now, we can handle the redirect in the middleware, as shown below:
// src/middleware.ts
import { defineMiddleware } from "astro/middleware";

const INDEX_PATH = "/";

export const onRequest = defineMiddleware((context, next) => {
  /**
   * The middleware runs every time a page or endpoint is about to be rendered.
   * Only redirect if this is the home page
   */
  if (context.url.pathname === INDEX_PATH) {
    /**
     * Construct a full URL by passing `context.url` as the base URL
     */
    return Response.redirect(new URL("/redirected", context.url), 302);

    /**
     * You may also redirect using `context.redirect` as shown below:
     * =========================================
     * return context.redirect("/redirected", 302);
     * =========================================
     * Note that this only works in SSR mode
     */
  }

  return next();
});
View the complete solution on GitHub.
Astro.localsFor the entire lifecycle of a request — from when it’s received by the middleware to when the eventual response is sent to the user — we may persist data in the locals object to be used in Astro pages, API endpoints, or other middleware.
Consider the example below:
// src/middleware.ts

import { defineMiddleware } from "astro/middleware";

export const onRequest = defineMiddleware((context, next) => {
  // Add a string value to the locals object
  context.locals.stringValue = "Hello Middleware";

  // Add a method to the locals object
  context.locals.functionValue = () => "This is a function return value";

  return next();
});
We added two values to the locals object and may access this on an Astro page, as shown below:
// src/pages/index.astro
---
const data = Astro.locals;

console.log({ data });
/**
 * Log ⬇️
 * {
  data: {
    stringValue: 'Hello Middleware',
    functionValue: [Function (anonymous)]
  }
}
 */

console.log({ res: data.functionValue() });

/**
 * Log ⬇️
 * { res: 'This is a function return value' }
 */
---
To add full TypeScript support, update the src/env.d.ts file to include the specific locals properties, as shown below:
// Before
/// <reference types="astro/client" />
// After

/// <reference types="astro/client" />
declare namespace App {
  interface Locals {
    stringValue: string;
    functionValue: () => string;
  }
}
View the complete solution on GitHub.
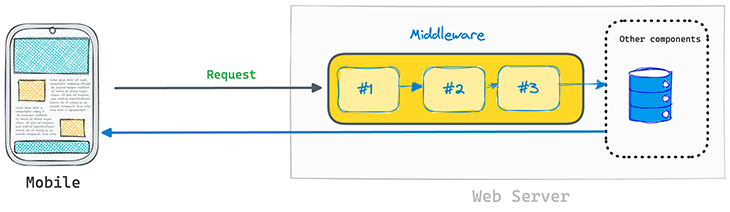
In our previous examples, we only considered an application with one middleware. In reality, we often use a series of middleware, and a user’s request is passed from one middleware to the next until a response is finally sent back to the user:
Create a new Astro project and create the following two middleware:
// src/middleware/auth.ts

import { defineMiddleware } from "astro/middleware";

export const auth = defineMiddleware((context, next) => {
  console.log("In auth middleware");
  return next();
});

// src/middleware/validate.ts
import { defineMiddleware } from "astro/middleware";

export const validate = defineMiddleware((context, next) => {
  console.log("In validate middleware");
  return next();
});
Note that we created these in a middleware directory, which looks like this:

It’s possible to inline the different middleware in a single src/middleware.ts file instead of creating a directory, but having a directory is arguably neater and more readable when working with multiple middleware.
Now, create an src/middleware/index.ts file to compose the multiple middleware, as shown below:
// src/middleware/index.ts

// sequence will accept middleware functions and will execute them in the order they are passed
import { sequence } from "astro/middleware";

// Import the middleware
import { auth } from "./auth";
import { validate } from "./validate";

// export onRequest. Invoke "sequence" with the middleware
export const onRequest = sequence(validate, auth);
Take a look in the server logs and find the logs from the validate and auth middleware:

Please note that the order in which you pass the middleware to sequence matters. For example, consider the change below:
// Before
export const onRequest = sequence(validate, auth);

// After
export const onRequest = sequence(auth, validate);
This will result in a different execution order, as seen in the logs:

View the complete solution on GitHub.
Basic authentication provides a way for browsers to provide a username and password when making a request.
Consider the basic auth example with Astro middleware shown below:
import { defineMiddleware } from "astro/middleware";

export const onRequest = defineMiddleware((context, next) => {
  // If present, this will have the form: "Basic <credential>"
  const basicAuth = context.request.headers.get("authorization");

  if (basicAuth) {
    // get auth value from string "Basic authValue"
    const authValue = basicAuth.split(" ")[1];

    // decode the Base64 encoded string via atob (https://developer.mozilla.org/en-US/docs/Web/API/atob)
    const [user, pwd] = atob(authValue).split(":");

    if (user === "admin" && pwd === "admin") {
      // forward request
      return next();
    }
  }

  return new Response("Auth required", {
    status: 401,
    headers: {
      "WWW-authenticate": 'Basic realm="Secure Area"',
    },
  });
});
If the browser request comes with an authorization header, we respond with the following:
return new Response("Auth required", {
    status: 401,
    headers: {
      "WWW-authenticate": 'Basic realm="Secure Area"',
    },
});
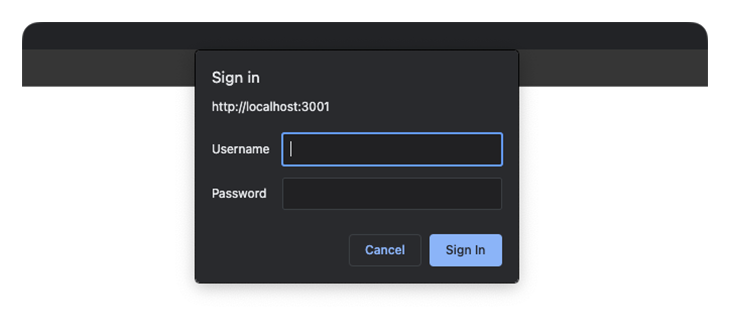
The browser receives this response and processes the request for basic authorization by showing the username and password prompt.
Once a user enters their username and password, it’s sent to the server via a header. We then parse the request accordingly in the middleware, as shown below:
const basicAuth = context.request.headers.get("authorization");

  if (basicAuth) {
    // Get auth value from string "Basic authValue"
    const authValue = basicAuth.split(" ")[1];

    // Decode the Base64 encoded string via atob (https://developer.mozilla.org/en-US/docs/Web/API/atob)
    const [user, pwd] = atob(authValue).split(":");

    // Our username and password must be "admin" to be valid
    if (user === "admin" && pwd === "admin") {
      // forward request
      return next();
    }
  }
By default, basic auth remains cached until the browser is closed, i.e., the user remains logged in until they close the browser.
View the complete solution on GitHub.
JSON Web Tokens are a common way to communicate authentication claims between server and client.
Let’s see an implementation in an Astro middleware. First, create a new project by running the following command:
npm create astro@latest -- --yes --skip-houston --template=basics jwt-auth
Now, create a new src/constants.ts file with the following contents:
// The key of the JWT cookie value
export const TOKEN = "token";

// The following pages do NOT need auth to be accessed
export const PUBLIC_ROUTES = ["/", "/api/login", "/api/logout"];
Create an endpoint route for /api/login to login a user:
// src/pages/api/login.ts

import { nanoid } from "nanoid";
import { SignJWT } from "jose";
import type { APIRoute } from "astro";
import { TOKEN } from "../../constant";

// The token secret. Note the environment variable "JWT_SECRET_KEY
// @see https://docs.astro.build/en/guides/environment-variables/
const secret = new TextEncoder().encode(import.meta.env.JWT_SECRET_KEY);

export const post: APIRoute = async (ctx) => {
  try {
    // Create the token
    // @see https://github.com/panva/jose
    const token = await new SignJWT({})
      .setProtectedHeader({ alg: "HS256" })
      .setJti(nanoid())
      .setIssuedAt()
      .setExpirationTime("2h")
      .sign(secret);

    // set JWT as a cookie
    ctx.cookies.set(TOKEN, token, {
      httpOnly: true,
      path: "/",
      maxAge: 60 * 60 * 2, // 2 hours in seconds
    });

    // return a successful response
    return new Response(
      JSON.stringify({
        message: "You're logged in!",
      }),
      {
        status: 200,
      }
    );
  } catch (error) {
    console.debug(error);

    return new Response(
      JSON.stringify({
        message: "Login failed",
      }),
      {
        status: 500,
      }
    );
  }
};
If a user is logged in, they should be able to visit any of the protected routes in the application.
Let’s handle the auth validation via middleware. Create one in src/middleware.ts and consider the annotated content below:
// src/middleware.ts
import { errors, jwtVerify } from "jose";
import { defineMiddleware } from "astro/middleware";
import { TOKEN, PUBLIC_ROUTES } from "./constant";

// The JWT secret
const secret = new TextEncoder().encode(import.meta.env.JWT_SECRET_KEY);

/**
* Verify if the client token is valid.
*/
const verifyAuth = async (token?: string) => {
  if (!token) {
    return {
      status: "unauthorized",
      msg: "Please pass a request token",
    } as const;
  }

  try {
    const jwtVerifyResult = await jwtVerify(token, secret);

    return {
      status: "authorized",
      payload: jwtVerifyResult.payload,
      msg: "successfully verified auth token",
    } as const;
  } catch (err) {
    if (err instanceof errors.JOSEError) {
      return { status: "error", msg: err.message } as const;
    }

    console.debug(err);
    return { status: "error", msg: "could not validate auth token" } as const;
  }
};

export const onRequest = defineMiddleware(async (context, next) => {
  // Ignore auth validation for public routes
  if (PUBLIC_ROUTES.includes(context.url.pathname)) {
   // Respond as usual
    return next();
  }

  // Get the token from cookies
  const token = context.cookies.get(TOKEN).value;
  // Verify the token
  const validationResult = await verifyAuth(token);

  console.log(validationResult);

  // Handle the validation result
  switch (validationResult.status) {
    case "authorized":
      // Respond as usual if the user is authorised
      return next();

    case "error":
    case "unauthorized":
      // If an API endpoint, return a JSON response
      if (context.url.pathname.startsWith("/api/")) {
        return new Response(JSON.stringify({ message: validationResult.msg }), {
          status: 401,
        });
      }
      // Otherwise, this is a standard page. Redirect to the root page for the user to login
      else {
        return Response.redirect(new URL("/", context.url));
      }

    default:
      return Response.redirect(new URL("/", context.url));
  }
});
View the complete solution on GitHub.
Feature flags enable easy rollback of a new feature or code. They can also be used to control access to certain parts of your application, all without the need for redeployment.
Handling feature flags via Astro middleware is straightforward depending on the service where your feature flags are hosted.
Assume we want to redirect users to a special marketing page if the feature flag astro-middleware-demo is toggled on. Regardless of your feature flag service, your implementation will look something like the following:
// 📂 src/middleware.ts
import { defineMiddleware } from "astro:middleware";

/** Import the Feature Flag client - make sure this is server compatible e.g., node js client **/
import { FeatureFlagger } from "some-feature-node-library";

const HOME_PAGE_PATH = "/";

/**
 * Depending on your service's API:
 * Create the feature flag client and pass your project API key
 * Add FEATURE_FLAG_API_KEY to "src/.env"
 */
const client = new FeatureFlagger(import.meta.env.FEATURE_FLAG_API_KEY);

/** 👀 The middleware function **/
export const onRequest = defineMiddleware(async (context, next) => {
  /**
   * Early return. We will only check the feature flag for requests
   * to the homepage
   */
  if (context.url.pathname !== HOME_PAGE_PATH) {
    return next();
  }

  try {
    /**
     * Retrieve the feature toggle for your feature flag
     * In this case, "astro-middleware-demo"
     */
    const isEnabled = await client.isFeatureEnabled(
      "astro-middleware-demo",
    );

    if (isEnabled) {
      console.log("Feature is ENABLED!");

      /**
       * When the feature flag is toggled on, redirect users who access the homepage,
       * to the "/astro-middleware-demo" page
       */
      return Response.redirect(new URL("/marketing", context.url), 302);

      /**
       * Otherwise, handle the request as usual
       */
      return next();
    }

    /**
     * Feature flag NOT enabled? Handle the request as usual
     */

    console.log("Feature is DISABLED!");
    return next();
  } catch (error) {
    console.error("Failed to load feature flag from some-feature-node-library");

    /**
     * Handle the request as usual
     */
    return next();
  }
});
Astro is now closer to parity with other mainstream frameworks like NextJS, thanks to its middleware support. Middleware in web client frameworks (regardless of which) helps centralize logic within your application and aims to solve the same problem.
It’s important to note that Astro only supports a single global middleware.ts file, and does not allow for route-specific middleware. However, if you’re deploying Astro on Vercel, you can take advantage of the matcher configuration available to NextJS middleware.
src/middleware.ts

export const config = {
  // Only run the middleware on the marketing route
 matcher: '/marketing'
}

// write Middleware as usual
If you find a use case for centralizing logic in an Astro middleware project across pages and API endpoints, consider using middleware, e.g., for feature flags, bot protection, A/B testing, and more.
Visit the Astro middleware examples GitHub repo for all the examples discussed here.
There’s no doubt that frontends are getting more complex. As you add new JavaScript libraries and other dependencies to your app, you’ll need more visibility to ensure your users don’t run into unknown issues.
LogRocket is a frontend application monitoring solution that lets you replay JavaScript errors as if they happened in your own browser so you can react to bugs more effectively.

LogRocket works perfectly with any app, regardless of framework, and has plugins to log additional context from Redux, Vuex, and @ngrx/store. Instead of guessing why problems happen, you can aggregate and report on what state your application was in when an issue occurred. LogRocket also monitors your app’s performance, reporting metrics like client CPU load, client memory usage, and more.
Build confidently — start monitoring for free.

Discover how React Fiber works under the hood. Learn how React builds the DOM, handles concurrent rendering, and works alongside React 19 features and the new React Compiler.

Learn how to use Skybridge, an open-source React framework, to build and deploy cross-platform AI apps and interactive UI widgets for ChatGPT, Claude, and MCP clients from a single codebase.

Learn how to set up Meilisearch, index documents, and build keyword, semantic, and hybrid search with AI-powered retrieval.

Compare pnpm and npm across security defaults, disk usage, dependency strictness, and workspace policy to decide which package manager fits your project.
Hey there, want to help make our blog better?
Join LogRocket’s Content Advisory Board. You’ll help inform the type of content we create and get access to exclusive meetups, social accreditation, and swag.
Sign up now

