UI designers are experiencing a growing need to master the skills related to integrating, creating, exporting, transferring, and adapting assets to enhance their interface design capabilities.

When discussing UI and animation, we often turn to the industry leaders, Figma and After Effects. However, the question arises: how can we seamlessly combine these two to craft animations like microinteractions? What is the process for integrating these tools, exporting SVGs from Figma, and animating them using After Effects?
Well, I guess we should start with the bad news; to this date, there is not a way to import SVG files straight into After Effects. The good news is, the integration is still possible.
But to cover the first step of this process, exporting Figma files as SVG files is quite straightforward.
Let’s suppose I want to accomplish the following effect: A step of a walkthrough panel, in which I demonstrate an animated scene, and below, the app introduces some lines on a specific functionality. In this case, it is a welcoming step and must show an animation of a woman walking with her luggage bag.
Considering the UI design depicted below, we in fact have a context presented with the picture, but let us suppose that we want to add value to the app in each aspect of its composition. Notice the difference of value for the UI with the implementation of an animation:

Now, when you add animation to the same design, it becomes evident that a high level of care and professionalism went into its creation. Customers perceive this even if they may not always pinpoint the exact reasons behind their impression. This represents an elevated standard of UI:

So, in order to export SVGs from Figma, after the UI design is all set up, select and group the layers that comprise the elements you wish to animate. In the case below, it is the group called MODEL1:

After that, with the group selected, on the bottom right corner, click Export:
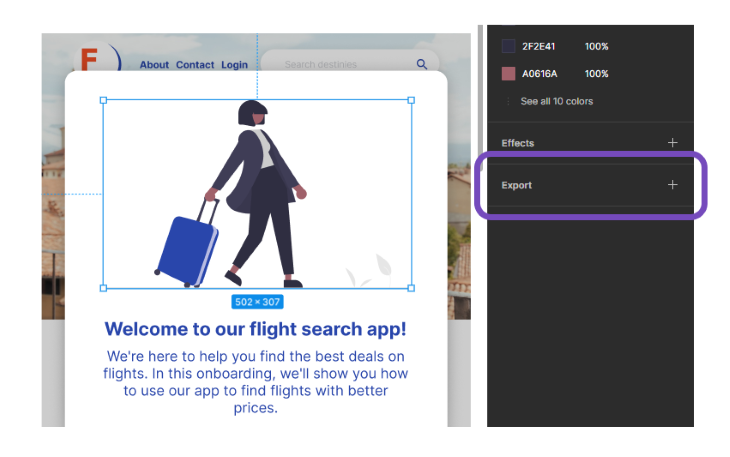
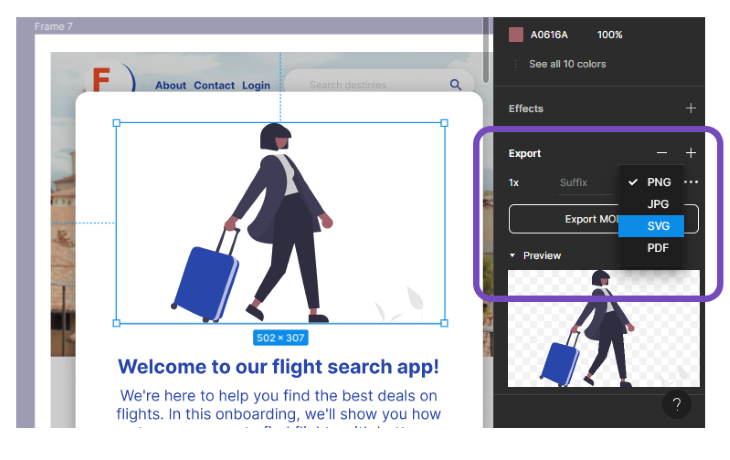
The options will extend and will probably come with PNG selected. You have to change that to the desired format. In this case, we want it in SVG:
Yes, there is this intermediary step, but no worries, Illustrator retains all the separate layers of the grouped SVG you exported from Figma. But this step is crucial, because here, you will organize these layers and export them as an Illustrator file (.ai):

Note that all parts come inside one single layer. In this step you need to:
To wrap up, what you are doing here is creating parts of the body of this character, such as LEFT LEG, RIGHT LEG, HEAD, LUGGAGE, and making each of these become a discrete layer. The next image will show how it looks at the end. Here, the HEAD is selected; it contains all parts of the head.
N.B., at this moment, you decide the level of discrete detail you want to create. For instance, I could have separated the hair from the head to animate separately, but I ended up leaving the whole head as one layer.
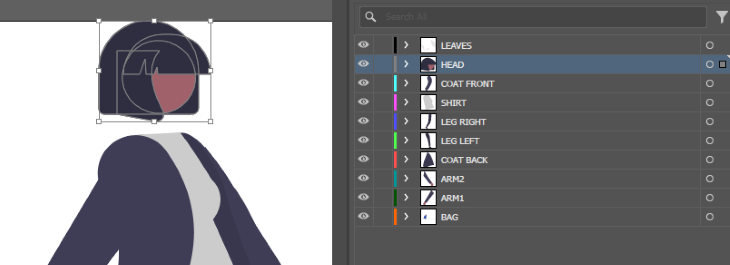
With the layers neatly organized, we can proceed and save this as an Illustrator file:
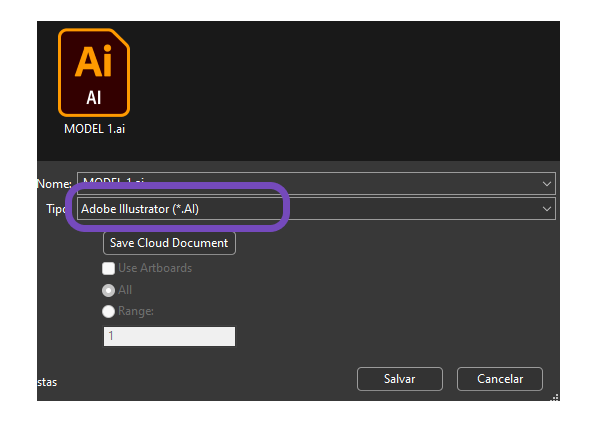
FILE > SAVE or Ctrl + S, and choose Adobe Illustrator (*.AI) from the dropdown menu. This file you can then import to After Effects.
As you choose the AI file you just created with all layers organized inside, select on the menu import as, “composition – Retain Layer Sizes.” This is important so that After Effects will retain all individual layers and their positions. Hence, it will create a new composition with the exact size you saved on AI:
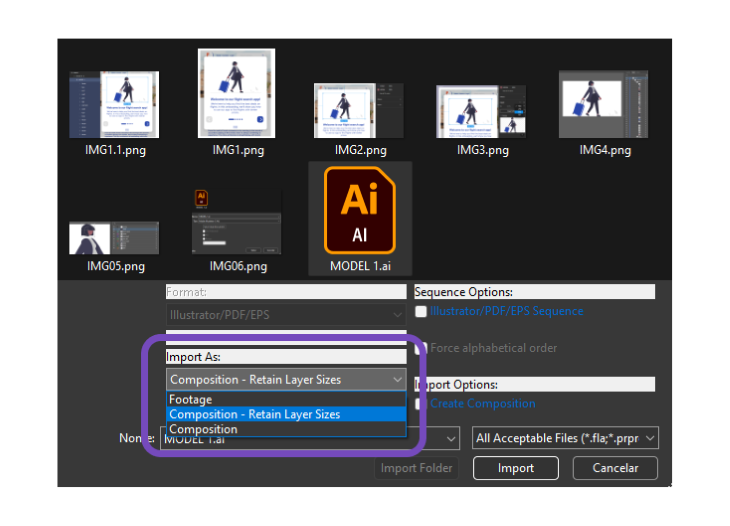
If you skip this step, it will automatically select the Footage option, meaning it will amalgamate all the layers into one single image, and you will not be able to animate each part separately.
Once inside After Effects, you can proceed with your animation, working on each layer as usual:
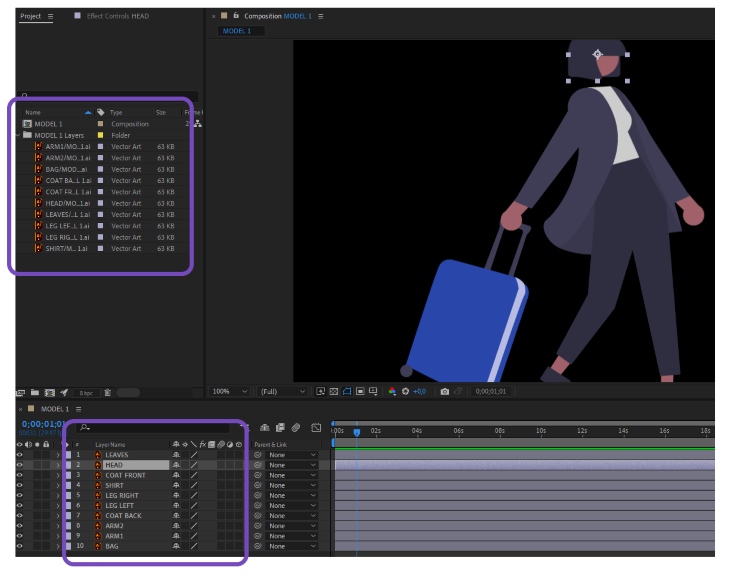
Important notes on the use of effects:
In case you export the animation as a Lottie file, you should change the format within After Effects. Notice that zooming on the image, it still loses definition, meaning it is a bitmap image.
To change these bitmap images into vector shapes, right click on the layer and Create > Create Shapes from Vector Layer. This will recover the vector information from the Illustrator file:
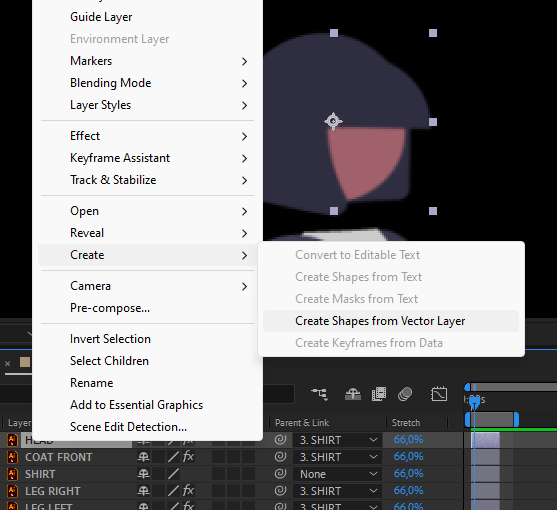
This method will create a layer with all shapes inside, as shown below:
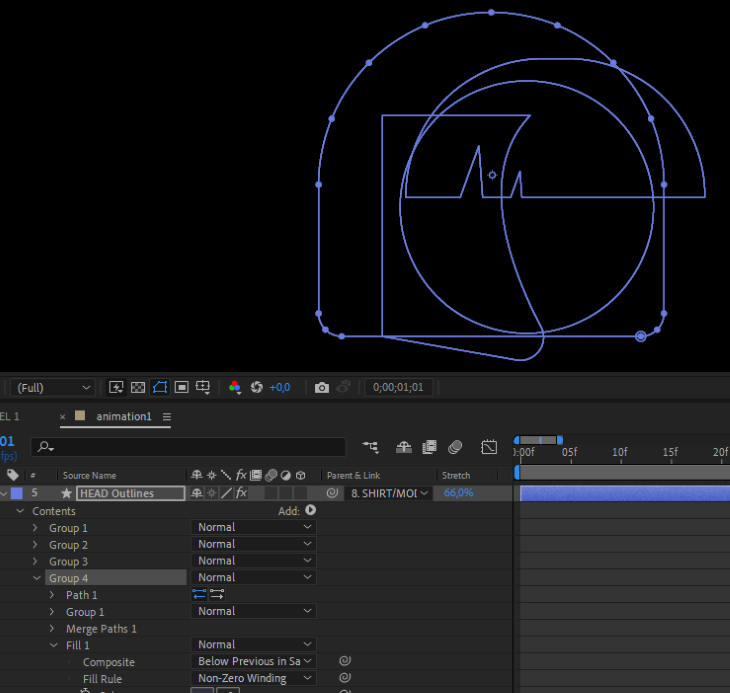
Understand the application of your animation. For instance, if it has any relation with conditions, such as percentage of loading or a burst animation for a like button, you can proceed with all-vector animations, also called shapes in AE. Now, the current animation we are making will be a gif that runs in loop while on screen, so it is now necessary to convert into shapes within After Effects.
Concerning animation, After Effects is a tool box, and it provides resources for any kind of visual animation, from character animation to Hollywood VFX. So, in most of the cases, it is a matter of stylistic adherence of the animator to choose between animating with keyframes or frame-by-frame.
I opted to use an intermediary technique, using keyframes but applying the Puppet Position Pin tool:
![]()
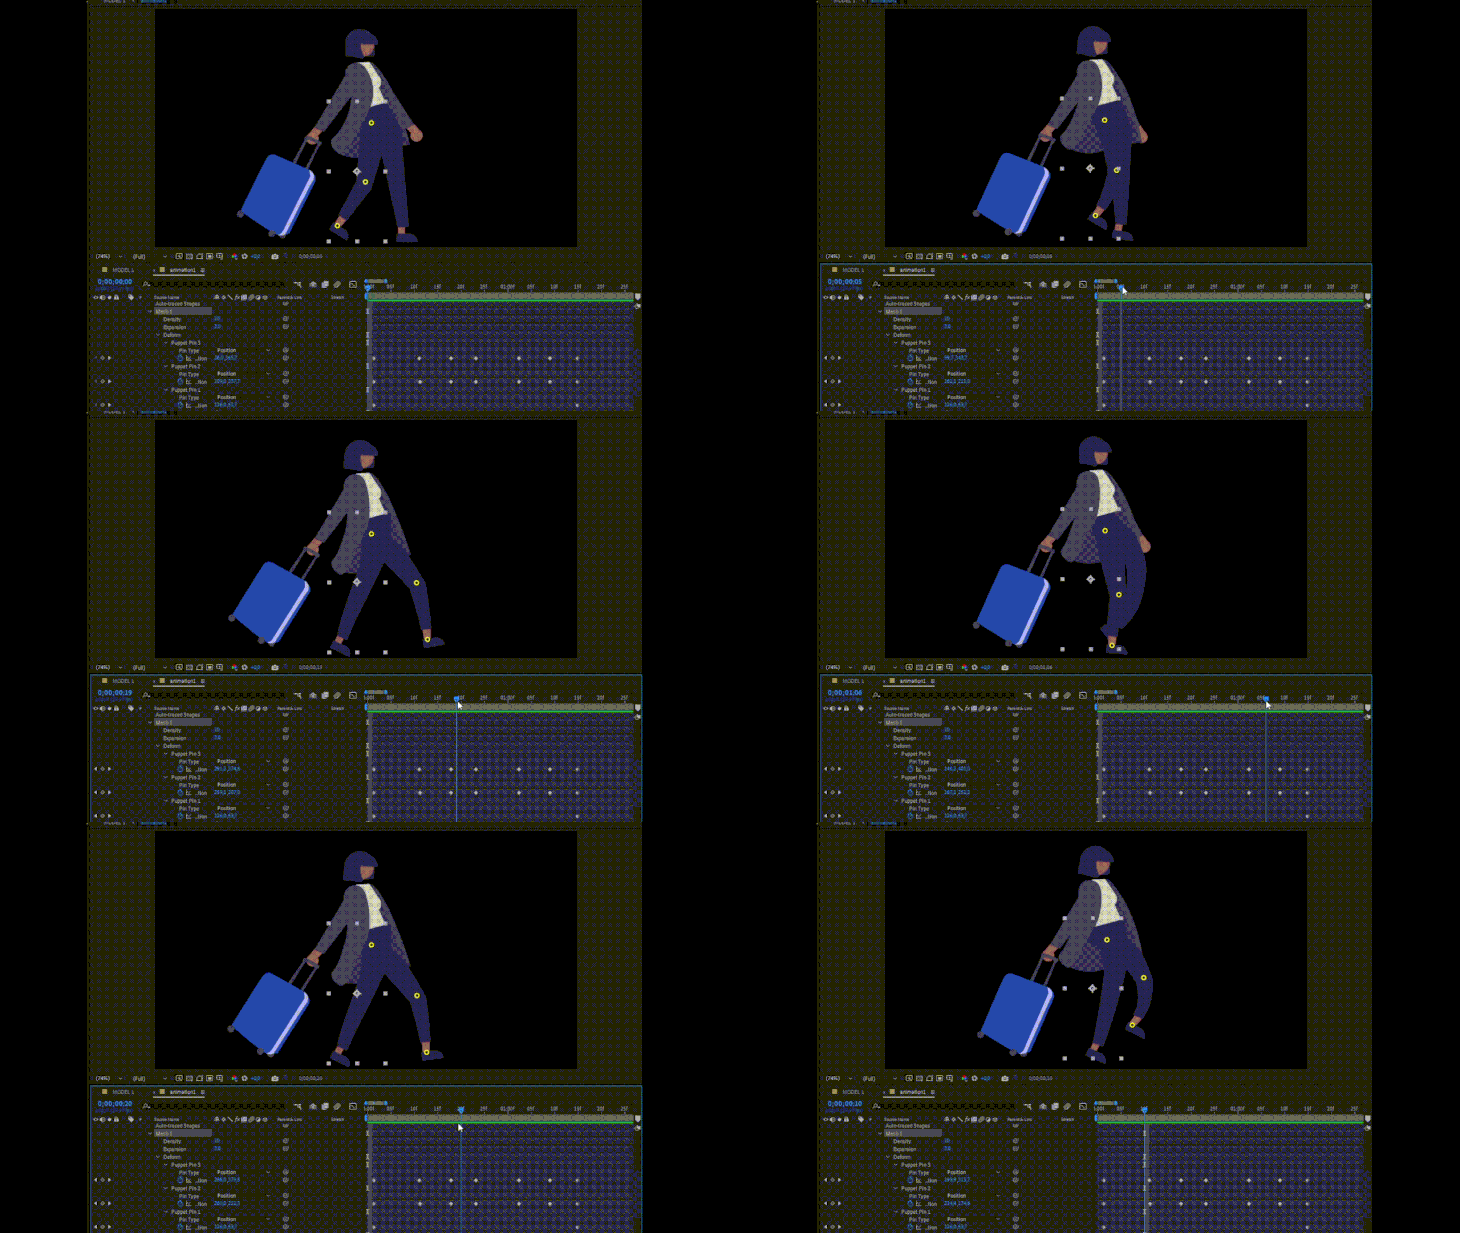
This technique allows you to set specific points and animate them via keyframes individually. In the example above, the leg has three points that I used as reference to animate the walking cycle. I added points for each layer, animating things such as her coat, her hair, and so on.
In the model we presented, as a loop GIF for the final product, it is necessary that you create a short loopable animation. This example uses an animation loop of two seconds, meaning that at second 2, it has exactly the same position of all layers as the first frame on the timeline.
Once the animation is done, go to Composition > Add to Adobe Media Encoder Queue:
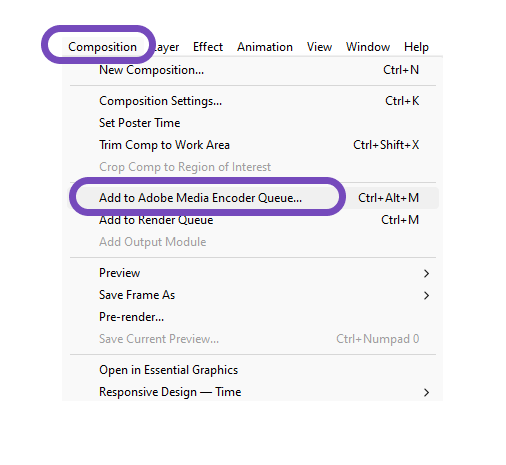
This is the best way to export straight to the GIF format, as the current versions of Media Encoder have this option natively and are pretty quick.
Once inside Media Encoder with the precomp loaded and ready for render, choose from the selector on the left the file format Animated GIF and hit render:
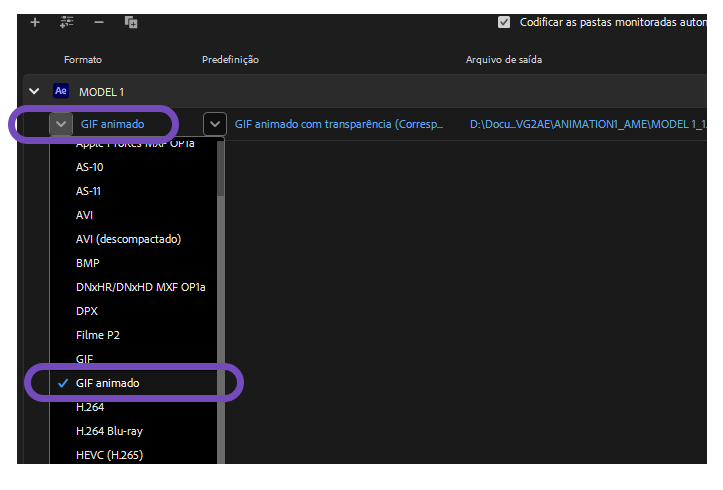
All you have to do now, is to go back to Figma and insert the animated GIF file, substituting the original vector group.
As shown in the image below, the layer receives a play icon, meaning it is animated:
![]()
N.B., it will not be animated in Figma until you play this composition as a prototype.
The most common problem you can find with GIF exporting is the size of the final file. If it has too many parts in movement, it will fastly reach up to 2MB or more, although it is small in pixel size. To avoid this, I personally use another method, which is to export as video H.264, import it on Photoshop, and export it as GIF using the Ctrl+Alt+Shift+S. It has a more complete set of options for exporting GIF with better results, and usually better compressed.
You can test both methods and check which one fits better your needs, the fastest way or the one with better compressions. Online compressors usually do a great job too, significantly reducing the size of GIF files, while retaining most of its visual quality.
Hopefully this demystifies transferring files between Figma and After Effects. If you’d like to use my example to test it out, I have a Google Drive of all the Illustrator and After Effects files I used for this project.
LogRocket's Galileo AI watches sessions and understands user feedback for you, automating the most time-intensive parts of your job and giving you more time to focus on great design.
See how design choices, interactions, and issues affect your users — get a demo of LogRocket today.

I’ve spent enough time designing with WCAG 2.2 to know it’s not enough. Here’s why I’m skeptical and cautiously hopeful about WCAG 3.0.
I learned this lesson the hard way. Good UX doesn’t survive endless approval loops. Here’s what went wrong — and how to protect your vision.
I’ve reviewed “final” designs more times than I can count — and the copy almost always gives users a reason to hesitate.

The checkbox is one of the most common elements in UX design. Learn all about the feature, its states, and the types of selection.