Editor’s note: This post was last updated on 20 November 2023 to include a concrete example of Figma file organization.
Organizing Figma files is critical to ensuring that everyone on a large team can work together effectively. Poor organization can quickly become cluttered, complicated, and a real problem.
Below we will consider different ways of organizing space based on the tasks on your table, the amount of work they require, and the size of the team.
I’ll also go through recommendations for organizing the internal space of your Figma files and projects.
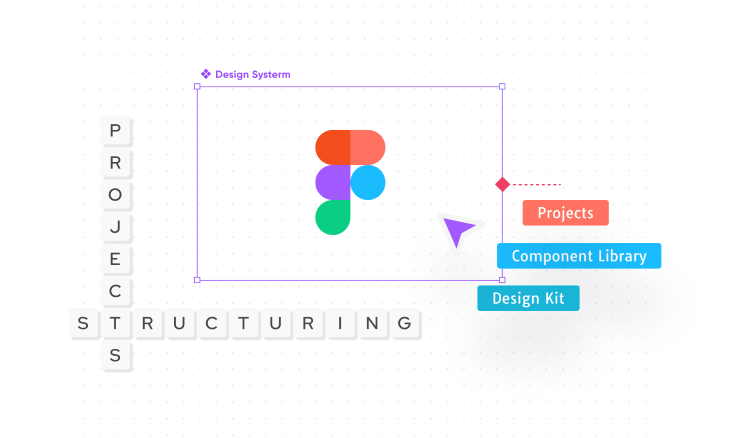
Let’s start by clarifying Figma’s terminology. Figma has discrete meanings for these terms:
Figma has a free and a paid version. As with all programs, the paid version has many more advantages than the free version. Keeping files organized in the free version is difficult, since you practically can’t group your projects in any way except to label the projects and make a cover for quick search and convenience.
Therefore, my first tip is to consider the paid version with more features. With that in mind, we can go in depth on how to use the paid features to keep your files logically organized.
It’s never too late to start structuring your projects.
We always start by sorting by item type. Separate superficially first drafts, projects, system designs, illustration files, and so on.
In this way, we already have groups of files that we need to put into place.
When a designer works as a freelancer, they don’t have a permanent job or a permanent project. A freelancer can have several agencies or customers as an employer.
When you pay for your own Figma plan, you pay for each team.
Based on this, after creating a team, you create a folder called Projects, and inside these projects, you lay out your files.
If you are a freelancer with many clients, we’ll need to repeat this process. Here are the steps if there are many projects and the designer creates several teams:
The working experience in both freelance or in-house settings can be substantially different. A primary challenge in any structure, regardless of which tool you use, resides in understanding the design process: discerning which design files are still in progress, up for updates, considered outdated, or all set up as the final product.
Each team operates on unique work standards that enhance the ease of file and project navigation for all designers. A uniform structure for every project warrants that each designer comprehends the structure. This holds true irrespective of their joining dates, empowering them to figure it out independently.
The structure for any organization, whether addressing a single product or multiple, ideally begins product-wise (with teams), pursuing a sequential division department-wise (their projects). These department divisions are usually marketing, development, animation, design, and so on.
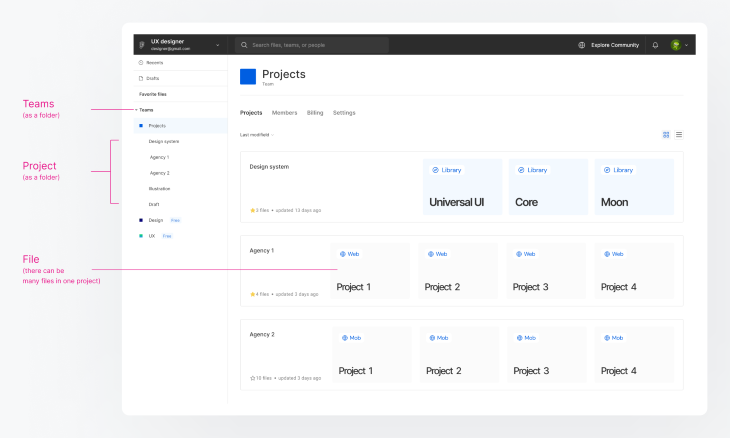
We need to structure our Figma files so that every team can access their relevant projects. Here’s an example structure:
For each file you make, approved by the system requirements of your team, make a cover. From the cover, everyone can understand what is inside the file.
Apply different markings on the cover itself to make it visually distinctive, such as version updates, clear titling, and visual elements like emojis, which anybody on your team can use to make a cover even if they aren’t designers.
These are some things to keep in mind for managing Figma files across your teams:
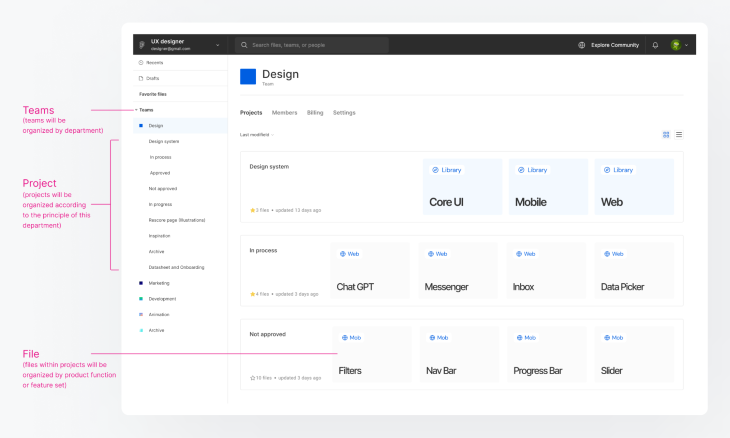
Teams will be organized by department (marketing, development, design, and so on). Projects will be organized along the lines of this department. Consider the design department, which needs a design system project, one for in progress designs, and so on. On the other hand, marketing might need projects for sales enablement materials, social media, or other use cases.
The files within the projects will be organized by their function or set of product features. Sometimes features are very expensive and require lots of assets, and in such cases, they are separated and put into the Team section. For example, say a casino site has a new game, and the casino operates in different markets: the European market and the Asian market. These should be separated out by team.
Now that we’ve put all the files in folders (Projects) and arranged them by team, it’s time to deal with the design system for each team.
We have the basic elements that make up the files in our design system: libraries, components, and styles.
Libraries are a type of Figma file with all the components a designer can use.
Taking small freelance projects as an example, this is a UI KIT that the designer creates themself or takes from ready-made UI systems to create a product design.
Within larger companies, such systems are proportionally larger, with all the specs and all the states included. Think of a constructor that you put together and take ready-made blocks to create a new design. Sometimes new components are created and you have to develop them.
And when you use existing elements, development is faster and more efficient. Such design systems have everything from icons to entire elements, such as the appearance of the messenger field. These belong in libraries.
Components are an element of design. Components are divided into what we can call atoms, molecules, and organisms.
We combine all the atoms into what we call variants. We do the same with molecules and organisms (e.g., default and active state, or hover and click). So by inserting one organism, we can easily choose the desired state of that organism and replace the atoms and molecules inside. Those are components.
This is how a design system is built. You always have to think about which elements you can combine with what and in which organisms they will be available. It is most difficult in CRM systems, because you have to think about which organisms should grow and what will be included in them.
And do not forget that when you design a system, you must always put the template first in the variant of the components. This is what you’ll modify in all future variants.
Styles are properties: color, fill, strokes, text, effects, and grid layouts to name a few. These are usually consistent across your projects.
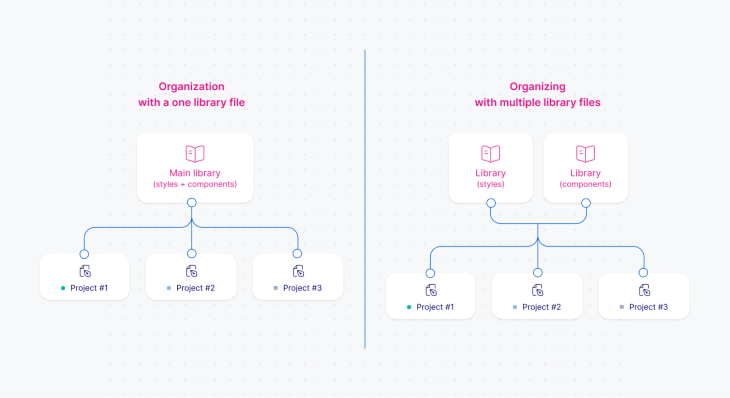
Company design systems are often very large and heavy, so it is better to divide them into several files. The easiest way to do this is to cascade your libraries, which are separate from the component library:
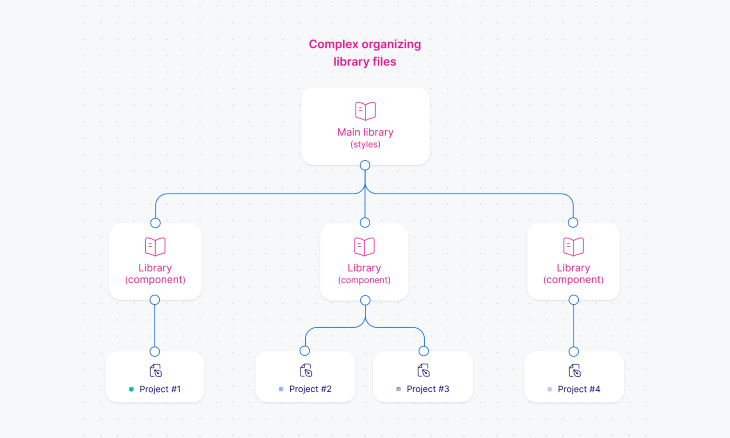
Not only will this speed up your design file creation and help your design team simplify iterations, but it should also make it easier to use your workspace.
Now we’ve got the structure of our files and design system, so we can move directly to the files — namely, to the organization of the workspace in the file itself.
It’s important to keep your Figma files organized and structured in a way that makes sense, as they will be viewed and referenced by stakeholders, such as software developers, UX writers, product managers, and more. Having an intuitive file structure will make it easier for stakeholders to find the information that they’re looking for within your Figma file.
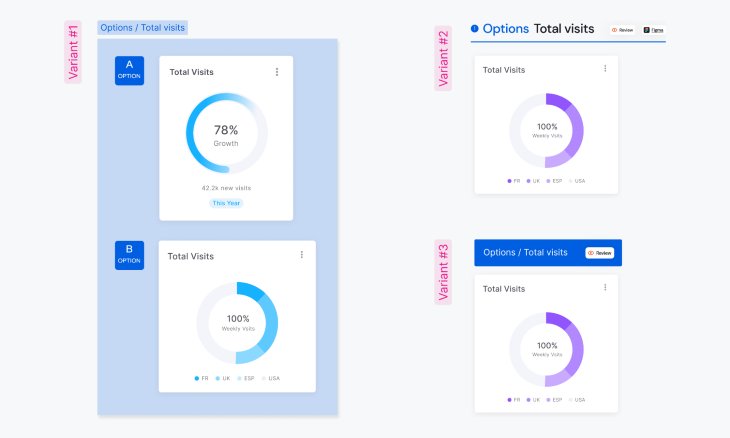
Always remember that it is necessary to divide large projects into pages. For example, if you create different design options for several pages of a website, separate them into different pages in your file to keep versions organized. After that, create a separate page with the final, approved options that will go live.
Dividing projects by pages ensures that your work is neatly separated and organized by work-in-progress and final designs.
Keep all versions of the design on a separate page. Never delete anything. Instead, create an archive.
Each edit should take place in a new frame (meaning you’ve copied the design and made edits). This is especially useful when you leave comments in the file — for example, to correct something. You copy the desired frame and make edits on the comments, and you can see both states: before and after.
Very often, you have to go back to the previous version or the one you originally did not like. Keep a hierarchy of edits and design variants in the file. Move unnecessary options to the archive, and transfer the selected frames for further edits separately.
Figma saves version history. If you need to restore something, it’s useful, but if you want to see one of the options that was proposed by someone else, version history won’t help you. It’s much clearer when everything is right in front of your eyes in the form of an archive.
For example, if we suddenly need to look at old solutions, it will be enough to go into the archive. There may be several different versions of the same page lying there too — we experimented, forgot, remembered after a while, and then realized that we could still use some of them for new projects.
Your colleagues should be able to read text, even if you can see the whole artboard at once.
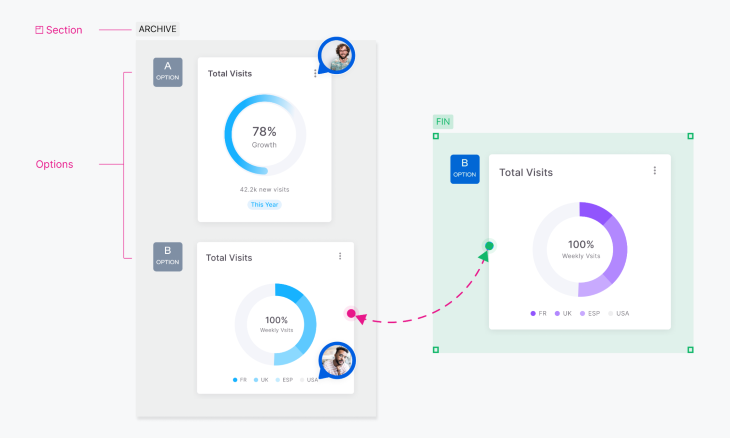
There is a new feature in Figma, sections, which allows you to select one or more elements to highlight the background and display the title (this title will be clearly visible at all scales). Before that, each team practiced different ways to label stages or frames themselves.
For example, select the stage name on a colored rectangle, information about each frame on other rectangles below, and of course, don’t forget to label each frame.
If your design implies a user path — i.e., it includes several consecutive screenshots — then they should always be put in sequence and complemented by directional arrows (from the button to the frame).
You may think this is unnecessary, but do not forget, if you are doing it, it is obvious for you, and if another designer or product manager comes along, they shouldn’t have to guess. They need to quickly understand the user’s path and see the whole way. The clearer you are as a designer, the better for the whole team.
If part of a frame, like a dropdown, has different states, you should put those states separately next to the frame. Then, duplicate them in the overall design.
Developers have to understand your design, because you have created a visualization, and the developer needs to recreate your image for the product.
Each illustration should be framed and rendered in curves. You can create an illustration, but then you have to translate it into curves (you have to keep both, because you cannot fix the text in curves).
The developer takes the illustration in SVG format and his illustration should not differ from yours. This illustration can easily become any size you want and always stays high quality.
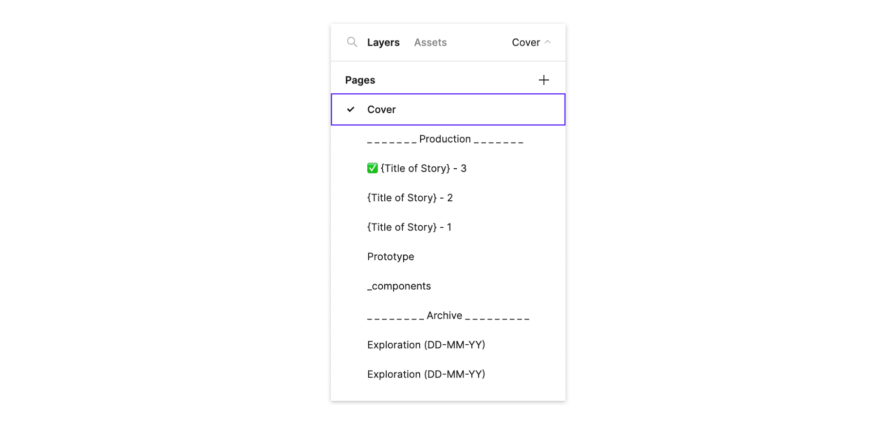
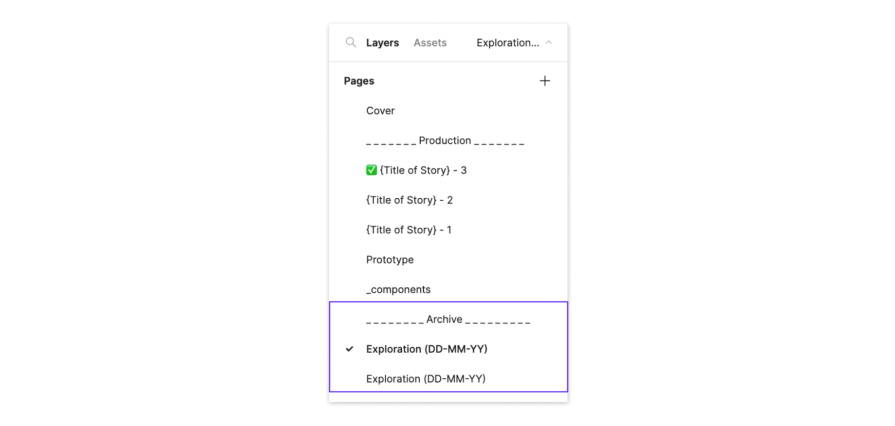
Let’s walk through an example of how a Figma file’s pages could be organized. Think of pages as different sections in your file. You can break up your file into three main sections: cover, production, and archive.
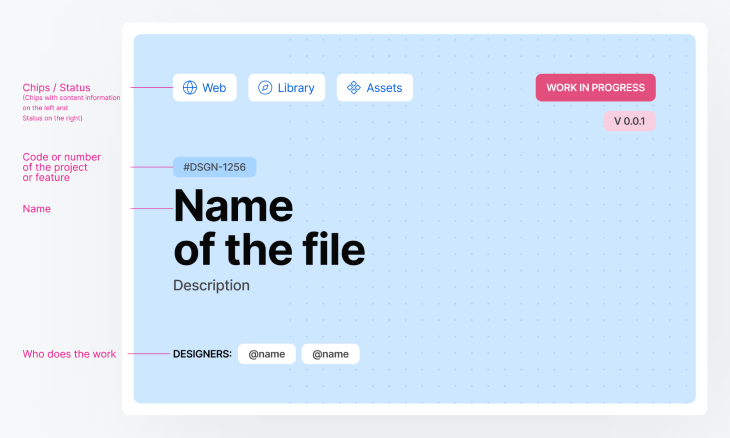
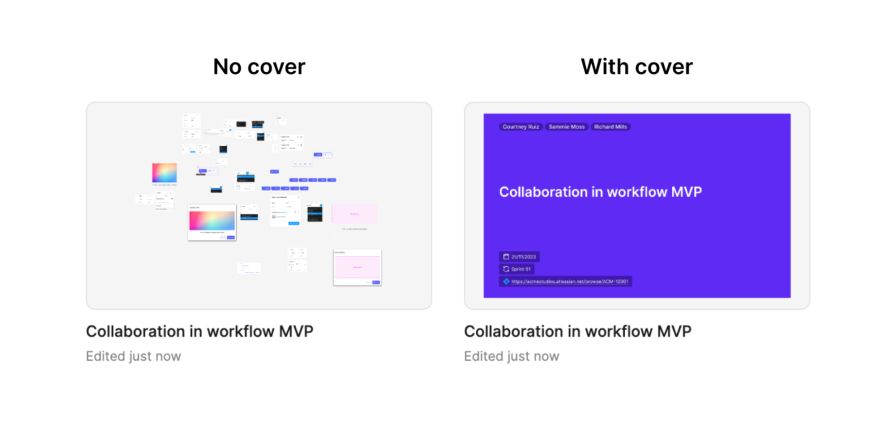
As mentioned earlier, the cover page is used for showing a thumbnail for your Figma file. Thumbnails distinguish files by displaying details like a title, the names of contributors, and the starting date.
Depending on your team’s way of working, you can also include information related to the project, such as the sprint number and a link to the ticket in a project management tool, like Jira. This ensures that stakeholders interested in more context can easily access additional details, such as the problem statement and acceptance criteria.

Without a cover, Figma will display a snapshot of the first page of your file, which is usually a cluttered mess. So don’t forget to include a cover in your files if you want to stay organized:
Next, let’s look at the Production section. Create an empty page called Production to separate your production pages from the cover and archive sections. This section will contain the bulk of your work, including your main design files. If your project contains multiple user stories, separate them into their own pages to keep your Figma file organized.
You can also include separate pages for a prototype if necessary, as well as any local design components used in the file. Since components can be referenced throughout the file, it’s a good idea to dedicate a separate page for them so that you don’t have to hunt through the pages to find the component you want.
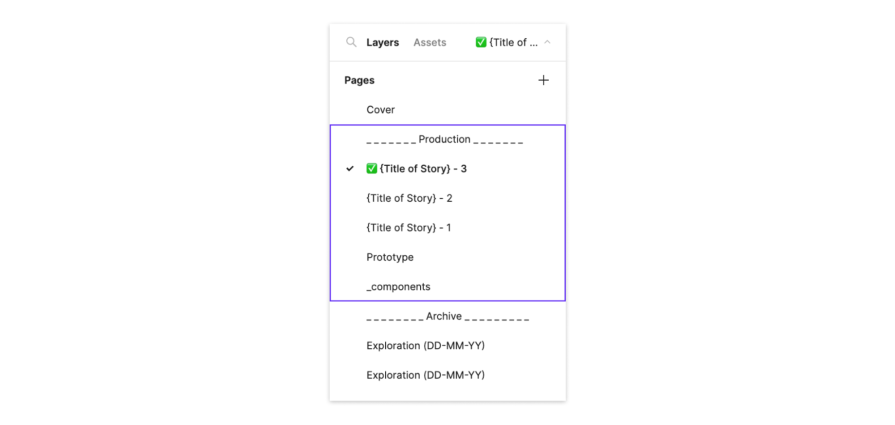
When your designs are finalized and ready to be handed off to development, add a checkmark emoji or another indicator to the name of that page. This lets stakeholders know that the designs on that page are final and have been handed off to be implemented.
Your designs will evolve as you iterate and make changes throughout the process. To separate old designs from your final designs without deleting them, you can move all the outdated designs or explorations into an Archive section.
Again, create an empty page called Archive to act as a divider between sections. This allows you to reference your design explorations and old designs within your file, while keeping the final designs in their own section. Include the date in the page title as a reference point:
By following a similar structure, your Figma files will be much easier to navigate and dig through, especially for stakeholders that are not familiar with the work that you completed. Organizing files makes for more efficient workflows and better team collaboration.
There is no perfect way to organize your Figma files, and you may find a different approach that works better for your own organization, but hopefully this post has given you a few ideas to improve how you array your files.
The main conclusions from all of the above are this:
Choose the right organization for you, whether you’re a freelancer, an agency, or any other complex organization. It all depends on your company and how you are organized, so you may find a different approach that is more appropriate for your organization.

LogRocket's Galileo AI watches sessions and understands user feedback for you, automating the most time-intensive parts of your job and giving you more time to focus on great design.
See how design choices, interactions, and issues affect your users — get a demo of LogRocket today.

Explore the core principles of GUI design and learn how consistency, simplicity, feedback, accessibility, and user testing contribute to better digital experiences.

After five years in UX, I revisited the Daily UI challenge to reconnect with hands-on design. Along the way, I learned that great interfaces come from thoughtful briefs, sound judgment, and user feedback, not just better AI tools.

Learn what makes a great login screen through real-world examples and UX best practices for creating secure, accessible, and low-friction authentication flows.
Skeuomorphism helped define early digital interfaces by mimicking real-world objects to make technology more intuitive. Learn how it compares with flat design and neumorphism, why it declined, and where it still has a place in modern UX.


