The Shiny package is popular for building web apps easily with R. It’s ideal for fast prototyping but not robust for building scalable solutions.

Thanks to the R package known as shiny.react, you can integrate React with Shiny to build even more complex and scalable interactive components. This package provides a toolbox for defining React component wrappers, which can then be added to your Shiny UI. This allows you to create small, complex reusable UI components that can be rendered dynamically with data from your Shiny server.
This tutorial will review how to create a simple, dynamically styled React app using shiny.react. See the full code for this post here on GitHub.
Jump ahead:
This tutorial assumes a basic understanding of React, Shiny, and their necessary development tools. Before getting started, you should have Node.js and R installed.
We’ll build a simple React app using shiny.react, which will render a select input from the shiny package that listens to user inputs and renders a React component based on the input. The data is passed in as props from the Shiny app to the React component:

To get started, install the shiny.react package using the command below in your R console:
install.packages("shiny.react")
You can load the package into your R session with the expression below:
library(shiny.react)
Then, create a new project folder; you can name it shinyReact. Add an app.R file for our shiny app logic and a data.json file for our dummy data.
In the data.json file, add the dummy data below:
[
  {
        "name": "John",
        "age": 30,
        "city": "New York",
        "color": "Gold"
    },
    {
        "name": "Jane",
        "age": 25,
        "city": "San Francisco",
        "color": "Lavender"
    },
    {
        "name": "Bob",
        "age": 40,
        "city": "Chicago",
        "color": "Salmon"
    },
    {
        "name": "Mary",
        "age": 32,
        "city": "Boston",
        "color": "Teal"
    },
    {
        "name": "Kate",
        "age": 21,
        "city": "Phoenix",
        "color": "Crimson"
    }
]
We’ll first create and run a Shiny app without React enabled. In the app.js file, add the code snippet below:
library(shiny.react)

colors <- list("Gold", "Lavender", "Salmon")
ui<- function(id) {
  ns <- NS(id)
   bootstrapPage(
    navbarPage(
      title = "Dynamic Shiny.React App",
      windowTitle = "Dynamic Shiny React App",
    ),
    div(
      class = "container",
      fluidRow(
          column(
              width = 3,
              wellPanel(
                selectInput(ns("person"), label = "Choose person", choices = colors)
             )
          ),
          column(
              width = 9,
              div(
                # Dynamically styled react component
                textOutput(ns("reactComponent"))
              )
          )
      )
    )
)
}
server <- function(id) {
  moduleServer(id, function(input, output, session) {
    output$reactComponent<- renderText({input$person})
  })
}
if (interactive()) {
  shinyApp(ui("app"), function(input, output) server("app"))
}
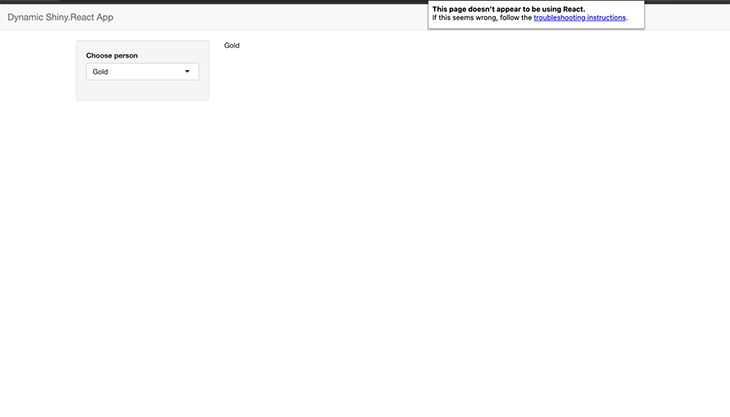
This code creates a Shiny app using the UI and server functions passed as arguments. The UI function renders a Bootstrap page with a navbar, select input, and text. The select input choices are an array of colors that, when selected, is displayed as the textOutput value.
When you run the application and view it in the browser, you’ll notice that our app doesn’t use React yet:
To add React code to our Shiny app, we have to create an output that preserves the React state on re-renders, and renders the React component in our output.
First, replace the textOutput with reactOutput, as shown below. This creates an output that can persist React state. The reactOutput method expects an output ID to render React on the server; its value is a Shiny tag that is placed on the UI:
# Initial output
textOutput(ns("reactComponent"))

# React output
reactOutput(ns("reactComponent"))
Then, replace the renderText with renderReact, as shown below. This renders your React component to your reactOutput. The method expects an expression that returns HTML or React components to be rendered:
# Initial render
output$reactComponent<- renderText({input$person})

# React render
output$reactComponent<- renderReact({
    div(input$person)
})
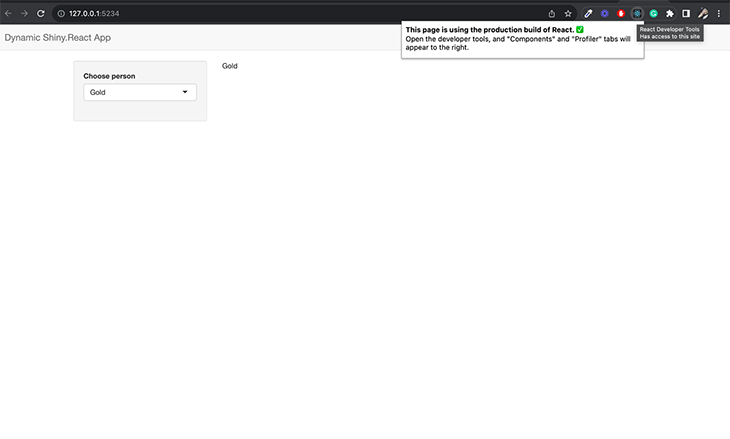
You are now running a React Shiny application. The reactOutput and renderReact methods from the shiny.react package enables React in your Shiny app by adding the necessary CDN links in the <head> tag:
With our integration done, we can now create custom, reusable React components to include in our Shiny app. Shiny.react offers a method, reactElement, which returns a shiny tag object that represents a React element.
The method expects the following arguments:
module – a JavaScript module from which we import the React component. This can be obtained from a bundled React applicationname – the name of the component in the JavaScript moduleprops – props to pass to the React component. The props will be obtained from your Shiny applicationdeps – HTML dependencies to attach to the componentIn your app.js file, create a ReactComponent variable that’s a function whose value is a shiny React element:
ReactComponent <- function(...) {
  shiny.react::reactElement(
    module = "CustomComponents",
    name = "ReactComponent",
    props = shiny.react::asProps(...),
  )
}
The code snippet above creates a reactElement element whose module is obtained from CustomComponents, which will be defined inside our R file. The name of the component we are accessing is ReactComponent and the props are destructured using shiny.react::asProps(...).
In your app.js file, create a JavaScript module named CustomComponents, as shown below:
# Create a script tag to be added # to our HTML
CustomComponents <- tags$script(HTML("(function() {
# import required js modules
  const React = jsmodule['react'];
  const Shiny = jsmodule['@/shiny'];
  const CustomComponents = jsmodule['CustomComponents'] ??= {};

# Create custom React component
# inside our js module

  CustomComponents.ReactComponent = function(props) {
   const {data} = props;
    return  React.createElement('div', {style:{backgroundColor:data[0].color , padding:'20px'}}, [
      React.createElement('h1', null, data[0].name),
      React.createElement('p', null, data[0].city)
    ])

  };
})()"))
The code snippet above creates a script tag, to be added to our HTML, and defines an Immediately Invoked Function Expression (IIFE).
Inside the function, we load the required JavaScript modules, i.e., react and shiny, and define a ReactComponent function that returns a React component. We write the component without JSX as it would look after compilation.
A more efficient approach would be to write your component in a React file, bundle it, and use the generated static file as the module for our React component.
We are now set to add the component to our Shiny app and pass in the required props.
Update your app.js file with the code below:
library(shiny.react)
library(jsonlite)
json_data <- fromJSON("./data.json")
CustomComponents <- tags$script(HTML("(function() {
  const React = jsmodule['react'];
  const ReactDOMServer = jsmodule['react-dom'];
  const Shiny = jsmodule['@/shiny'];
  const CustomComponents = jsmodule['CustomComponents'] ??= {};
  CustomComponents.ReactComponent = function(props) {
   const {data} = props;
    return  React.createElement('div', {style:{backgroundColor:data[0].color , padding:'20px'}}, [
      React.createElement('h1', null, data[0].name),
      React.createElement('p', null, data[0].city)
    ])

  };
})()"))
ReactComponent <- function(...) {
  shiny.react::reactElement(
    module = "CustomComponents",
    name = "ReactComponent",
    props = shiny.react::asProps(...),
  )
}
ui<- function(id) {
  ns <- NS(id)
   bootstrapPage(
    tagList(CustomComponents),
    navbarPage(
      title = "Dynamic Shiny.React App",
      windowTitle = "Dynamic Shiny React App",
    ),
    div(
      class = "container",
      fluidRow(
          column(
              width = 3,
              wellPanel(
                selectInput(ns("person"), label = "Choose person", choices = unique(json_data$name))
             )
          ),
          column(
              width = 9,
              div(
                  reactOutput(ns("reactComponent"))
              )
          )
      )
    )
)
}


server <- function(id) {
  moduleServer(id, function(input, output, session) {
    dataVal <- reactiveVal()
    observeEvent(input$person, {
      selected_data <- json_data[json_data$name == input$person, ]
      dataVal(selected_data)
    })
    output$reactComponent<- renderReact({
        ReactComponent(data = dataVal())
      })
  })
}
if (interactive()) {
  shinyApp(ui("app"), function(input, output) server("app"))
}
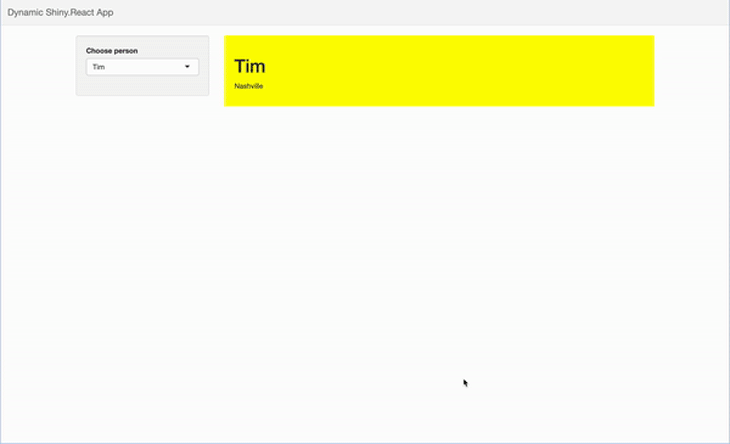
Here, we make use of the jsonlite package to read the data from the JSON file we created, and then use the data obtained as choices for our input.
We also update the server function to respond to changes in the value of our select input. The new value is set as the reactive value, which is passed to our React component as a prop. Our React component will be rebuilt whenever the input value changes.
Running our application displays the app below. When a user selects a new value, our React component updates its text and background color:
In this tutorial, we discussed how to use React in your Shiny apps using the package shiny.react. We explored some of the various methods offered by the package to include React in your app. Finally, we created a JavaScript module that contained our reusable React component and rendered it dynamically based on the data passed as props from our Shiny app. The complete code used in this article is available on GitHub.
The technique used in this article is just one of many methods that can be used to integrate a React application with your Shiny app. By experimenting with different methods, you can decide which ones you prefer to build scalable and interactive Shiny React applications. Happy coding!
Install LogRocket via npm or script tag. LogRocket.init() must be called client-side, not
server-side
$ npm i --save logrocket

// Code:

import LogRocket from 'logrocket';
LogRocket.init('app/id');
// Add to your HTML:

<script src="https://cdn.lr-ingest.com/LogRocket.min.js"></script>
<script>window.LogRocket && window.LogRocket.init('app/id');</script>

Learn how to set up Meilisearch, index documents, and build keyword, semantic, and hybrid search with AI-powered retrieval.

Compare pnpm and npm across security defaults, disk usage, dependency strictness, and workspace policy to decide which package manager fits your project.

I migrated 20 production-style components from Tailwind to StyleX. Here’s what the data showed about LOC, CSS bundle size, build time, and type safety.

A guide for using JWT authentication to prevent basic security issues while understanding the shortcomings of JWTs.
Would you be interested in joining LogRocket's developer community?
Join LogRocket’s Content Advisory Board. You’ll help inform the type of content we create and get access to exclusive meetups, social accreditation, and swag.
Sign up now
