
Setting up, configuring, and deploying Node.js apps can often be a complex and time-consuming process. Replit, an online text editor and IDE that runs on the browser, can help streamline this process and make Node.js app deployment faster and more efficient.
Unlike a local IDE that runs on your device, Replit allows you to create online projects and maintain them from any device at any time. In this article, we’ll explore Replit’s features and how this editor can make it easier to build applications collaboratively.
To do so, we will build two types of Node.js apps using Replit — specifically, a Discord bot and a to-do app with React — and deploy them using Replit as well. We will cover:
Building the Discord bot will allow us to focus on familiarizing ourselves with Replit, since Discord already comes with an interface and we won’t have to create our own. Cloning a GitHub repo as a template for a to-do app will give us more options for building and deploying Node.js apps with Replit.
You can find the full code for the Discord bot and the to-do app in their respective GitHub repos. Let’s jump right in.
The Replay is a weekly newsletter for dev and engineering leaders.
Delivered once a week, it's your curated guide to the most important conversations around frontend dev, emerging AI tools, and the state of modern software.
Replit was founded in 2016 and has since become widely admired, adapted, and supported by the developers’ community. Some of its features include:
The Replit team is always coming up with new features — so much so that Replit has gone from being just an IDE to a hosting provider. Some other features that make Replit suitable as a hosting service include:
With Replit, you can host static websites as well as deploy your apps for production. We will look into both later in this article and explore Secrets in more detail as well.
Before 2023, Replit only had support for hosting static web pages via your development environment’s repl.co. This makes your production and development environments inseparable — in other words, whatever changes you make in development will affect production.
This feature, which is called Legacy Hosting, is now in maintenance mode only, so no new features are going to come. Deployments, on the other hand, were introduced in April this year.
With deployments, you can create a snapshot of your Repl and deploy it. This way, changes to your Repl in development will not affect the website or app in production. Logs from production are also separate from logs during development.
Deployment is a huge step into hosting efficiently with Replit. With deployments, you also don’t have to worry about the “Always on” feature, which you needed for Legacy Hosting to prevent your app from going to sleep.
As of the time of this writing, there isn’t a free tier for deployment, unlike Legacy Hosting. However, Replit is working on a free tier that will allow you to only pay for the resources you use.
It is unclear when this free tier will be out, but in the meantime, we will take a look at how we can deploy Node.js apps with Replit for a fee. We will also look at how we can do the same thing traditionally with Legacy Hosting.
Our very first step is to sign into Replit. If you don’t have an account with Replit yet, you can create one on their website.
Once signed in, create a new Repl and select Node.js as the template. For the sake of this tutorial, we will be calling this Repl Buddy-bot.
By default, Replit’s layout consists of three sections horizontally:
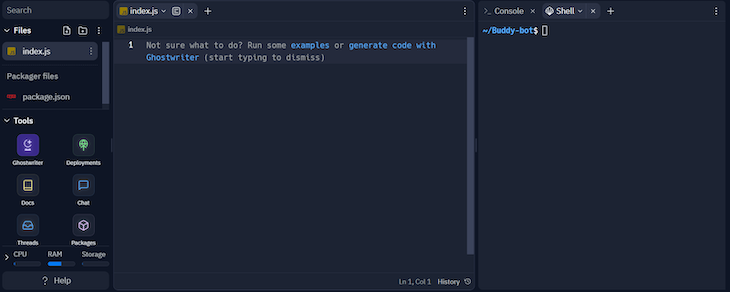
From left to right, these sections are:
Each section is adjustable and movable except the leftmost section. You can move the terminal to the bottom or the top of the page, whichever is more suitable for you.
The left section of the editor also has a “Tools” sub-menu. This menu, as the name suggests, allows you easily navigate around Replit’s tools. We will explore some of these tools in more detail in the upcoming sections.
With Secrets, you can store your Node.js app’s important secrets as environment variables. When you click Secrets in the Tools menu, a new tab should open in the rightmost section. In that tab, you can pass in your secrets easily as you would traditionally when using a .env file:
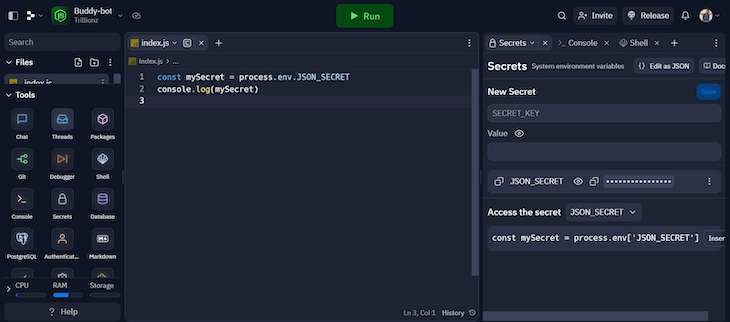
As you can see in the image above, accessing your environment variables in Replit is the same as accessing them in any Node.js app. When a new env is stored, you’d have to reload the page for it to reflect in your app.
Replit provides a tool to easily search and install dependencies into your application:
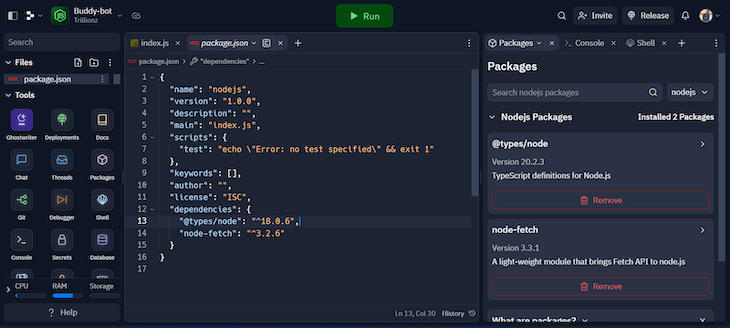
All you have to do is search for a package name from npm and install it, and it will be a dependency in your app. Alternatively, you could use a Shell command in the terminal and install your dependencies traditionally.
The traditional way of staging and making commits to Git is by using the terminal. However, you can use also Replit’s interactive interface to perform Git operations on your app:
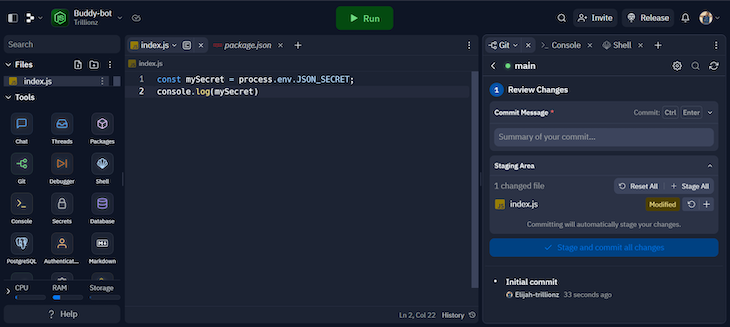
This makes using Git on your app a lot easier and faster.
Replit also provides a tool for debugging your apps through breakpoints. You can create breakpoints, and when the debugger is running, you can skip steps, move to the next breakpoint, and more:
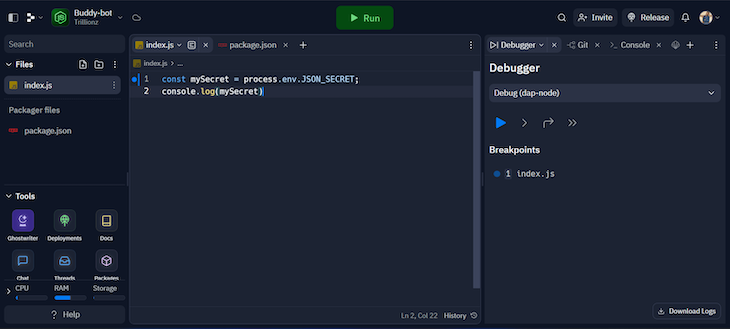
Replit provides many more tools, but you can explore them on your own — the tools we’ve covered up to this point are all you need for this tutorial. Now we are going to build and deploy our first Node.js app with Replit. Let’s get started.
For this tutorial, you need to have a Discord account as well as a Discord server. You can easily create both on Discord’s website. The bot we create will be deployed to your server, so I recommend creating a test server for the sake of this tutorial.
The first thing we need to do is head to the Discord developer dashboard:
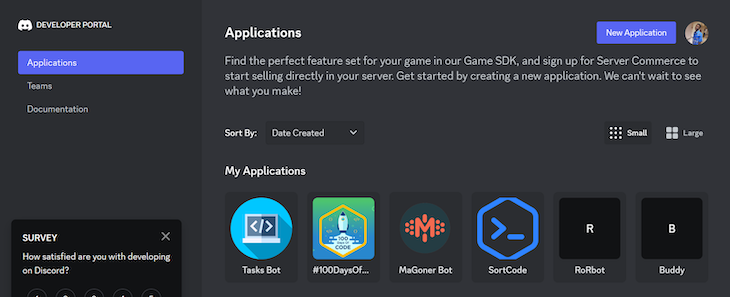
When you click the New Application button, a modal will pop up requesting a name for the application. Let’s call it “Buddy.” Click Create for Discord to take you to the new application.
On the left sidebar of the page, click OAuth > URL Generator. Here, we are going to indicate the kind of application we’re building — which is a bot — and assign permissions to it.
Scroll down to the Scopes section and select bot. This will generate a list of permissions for the bot. Then, scroll down to Bot Permissions and select permissions as shown in the image below:
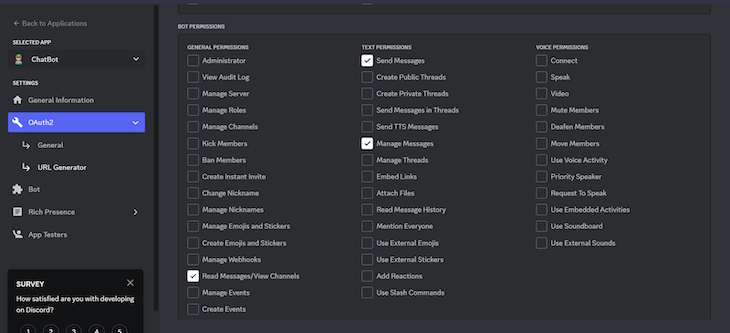
The bot is only going to send and read messages. When you scroll down after selecting the permissions, you’ll find a generated URL. Copy the URL and open it in a new tab on your browser. This is the URL you’ll use to invite the bot to your Discord server:
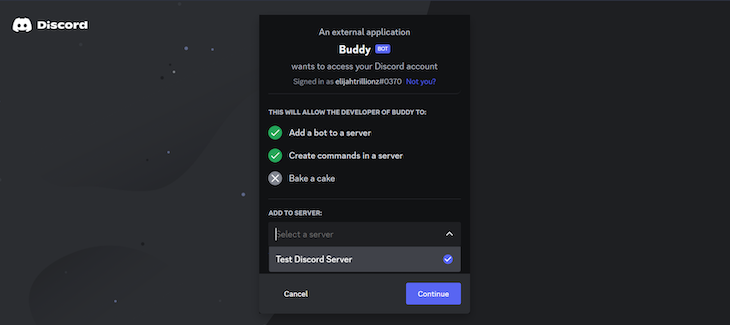
You can change the username of the bot when you head to the Bot settings in the Discord developer’s dashboard. There is just one last thing we have to do before we start programming the bot. The bot will not be able to read messages with just the permissions we specified earlier.
Discord considers reading messages by a bot to be a privileged permission, so there is more we need to do. Head to Bot and scroll down to Message Content Intent to enable the permission.
When you go to the server where the bot is, you’ll discover that it is offline. This is because we haven’t activated the bot yet — that’s what we will be doing in this section.
Now, let’s go back to Replit, where we will install the packages we need for this tutorial. In the terminal, run the following commands:
npm install discord.js express
npm install -D nodemon
discord.js is the library we will use to connect with the Discord API. We will use express to create a simple web page. nodemon will restart the application whenever we make changes to it.
During development, we will not be using Replit’s Run command. Instead, we will use the terminal to run the application. So, head up to package.json and change the scripts to the following:
"scripts": {
    "start": "node index",
    "app": "nodemon index"
  }
Now let’s get our bot’s token. Go back to the Discord developer dashboard and click the Bot menu. If there isn’t a token under the username of your bot, click Reset token and copy the new token.
In Replit, paste the copied token as an environment variable as referenced before in the section on using Secrets in Replit. We will call it DISCORD_TOKEN. When done, reload the page.
Now create a new file called intents.js, and paste the following:
const { GatewayIntentBits } = require('discord.js');
const { Guilds, GuildMessages, MessageContent } = GatewayIntentBits;
module.exports = [Guilds, GuildMessages, MessageContent];
With the code above, we are specifying what the bot will be doing and what it will have access to. Now paste the following in the index.js file:
const { Client, Partials } = require('discord.js');
const botIntents = require('./intents');
const express = require('express');
const app = express();

app.all('/', (req, res) => {
  res.send('Bot is running');
});
const client = new Client({
  intents: botIntents,
  partials: [Partials.Channel],
});

client.on('ready', () => {
  console.log('Logged in as ' + client.user.tag);
});

client.on('messageCreate', (msg) => {
  if (msg.author.bot) return; // ignore if msg is from bot
  if (!msg.content.startsWith('!')) return; // ignore if msg doesn't start with !

  if (msg.content === '!say-hello') {
    return msg.reply(`Hello ${msg.author.username}`);
  } else if (msg.content === '!tell-a-joke') {
    return msg.reply("JavaScript isn't funny");
  }
});

client.login(process.env.DISCORD_TOKEN);
app.listen(process.env.PORT || 5000, () =>
  console.log('app is running on port 5000')
);
In the code above, we used Express to create a simple Node.js server. We will need this to host the Discord bot. Our bot is only going to respond to two commands — !say-hello and !tell-a-joke. To run the application in the terminal, run npm run app. Your app should be up and running.
Now if you go to your Discord server, your bot should be online and responding to the recognized commands. If you stop the server, the bot will go offline.
The bot will go offline if you close your browser or switch off your system. But we want the bot to be online all the time, so now we have to deploy the app.
Unlike Legacy Hosting, where you deploy using Replit’s new deployments feature, your app is deployed to a <app-name>.replit.app URL.
At the top right of the Replit editor, click Release and select Deploy. When selected you will be prompted to choose a plan:
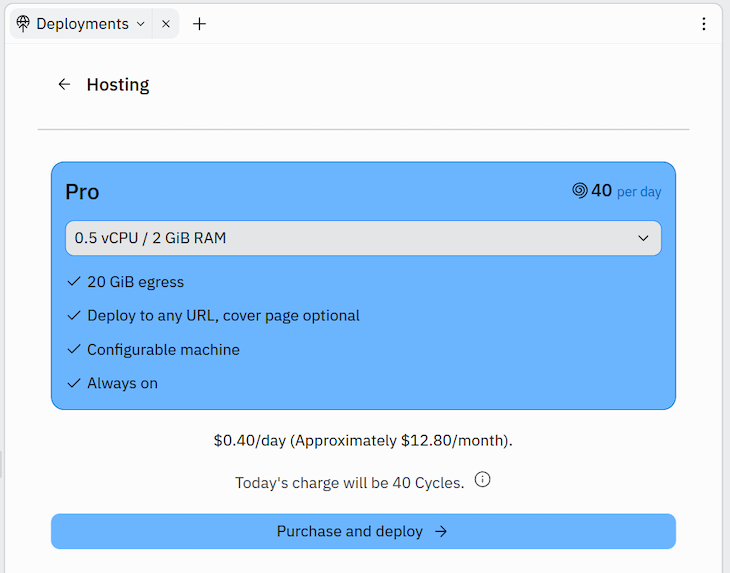
After selecting a plan, you will be required to provide some setup information for the deployment. This includes your preferred name for the app’s domain. Most importantly, you’ll need to add a DISCORD_TOKEN environment variable. Once you’ve done so, click Deploy, and you’re good to go.
Now if you don’t want to pay for deployment just yet, you can actually use the URL provided through Legacy Hosting to keep the app awake instead.
When you click the Run button on Replit, it will run your application. However, that alone cannot stop your app from sleeping.
As mentioned before, Replit’s Legacy Hosting feature has an “Always on” feature that keeps your app awake when you run the app. The catch is that the “Always on” feature also costs money.
Alternatively, you can use a tool that will keep making requests to your app. This way, inactivity will not shut it down. A very common tool used for this is UptimeRobot, which you can also use to do a health check in your Node.js application.
UptimeRobot continually checks that a specified page of your app is running. This means it sends requests to your app every now and then, which is exactly what we want to keep our app awake and our bot always online.
Simply navigate to UptimeRobot, create an account if you haven’t already, and add a new monitor. This will prompt you for information on the monitor.
Select HTTP(s) as the monitor type and give it a name. Then, copy the URL from Replit’s WebView and paste it as the URL for your UptimeRobot monitor:
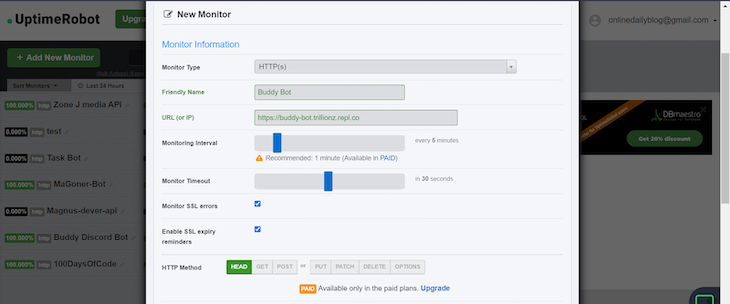
Change the Monitoring Interval to every five minutes as shown in the image above. Then, click the Create monitor button. Now, if you close your browser or shut your system down, the bot will still be online and functional.
The steps we’ve covered so far are the same steps you would need to take when deploying web apps in Replit. In the next section, we will take a look at how to create a to-do application using Replit by cloning an existing GitHub repo.
Generating a Node.js project is not the only way to use Replit for your projects. You can also import repositories from GitHub into a Repl.
So, for example, let’s say you have a project you’ve already been working on using some other IDE. To migrate the project to Replit, you’d just import the code from GitHub, and then you’d be good to go.
In this section, we will be building a to-do app — or, at least, we’re going to clone the to-do app’s GitHub repo as a template. Before we get started, you can check out a demo of the app, which is a React project created with Vite.
The app is fully functional, but you can clone it into a Repl and add more features to it with Replit. Let’s see how that works.
At the left sidebar in your Replit dashboard, click the Create Repl button. This will prompt you to select the template for your new project, but instead, click Import from GitHub at the top right of the modal. Then, input the following in the GitHub URL field:
https://github.com/Elijah-trillionz/my-todo-app
Click the Import from GitHub button and wait. Importing the repo will take a few minutes, after which the Replit editor will display something like this:
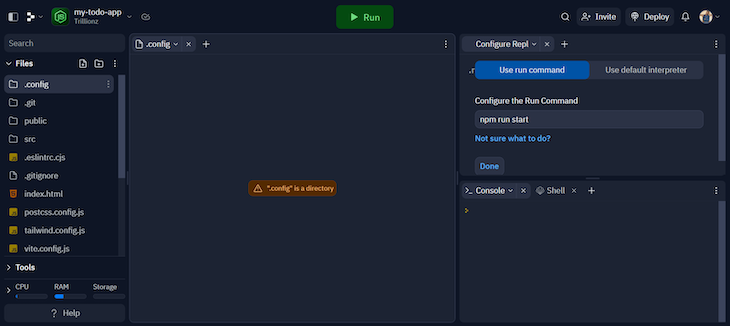
At this point, your Replit layout may not appear exactly as shown in the image above. However, the Configure Repl option on the right will always come up for any Repl imported from GitHub, prompting you to configure the run command.
The default run command from Replit is npm run start, but this isn’t the same as the to-do project. Replace npm run start with npm run dev and click Done.
Now, if you click the Run button, it will install the app’s dependencies and run the app with the command we just configured:
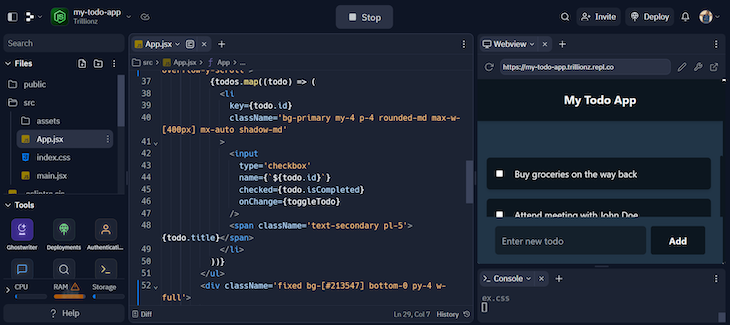
From here on, you can add more Replit features, such as multiple themes. You can also deploy the app using either Legacy Hosting or the “Always on” feature from Replit, or the “Always on” workaround with UptimeRobot as we covered in the Discord bot example.
We’ve seen how useful Replit can be for building and deploying Node.js apps, whether client-side (e.g., with React) or server-side (e.g., with Express). Online IDEs have also proven to be a great tool for real-time collaboration and Replit provides the necessary tools to make this smooth.
We’ve also seen how deploying a Node.js app on Replit doesn’t necessarily require you to build the app first on Replit. Instead, we can import code from GitHub as a template for our new Repl, as we saw in our to-do app example.
With that, we can call this article a wrap. Thanks for reading, and happy hacking.
 Monitor failed and slow network requests in production
Deploying a Node-based web app or website is the easy part. Making sure your Node instance continues to serve resources to your app is where things get tougher. If you’re interested in ensuring requests to the backend or third-party services are successful, try LogRocket.

LogRocket lets you replay user sessions, eliminating guesswork around why bugs happen by showing exactly what users experienced. It captures console logs, errors, network requests, and pixel-perfect DOM recordings — compatible with all frameworks.
LogRocket's Galileo AI watches sessions for you, instantly identifying and explaining user struggles with automated monitoring of your entire product experience.
LogRocket instruments your app to record baseline performance timings such as page load time, time to first byte, slow network requests, and also logs Redux, NgRx, and Vuex actions/state. Start monitoring for free.

@container scroll-state: Replace JS scroll listeners nowCSS @container scroll-state lets you build sticky headers, snapping carousels, and scroll indicators without JavaScript. Here’s how to replace scroll listeners with clean, declarative state queries.

Explore 10 Web APIs that replace common JavaScript libraries and reduce npm dependencies, bundle size, and performance overhead.

Russ Miles, a software development expert and educator, joins the show to unpack why “developer productivity” platforms so often disappoint.

Discover what’s new in The Replay, LogRocket’s newsletter for dev and engineering leaders, in the February 18th issue.
Would you be interested in joining LogRocket's developer community?
Join LogRocket’s Content Advisory Board. You’ll help inform the type of content we create and get access to exclusive meetups, social accreditation, and swag.
Sign up now