Most smartphones today already come with an accelerometer, gyroscope, magnetometer, and barometer. These components are used to help determine the user’s location, how fast they’re moving, and other such data usually used by health and map apps.

In this tutorial, we’ll see a practical example of how we can use devices’ accelerometer data. Specifically, we’ll be creating a car racing game in which the user can drive the car sideways by tilting their device to the left or to the right.
If you want to follow along, it’s important to have the following:
As mentioned earlier, we’ll be creating a car racing game. The main objective of the game is to avoid cars that are going in the opposite direction of your car. We will be implementing that through the use of the phone’s accelerometer data. Specifically, we’re using it to detect the phone’s tilt.
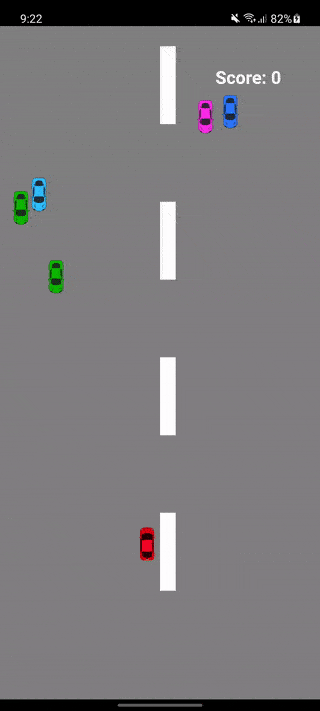
Here’s what the app will look like:
We will be using the following libraries to build the game:
The quickest way to get a demo working is by creating a new React Native project then copying all the files from the repo into your project:
npx react-native init RNSensorCarGame
Once that’s done, install all the dependencies:
cd RNSensorCarGame
npm install
Lastly, follow the installation instructions of React Native Sensors. At the time of writing, auto-linking still isn’t supported yet for this library. So you’ll have to link it manually:
react-native link react-native-sensors
For iOS, add the following to your podfile:
pod 'RNSensors', :path => '../node_modules/react-native-sensors'
Then execute the following:
cd ios && pod install
Once that’s done, you should be able to run the project:
npx react-native run-android
For iOS, it’s best to run it through Xcode.
If you got the app to run, then there’s no longer a need to follow along. If you want to learn how it’s all built, then feel free to do so.
In the App.js file, we simply render the World component where all the magic happens:
// App.js
import React from 'react';
import type {Node} from 'react';

import World from './src/World';

const App: () => Node = () => {
  return <World />;
};

export default App;
In the World.js file, we first import the libraries we need. This includes react-native-sensors, matter-js, and react-native-game-engine. random-int and sampleSize are simply helpers as you’ll see later:
// World.js
import React, {Component} from 'react';
import {StyleSheet, Text, View, Alert} from 'react-native';

import {
  accelerometer,
  setUpdateIntervalForType,
  SensorTypes,
} from 'react-native-sensors';

import Matter from 'matter-js';
import {GameEngine} from 'react-native-game-engine';

import randomInt from 'random-int';
import sampleSize from 'lodash.samplesize';
Next are the components that represent the game objects we’ll render on the screen. We’re also importing a homemade helper for generating a random decimal:
import Car from './components/Car';
import Box from './components/Box';
import Road from './components/Road';

import getRandomDecimal from './helpers/getRandomDecimal';
Next are the constant values to be used by the objects:
import {
  CAR_WIDTH,
  CAR_HEIGHT,
  MID_POINT, // position of the mid-point of the screen in the X axis
  DEVICE_HEIGHT,
  DEVICE_WIDTH,
} from './Constants';

import {OPPOSING_CAR_IMAGES} from './Images';
We also need to create the corresponding Matter.js objects. These are the actual game objects that provide functionality and can interact (or be interacted) with other objects. The Car, Box, and Road components we created earlier are simply the renderer for these objects:
import {car, floor, road} from './Objects';
Let’s quickly take a look at the code for each of the renderers. First is the Car component. We’re calculating its width and height based on the device width and height. We can’t simply use a fixed width and height because devices differ in size.
This component accepts the body and image as its parameters. These will both be passed to this component using Matter.js. You’ll see how that’s done later on when we declare the game entities in the World.js file:
// src/components/Car.js
import React from 'react';
import {Image} from 'react-native';

import {DEVICE_WIDTH, DEVICE_HEIGHT} from '../Constants';

const BODY_DIAMETER = Math.trunc(Math.max(DEVICE_WIDTH, DEVICE_HEIGHT) * 0.05);

function Car({body, image}) {
  const {position} = body;

  const x = position.x - BODY_DIAMETER / 2;
  const y = position.y - BODY_DIAMETER / 2;

  return (
    <Image
      source={image}
      resizeMode="contain"
      style={{
        width: BODY_DIAMETER,
        height: BODY_DIAMETER,
        position: 'absolute',
        left: x,
        top: y,
      }}
    />
  );
}

export default Car;
Next, we have the Box component. This is relatively simpler compared to the Car component as it only uses the View component. This component is used as the renderer for the floor object:
// src/components/Box.js
import React from 'react';
import {View} from 'react-native';

const Box = ({body, size, color}) => {
  const width = size[0];
  const height = size[1];

  const x = body.position.x;
  const y = body.position.y;

  return (
    <View
      style={{
        position: 'absolute',
        left: x,
        top: y,
        width: width,
        height: height,
        backgroundColor: color,
      }}
    />
  );
};

export default Box;
Lastly, we have the Road component. It looks similar to the Box. The only difference is that it has multiple RoadLine components as its children. They represent the white lines you see on the road. This is very important because it is what’s used to provide the illusion that the car is moving.
We’re going to animate this later on via the “systems” provided by React Native Game Engine:
// src/components/Road.js
import React from 'react';
import {View} from 'react-native';

import RoadLine from './RoadLine';

const Road = ({body, size}) => {
  const width = size[0];
  const height = size[1];

  const x = body.position.x;
  const y = body.position.y;

  return (
    <View
      style={{
        position: 'absolute',
        left: x,
        top: y,
      }}
    >
      <RoadLine width={width} height={height} top={0} />
      <RoadLine width={width} height={height} />
      <RoadLine width={width} height={height} />
      <RoadLine width={width} height={height} />
      <RoadLine width={width} height={height} />
    </View>
  );
};

export default Road;
Here’s the code for the RoadLine component:
// src/components/RoadLine.js
import React from 'react';
import {View} from 'react-native';

const RoadLine = ({width, height, top = 100}) => {
  return (
    <View
      style={{
        marginTop: top,
        width: width,
        height: height,
        backgroundColor: '#fff',
      }}
    ></View>
  );
};

export default RoadLine;
Now let’s create the Matter.js objects. These represent the objects in the real world. MatterJS allows you to create objects based on basic shapes like rectangles and circles, but you can pretty much create any shape you want.
In this tutorial, we’re only going to stick with rectangle because that’s the shape that best represents the objects that we’re trying to create.
To create a rectangular object, call the Matter.Bodies.rectangle() method. This accepts the x and y position of the object as its first and second argument, the width and height as its third and fourth arguments, and the object properties as the fifth argument. For the object properties, all we need are the following:
isStatic — setting this to true means that the object isn’t affected by the laws of physics (e.g., gravity), so in order to change its position, you need to call the setPosition() method on the body. This is false by default, so if you don’t specify this option on an object, it’s affected by the laws of physics by defaultisSensor — setting this to true means that the object will trigger a collision event when another nonstatic object collides into it by means of gravity or any other forceslabel — the human-readable label for describing the object. We will use this later on to refer to the object// src/Objects.js
import Matter from 'matter-js';
import {CAR_WIDTH, CAR_HEIGHT, DEVICE_WIDTH, DEVICE_HEIGHT} from './Constants';
import randomInt from 'random-int';
export const car = Matter.Bodies.rectangle(
0,
DEVICE_HEIGHT - 30,
CAR_WIDTH,
CAR_HEIGHT,
{
isStatic: true,
label: 'car',
},
);
export const floor = Matter.Bodies.rectangle(
DEVICE_WIDTH / 2,
DEVICE_HEIGHT,
DEVICE_WIDTH,
10,
{
isStatic: true,
isSensor: true,
label: 'floor',
},
);
export const road = Matter.Bodies.rectangle(DEVICE_WIDTH / 2, 100, 20, 100, {
isStatic: true,
isSensor: false,
label: 'road',
});
Now let’s go back to World.js. To start listening for the accelerometer changes, call the setUpdateIntervalForType() method provided by the react-native-sensors library. This accepts the sensor you want to listen to, and the interval in milliseconds.
We’ve set 15 so it will only fire off the function for getting the current accelerometer data every 15 milliseconds. You can adjust this accordingly to save battery life:
// ..
import getRandomDecimal from './helpers/getRandomDecimal';

// add this
setUpdateIntervalForType(SensorTypes.accelerometer, 15);
Next, create the component and set the initial state.
We’re using a class-based component instead of a function-based one because we need to create objects that are local to the class. We can’t really do that in a functional component since we’ll be limited to using the state. Matter.js objects can’t really live within the state:
export default class World extends Component {

  state = {
    x: 0, // initial x position of the player's car
    y: DEVICE_HEIGHT - 200, // initial y position of the player's car
    isGameSetup: false, // if the world has been setup
    isGamePaused: false, // if the game is currently paused
    score: 0, // the current player score
  };

}
In the constructor, we need to do three things:
entities object. This is what we need to pass to the React Native Game Engine laterconstructor(props) {
super(props);
this.opposing_cars = [];
const {engine, world} = this.addObjectsToWorld(car);
this.entities = this.getEntities(engine, world, car, road);
// next: add code for customizing game physics
}
// last: add componentDidMount
Next, still inside the constructor(), we declare the game physics. This is one of the systems that runs the game. This is the function that gets called for every tick of the game.
Here, we’re specifying the gravity for the y axis. Setting it to 0.5 means that the objects will fall at that rate. So the opposing cars will actually be falling from their initial position because of the gravity:
this.physics = (entities, {time}) => {
  let engine = entities['physics'].engine;
  engine.world.gravity.y = 0.5;
  Matter.Engine.update(engine, time.delta);
  return entities;
};

// next: add code for road animation
Next, we have another system. Its main responsibility is to change the road’s position by 1 point for every tick of the game’s clock. We add 1 to the road’s y position to make it look like the car is moving. And once it reaches a fifth of the device’s height, we reset it back to its original position to make it go on forever:
this.roadTranslation = (entities, {time}) => {
  if (!this.state.isGamePaused) {
    Matter.Body.setPosition(road, {
      x: road.position.x,
      y: road.position.y + 1,
    });

    if (road.position.y >= DEVICE_HEIGHT / 5) {
      Matter.Body.setPosition(road, {
        x: road.position.x,
        y: 0,
      });
    }
  }
  return entities;
};

// next: add code for setting up collision handler
Lastly, set up the collision handler:
this.setupCollisionHandler(engine);
Now we go outside the constructor and listen for when the component is mounted. This is where we initialize the player car’s position and subscribe to the accelerometer data.
The player’s car is constrained to only move sideways to avoid the opposing cars. That’s why we’re only getting the data for the x axis and then using that to update the state.
This is also where we update isGameSetup to true since everything that’s needed for the game to work has been initialized at this point:
componentDidMount() {
  // initialize car position
  Matter.Body.setPosition(car, {
    x: DEVICE_WIDTH / 2,
    y: DEVICE_HEIGHT - 200,
  });

  this.accelerometer = accelerometer.subscribe(({x}) => {
    if (!this.state.isGamePaused) {
      Matter.Body.setPosition(car, {
        x: this.state.x + x,
        y: DEVICE_HEIGHT - 200,
      });

      // next: add code for detecting if car goes out of bounds
    }
  });

  // start the game
  this.setState({
    isGameSetup: true,
  });
}

// last: add componentWillUnmount
The player’s car will move outside the bounds of the device’s screen if the user tilts it long enough to one side. We don’t really want that to happen, so we need to put something in place to prevent this.
In our case, we simply keep track of it using the state. We execute a function every time the state is updated. This will check if it’s less than zero or greater than the device width. Both of which means that the player’s car has veered off to the side of the road. When that happens, we finish the current game and reset the car back to its initial position:
this.setState(
  state => ({
    x: x + state.x,
  }),
  () => {
    if (this.state.x < 0 || this.state.x > DEVICE_WIDTH) {
      Matter.Body.setPosition(car, {
        x: MID_POINT,
        y: DEVICE_HEIGHT - 30,
      });

      this.setState({
        x: MID_POINT,
      });

      this.gameOver('You hit the side of the road!');
    }
  },
);
We also need to clean up after ourselves when the component is about to be unmounted. In this case, we stop the app’s interaction with accelerometer:
componentWillUnmount() {
  if (this.accelerometer) {
    this.accelerometer.stop();
  }
}

// next: add objects to world
Next, we now proceed with the function body of the functions we called earlier in the constructor. First is addObjectsToWorld(). This is where we create the physics engine by calling Matter.Engine.create(). enableSleeping makes the engine stop updating and detecting collisions on objects that have come to rest (e.g., by being stopped by another object after a collision).
After that, we construct an array containing the objects we want to add to the world. This includes the road, the player’s car, the floor, and the opposing cars. The opposing cars have a random x position, but their y position is always at the top of the screen. We’re also setting the frictionAir, which is simply the air resistance of the object. The higher the value, the faster the object will travel through space:
addObjectsToWorld = car => {
  const engine = Matter.Engine.create({enableSleeping: false});
  const world = engine.world;

  let objects = [road, car, floor];

  for (let x = 0; x <= 4; x++) {
    const opposing_cars = Matter.Bodies.rectangle(
      randomInt(1, DEVICE_WIDTH - 10),
      0,
      CAR_WIDTH,
      CAR_HEIGHT,
      {
        frictionAir: getRandomDecimal(0.05, 0.25),
        label: 'opposing_car',
      },
    );

    this.opposing_cars.push(opposing_cars);
  }

  objects = objects.concat(this.opposing_cars);

  Matter.World.add(world, objects);

  return {
    engine,
    world,
  };
};

// next: add code for getEntities()
Next, we have the getEntities() function, which is what returns the object you see on the screen. Each entity is composed of both the Matter.js body and the renderer. Everything else that you pass to it is basically passed as a prop to the renderer as you’ve seen earlier. This includes things like the size, image, and color:
getEntities = (engine, world, car, road) => {
  const entities = {
    physics: {
      engine,
      world,
    },

    theRoad: {
      body: road,
      size: [20, 100],
      renderer: Road,
    },

    playerCar: {
      body: car,
      size: [CAR_WIDTH, CAR_WIDTH],
      image: require('../assets/images/red-car.png'),
      renderer: Car,
    },

    gameFloor: {
      body: floor,
      size: [DEVICE_WIDTH, 10],
      color: '#414448',
      renderer: Box,
    },
  };

  // next: add code for generating entities for opposing cars

  return entities;
};

// last: add setupCollisionHandler()
Here’s the code for generating entities for opposing cars. This selects random images using the sampleSize() function and then uses those as images for each of the entities:
// get unique items from array
const selected_car_images = sampleSize(OPPOSING_CAR_IMAGES, 5);

for (let x = 0; x <= 4; x++) {
  Object.assign(entities, {
    ['opposing_car' + x]: {
      body: this.opposing_cars[x],
      size: [CAR_WIDTH, CAR_HEIGHT],
      image: selected_car_images[x],
      renderer: Car,
    },
  });
}
Next is the second system (first one being the road translator) we need to pass to React Native Game Engine: the collision handler. The collision handler has two purposes:
setupCollisionHandler = engine => {
  Matter.Events.on(engine, 'collisionStart', event => {
    var pairs = event.pairs;

    var objA = pairs[0].bodyA.label;
    var objB = pairs[0].bodyB.label;

    if (objA === 'floor' && objB === 'opposing_car') {
      Matter.Body.setPosition(pairs[0].bodyB, {
        // set new initial position for the block
        x: randomInt(20, DEVICE_WIDTH - 20),
        y: 0,
      });

      this.setState(state => ({
        score: state.score + 1,
      }));
    }

    if (objA === 'car' && objB === 'opposing_car') {
      this.gameOver('You bumped to another car!');
    }
  });
};
Here’s the gameOver() function. All it does is set all opposing cars to a static body. They’ll basically be suspended in midair when this happens. The game is also paused while waiting for the user’s input on whether to continue playing the game or not.
If the user cancels, then the app stops listening for the changes in accelerometer data. If they decide to continue, the game will simply start over:
gameOver = msg => {
  this.opposing_cars.forEach(item => {
    Matter.Body.set(item, {
      isStatic: true,
    });
  });

  this.setState({
    isGamePaused: true,
  });

  Alert.alert(`Game Over, ${msg}`, 'Want to play again?', [
    {
      text: 'Cancel',
      onPress: () => {
        this.accelerometer.unsubscribe();
        Alert.alert(
          'Bye!',
          'Just relaunch the app if you want to play again.',
        );
      },
    },
    {
      text: 'OK',
      onPress: () => {
        this.resetGame();
      },
    },
  ]);
};

// next: add resetGame()
Here’s the function for starting over:
resetGame = () => {
  this.setState({
    isGamePaused: false,
  });

  this.opposing_cars.forEach(item => {
    // loop through all the blocks
    Matter.Body.set(item, {
      isStatic: false, // make the block susceptible to gravity again
    });
    Matter.Body.setPosition(item, {
      // set new position for the block
      x: randomInt(20, DEVICE_WIDTH - 20),
      y: 0,
    });
  });

  this.setState({
    score: 0, // reset the player score
  });
};
Lastly, we have the render() function, where we use the GameEngine component provided by React Native Game Engine to bring everything together. It’s responsible for rendering all the entities and running all the systems simultaneously. Inside it, all we have is the score container since its not really something that interacts with the game entities directly:
render() {
  const {isGameSetup, score} = this.state;

  if (isGameSetup) {
    return (
      <GameEngine
        style={styles.container}
        systems={[this.physics, this.roadTranslation]}
        entities={this.entities}
      >
        <View style={styles.infoWrapper}>
          <View style={styles.scoreContainer}>
            <Text style={styles.scoreText}>Score: {score}</Text>
          </View>
        </View>
      </GameEngine>
    );
  }

  return (
    <View style={styles.centered}>
      <Text style={styles.text}>Something isn't right..</Text>
    </View>
  );
}
You can view the styles and any other nonvital code in the GitHub repo.
At this point, you can now play the game:
npx react-native run-android
If you’re on Mac, simply start the app from Xcode.
That’s it! In this tutorial, you learned how to use your phone’s accelerometer data to move an object on the screen. Along the way, you also learned how to use the React Native Game Engine and Matter.js to create a game.
You can view the app’s source code on its GitHub repo.

LogRocket's Galileo AI watches sessions for you and and surfaces the technical and usability issues holding back your React Native apps.
LogRocket also helps you increase conversion rates and product usage by showing you exactly how users are interacting with your app. LogRocket's product analytics features surface the reasons why users don't complete a particular flow or don't adopt a new feature.
Start proactively monitoring your React Native apps — try LogRocket for free.
Hey there, want to help make our blog better?
Join LogRocket’s Content Advisory Board. You’ll help inform the type of content we create and get access to exclusive meetups, social accreditation, and swag.
Sign up now
Not sure if low-code is right for your next project? This guide breaks down when to use it, when to avoid it, and how to make the right call.

Compare Firebase Studio, Lovable, and Replit for AI-powered app building. Find the best tool for your project needs.

Discover how to use Gemini CLI, Google’s new open-source AI agent that brings Gemini directly to your terminal.

This article explores several proven patterns for writing safer, cleaner, and more readable code in React and TypeScript.


