Editor’s note: This post was last reviewed and updated on 8 October 2024.

Prettier and ESLint are code formatting and linting tools, respectively, that can be used together to improve overall code quality and streamline the development process. Linting and pretty printing JavaScript code can:
However, when using a formatter for pretty printing and a linter together, there can be some friction. For example, the formatter might do something that the linter deems problematic. The linter can then overwrite style changes from the formatter, causing the two to pull in different directions. To use these tools together successfully, developers must get them on the same page.
Read on to explore how to use Prettier and ESLint together, and the reason why you should use Prettier if ESLint can already format. We’ll guide you through setting up both tools and using them together, both on the command line and in Visual Studio Code (VS Code), to automatically fix and format code.
The Replay is a weekly newsletter for dev and engineering leaders.
Delivered once a week, it's your curated guide to the most important conversations around frontend dev, emerging AI tools, and the state of modern software.
Prettier is an opinionated code formatter for JavaScript and other popular languages. Prettier enforces a consistent format by parsing code and reprinting it with its own rules that take the maximum line length into account, wrapping code when necessary.
This reprinting/rewriting process prevents developers from introducing any formatting mistakes. The primary reason Prettier was created was to eliminate debates over code styles. The idea is that Prettier’s style guide is fully automatic. Even if Prettier does not format your code 100% the way you like, it’s worth the sacrifice for the simplicity of the approach.
While a big reason to use Prettier is to avoid configuration altogether, Prettier does support a configuration file that has a handful of formatting options.
ESLint is a JavaScript linting utility that was first released in June 2013 and is now by far the number one linting utility. Linting is a type of static analysis that finds problematic patterns and codes that don’t adhere to style guidelines.
Because JavaScript is a dynamic and loosely typed language, it is especially prone to developer errors. Without the benefit of a compilation process, JavaScript code typically executes to find syntax or other errors.
However, ESLint enables developers to discover problems with their code without actually executing their code. The primary reason ESLint was created was to allow developers to create their own linting rules. ESLint has built-in rules that make it useful from the start, but you can add rules specific to your project and whatever flavor of JavaScript you use.
Many people have done the heavy lifting for you by creating shareable configs, which have rulesets for popular JavaScript frameworks and common style guides/coding standards such as Google’s JavaScript Style Guide.
You can find some of these shared configs on npmjs.com by searching for “eslint-config” (the naming convention for shared configs).
ESLint also has a pluggable architecture that allows you to create plugins, which can add extra capabilities to ESLint and give a new baseline to add your own custom rules. An example of this is eslint-plugin-vue, which is the official plugin for Vue.js. This plugin allows us to lint the <template> and <script> sections of .vue files, as well as Vue code contained in .js files.
In a dedicated ESLint configuration file, you can manage the rules your project uses and disable any you don’t wish to use. ESLint allows rules to be set as errors or warnings and some errors can be automatically fixed.
While ESLint can handle some formatting tasks, Prettier offers several advantages that make it a valuable addition to the development workflow.
Prettier enforces a consistent code style across your entire codebase. This consistency is especially useful in large projects with multiple contributors. Prettier focuses solely on code formatting, making it easier to set up and use when compared to ESLint, which has a broader range of functionality, including code linting and style checking.
So, why are there any options at all? It is mostly due to historical reasons. A few were added during Prettier’s infancy to entice more people into using it, a couple of options were added due to demand, and some rules were added for compatibility reasons.
The bottom line is that the development team intends to never add any more options; you can read more about this in Prettier’s Option Philosophy.
| ESLint | Prettier | |
| Reports code errors | Yes | No |
| Automatically fixes code errors | Yes | No |
| Formats code | Yes | Yes |
| Offer configuration options | Yes | Limited |
| Adds custom rules/options | Yes | No |
In a nutshell, you’d use Prettier to simplify the formatting of your code and ESLint for catching bugs.
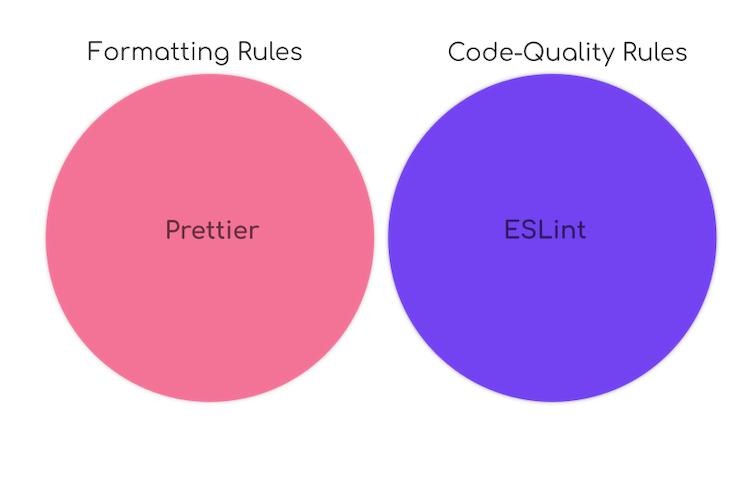
There are two broad categories of linting rules: formatting rules and code-quality rules. Formatting rules are the rules that affect the style of the code and are not concerned with bugs. For example, the no-mixed-spaces-and-tabs rule in ESLint ensures that only tabs or spaces are used for indentation. Prettier has a tabs option for the same thing.
Secondly, the code-quality rules improve code quality and can prevent or catch bugs. For example, the ESLint rule no-implicit-globals disallows global scope variables.
Name collisions can occur with global variables created from other scripts, which usually leads to runtime errors or unexpected behavior:
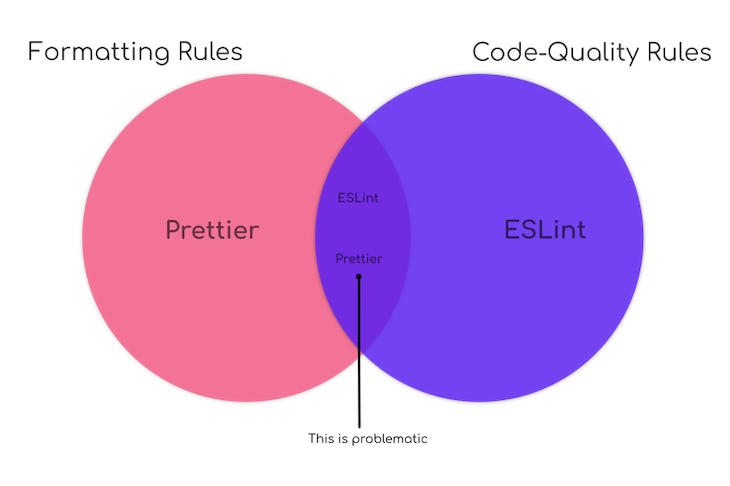
The problem is that the rules of Prettier and ESLint overlap, and we’d prefer that they didn’t! Generally, we want Prettier to handle the first category and ESLint to handle the second. Some rules may be difficult to categorize as one or the other — we don’t need to be pedantic about which category they fit into. Our interest is in ensuring that either Prettier or ESLint perform a particular action and do not bump into one another:
As for the order to run them in, it is generally best to run Prettier before ESLint because Prettier reprints your entire program from scratch. So, if you want to let ESLint in on the formatting act, you should run it after Prettier to prevent the changes from being overwritten.
If you’re not familiar with ESLint and Prettier, the next section will cover how you can configure and use them.
Both ESLint and Prettier are available to download from npm and Yarn. For every project, you must create a package.json and add them as devDependencies:
npm install --save-dev eslint
npm install --save-dev --save-exact prettier
ESLint starts as a blank slate. It won’t do anything until you create a configuration with some rules. You must put the configuration file, .eslintrc.{js,yml,json}, into the project directory and you’ll be ready to lint.
You can create the configuration on the command line with the following commands:
npm init @eslint/config

# or

yarn create @eslint/config
Note that npm init @eslint/config assumes you have a package.json file already. If you don’t, you can run npm init or yarn init to create one.
This command will lead to a wizard with a series of questions to establish what it is you want to lint, such as module type, the framework used, where your code runs, and so on. It will spit out a configuration file and install any related dependencies for you.
If you just want to use the built-in recommended rules, you can simply add eslint.json like so:
{
    "extends": "eslint:recommended"
}
With a configuration in place, you can run ESLint on any file or directory. For example, here I am linting my src directory:
npx eslint src

# or

yarn run eslint src
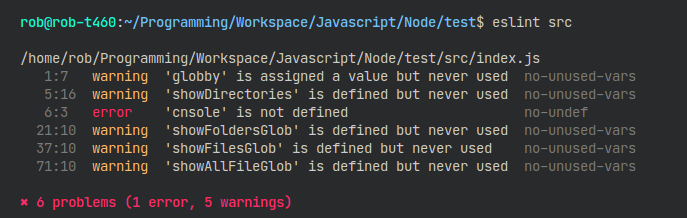
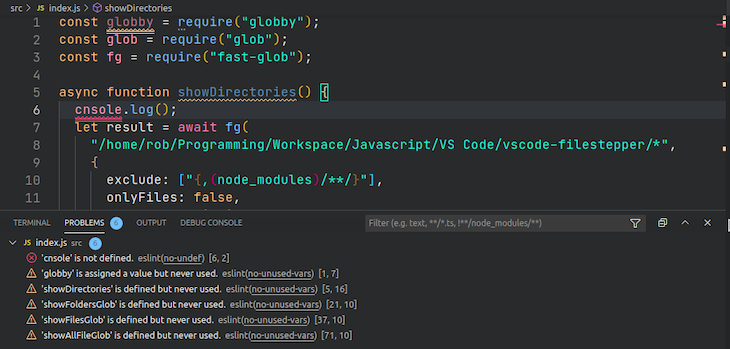
As you can see in the image above, ESLint outputs a list of problems with the details: location of the error (formatted as <line number: character number>), type (error or warning), description, and rule name. You can read ESLint’s Getting Started Guide for more details.
You can also set up a global configuration, but ESLint has deprecated it (and discourages it). I still use a global configuration. 🤫
On the other hand, Prettier has a default configuration. It can run without creating a configuration file, so you can begin using it immediately. The recommendation is to use a specific version of Prettier on big projects, otherwise, updates may cause changes to files and add noise to your Git commits.
You should also use a .prettierignore file to ignore things that should not be formatted. You can read Prettier’s installation guide for more information:
![]()
A typical package.json will look something like the following. Here, we target the files in the src and test folders for the npm scripts.
I prefer to skip .eslintignore and .prettierignore files if possible — simple is better! 😅
{
  "name": "basic-project",
  "version": "1.0.0",
  "main": "index.js",
  "scripts": {
    "lint": "npx eslint src test",
    "lint:fix": "npm run lint -- --fix",
    "prettier": "npx prettier src test --check",
    "prettier:fix": "npm run prettier -- --write",
  },
  "author": "rob o'leary",
  "license": "ISC",
  "devDependencies": {
    "eslint": "^7.25.0",
    "prettier": "^2.2.1"
  }
}
This method is the cleanest, most efficient, and the most recommended.
It’s easy to turn off rules that conflict with Prettier in ESLint by using the following configs:
eslint-config-prettier for JavaScripttslint-config-prettier for TypeScriptFirst, install the config for JavaScript:
npm install --save-dev eslint-config-prettier
Then, append that config name to the extends array in your local .stylelintrc.* ESLint config file. Make sure to put the Prettier config last so it overrides the settings from other configs.
Here is an example .eslintrc.json:
{
  // ...
  extends: [
    // ...
    'eslint:recommended',
    "prettier" // Make sure this is the last
  ],
  // ...
}
Now, you can run Prettier and ESLint together without any side effects. You can also run Prettier and ESLint one after another like on the command line by defining them as npm scripts. Here is how that looks in a package.json:
{
   "name": "no-worries-setup",
   "version": "1.0.0",
   "scripts": {
    "lint": "npx eslint src test",
    "lint:fix": "npm run lint -- --fix",
    "prettier": "npx prettier src test --check",
    "prettier:fix": "npm run prettier -- --write",
    "format": "npm run prettier:fix && npm run lint:fix",
  }
  // ...
}
Now, you can run the npm run format command to format and fix all your code in one go.
All the major code editors have extensions for ESLint and Prettier. For VS Code, the official extensions are Prettier – Code formatter and ESLint:
To use with VS code, install the extensions: ESLint, Prettier, and Format Code Action, and update your user settings (settings.json) as shown below. You can access this file with the Preferences: Open User Settings (JSON) command in the Command Palette (Ctrl+Shift+P):
{
  //...
  "editor.defaultFormatter": "esbenp.prettier-vscode",
  "eslint.probe": [
      "javascript",
      "javascriptreact",
      "vue"
  ],
  "editor.formatOnSave": false,
  // Runs Prettier, then ESLint
  "editor.codeActionsOnSave": [
    "source.formatDocument",
    "source.fixAll.eslint"
  ],
  "vetur.validation.template": false
  // ...
}
Next, you need to disable the editor formatting on save (editor.formatOnSave) because we want to handle everything through code actions.
The editor.codeActionsOnSave property accepts an array of code actions, which permits ordered code actions. If we install the Format Code Action extension, we can make formatting available as a code action.
So now, we can run Prettier and ESLint as code actions in whichever order we like. Sweet!
In this example, we run Prettier first with the action source.formatDocument (it uses the default formatter), and then we run eslint --fix with the source.fixAll.eslint action.
The eslint.probe property targets the languages that ESLint should validate. You can use eslint.validate if you want to see pop-up messages instead.
If you use the Vetur extension, ensure it does not do its own validation. There is a setting vetur.validation.template, which you should not enable.
Prettier does not have a specific configuration option for maximum line length. Instead, it formats the code according to its own rules. However, you can indirectly control line length by setting the printWidth option in your Prettier configuration file (.prettierrc or prettier.config.js).
For example, to limit the line length to 100 characters, you can add the following to your .prettierrc file:
{
 "printWidth": 100
}
To disable Prettier in VS Code for a specific language, you can use the prettier.disableLanguages setting in your VS Code settings (.vscode/settings.json).
For example, to disable Prettier for JavaScript files, add the following to your settings.json file:
"prettier.disableLanguages": ["javascript"]
You can also disable Prettier globally by setting "prettier.enable": false in your VS Code settings.
ESLint does not directly control indentation, but it can work alongside Prettier to enforce consistent indentation. To configure ESLint’s indentation settings, you can use the indent rule in your ESLint configuration file (.eslintrc or .eslintrc.json).
For example, to enforce double-space indentation, add the following to your ESLint configuration file:
{
 "rules": {
   "indent": ["error", 2]
 }
}
The following applications offer a unified way to run prettier followed immediately by eslint --fix on files:
prettier-eslint for JavaScriptprettier-tslint for TypeScriptFirst, install the package. This is just for JavaScript:
npm install --save-dev prettier-eslint
Next, write your own implementation to target your files and run the formatting. Below is a basic example of formatting a string:
const format = require("prettier-eslint");

// notice, no semicolon in the original text
const sourceCode = "const {foo} = bar";

const options = {
  text: sourceCode,
  eslintConfig: {
    parserOptions: {
      ecmaVersion: 7,
    },
    rules: {
      semi: ["error", "never"],
    },
  },
  prettierOptions: {
    bracketSpacing: true,
  },
  fallbackPrettierOptions: {
    singleQuote: false,
  },
};

const formatted = format(options);

// notice no semicolon in the formatted text
formatted; // const { foo } = bar
Obviously, this method requires more work to target the files, read the content, and write the output. To use in VS Code, you can install and use the Prettier ESLint extension.
This is generally not recommended because:
You can use ESLint plugins that let you run Prettier as if it is a linter rule:
eslint-plugin-prettier for JavaScripttslint-plugin-prettier for TypeScriptFirst, install the plugin. This is just for JavaScript:
npm install --save-dev eslint-plugin-prettier
Then, append the plugin(s) to the plugins array in your .stylelintrc.* file. For example, in .eslintrc.json:
{
  "plugins": ["prettier"],
  "rules": {
    "prettier/prettier": "error"
  }
}
Using Prettier and ESLint together can greatly enhance your JavaScript development workflow. Prettier focuses on maintaining a consistent code style by formatting your code, while ESLint detects and fixes code quality issues.
Although some issues can arise between the two tools, especially when their rules overlap, integrating them properly will ensure a seamless process. By configuring ESLint to avoid conflicts with Prettier and running both tools in sequence, you can enjoy the benefits of automated code formatting and error detection. This setup improves code quality and also makes it more readable and easier to maintain.
For developers wondering whether Prettier or ESLint is worth it, the combination of both in your toolkit is highly recommended.
Debugging code is always a tedious task. But the more you understand your errors, the easier it is to fix them.
LogRocket allows you to understand these errors in new and unique ways. Our frontend monitoring solution tracks user engagement with your JavaScript frontends to give you the ability to see exactly what the user did that led to an error.

LogRocket records console logs, page load times, stack traces, slow network requests/responses with headers + bodies, browser metadata, and custom logs. Understanding the impact of your JavaScript code will never be easier!

AI-generated tests can speed up React testing, but they also create hidden risks. Here’s what broke in a real app.re

Why the future of DX might come from the web platform itself, not more tools or frameworks.

A hands-on test of Claude Code Review across real PRs, breaking down what it flagged, what slipped through, and how the pipeline actually performs in practice.

CSS art once made frontend feel playful and accessible. Here’s why it faded as the web became more practical and prestige-driven.
Would you be interested in joining LogRocket's developer community?
Join LogRocket’s Content Advisory Board. You’ll help inform the type of content we create and get access to exclusive meetups, social accreditation, and swag.
Sign up now

