
Developers often encounter challenges when setting up their development environments, which can be time-consuming and hinder the process of testing changes or exploring new projects. The initial steps typically involve referring to documentation, installing dependencies, ensuring compatibility with other services, configuring IDEs, etc.

Unfortunately, this process is prone to errors and may not accurately replicate the required configuration for effective testing and contribution to a project. In this article, we’ll learn about Hocus, an application that solves this problem.
Jump ahead:
hocus.yml fileThe Replay is a weekly newsletter for dev and engineering leaders.
Delivered once a week, it's your curated guide to the most important conversations around frontend dev, emerging AI tools, and the state of modern software.
Hocus is a self-hosted application that quickly spins up disposable development environments on your own servers. By defining your development environments as code and launching them effortlessly from your browser, Hocus provides a self-hosted alternative to popular platforms like Gitpod and GitHub Codespaces.
A remarkable aspect of Hocus is its seamless integration with various Git providers using the SSH protocol, including GitHub, GitLab, BitBucket, and Gitea. It automatically prebuilds development environments for all branches on every commit, mimicking the functionality of a robust CI system.
This feature enables your team members to code promptly with fresh, fully configured development environments. Whether you’re addressing a bug, constructing a new feature, or engaging in a code review, Hocus ensures that all your requirements are met. It also seamlessly integrates with VS Code so that you can still use your favorite IDEs.
Now, let’s review some of the key features that Hocus provides.
Hocus offers disposable development environments that are fully configured and powered by Firecracker micro VMs. These environments are defined as code, allowing for easy replication and customization.
Similar to a CI system, Hocus continuously builds your project, ensuring that you can swiftly spin up a fresh development environment in a matter of seconds. This eliminates the need to wait and allows you to focus on coding without any delays.
Collaborating with your team is simplified with Hocus’s ability to declare shared environment variables. This feature ensures consistency across the team and facilitates smooth collaboration on projects.
Seamlessly connect to Hocus workspaces via SSH directly from your local VS Code editor. This integration streamlines your development workflow by providing a familiar and powerful coding environment.
Hocus workspaces offer full root access, granting you complete control over your environment. Unlike Docker containers, these workspaces are full-fledged VMs, allowing you to leverage advanced capabilities such as Docker and nested KVM, run LocalStack, or even deploy Kubernetes.
Hocus extends its compatibility to various Git providers, including popular platforms like GitHub, GitLab, Bitbucket, Gitea, Gerrit, and more. This wide-ranging support ensures that you can seamlessly integrate Hocus into your existing development workflow.
Hocus enables the creation of multiple development environments for different projects within a single repository. This monorepo support simplifies managing and organizing your projects, providing flexibility and convenience.
The DevOps/team leads who set up Hocus for their teammates should ensure that their systems meet the following requirements:
It’s important to note that Hocus is fully containerized, meaning it won’t directly install anything on your host system.
To simplify the setup process, you can use the script provided below. Running the script will check if your system meets the requirements, prompt you to install any missing dependencies, and configure Hocus with docker-compose:
git clone https://github.com/hocus-dev/hocus.git
cd hocus
# HOCUS_HOSTNAME is the hostname of the machine where you are deploying Hocus
# If you are running Hocus locally, set it to "localhost"
# If you are running Hocus on a remote server, set it to the hostname of the server
HOCUS_HOSTNAME="localhost" ops/bin/local-up.sh
The script will bring up:
To stop Hocus, you can execute the ops/bin/local-down.sh script to halt the operation of Hocus. And to completely remove Hocus from your system, you can run the ops/bin/local-cleanup.sh script. This will eliminate all traces of Hocus from your environment.
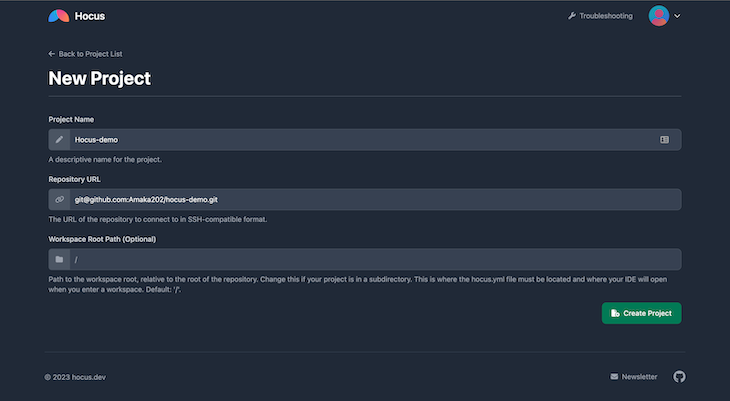
Upon launching the Hocus dashboard, you’ll be guided to create your initial project. Projects serve as the top-level entities within Hocus. They are associated with Git repositories and encompass workspaces and prebuilds.
To create a project, simply click the New Project button and fill out the input fields. You must have created a Git repository for your project. Be sure to copy the URL of your project’s Git repository in an SSH-compatible format:
Once the project is created, you’ll be directed to the project page. However, Hocus is unable to access the Git repository at this stage. While the repository may be public, GitHub restricts Hocus from cloning it over SSH until you add the project’s SSH key to the GitHub website. You have the option to add the SSH key to another repository’s deploy keys or associate it with your personal account.
Click on the project to open its details. There, you’ll see the SSH public key and instructions on how to add it to your GitHub or GitLab:
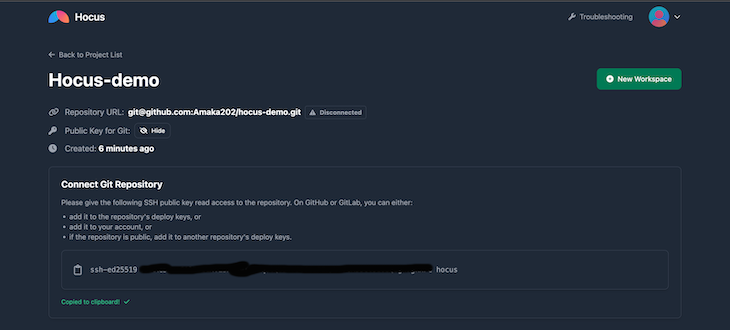
Notice that once connected successfully, the repo URL goes from “disconnected” to a green check mark. Upon successfully connecting the repository, simply refresh the page and navigate to the Prebuilds tab. If the process proceeded smoothly, you should observe an ongoing prebuild in the list:

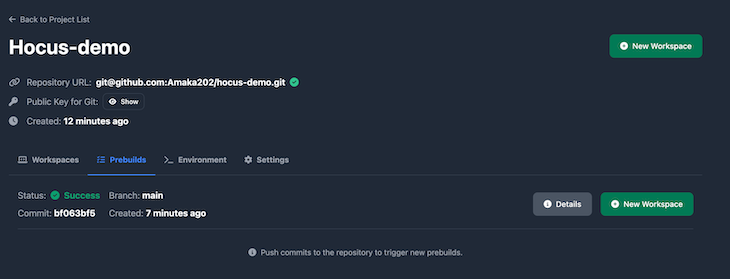
In case you encounter difficulties and require further insight into the issue, you can review the development logs by using the following command:
ops/bin/local-cmd.sh logs
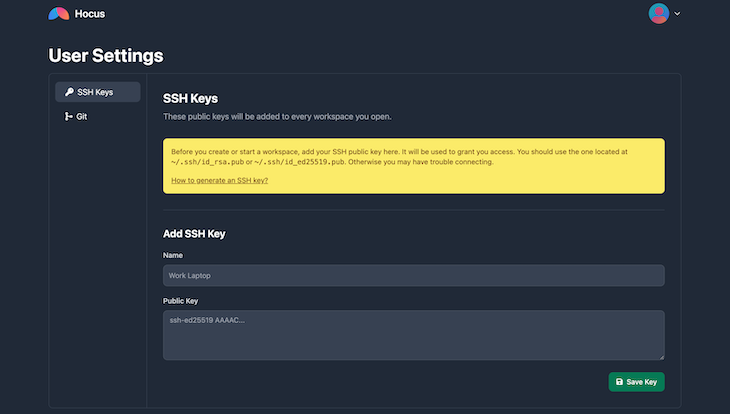
Once the prebuild process is finished, create a workspace by clicking on the New Workspace button. This action will redirect you to the SSH Keys settings page, where you can add your public key:
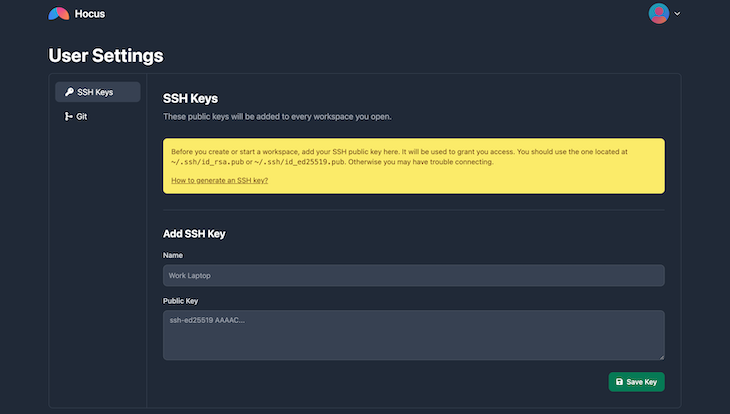
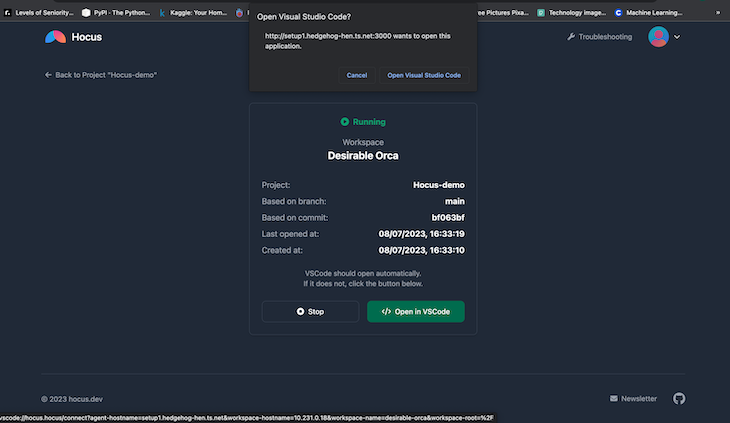
After adding the public key, try creating a workspace again and this time it should work. Once a workspace has been created and running, you will be prompted to allow Hocus to open the VS Code. This leads directly to VS Code:
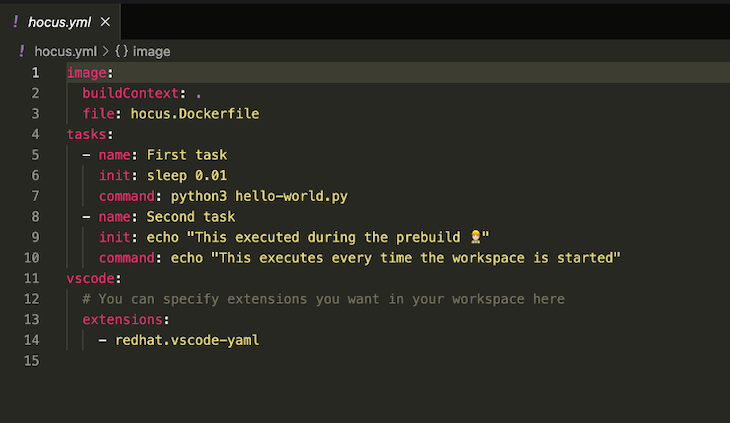
In VS Code, you will see the hocus.yml file, which serves as the configuration file for your development environment. When you open the workspace, you should see that VS Code has automatically opened two terminals for you.
If the terminals didn’t open automatically, it is likely that the Hocus extension installation failed. You can manually install the extension using its ID, which is hocus.hocus-remote:
At the time of writing this article, there are no team features — everything works on the same account. The teammates work from the account created by the DevOps team, open the workspaces in the VS Code, and contribute to the project.
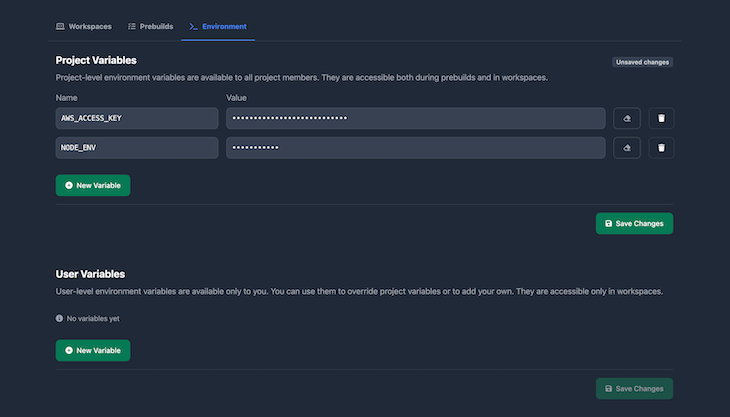
Shared environment variables can be configured within your project, providing a convenient way to set up and share variables among all team members. These variables will be accessible in both workspaces and prebuilds, ensuring consistent and accessible values throughout your development process and among teammates:
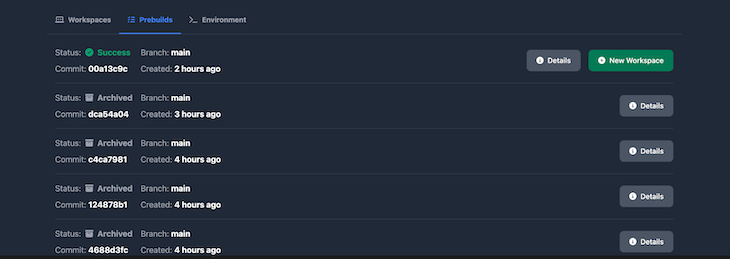
Triggered by push events to your repository, prebuilds offer an automated approach to building your project. They serve as the foundational building blocks for creating workspaces, providing a solid starting point for your development environment.
Prebuilds include the buildfs event for creating an image from a Dockerfile and the execution of prebuild tasks, all of which can be accessed in the Prebuilds tab of your project:
Prebuilds are configured in the hocus.yml file, which we’ll discuss later.
Workspaces are disposable, completely configured development environments that leverage Firecracker micro VMs. They are generated from prebuilds, and their setup is defined by a hocus.yml file located in the root directory of your project.
You can access workspaces via SSH, and you can configure the authorized_keys for these workspaces on the User Settings page. When you open a workspace through the Hocus dashboard, the Hocus VS Code extension automatically modifies your local SSH configuration and adds the connection details for the workspace:
To establish persistent Git username and email configurations, navigate to User Settings within the Hocus web dashboard:
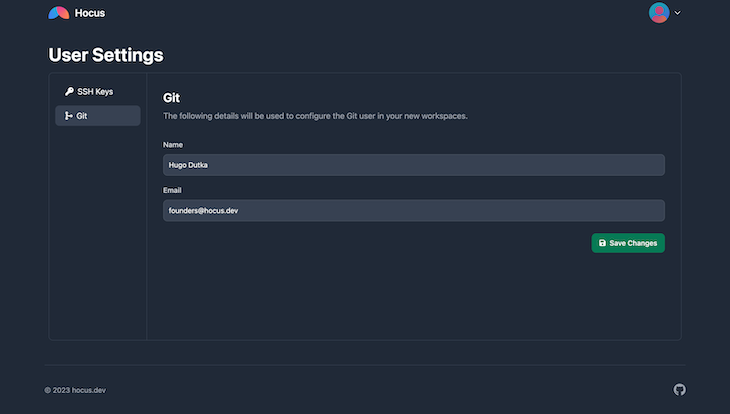
Authentication for Git is seamlessly managed through SSH Agent forwarding, which is automatically configured by the Hocus VS Code extension. This ensures that your existing local SSH keys are utilized for secure access to private Git repositories.
At the time of writing, VS Code is the only supported IDE. There are two VS Code extensions for Hocus that are conveniently installed when you open a workspace through the web dashboard. The first is Hocus, which is installed on your local machine. It modifies your SSH configuration to enable seamless connection to Hocus workspaces. Hocus also configures SSH Agent forwarding, allowing access to private Git repositories within a workspace.
The section extension is Hocus Remote, which is installed within Hocus workspaces. It installs VS Code extensions specified in the hocus.yml configuration. It also opens terminals that are associated with workspace tasks defined in the hocus.yml configuration.
hocus.yml fileThe hocus.yml file, which serves as the configuration file for your project, should be located in the root directory. Within this file, you have the flexibility to define important project settings, including the workspace image, prebuild tasks, tasks executed upon workspace initiation, and the required IDE extensions.
It’s crucial to remember that the image specified in hocus.yml should extend hocusdev/workspace. This particular image encompasses all the essential dependencies required by Hocus and is constructed based on the instructions provided in the accompanying Dockerfile:
image:
  buildContext: .
  # The Dockerfile MUST extend `hocusdev/workspace`.
  file: hocus.Dockerfile
tasks:
  - name: First task
    prebuild: echo "This executes during the prebuild"
    workspace: echo "This executes every time the workspace is started"
  - name: Second task
    prebuild: echo "This also executes during the prebuild"
    workspace: python3 hello-world.py
vscode:
  extensions:
    - redhat.vscode-yaml
Read the docs for more information on hocus.yml configuration and the schema.
Just like other ready-to-use development environments, Hocus offers developers the convenience, flexibility, scalability, and collaboration benefits of cloud-based development environments, ultimately enhancing productivity and streamlining the software development process.
I hope you enjoyed this article! Be sure to leave a comment if you have any questions. Happy coding!

@container scroll-state: Replace JS scroll listeners nowCSS @container scroll-state lets you build sticky headers, snapping carousels, and scroll indicators without JavaScript. Here’s how to replace scroll listeners with clean, declarative state queries.

Russ Miles, a software development expert and educator, joins the show to unpack why “developer productivity” platforms so often disappoint.

Discover what’s new in The Replay, LogRocket’s newsletter for dev and engineering leaders, in the February 18th issue.

Learn how to recreate Claude Skills–style workflows in GitHub Copilot using custom instruction files and smarter context management.
Hey there, want to help make our blog better?
Join LogRocket’s Content Advisory Board. You’ll help inform the type of content we create and get access to exclusive meetups, social accreditation, and swag.
Sign up now