The critical piece of any full-stack application is the connection between the frontend and backend. Generally, the communication is implemented by the client making the request to the server and the server sending back the response with the data.


This gives users the control to decide when to receive the data, but there might be specific cases where the traditional request-response approach might not be enough.
Take web apps with real-time content, like live game scores, stock prices, or notifications on Twitter, for example. In these cases, the user doesn’t control when the information is being updated, and thus, does not know when to make a request. Yet the information displayed in the app is always new and up-to-date.
The described functionality is achieved by the use of server-sent events that help developers create dynamic applications with a seamless user experience.
In this tutorial, we will explore the working principles of server-sent events by focusing on a specifically designed open source package Fetch Event Source developed by Microsoft and contributors to help developers increase the control over real-time data from the server.
Server-sent events (SSE) are one-directional events that are sent from the server to the client via the Hypertext Transfer Protocol (HTTP). The events are pushed by the server as soon as they happen, meaning the user has access to the real-time data:
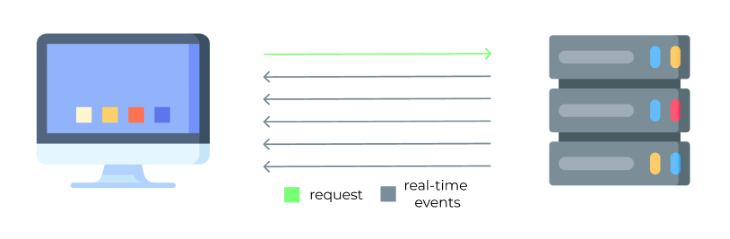
Because the user cannot directly influence the server-sent events while they are being sent, all the necessary parameters need to be sent on the connection request and processed on the server, so it knows which real-time data the user needs access to.
The traditional way to work with server-sent events is by using the EventSource API interface, which is included in the HTML WC3 specification. It offers the basis to create a connection with the server, receive the server messages, and display errors.
Unfortunately, EventSource API is a primitive interface and comes with many limitations. We will review them next and provide alternative solutions from Fetch Event Source, which allows more customization and control over making a request and getting a response.
As the name suggests, the main advantage of Fetch Event Source is the ability to use all the extended features provided by the Fetch API. This means users can send custom request methods, headers, and even bodies with specific parameters to the server. In contrast, EventSource API allowed just to send url and withCredentials properties.
When working with Fetch Event Source, the developer also has access to the response object that comes from the server. This can be useful if the user wants to have some validation for the event source. It also allows way more control over errors and retry strategies, whereas EventSource API does not provide any reliable way to have control over this.
The Fetch Event Source also supports the Page Visibility API, meaning the server-sent events will be stopped when the browser window is minimized and automatically resumed once it comes back to the viewport. This helps reduce the load on the server, which is crucial, especially if you are running multiple tasks on the server.
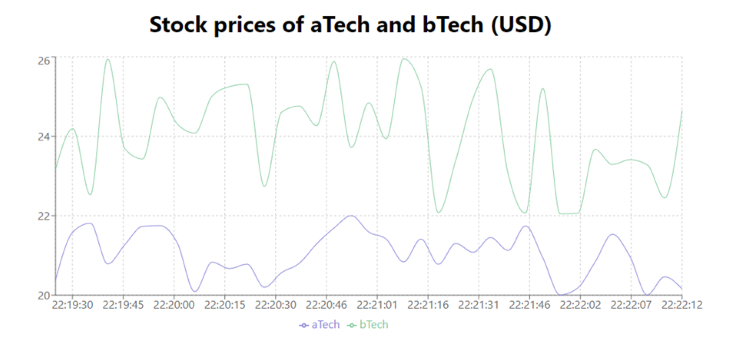
To test the features of Fetch Event Source, we will create a practical application that will simulate the stock price changes in the real-time line graph, demonstrating all of the described advantages in the practice.
Our app will consist of both the frontend and backend, so let’s create separate workspaces for the entire app to keep everything organized.
To do that, open the terminal and run the following command: mkdir sse-fetch-event-source && cd sse-fetch-event-source && mkdir frontend server. This will create a new folder sse-fetch-event-source, point the current working directory to it, and create folders frontend and server inside it.
First, let’s create a simple client-side application so we can have a user interface to display the information that we receive from the backend.
While still in the sse-fetch-event-source directory, change the directory into the frontend folder by running the command, cd frontend.
We will use Create React App, which is a utility to create a fully functional React project within a minute or less. To do that, run the following command: npx create-react-app frontend.
This will create a folder called frontend in our main workspace, consisting of all the frontend code.
Next, we will set up the Fetch Event Source package and recharts library, which will later allow us to display the data. Run the following command to install both:
npm install @microsoft/fetch-event-source recharts
Then, expand frontend in the files tree and find the src directory. In it, you will find the file App.js. Replace its content with the following code:
javascript
import { useState, useEffect } from "react";
import { fetchEventSource } from "@microsoft/fetch-event-source";
import {
  LineChart,
  Line,
  XAxis,
  YAxis,
  CartesianGrid,
  Tooltip,
  Legend,
} from "recharts";

const serverBaseURL = "http://localhost:5000";

const App = () => {
  const [data, setData] = useState([]);

  useEffect(() => {
    const fetchData = async () => {
      await fetchEventSource(`${serverBaseURL}/sse`, {
        method: "POST",
        headers: {
          Accept: "text/event-stream",
        },
        onopen(res) {
          if (res.ok && res.status === 200) {
            console.log("Connection made ", res);
          } else if (
            res.status >= 400 &&
            res.status < 500 &&
            res.status !== 429
          ) {
            console.log("Client side error ", res);
          }
        },
        onmessage(event) {
          console.log(event.data);
          const parsedData = JSON.parse(event.data);
          setData((data) => [...data, parsedData]);
        },
        onclose() {
          console.log("Connection closed by the server");
        },
        onerror(err) {
          console.log("There was an error from server", err);
        },
      });
    };
    fetchData();
  }, []);

  return (
    <div style={{ display: "grid", placeItems: "center" }}>
      <h1>Stock prices of aTech and bTech (USD)</h1>
      <LineChart width={1000} height={400} data={data}>
        <CartesianGrid strokeDasharray="3 3" />
        <XAxis dataKey="time" />
        <YAxis domain={[20, 26]} />
        <Tooltip />
        <Legend />
        <Line type="monotone" dataKey="aTechStockPrice" stroke="#8884d8" />
        <Line type="monotone" dataKey="bTechStockPrice" stroke="#82ca9d" />
      </LineChart>
    </div>
  );
};

export default App;
First, we imported the built-in React hooks useState and useEffect. Then, we imported the fetchEventSource library itself and the necessary recharts components to display the received data in a nice UI. We also created a variable for the server path.
Inside the App function, we created a state variable for the data and made a fetchEventSource call to the server. We included the custom call method (POST), as well as configured header values to accept particular media types.
We used the onopen, onmessage, onclose, and onerror events to control the app behavior based on the server response.
Finally, we built a simple recharts line chart in the return section that will be rendered to the screen. Notice that we passed in the data from useState, meaning the line chart will update each time the data value updates.
Make sure to leave the console.log statements in, as they will help us to test the application later by providing the data to the developer console in the browser.
Now, we will implement a simple Node.js server. For the easier server configuration, we’ll use Express, which is a fast and minimalistic web framework for Node.
If you followed along by setting up the frontend in the previous section, you should still be in the frontend directory. To set up the backend, switch to the backend folder. You can do that by running the command cd ../server.
First, initialize the npm by using the command npm init -y. This will create a simple package.json file with all the default entry point information. Open the file and change the main value from index.js to server.js.
Then, install the Express framework and cors package by running the command npm install express cors. CORS (Cross-Origin Resource Sharing) will allow us to make requests between the different ports in our app (frontend and backend).
Next, we need to create a file to create a server. While still in the server directory, run the following command: touch server.js.
Open the newly created file and include the following code:
javascript
const express = require("express");
const cors = require("cors");

const app = express();
app.use(cors());

const PORT = 5000;

const getStockPrice = (range, base) =>
  (Math.random() * range + base).toFixed(2);
const getTime = () => new Date().toLocaleTimeString();

app.post("/sse", function (req, res) {
  res.writeHead(200, {
    Connection: "keep-alive",
    "Content-Type": "text/event-stream",
    "Cache-Control": "no-cache",
  });
  setInterval(() => {
    res.write(
      `data: {"time": "${getTime()}", "aTechStockPrice": "${getStockPrice(
        2, 20)}", "bTechStockPrice": "${getStockPrice(4, 22)}"}`
    );
    res.write("\n\n");
  }, 5000);
});

app.listen(PORT, function () {
  console.log(`Server is running on port ${PORT}`);
});
We first imported Express and cors and created a new server to run on port 5000. We used cors as a middleware to allow us to make the calls from the frontend.
We then created a couple of custom functions, getStockPrice and getTime. The first will generate a random price for the stock, receiving the base value and highest value (range) as arguments. The second will return the current time in the format of hh:mm:ss.
We made the server listen for the post requests on the sse route. Inside, we wrote a response header by defining the connection and content-type, as well as disabling the cache. Finally, we used a setInterval to generate new data every 5000ms (5 seconds).
Because our app has both frontend and backend servers, we need to run both separately so we can interact between the two by sending the requests and receiving server-sent events.
Your current working directory should be server. Launching the server should be as easy as running the command, node server.js. If you did everything right, it should now say Server is running on port 5000 in the terminal.
To run the frontend, open another terminal, switch to the frontend directory via cd frontend, and run the command npm start, which will start the frontend application.
Depending on what terminal you use and whether or not you use the built-in terminals in the text editor, running the backend and frontend in parallel would look something like this:

After you start the frontend, your default browser should open automatically. If it does not, open it manually, type http://localhost:3000 in the URL bar, and execute. It should now display the functional full-stack app with all the data being received in real-time using the server-sent events:
Now, let’s test the features of the Fetch Event Source. While still on the browser, open the developer console from the browser settings or by pressing the F12 key on the keyboard.
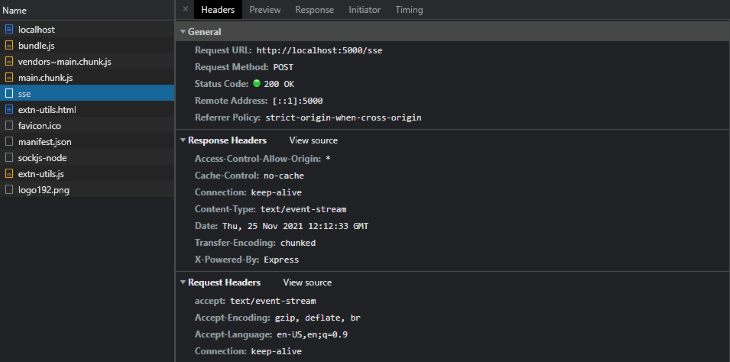
First, open the Network tag and refresh the app by using the F5 key on the keyboard. The Network tab allows users to see all the requests that are being sent to the server.
Click on sse to see the Fetch Event Source connection request. Notice that the request type is POST and we were able to set the custom header parameters, such as accept, type for the request. This is all thanks to Fetch Event Source which would not be possible by using the EventSource API.
Then, navigate to the Console tab, where you should see additional information thanks to the console.log statements we used in the frontend.
When the user tries to make a connection, they receive a response object (also a feature of Fetch Event Source), meaning it could be further used to detect the possible causes for the issues on the connection.
In our case, the connection was successful and we receive events based on the 5000ms interval we defined in the server:

Now, let’s test for some errors. Change the fetch URL in the frontend to something nonexistent, such as ${serverBaseURL}/noroute. Save the code, refresh the browser page, and you should see the browser console.
The Fetch Event Source automatically lets us know that the error comes from the frontend, and the server closed the connection:
![]()
Finally, let’s test the Page Visibility API. Change the frontend code back to the existing sse. Save the code and refresh the browser window. Let the app run for a minute.
Now, minimize the browser. After some time, maximize the browser window and see that during the time the window was minimized, there were no server events received. The process resumed automatically after the browser was maximized.
In this tutorial, we learned that the Fetch Event Source can be used to send specific headers and methods, get the details of the response objects, have wider control over the error handling, and save the server resources while the browser window is not visible.
Next time you need to implement the functionality of receiving live updates from the server, you will not only be aware of the working principles of server-sent events, but also know how to implement them using the flexible features of Fetch Event Source.
Also, note that their GitHub repository welcomes new contributions and suggestions, so feel free to contribute if you have some amazing ideas for additional features.
Install LogRocket via npm or script tag. LogRocket.init() must be called client-side, not
server-side
$ npm i --save logrocket

// Code:

import LogRocket from 'logrocket';
LogRocket.init('app/id');
// Add to your HTML:

<script src="https://cdn.lr-ingest.com/LogRocket.min.js"></script>
<script>window.LogRocket && window.LogRocket.init('app/id');</script>

Learn how to detect unused and ghost dependencies in JavaScript projects using Knip, a project-level linter that keeps your dependency graph accurate.

Learn how Storybook MCP enables AI agents to understand your component library, generate accurate UI, and validate code using documentation, stories, and automated tests.

Debug RSC hydration mismatches in production with Next.js instrumentation, Suspense isolation, HTML diffing, and CI smoke tests.

Explore why npm dependencies are a major supply chain security risk and how to protect JavaScript apps from compromised packages and transitive threats.
Would you be interested in joining LogRocket's developer community?
Join LogRocket’s Content Advisory Board. You’ll help inform the type of content we create and get access to exclusive meetups, social accreditation, and swag.
Sign up now

