Whether you’re a budding developer or an experienced software engineer, you’ve likely used GitHub, a platform where people host the source code to their projects, contribute to other projects by other developers, and develop open source software.

Essentially, GitHub has become the de-facto platform where you’ll find a wide range of open-source software and related projects. It has tons of features and an open API for developing applications that will be connected to GitHub.
Telegram is a fast and extensible messaging platform, and one of its major advantages is chat bots. Chat bots are easily programmable, have a simple HTTP API to work with, and are easy to manage. And, most languages have wrappers for using Telegram’s Bot API.
In this article, we’ll create a Telegram bot that get updates from a GitHub repository with Python and GitHub webhooks. We’ll use FastAPI for the server side and Telegram’s HTTP API for sending the messages.
Before we start, we’ll be creating a Python Virtual Environment for a clean set-up.
These are the packages we’ll need to build the project:
Ready? Let’s begin by setting up the environment. We’ll write all the code in a main.py file:
$ mkdir fastapi-tg
$ cd fastapi-tg
$ python3 -m venv venv
$ source venv/bin/activate # For Linux and Mac
$ venv\Scripts\activate # For Windows
(venv) $ pip install fastapi uvicorn pyngrok httpx
In order for the messages to be sent to and received by us, we need something programmable. This is where Telegram bots come in. Bots are programmable chat bots for the Telegram messaging platform.
A telegram bot will have a BOT_TOKEN, which is a unique identifier for the bot. To create a bot for Telegram, we need to get the BOT_TOKEN. To do, we’ll speak to another bot in Telegram, BotFather.
We can create a new bot by entering /newbot command to BotFather. We also need to enter the name and display name for the bot.
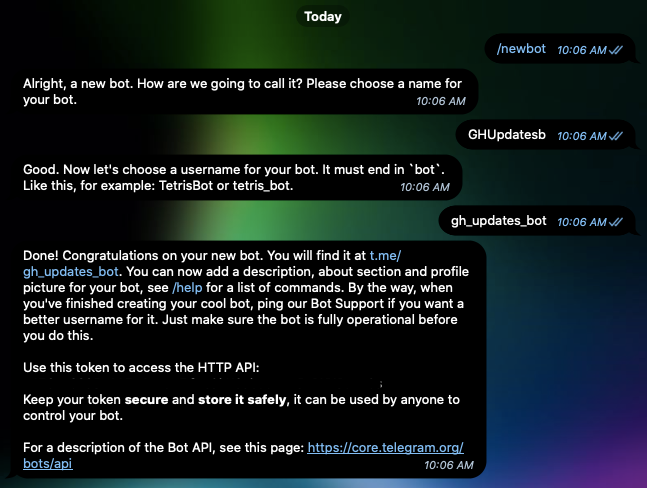
After completing these steps, we’ll receive the BOT_TOKEN. Once you have it, set it as an environment variables in terminal/cmd, which we’ll accomplish by the end of this section.
Now, start your bot by executing the /start command.
Once we have successfully created a Telegram Bot, the next step is to get a CHAT_ID, which is a unique identifier for a Telegram user, and every Telegram user has one.
To get the CHAT_ID, open a chat conversation with Json Dump Bot in Telegram. The /start command itself will give you a JSON object in text. It will look similar to this:
{
  "update_id": 143931094,
  "message": {
    "message_id": 155844,
    "from": {
      "id": 123456789, //this is the Chat_ID of a telegram user
      "is_bot": false,
      "first_name": "<name>",
      "username": "<username>"
    },
    "chat": {
      "id": 123456789, //this is the Chat_ID of a telegram user
      "first_name": "<name>",
      "username": "<username>",
      "type": "private"
    },
    "date": 1575035172,
    "text": "/start",
    "entities": [
      {
        "offset": 0,
        "length": 6,
        "type": "bot_command"
      }
    ]
  }
}
We can get the CHAT_ID from the id key. Once we have both TOKEN and CHAT_ID, we need to add these as environment variables to our local session.
In terminal/Command Prompt, execute these commands:
# for linux/mac
$ export TOKEN=<bot_token>
$ export CHAT_ID=<chat_id>

# for windows
$ set TOKEN=<bot_token>
$ set CHAT_ID=<chat_id>
Once you have loaded the environment variables, let’s write our server
We’ll kick off with a “Hello World!” endpoint with FastAPI. FastAPI is a relatively new web framework for Python and has gained quite a lot popularity in the last few months.
It supports asynchronous operations and is based on Python Type Hints and OpenAPI, which is a specification for APIs. We also get documentation at the /docs and /redoc endpoints.
Let’s create a simple “Hello World” endpoint which returns a name that is passed as a url parameter:
# main.py

from fastapi import FastAPI

app = FastAPI()

@app.get("/{name}")
async def helloname(name:str):
    """
    Returns a Hello to the User with a wave emoji
    """
    return f"Hello {name} 👋"
Notice that this is a bare-bone “Hello World” app with FastAPI. Here, we specify the endpoint as /. This endpoint has a URL parameter, which we specified as name.
To run the server, we’ll use Uvicorn, an ASGI (Asynchronous Server Gateway Interface) server.
Execute the following command in the terminal to start the server:
$ uvicorn main:app --reload --port 9000
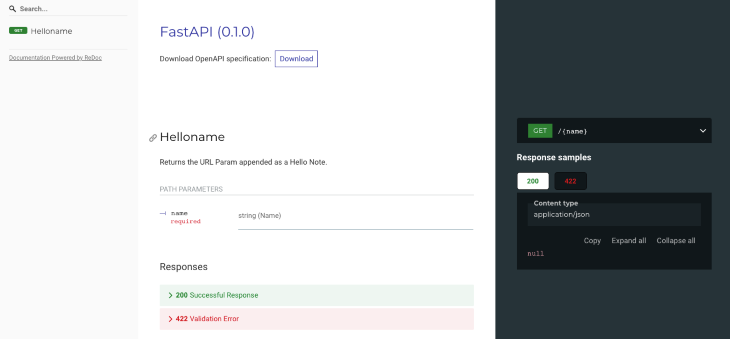
This will start our FastAPI server at port 9000. If we navigate to http://localhost:9000/docs, we can find the auto-generated interactive docs by Swagger.

If we navigate to http://localhost:9000/redoc, we’ll see more auto-generated docs with redoc.
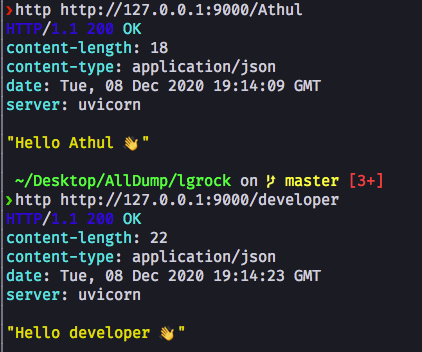
If we try to fetch the endpoint with curl or Httpie, this will be the result:
Now, let’s write our server for receiving webhooks and sending messages. Our server will be doing the following tasks:
Webhooks are payloads and information sent by a server to another app if an action has occurred. Usually webhook payloads are in JSON format.
GitHub delivers a webhook to a specified URL if an action has occurred in a repository. We’ll write our server to receive these webhooks and process them, then add more functionality to the server in the coming sections.
For the sake of simplicity, we’ll only handle the star and pull_request GitHub events. The star event is triggered when the repository is starred, and a pull_request event is triggered when a pull request is opened or closed. You can read more about GitHub pull requests here.
# main.py
from fastapi import FastAPI,Request
import os

app=FastAPI()

TOKEN = os.getenv("TOKEN")  # Telegram Bot API Key
CHAT_ID = os.getenv("CHAT_ID")  # Telegram Chat ID

async def sendTgMessage():
# TODO

@app.post("/hook")
async def recWebHook(req: Request):
    """
    Receive the Webhook and process the Webhook Payload to get relevant data
    Refer https://developer.github.com/webhooks/event-payloads for all GitHub Webhook Events and Payloads
    """
    body = await req.json()
    event = req.headers.get("X-Github-Event")
    if event == "star":  # check if the event is a star
        nos_stars = body\["repository"\]["stargazers_count"]
        starrer_username = body\["sender"\]["login"]
        repo_url = body\["repository"\]["html_url"]
        repo_name = body\["repository"\]["name"]
        message = f"{starrer_username} has starred the \[{repo_name}\]({repo_url}). \n\n The Total Stars are {nos_stars}"
        await sendTgMessage(message)
    elif event == "pull_request":  # check if event is a pull request
        pr_number = body["number"]
        if body\["pull_request"\]["merged"] == True:
            pr_action = "merged"
        pr_action = body["action"]
        pr_title = body\["pull_request"\]["title"]
        pr_desc = body\["pull_request"\]["body"]
        pr_login = body\["sender"\]["login"]
        pr_login_url = body\["sender"\]["html_url"]
        pr_url = body\["pull_request"\]["html_url"]
        message = f"Pull Request(\[{pr_number}\]({pr_url})) {pr_action} by \[{pr_login}\]({pr_login_url}).\n\n Title: *{pr_title}* \n\n Description: **{pr_desc}**"
        await sendTgMessage(message)
In this code, we’ve written the /hook endpoint to receive the webhook from GitHub and process the webhooks to a message that will be sent via Telegram. We’ll then receive the webhook payload and its headers with the Request class of FastAPI.
First, we’ll check what the action is. If it’s a star or pull request event, we’ll make messages for the specific event. We get the data we required from the JSON body. JSON is parsed to a Python dictionary, so we’ll use the dictionary keys as indexes and fetch the values for these keys. You can also use the get() method of dictionaries to do the same.
For the star event, we take in the current number of stars, the GitHub username of the person who starred the repository, and the URL of the repository. And for pull requests, we’ll also fetch the title and body of the pull request, too, as well as check if the pull request is merged.
This way, we can extend to many other events like issues and reviews, and almost all of them are in a similar pattern. Now, we’ll write the sendTgMessage() method to send the generated image to telegram.
Telegram has a powerful bot API. There are tons of wrappers for it, but in this blog post, we’ll use the HTTP API to send the message asynchronously via the bot we created above.
# main.py
import httpx

async def sendTgMessage(message:str):
    """
    Sends the Message to telegram with the Telegram BOT API
    """
    tg_msg = {"chat_id": CHAT_ID, "text": message, "parse_mode": "Markdown"}
    API_URL = f"https://api.telegram.org/bot{TOKEN}/sendMessage"
    async with httpx.AsyncClient() as client:
        await client.post(API_URL, json=tg_msg)
Here we have the function, which has the message as an argument. Telegram has great support for Markdown and HTML formatting in messages. Let’s use the Markdown formatting option here. You can read more about formatting options for Telegram messages here.
Telegram Bot API needs the data as JSON as the body of the POST request to the sendMessage endpoint. The JSON body needs the following keys for sending the message:
CHAT_ID key is for the chat ID of the user where the bot should send the messagetext key is for what the message should beparse_mode is for the formatting option of the messagesendMessage API method in the docs.We use Python dictionaries as the POST request body and send the request with httpx. Httpx is an asynchronous HTTP library with a similar API of the Python requests library.
Once the message is sent, we’ll receive a JSON response whether the message has been sent or not.
Let’s run our server. Here is the full source code:
# main.py
from fastapi import FastAPI, Request
import os
import httpx

app = FastAPI()

TOKEN = os.getenv("TOKEN")  # Telegram Bot API Key
CHAT_ID = os.getenv("CHAT_ID")  # Telegram Chat ID

async def sendTgMessage(message: str):
    """
    Sends the Message to telegram with the Telegram BOT API
    """
    print(message)
    tg_msg = {"chat_id": CHAT_ID, "text": message, "parse_mode": "Markdown"}
    API_URL = f"https://api.telegram.org/bot{TOKEN}/sendMessage"
    async with httpx.AsyncClient() as client:
        await client.post(API_URL, json=tg_msg)

@app.post("/hook")
async def recWebHook(req: Request):
    """
    Receive the Webhook and process the Webhook Payload to get relevant data
    Refer https://developer.github.com/webhooks/event-payloads for all GitHub Webhook Events and Payloads
    """
    body = await req.json()
    print(body)
    event = req.headers.get("X-Github-Event")
    if event == "star":  # check if the event is a star
        nos_stars = body\["repository"\]["stargazers_count"]
        starrer_username = body\["sender"\]["login"]
        repo_url = body\["repository"\]["html_url"]
        repo_name = body\["repository"\]["name"]
        message = f"{starrer_username} has starred the \[{repo_name}\]({repo_url}). \n\n The Total Stars are {nos_stars}"
        await sendTgMessage(message)
    elif event == "pull_request":  # check if event is a pull request
        pr_number = body["number"]
        if body\["pull_request"\]["merged"] == True:
            pr_action = "merged"
        pr_action = body["action"]
        pr_title = body\["pull_request"\]["title"]
        pr_desc = body\["pull_request"\]["body"]
        pr_login = body\["sender"\]["login"]
        pr_login_url = body\["sender"\]["html_url"]
        pr_url = body\["pull_request"\]["html_url"]
        message = f"Pull Request(\[{pr_number}\]({pr_url})) {pr_action} by \[{pr_login}\]({pr_login_url}).\n\n Title: {pr_title} \n\n Description: {pr_desc}"
        await sendTgMessage(message)
To run our server, execute the following command in the command line/terminal. Make sure you’re inside the virtual environment:
$ uvicorn main:app --reload --port 9000
This will open our server on port 9000. To receive data from GitHub to our local server, we have to expose our local server to the internet, this is where ngrok comes in. We have already installed Pyngrok with pip. Pyngrok is a Python wrapper for ngrok with its own binary for distribution.
To tunnel our server, we need to have our server running. Open another terminal/command-line window or tab and activate the virtual environment. Then execute the following:
$ ngrok http 9000
You should see an output similar to this:
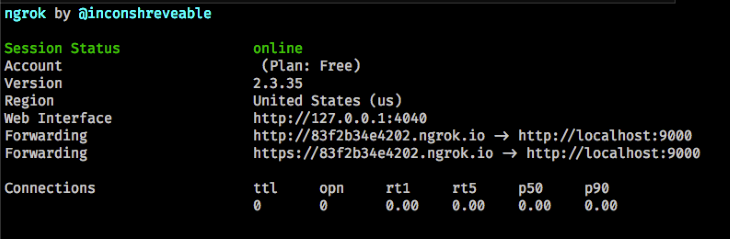
There will be two URLs that will expose our local server. We’ll only need the one with the https prefix or the second URL.
The next step is to tell GitHub to send webhooks to this URL.
To connect our server to GitHub, we need to have a repository. This can either be a new repository or an existing one. If you want to create a new repository, navigate to https://github.new to create a new repository.
To set up webhooks, go to the settings tab in your repository and select the webhooks section. Press the Add Webhook button to add a new webhook. You’ll then be asked to enter your GitHub password.
Once you do, add the URL we received from ngrok (don’t forget to add /hook as a suffix to the URL), as this is our endpoint for receiving the webhooks. Change the content-type to application/json. Then, select the webhook events you want to get. In our case, we need the star and pull_request event. Finally, save these changes.
Here’s a short video for a walkthrough.
To make sure our bot is working, star the repository. If everything works properly, we’ll get a message on Telegram to the specified CHAT_ID from the bot we created. Here’s a sample message.
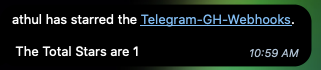
Congratulations! Our server is working and sending messages to Telegram. How cool is that?
You can extend the webhook handling to get details about issues, reviews, pushes and the like. All of the webhook events are nicely documented in the GitHub Docs. Also, the Telegram Bot API docs are a good reference.
You can find the full source code on GitHub.
Of course, you can extend this project further to get info regarding issues, new pushes and pull request reviews, and any other GitHub webhook events. But make sure you change the events you need in the GitHub webhook settings to do so.
You can also send messages to channels/groups with the bot — just add the bot to the channel/group and change the CHAT_ID environment variable with the channel/group ID.
We have learned how to make a REST API with FastAPI and Python, to create a Telegram Bot, and to connect a local server to GitHub with ngrok. Thanks for reading!

Learn how to use Fallow to analyze AI-generated code, detect dead code, duplicate logic, and complexity issues, and integrate automated code quality checks into your AI-assisted development workflow.

Learn how to protect full-stack projects from NPM supply chain attacks with a practical security checklist.

Explore 15 essential MCP servers for web developers to enhance AI workflows with tools, data, and automation.

Learn how contrast-color() automatically picks accessible text colors using native CSS, without JavaScript.
Would you be interested in joining LogRocket's developer community?
Join LogRocket’s Content Advisory Board. You’ll help inform the type of content we create and get access to exclusive meetups, social accreditation, and swag.
Sign up now

