Deno is a runtime for JavaScript and TypeScript that’s based on the V8 JavaScript engine and Rust.

Officially announced in April 2019 by Ryan Dahl, the original creator of Node.js, at JSConf EU, Deno has first-class TypeScript support. That means you don’t have to write any manual configurations to set it up, but it doesn’t mean you’re restricted to writing your code using TypeScript.
Deno is quite different from Node in that it has no package manager. Having to rely on URLs to host and import packages has its pros and cons.
In this tutorial, we’ll build a Deno application that sends mail to another user using Deno’s SMTP mail client. To follow along, you’ll need a basic understanding of JavaScript, a text editor (we’ll be using VS Code), and POSTMAN installed on your local machine.
The Replay is a weekly newsletter for dev and engineering leaders.
Delivered once a week, it's your curated guide to the most important conversations around frontend dev, emerging AI tools, and the state of modern software.
The best and easiest way to install Deno is by using HomeBrew.
Open up your terminal and type:
brew install deno
When the installation is complete, run deno on your terminal to confirm that it was successful.
Now let’s set up a server for our application. We’ll use Oak, a middleware framework for Deno’s HTTP server that also supports routing, to build our server.
Create a server.ts file and add the following.
import { Application } from "https://deno.land/x/oak/mod.ts";
const app = new Application();
import router from "./routes.ts";
const PORT: number = 3000;
app.use(router.routes());
app.use(router.allowedMethods());
app.listen({ port: PORT });
Here, we accessed the Application class of Oak, which wraps the serve function from the http package. We stored this instance in the app variable, which will be used to define routes and also listen to a port.
Next, we’ll create a routes.ts file. This is where we’ll create our routes, which will communicate to a controller file.
import { Router } from "https://deno.land/x/oak/mod.ts";
const router = new Router();
router
  .get("/", (ctx) => {
    ctx.response.body = "This is the home route";
  })
export default router;
Note how we brought in the Router class from Oak and then created a new instance of it.
Now we can run our application by running deno run --allow-all server.ts on the terminal. This will run the application on port 3000. Now if you try to access the application, you’ll get This is the home route.
The next step is to add a new route to send our message and then implement the mailer function.
import { Router } from "https://deno.land/x/oak/mod.ts";
import { sendMail } from "./controller.ts";
const router = new Router();
router
  .get("/", (ctx) => {
    ctx.response.body = "This is the home route";
  })
  .post("/send-mail", sendMail);
export default router;
We added a new route, which is a POST request for sending the mail. Next, we’ll create a controller.ts file, where we’ll define our route method. We’ll also create an index.ts file for our mailer config.
Creating the controller.ts file and add the following code.
import { mailerObj } from "./index.ts";
let sendMail = async (ctx: any) => {
  try {
    let body: any = await ctx.request.body();
    let dataObj = await body.value;
    await mailerObj(dataObj);
    ctx.response.body = { status: true, message: "Mail Sent" };
    ctx.response.status = 201;
  } catch (err) {
    ctx.response.body = { status: false, data: null };
    ctx.response.status = 500;
    console.log(err);
  }
};
export { sendMail };
We start by bringing in our mailer instance, which we’ll define soon. Each controller method is passed a context, which we’ll use to create a request body. This body will consist of our mail body, which is the mail body we’re sending, and to, which is the receiver to which we’re sending the mail.
We’ll pass the body into our mailerObj method for easy access.
Before we set up our mailer method, we have to turn on the less secure option. When this is done, we can proceed with our configuration.
Create an index.ts file and add the following code.
import { SmtpClient } from "https://deno.land/x/smtp/mod.ts";
const client = new SmtpClient();
await client.connectTLS({
  hostname: "smtp.gmail.com",
  port: 465,
  username: <gmail email>,
  password: <gmail password>
});
let mailerObj = async (data: any) => {
  await client.send({
    from: "Mail from Wisdom", // Your Email address
    to: data.to, // Email address of the destination
    subject: "Deno is Great",
    content: data.body,
  });
  await client.close();
};
export { mailerObj };
Next, bring in Deno’s SmtpClient module and then create an instance of it. Use the Smtp instance to connect to Gmail. This config takes in our Gmail username and password. For security purposes, we’ll need to save these details in our environment variables.
The next step is to define our mailer object, which takes in details about the message such as the sender, receiver, subject, and content. We have to export this config to make it accessible to other files.
Let’s modify our code by using some environment variables to store our Gmail information.
Create an .env file in the root of the application and add the following.
GMAIL_USERNAME=<gmail email>
GMAIL_PASSWORD=<gmail password>
Next, modify our mailer config to listen to this environment variables.
import "https://deno.land/x/dotenv/load.ts";
import { SmtpClient } from "https://deno.land/x/smtp/mod.ts";
const client = new SmtpClient();
await client.connectTLS({
  hostname: "smtp.gmail.com",
  port: 465,
  username: Deno.env.get("GMAIL_USERNAME"),
  password: Deno.env.get("GMAIL_PASSWORD"),
});
let mailerObj = async (data: any) => {
  await client.send({
    from: "Mail from Wisdom", // Your Email address
    to: data.to, // Email address of the destination
    subject: "Testing Deno SMTP client",
    content: data.body,
  });
  await client.close();
};
export { mailerObj };
To access data stored in the .env file, we have to bring in Deno’s env module and use the Deno.env.get(name) to get the value stored.
Always remember to create an .env.example file with the same keys stored in the .env file but without a value, and also add the .env file to the .gitignore file.
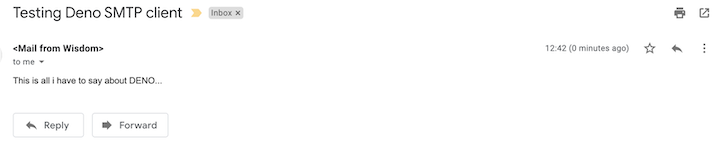
To test the application, open up POSTMAN and make a post request.
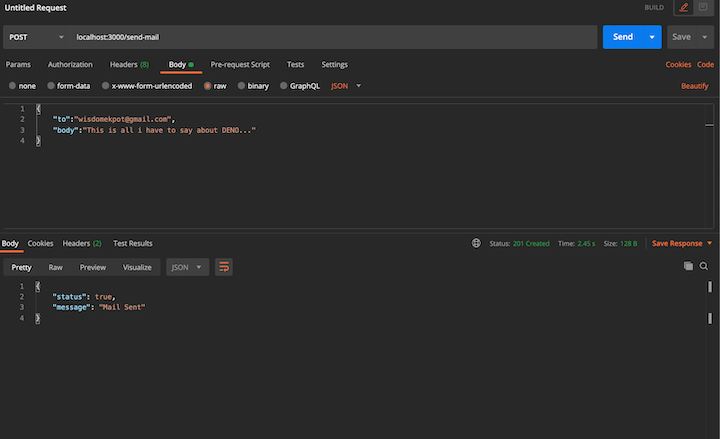
After making the request, you can open up the receiver mail to confirm that the mail was sent.
Sending messages using the Deno SMTP client is quite easy. Common use cases forr this module include sending newsletters to subscribers and sending templated email.
In this tutorial, we walked through how to set the SMTP config for Gmail and other mail providers and how to send dynamic messages to users. It’s always a good practice to store sensitive configuration details in the environment variable for better security.
Head to GitHub for the full source code used in this tutorial.
Install LogRocket via npm or script tag. LogRocket.init() must be called client-side, not
server-side
$ npm i --save logrocket

// Code:

import LogRocket from 'logrocket';
LogRocket.init('app/id');
// Add to your HTML:

<script src="https://cdn.lr-ingest.com/LogRocket.min.js"></script>
<script>window.LogRocket && window.LogRocket.init('app/id');</script>

Learn what context rot is, why AI agent sessions degrade over time, and how to fix it with compaction, prompt anchoring, context files, plan files, and RAG.

Learn about TypeScript v6’s breaking changes, new ES2025 features, and deprecated options. A complete migration guide from v5 to prepare for v7.

Learn how Vite+ unifies Vite, Vitest, Oxlint, Oxfmt, Rolldown, and Node.js management in one CLI.

AI companies are buying developer tools as coding agents turn runtimes, package managers, and linters into strategic infrastructure.
Hey there, want to help make our blog better?
Join LogRocket’s Content Advisory Board. You’ll help inform the type of content we create and get access to exclusive meetups, social accreditation, and swag.
Sign up now

